-
Spring Boot整合Mybatis
✨Spring Boot整合持久层
📃个人主页:不断前进的皮卡丘
🌞博客描述:梦想也许遥不可及,但重要的是追梦的过程,用博客记录自己的成长,记录自己一步一步向上攀登的印记
🔥网站推荐:千里之行,始于足下。每天坚持刷题,巩固所学知识,也为将来找工作,面试做好准备-----刷题神器1.基本工程
1.1基本工程
- 创建一个Spring Boot工程,添加Web依赖,Mybatis依赖以及MySQL驱动依赖
- 创建成功以后,删除MySQL运行域scope


1.2修改mybatis配置信息
在application.properties中修改配置信息

# 指定Mybatis的Mapper接口的xml映射文件的路径 mybatis.mapper-locations=classpath:mapper/*.xml # MySQL数据库驱动 #这个驱动也可以省略,可以根据使用的MySQL自动加载相应的驱动 spring.datasource.driver-class-name=com.mysql.cj.jdbc.Driver # 数据源名称 spring.datasource.name=defaultDataSource # 数据库连接地址 spring.datasource.url=jdbc:mysql://localhost:3306/bjpowernode?serverTimezone=UTC # 数据库用户名和密码 spring.datasource.username=root spring.datasource.password=123456 # 设置日志级别 logging.level.com.zyh.springboot=debug- 1
- 2
- 3
- 4
- 5
- 6
- 7
- 8
- 9
- 10
- 11
- 12
- 13
- 14
数据库(大家可以用以前创建的数据库来进行测试)

1.3创建实体类及其接口
@Mapper注解:
作用:在接口类上添加了@Mapper,在编译之后会生成相应的接口实现类

1.4单元测试
我们可以选中mapper接口,使用快捷键alt+/,就可以创建junit单元测试

2022-07-31 12:35:13.453 INFO 10228 --- [ main] c.zyh.springboot.mapper.DeptMapperTest : Starting DeptMapperTest using Java 1.8.0_131 on LAPTOP-59BP4RH1 with PID 10228 (started by 17614 in D:\springboot\springboot09_base) 2022-07-31 12:35:13.453 DEBUG 10228 --- [ main] c.zyh.springboot.mapper.DeptMapperTest : Running with Spring Boot v2.7.2, Spring v5.3.22 2022-07-31 12:35:13.453 INFO 10228 --- [ main] c.zyh.springboot.mapper.DeptMapperTest : No active profile set, falling back to 1 default profile: "default" 2022-07-31 12:35:15.183 INFO 10228 --- [ main] c.zyh.springboot.mapper.DeptMapperTest : Started DeptMapperTest in 2.055 seconds (JVM running for 3.177) 2022-07-31 12:35:15.390 INFO 10228 --- [ main] com.zaxxer.hikari.HikariDataSource : defaultDataSource - Starting... 2022-07-31 12:35:18.720 INFO 10228 --- [ main] com.zaxxer.hikari.HikariDataSource : defaultDataSource - Start completed. 2022-07-31 12:35:18.720 DEBUG 10228 --- [ main] c.z.s.mapper.DeptMapper.queryAllDept : ==> Preparing: select * from dept 2022-07-31 12:35:18.751 DEBUG 10228 --- [ main] c.z.s.mapper.DeptMapper.queryAllDept : ==> Parameters: 2022-07-31 12:35:18.782 DEBUG 10228 --- [ main] c.z.s.mapper.DeptMapper.queryAllDept : <== Total: 3 2022-07-31 12:35:18.782 DEBUG 10228 --- [ main] c.zyh.springboot.mapper.DeptMapperTest : Dept(deptno=10, dname=媒体部, loc=上海) 2022-07-31 12:35:18.782 DEBUG 10228 --- [ main] c.zyh.springboot.mapper.DeptMapperTest : Dept(deptno=20, dname=研发部, loc=上海) 2022-07-31 12:35:18.782 DEBUG 10228 --- [ main] c.zyh.springboot.mapper.DeptMapperTest : Dept(deptno=30, dname=人事部, loc=杭州) 2022-07-31 12:35:18.798 INFO 10228 --- [ionShutdownHook] com.zaxxer.hikari.HikariDataSource : defaultDataSource - Shutdown initiated... 2022-07-31 12:35:18.813 INFO 10228 --- [ionShutdownHook] com.zaxxer.hikari.HikariDataSource : defaultDataSource - Shutdown completed.- 1
- 2
- 3
- 4
- 5
- 6
- 7
- 8
- 9
- 10
- 11
- 12
- 13
- 14
2.Mapper接口扫描
@MapperScan
作用:指定要变成实现类的接口所在的包,然后包下面的所有接口在编译之后都会生成相应的实现类
添加位置:是在Springboot启动类上面添加。

3.注解式开发
3.1环境准备
我们先准备数据库和表
# 创建数据库 CREATE DATABASE shop; # 使用数据库 USE shop; # 创建商品类别表: type # id 主键自增 # name 类别名称 # 创建表 CREATE TABLE `type`( id INT PRIMARY KEY AUTO_INCREMENT, `name` VARCHAR(20) ); DESC TABLE `type`; # 创建商品表 product # id 主键自增 # name 商品名称 # price 要求是非负的浮点数 # sell 布尔类型 sell=0表示售卖,sell=1表示下架 #c_date 开始售卖时间,精确到年月日即可 # tid商品类型id,外键,管理type表的id CREATE TABLE product( id INT PRIMARY KEY AUTO_INCREMENT, NAME VARCHAR(20), price DOUBLE UNSIGNED, sell TINYINT UNSIGNED, c_date DATE, tid INT, FOREIGN KEY(tid) REFERENCES `type`(id) ); # 插入数据 INSERT INTO `type` VALUES (DEFAULT,'手机'), (DEFAULT,'电脑'), (DEFAULT,'平板'); SELECT * FROM `type`; INSERT INTO product VALUES (DEFAULT,"华为手机",5000.0,0,'2022-7-31',1), (DEFAULT,"苹果手机",9000.0,0,'2012-5-26',1), (DEFAULT,"华为电脑",8000.0,0,'2010-5-26',2), (DEFAULT,"苹果电脑",12000.0,0,'2012-3-10',2), (DEFAULT,"华为平板",2000.0,0,'2019-4-8',3), (DEFAULT,"苹果平板",6000.0,0,'2016-3-2',3);- 1
- 2
- 3
- 4
- 5
- 6
- 7
- 8
- 9
- 10
- 11
- 12
- 13
- 14
- 15
- 16
- 17
- 18
- 19
- 20
- 21
- 22
- 23
- 24
- 25
- 26
- 27
- 28
- 29
- 30
- 31
- 32
- 33
- 34
- 35
- 36
- 37
- 38
- 39
- 40
- 41
- 42
- 43
- 44
- 45
- 46
- 47
- 48
然后创建spring boot项目,修改相关配置
# 指定Mybatis的Mapper接口的xml映射文件的路径 mybatis.mapper-locations=classpath:mapper/*.xml # MySQL数据库驱动 #这个驱动也可以省略,可以根据使用的MySQL自动加载相应的驱动 spring.datasource.driver-class-name=com.mysql.cj.jdbc.Driver # 数据源名称 spring.datasource.name=defaultDataSource # 数据库连接地址 spring.datasource.url=jdbc:mysql://localhost:3306/shop?serverTimezone=UTC&zeroDateTimeBehavior=convertToNull # 数据库用户名和密码 spring.datasource.username=root spring.datasource.password=123456 # 设置日志级别 logging.level.com.zyh.springboot=debug # 开启mybatis驼峰命名规则自动转换功能 mybatis.configuration.map-underscore-to-camel-case=true- 1
- 2
- 3
- 4
- 5
- 6
- 7
- 8
- 9
- 10
- 11
- 12
- 13
- 14
- 15
- 16
- 17

3.2.mybatis的单表操作
- 查询所有商品信息
- 根据商品编号查询指定的商品信息
- 根据商品名称模糊查询商品
- 根据商品价格,查询指定范围的商品
- 插入一条商品数据
- 根据编号删除指定商品
- 根据商品编号,修改商品价格
3.3查询所有商品信息

可能遇到的问题:org.springframework.dao.TransientDataAccessResourceException: Error attempting to get column ‘c_date’ from result set.
解决方法如下:

3.4根据商品编号查询指定的商品信息

3.5根据商品名称模糊查询商品
这里面涉及到的知识点是mybatis的内容,大家忘记的可以去复习复习,Mybatis特殊SQL的执行


3.6根据商品价格,查询指定范围的商品


我们也可以通过map来传参


3.7插入一条商品数据
3.7.1代码演示


我们发现此时打印的信息中,主键为空,但是事实上,数据插入在数据库中是有主键的

3.7.2 获取自增的主键


3.8根据编号删除指定商品
// 根据编号删除指定商品 @Delete("delete from product where id=#{id}") void deleteById(Integer id);- 1
- 2
- 3
@Test public void testDeleteById(){ productMapper.deleteById(8); }- 1
- 2
- 3
- 4
- 5

3.9根据商品编号,修改商品价格
// 根据商品编号,修改商品价格 @Update("update product set price=#{price} where id=#{id}") void updateById(@Param("id") Integer id,@Param("price") Double price);- 1
- 2
- 3
@Test public void testUpdateById(){ productMapper.updateById(8, 3000.0); }- 1
- 2
- 3
- 4
- 5


4.映射文件开发
4.1基本操作
大家可以先把这个插件下载下来,可以帮助我们快速开发

环境配置和上面的注解开发是一样的# 指定Mybatis的Mapper接口的xml映射文件的路径 mybatis.mapper-locations=classpath:mapper/*.xml # MySQL数据库驱动 #这个驱动也可以省略,可以根据使用的MySQL自动加载相应的驱动 spring.datasource.driver-class-name=com.mysql.cj.jdbc.Driver # 数据源名称 spring.datasource.name=defaultDataSource # 数据库连接地址 spring.datasource.url=jdbc:mysql://localhost:3306/shop?serverTimezone=UTC&zeroDateTimeBehavior=convertToNull # 数据库用户名和密码 spring.datasource.username=root spring.datasource.password=123456 # 设置日志级别 logging.level.com.zyh.springboot=debug # 开启mybatis驼峰命名规则自动转换功能 mybatis.configuration.map-underscore-to-camel-case=true- 1
- 2
- 3
- 4
- 5
- 6
- 7
- 8
- 9
- 10
- 11
- 12
- 13
- 14
- 15
- 16
- 17
提供对应的实体类和mapper接口


mapper
DOCTYPE mapper PUBLIC "-//mybatis.org//DTD Mapper 3.0//EN" "http://mybatis.org/dtd/mybatis-3-mapper.dtd" > <mapper namespace="com.zyh.springboot.mapper.ProductMapper"> <select id="queryById" resultType="com.zyh.springboot.bean.Product"> select * from product where id=#{id} select> mapper>- 1
- 2
- 3
- 4
- 5
- 6
- 7
测试

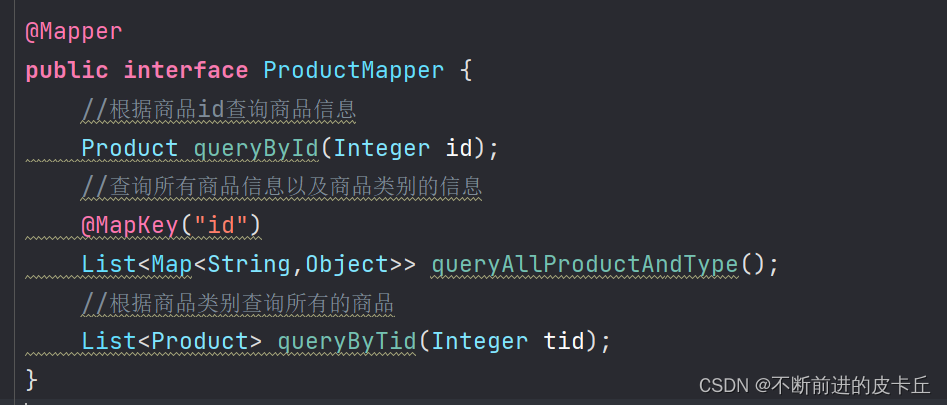
4.2查询所有商品信息以及商品类别的详细信息(多对一)
因为涉及到多表查询,我们这个时候需要新增加一个类Type


测试代码


4.3查询所有商品类别及其商品信息(一对多)


测试

测试结果2022-08-01 09:34:53.982 INFO 30284 --- [ main] c.zyh.springboot.mapper.TypeMapperTest : Starting TypeMapperTest using Java 1.8.0_131 on LAPTOP-59BP4RH1 with PID 30284 (started by 17614 in D:\springboot\springboot11_mybatis_xml) 2022-08-01 09:34:53.982 DEBUG 30284 --- [ main] c.zyh.springboot.mapper.TypeMapperTest : Running with Spring Boot v2.7.2, Spring v5.3.22 2022-08-01 09:34:53.982 INFO 30284 --- [ main] c.zyh.springboot.mapper.TypeMapperTest : No active profile set, falling back to 1 default profile: "default" 2022-08-01 09:34:58.015 INFO 30284 --- [ main] c.zyh.springboot.mapper.TypeMapperTest : Started TypeMapperTest in 4.63 seconds (JVM running for 7.326) 2022-08-01 09:34:58.388 INFO 30284 --- [ main] com.zaxxer.hikari.HikariDataSource : defaultDataSource - Starting... 2022-08-01 09:35:02.138 INFO 30284 --- [ main] com.zaxxer.hikari.HikariDataSource : defaultDataSource - Start completed. 2022-08-01 09:35:02.166 DEBUG 30284 --- [ main] c.z.s.m.T.queryAllTypeAndProduct : ==> Preparing: select * from type; 2022-08-01 09:35:02.249 DEBUG 30284 --- [ main] c.z.s.m.T.queryAllTypeAndProduct : ==> Parameters: 2022-08-01 09:35:02.370 DEBUG 30284 --- [ main] c.z.s.mapper.ProductMapper.queryByTid : ====> Preparing: select * from product where tid=? 2022-08-01 09:35:02.372 DEBUG 30284 --- [ main] c.z.s.mapper.ProductMapper.queryByTid : ====> Parameters: 1(Integer) 2022-08-01 09:35:02.396 DEBUG 30284 --- [ main] c.z.s.mapper.ProductMapper.queryByTid : <==== Total: 3 2022-08-01 09:35:02.414 DEBUG 30284 --- [ main] c.z.s.mapper.ProductMapper.queryByTid : ====> Preparing: select * from product where tid=? 2022-08-01 09:35:02.415 DEBUG 30284 --- [ main] c.z.s.mapper.ProductMapper.queryByTid : ====> Parameters: 2(Integer) 2022-08-01 09:35:02.419 DEBUG 30284 --- [ main] c.z.s.mapper.ProductMapper.queryByTid : <==== Total: 2 2022-08-01 09:35:02.420 DEBUG 30284 --- [ main] c.z.s.mapper.ProductMapper.queryByTid : ====> Preparing: select * from product where tid=? 2022-08-01 09:35:02.421 DEBUG 30284 --- [ main] c.z.s.mapper.ProductMapper.queryByTid : ====> Parameters: 3(Integer) 2022-08-01 09:35:02.425 DEBUG 30284 --- [ main] c.z.s.mapper.ProductMapper.queryByTid : <==== Total: 2 2022-08-01 09:35:02.426 DEBUG 30284 --- [ main] c.z.s.m.T.queryAllTypeAndProduct : <== Total: 3 2022-08-01 09:35:02.430 DEBUG 30284 --- [ main] c.zyh.springboot.mapper.TypeMapperTest : Type(id=1, name=手机, products=[Product(id=1, name=华为手机, price=5000.0, sell=false, cDate=Sun Jul 31 00:00:00 CST 2022, tid=1, type=null), Product(id=2, name=苹果手机, price=9000.0, sell=false, cDate=Sat May 26 00:00:00 CST 2012, tid=1, type=null), Product(id=8, name=小米手机, price=3000.0, sell=true, cDate=Sun Jul 31 00:00:00 CST 2022, tid=1, type=null)]) 2022-08-01 09:35:02.430 DEBUG 30284 --- [ main] c.zyh.springboot.mapper.TypeMapperTest : Type(id=2, name=电脑, products=[Product(id=3, name=华为电脑, price=8000.0, sell=false, cDate=Wed May 26 00:00:00 CST 2010, tid=2, type=null), Product(id=4, name=苹果电脑, price=12000.0, sell=false, cDate=Sat Mar 10 00:00:00 CST 2012, tid=2, type=null)]) 2022-08-01 09:35:02.431 DEBUG 30284 --- [ main] c.zyh.springboot.mapper.TypeMapperTest : Type(id=3, name=平板, products=[Product(id=5, name=华为平板, price=2000.0, sell=false, cDate=Mon Apr 08 00:00:00 CST 2019, tid=3, type=null), Product(id=6, name=苹果平板, price=6000.0, sell=false, cDate=Wed Mar 02 00:00:00 CST 2016, tid=3, type=null)]) 2022-08-01 09:35:02.480 INFO 30284 --- [ionShutdownHook] com.zaxxer.hikari.HikariDataSource : defaultDataSource - Shutdown initiated... 2022-08-01 09:35:02.500 INFO 30284 --- [ionShutdownHook] com.zaxxer.hikari.HikariDataSource : defaultDataSource - Shutdown completed.- 1
- 2
- 3
- 4
- 5
- 6
- 7
- 8
- 9
- 10
- 11
- 12
- 13
- 14
- 15
- 16
- 17
- 18
- 19
- 20
- 21
- 22
- 23
5.整合Druid
5.1传统获取连接的问题
连接底层是socket连接,比较耗费时间,Java程序在连接数据库的时候,它的最大连接数也是有要求的,如果连接过多的话,可能数据库就崩了。 而且,效率还低。—可以自己去测试一下时间
所以,为了解决这个问题,我们引入了数据库连接池。


5.2数据库连接池

接下来我对上面做一下解释

5.3整合步骤
druid是alibaba的一个开源项目,是目前比较主流的数据库连接技术
5.3.1引入pom依赖
<dependency> <groupId>com.alibabagroupId> <artifactId>druid-spring-boot-starterartifactId> <version>1.1.10version> dependency>- 1
- 2
- 3
- 4
- 5
- 6
5.3.2添加druid配置
# 数据源名称 spring.datasource.name=com.alibaba.druid.pool.DruidDataSource- 1
- 2
5.3.3完整配置
# 指定Mybatis的Mapper接口的xml映射文件的路径 mybatis.mapper-locations=classpath:mapper/*.xml # MySQL数据库驱动 #这个驱动也可以省略,可以根据使用的MySQL自动加载相应的驱动 spring.datasource.driver-class-name=com.mysql.cj.jdbc.Driver # 数据源名称 spring.datasource.name=com.alibaba.druid.pool.DruidDataSource # 数据库连接地址 spring.datasource.url=jdbc:mysql://localhost:3306/bjpowernode?serverTimezone=UTC&zeroDateTimeBehavior=convertToNull # 数据库用户名和密码 spring.datasource.username=root spring.datasource.password=123456 # 设置日志级别 logging.level.com.zyh.springboot=debug # 开启mybatis驼峰命名规则自动转换功能 mybatis.configuration.map-underscore-to-camel-case=true- 1
- 2
- 3
- 4
- 5
- 6
- 7
- 8
- 9
- 10
- 11
- 12
- 13
- 14
- 15
- 16
5.3.4代码测试


6.事务管理
6.1事务的概念
- 事务我们可以理解成是在一系列的操作中,这些操作要么全部成功,要么全部不成功。
- 最经典的就是银行的转帐问题,比如说张三要转账给李四,我们是不是得保证张三账户的转出和李四账户的转入操作要么都成功,要么都失败,如果一个成功一个失败,就会导致 转入金额和转出金额不一致 的情况,为了防止这种情况,需要使用事务来处理。
6.2事务的四大特性(ACID)
名称 描述 原子性(Atomicity) 事务是一个不可分割的单位,事务中包含的操作要么全部执行,要么全部不执行 一致性(Consistency) 事务执行前后数据的完整性必须保持一致。例如:在转账时,只有保证转出和转入的金额一致才能构成事务。也就是说事务发生前和发生后,数据的总额依然匹配。一致性是通过原子性来保证的 隔离性(Isolation) 一个事务不会影响其他事务的运行,多个事务并发要互相隔离。 持久性 (Durability) 在事务完成以后,该事务对数据库所作的更改将持久地保存在数据库之中,并不会被回滚。 6.3事务的隔离级别
1.
Isolation.DEFAULT: 以连接的数据库的事务隔离级别为主
2.Isolation.READ_UNCOMMITTED: 读未提交, 可以读取到未提交的事务, 存在脏读
3.Isolation.READ_COMMITTED: 读已提交, 只能读取到已经提交的事务, 解决了脏读, 但存在不可重复读
4Isolation.REPEATABLE_READ: 可重复读, 解决了不可重复读, 但存在幻读
5.Isolation.SERIALIZABLE: 串行化, 可以解决所有并发问题, 但性能低6.4事务的传播机制(图解)
Spring 事务传播机制定义了多个包含了事务的方法, 相互调用时, 事务是如何在这些方法间进行传递的
Spring 事务的传播机制包含以下 7 种 :1.
Propagation.REQUIRED: 默认的事务传播级别, 它表示如果A当前存在事务, B则使用该事务; 如果A当前没有事务,则B创建一个新的事务.
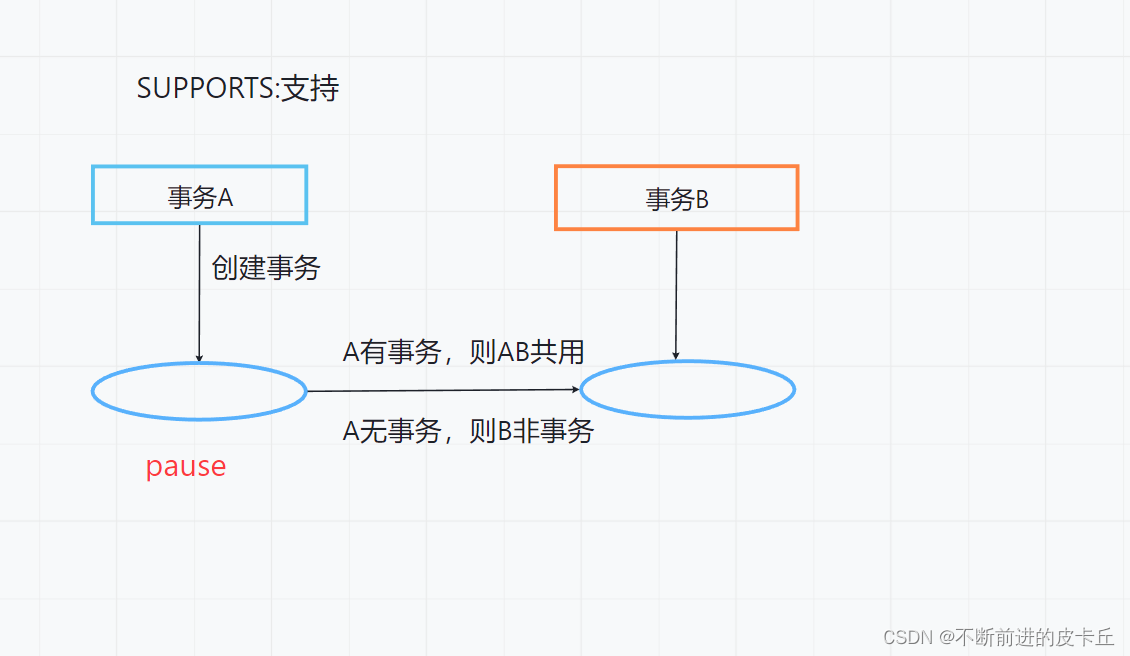
2.Propagation.SUPPORTS: 如果A当前存在事务, 则B使用该事务; 如果A当前没有事务, 则B以非事务的方式继续运行.
3.Propagation.MANDATORY: 如果A当前存在事务, 则B使用该事务; 如果A当前没有事务,则B抛出异常.
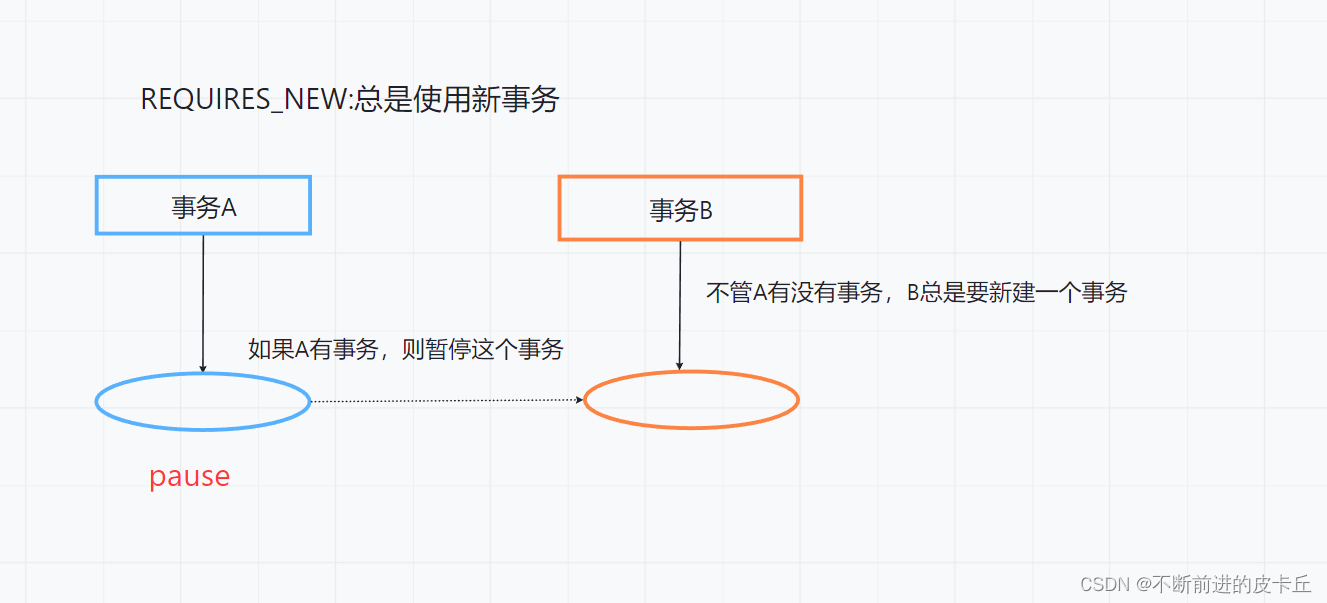
4.Propagation.REQUIRES_NEW: 表示创建一个新的事务, 如果A当前存在事务, 则把A当前事务挂起,B创建新事务,A如果没有事务,B创建一个新事务
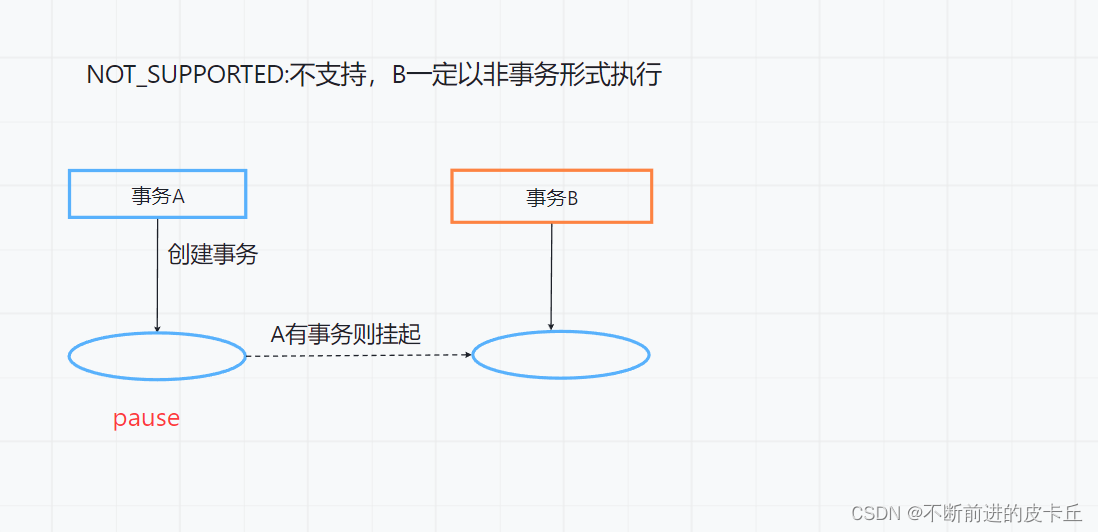
5.Propagation.NOT_SUPPORTED: 以非事务方式运行, 如果A当前存在事务, 则把A当前事务挂起.B以非事务执行;如果A没有事务,则B以非事务执行
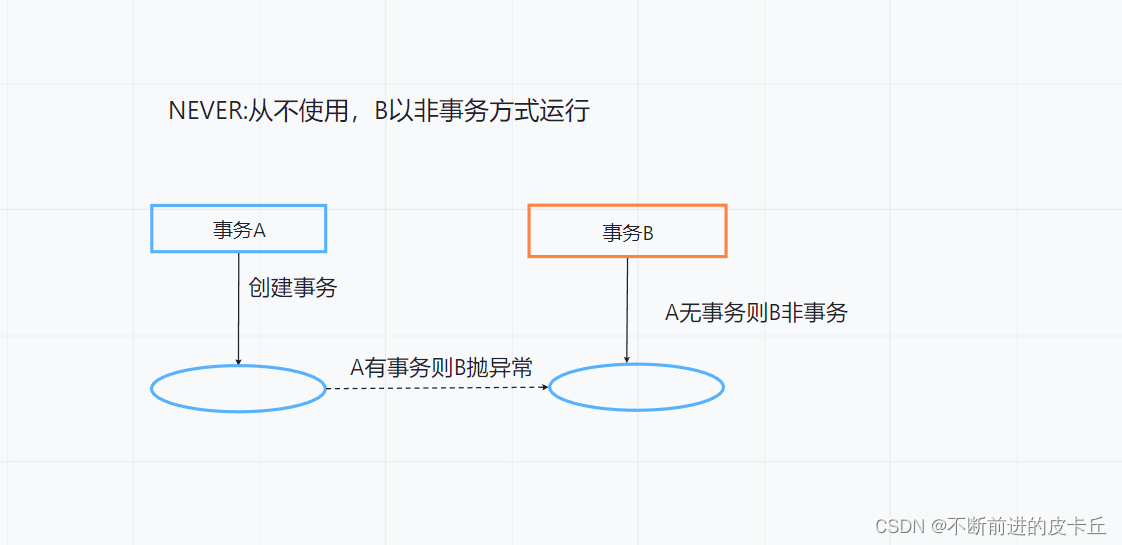
6.Propagation.NEVER: 以非事务方式运行, 如果A当前存在事务, 则抛出异常.如果A没有事务,则B以非事务执行
7.Propagation.NESTED: 嵌套的事务,自己会创建一个新事务,但是这个新事务并不是自己单独提交的,而是等待外层事务一起提交,所以事务B后面 事务 A中的其他代码如果造成了rollback则也会导致事务Brollback


6.5事务的实现
Spring对数据库事务的支持有两种方式
- 编程式事务管理:手动实现事务管理,需要通过TransactionManager手动管理事务
- 声明式事务管理:在service的方法实现上,用@Transaction注解进行事务管理
6.6代码实现
事务操作的代码级别应该放在service层(涉及业务逻辑)
①创建Spring Boot项目
②环境配置
③准备好数据库和表(dept)

④提供对应mapper接口和相关操作数据库方法,以及对应的实体类

⑤准备service层


⑥测试


7.Mybatis缓存
7.1使用缓存的原因
对于一些我们经常查询但是又不经常改变的数据,如果每次查询都要和数据库进行交互,会大大降低效率,因此我们可以使用缓存,把一些对结果影响不大但是经常查询的数据存放在内存中,从而减少和数据库的交互来提高效率。
7.2Mybatis的缓存分类
- 一级缓存
- SqlSession级别的缓存
- 同一个SqlSession对象,在参数和SQL完全一样的情况下,只执行一次SQL语句(基本不用)
- 二级缓存
- Mapper命名空间级别的缓存
- 二级缓存的作用域是同一个namespace映射文件内容,多个SqlSession共享
7.3 Spring Boot对Mybatis的支持
Spring Boot默认支持二级缓存
Mybatis默认支持一级缓存- Mapper中的实体类需要实现序列化
- 注解式开发需要在Mapper接口添加
@CacheNamespace,开启二级缓存 - xml映射文件通过
- 使用二级缓存的时候,sql语句的映射要么全部都是xml格式表示,要么都是注解表示,选中其中一种情况就可以
- 在实际项目中,一般会使用Redis非关系型数据库作为缓存数据库
7.4代码实现
首先是环境搭建,然后是代码实现
提供实体类@Data @AllArgsConstructor @NoArgsConstructor public class Dept implements Serializable { private Integer deptno; private String dname; private String loc; }- 1
- 2
- 3
- 4
- 5
- 6
- 7
- 8
提供对应的接口
@Mapper @CacheNamespace public interface DeptMapper { //查询所有部门信息 @Select("select * from dept ") ListqueryAllDept(); }- 1
- 2
- 3
- 4
- 5
- 6
- 7
- 8
测试
@SpringBootTest @Slf4j class DeptMapperTest { @Autowired private DeptMapper deptMapper; @Test public void testQueryAllDept(){ ListdeptList = deptMapper.queryAllDept(); for (Dept dept:deptList){ log.debug(dept.toString()); } List deptList2 = deptMapper.queryAllDept(); for (Dept dept:deptList2){ log.debug(dept.toString()); } } } - 1
- 2
- 3
- 4
- 5
- 6
- 7
- 8
- 9
- 10
- 11
- 12
- 13
- 14
- 15
- 16
- 17
- 18

7.5缓存的底层细节(博客推荐)
这部分内容,我推荐大家去看亦山大佬的博客,讲解很清楚深入理解MyBatis原理
如果想要更透彻的理解的话,其实大家可以去看看计算机组成原理。 -
相关阅读:
LabVIEW Modbus通讯稳定性提升
基于Unity默认烘焙系统产出Ambient Occlusion, Sky Occlusion等数据
SecureCRT取消Session记录的密码
Gin-Swagger的使用
【LeetCode75】第六十二题 多米诺和托米诺平铺
STM32cubeMX详细教学及多个小项目合集(包含RTOS)
程序员面试代码
Kubernetes - Ingress HTTP 负载搭建部署解决方案(新版本v1.21+)
Think PHP 完整的带富文本格式以及图片上传,并且在页面上分页展示
现代企业管理笔记——领导
- 原文地址:https://blog.csdn.net/qq_52797170/article/details/126080594
