-
Spring源码编译一次性通过遇到问题如何解决?
前言
spring源码本地编译,按网上的博客参考资料的操作步骤,总是会出现各种莫名其妙的错误。根据错误信息找解决方案,但在自己的环境下又总是编译不过去。自己多种方式尝试,最终编译成功了。
为了验证自己的方式是否有失误的地方,全部过程我自己走了大概5遍,详细记录下每个步骤。如果按1天8小时计的话,为了这个源码编译至少花了3~4天时间。我觉得是值得的,为后面的源码阅读扫除一个拦路虎。
1.资源及环境说明:
idea 2019.3.3
gradle-5.6.4版本(对源码里面的版本,版本需要一致,否则编译过程会出现各种异常)
jdk1.8 or 以上版本
spring-5.2.8.RELEASE
系统:win7 or 以上
2.下载源码
选择gitee下载速度快,官网速度非常慢,耗时约60sgit clone --branch v5.2.8.RELEASE https://gitee.com/Z201/spring-framework.git2.1.查看源码gradle版本号
查看文件路径:/gradle/wrapper/gradle-wrapper.properties对应的gradle版本:gradle-5.6.4-bin.zip
3.gradle下载&配置环境变量
3.1.gradle下载
# gradle 下载地址https://services.gradle.org/distributions/选择版本: gradle-5.6.4-bin.zip下载到本机,并解压到指定路径
3.2.配置环境变量
配置环境变量变量名:GRADLE_HOME变量值:A:\java_about\gradle-5.6.4在Path加上 ;%GRADLE_HOME%\bin
3.3.验证gradle

4.源码配置相关修改
4.1.gradle-wrapper.properties配置修改
目录:spring-framework/gradle/wrapper修改 distributionUrl=file:///A:/java_about/gradle-5.6.4-bin.zip #(本机的所在路径)
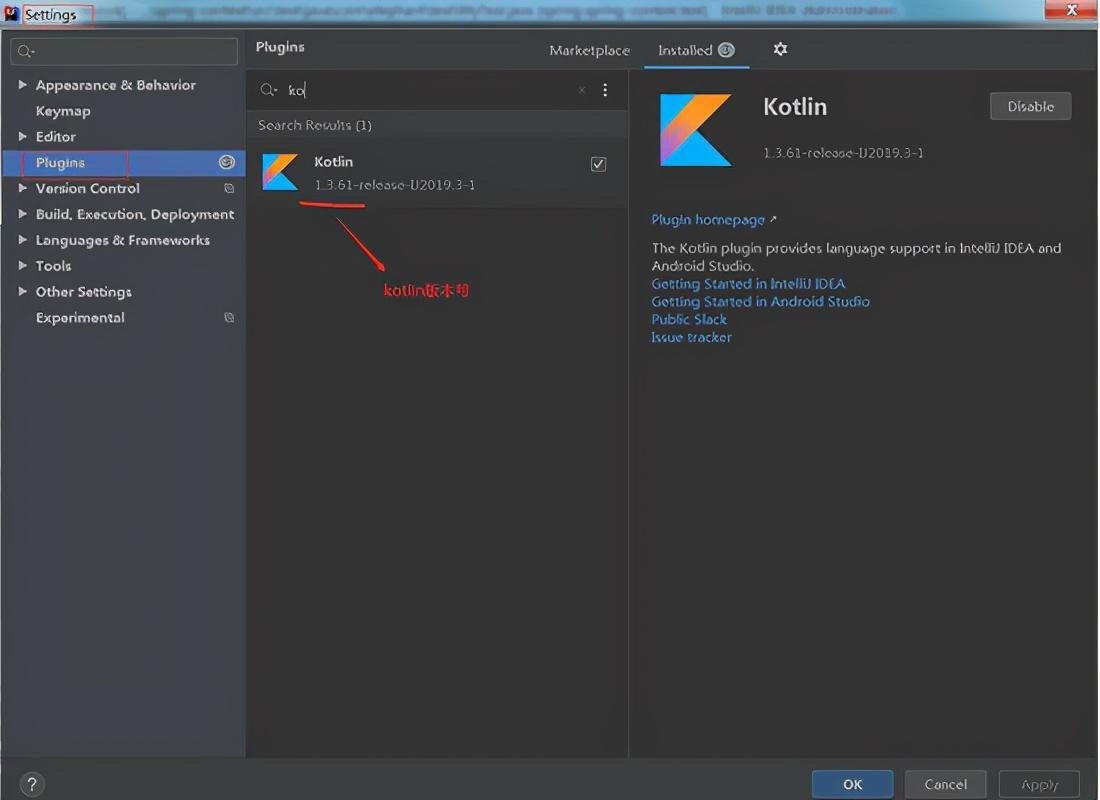
4.2.确认kotlin版本号
先查看idea的kotlin版本,查看路径:File->Setting->Plugins,搜索kotlin,如果还没安装过先安装一下。
我的版本号是1.3.61
4.3.build.gradle配置
目标文件:build.gradle 在根目录下
4.3.1.注释gradle企业约束
因为该plugins不注释,会发生很多不可预期的错误,
搜索关键字:io.spring.gradle-enterprise-conventions注释如下:
//id 'io.spring.gradle-enterprise-conventions' version '0.0.2'
4.3.2.确认kotlin版本号是否一致
如果不一致,修改成跟idea的kotlin的版本号一样,我的版本号为1.3.61,而Spring-5.2.8.RELEASE对应kotlin的版本号是1.3.72,所以需要修改。需要修改的地方有2处
搜索关键字:kotlin.jvm , kotlin-bom
4.3.3.添加上阿里镜像
为仓库添加上阿里镜像,目的是加快资源下载,编译速度加快。行号约279,在dependencyManagement下的repositories 添加:
maven { url 'https://maven.aliyun.com/nexus/content/groups/public/' }maven { url 'https://maven.aliyun.com/nexus/content/repositories/jcenter'}
4.4.settings.gradle配置
为插件仓库添加上阿里镜像,行号约2,在pluginManagement下的repositories 添加:
maven { url "https://maven.aliyun.com/repository/public" }
4.5.解决gradle build慢问题
目标文件:gradle.properties
1.增加内存分配 -- 这个按本机的内存去分配,我的是16Gorg.gradle.jvmargs=-Xmx2048M2.按需配置org.gradle.configureondemand=true3.开启守护进程org.gradle.daemon=true
5.idea导入源码
依次点击File->New->Project from Existing Sources,选择源码包路径下的 build.gradle 文件完成源码导入

5.1.idea配置gradle
可以预先打开idea配置,也可在导入过程中去配置(导入后会出现一个进度条,选择backgroud后台运行)
操作路径:File->Setting->Build,Execution,Deployment->Build Tools->Gradle

5.2.导入等待&configure成功
以上设置完成后,就是等待过程了,具体多长时间看网速,我的导入编译完成耗时约11m 57s,一次性成功。
编译日志内容如下:
Starting Gradle Daemon...Gradle Daemon started in 4 s 477 ms> Task :buildSrc:compileJava> Task :buildSrc:compileGroovy NO-SOURCE> Task :buildSrc:pluginDescriptors> Task :buildSrc:processResources> Task :buildSrc:classes> Task :buildSrc:jar> Task :buildSrc:assemble> Task :buildSrc:pluginUnderTestMetadata> Task :buildSrc:compileTestJava NO-SOURCE> Task :buildSrc:compileTestGroovy NO-SOURCE> Task :buildSrc:processTestResources NO-SOURCE> Task :buildSrc:testClasses UP-TO-DATE> Task :buildSrc:test NO-SOURCE> Task :buildSrc:validateTaskProperties> Task :buildSrc:check> Task :buildSrc:buildCONFIGURE SUCCESSFUL in 11m 57s
5.3.预编译
在idea底部菜单栏,切到Terminal菜单,输入spring-oxm的预编译命令:
gradlew :spring-oxm:compileTestJava预编译成功,耗时约 29s:

6.测试
6.1.前置说明
在spring-context添加测试类,测试验证是否能编译通过,拿到实例的对象。
6.2.添加测试实体类
为了快速定位到,先添加测试的package: com.elephant.bean , 创建Student实体类
package com.elephant.bean;import org.springframework.stereotype.Service;@Servicepublic class Student {private String username = "elephant";private String password;public String getUsername() {return username;}public void setUsername(String username) {this.username = username;}public String getPassword() {return password;}public void setPassword(String password) {this.password = password;}}6.3.测试配置文件
spring-test.xml ,目录在test/resources,内容如下:
<beans xmlns="http://www.springframework.org/schema/beans" xmlns:xsi="http://www.w3.org/2001/XMLSchema-instance" xmlns:context="http://www.springframework.org/schema/context" xsi:schemaLocation="http://www.springframework.org/schema/beanshttp://www.springframework.org/schema/beans/spring-beans.xsd http://www.springframework.org/schema/context http://www.springframework.org/schema/context/spring-context.xsd"> <context:component-scan base-package="com.elephant"/>beans>6.4.添加测试类
为了快速定位到,先添加测试的package: com.elephant.test , 创建MyTest类
package com.elephant.test;import com.elephant.bean.Student;import org.junit.Test;import org.springframework.context.support.ClassPathXmlApplicationContext;public class MyTest {@Testpublic void test1() {ClassPathXmlApplicationContext applicationContext = new ClassPathXmlApplicationContext("spring-test.xml");Student student = (Student)applicationContext.getBean("student");System.out.println(student.getUsername());System.out.println("我获取用户名了:"+student.getUsername());}}6.5.运行测试
该类MyTest 方法 test1() 右击Run,然后等待运行结果。

6.6.运行结果
耗时约 1m 36s
预期结果:成功打印出student的userName , 结果符合预期,成功!
我获取用户名了:elephantBUILD SUCCESSFUL in 1m 36s50 actionable tasks: 26 executed, 7 from cache, 17 up-to-dateThe remote build cache was disabled during the build due to errors.18:34:24: Tasks execution finished ':spring-context:cleanTest :spring-context:test --tests "com.elephant.test.MyTest.test1"'.
-
相关阅读:
BUG 随想录 - Java: 程序包 com.example.xxx 不存在
【Python第三方包】如何让中文变成拼音呢?(pypinyin包)
43-设计问题-最小栈
一条龙-T检验+绘制boxplot
浅谈防勒索病毒方案之主机加固
Nginx编译安装,信号,升级nginx
Spring的事务
探画系统探画系统开发源码分享
BeanUtils.copyProperties:曾经是我的女神,现在是我的毒药。
二、Robot Framework 对数据库的操作
- 原文地址:https://blog.csdn.net/weixin_62421895/article/details/126015337