-
Spring 从入门到精通 (十) 复杂对象详解
关键词:Spring | 复杂对象
本专栏通过理论和实践相结合,系统学习框架核心思想及简单原理,原创不易,如果觉得文章对你有帮助,点赞收藏支持博主 ✨

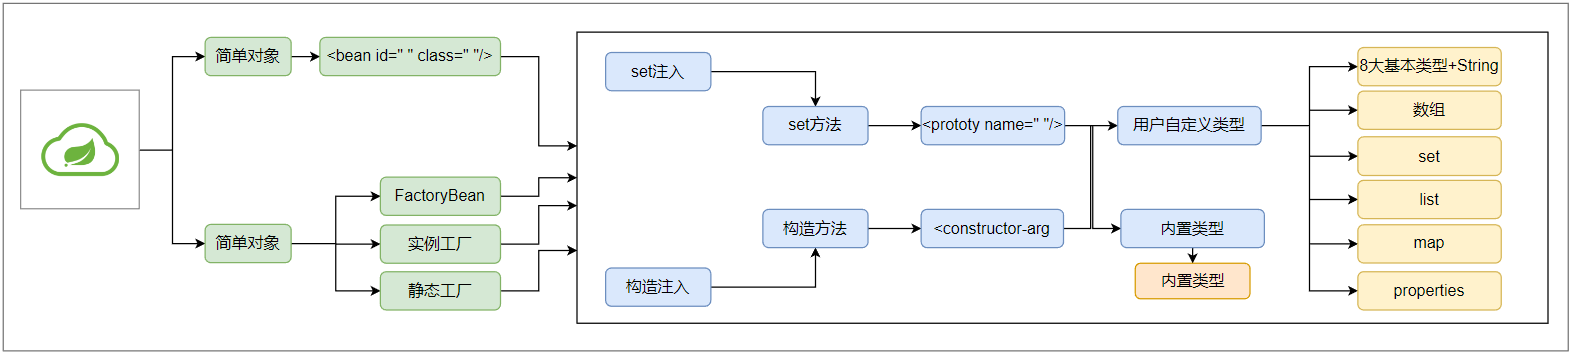
一、什么是简单对象?
可以直接 new 构造方法来创建的对象,就是简单对象,反射底层一样会调用构造方法
二、什么是复杂对象?
不能直接通过 new 构造方法创建的对象
举例:常见的
jdbc中的Connection对象,mybatis中的SqlSessionFactory对象三、Spring工厂创建复杂对象的三种方式
- FactoryBean接口
- 实例工厂
- 静态工厂
3.1、FactoryBean接口
现在想把 jdbc 中的 Connection 对象也交给 Spring 创建
首先,在 pom 中引入 MySQL 驱动 jar 包
<dependency> <groupId>mysqlgroupId> <artifactId>mysql-connector-javaartifactId> <version>5.1.48version> dependency>- 1
- 2
- 3
- 4
- 5
- 6
开发自己的 FactoryBean
package factorybean; import org.springframework.beans.factory.FactoryBean; import java.sql.Connection; import java.sql.DriverManager; public class ConnectionFactoryBean implements FactoryBean<Connection> { // 写创建复杂对象的代码 @Override public Connection getObject() throws Exception { Class.forName("com.mysql.jdbc.Driver"); Connection conn = DriverManager.getConnection("jdbc:mysql://localhost:3306/zhou", "root", "root"); return conn; } // 返回创建对象的Class对象 @Override public Class<?> getObjectType() { return Connection.class; } // 是否为单例 @Override public boolean isSingleton() { return true; } }- 1
- 2
- 3
- 4
- 5
- 6
- 7
- 8
- 9
- 10
- 11
- 12
- 13
- 14
- 15
- 16
- 17
- 18
- 19
- 20
- 21
- 22
- 23
- 24
- 25
- 26
- 27
- 28
- 29
- 30
spring配置文件
<bean id="conn" class="factorybean.ConnectionFactoryBean"/>- 1
- 2
- 3
测试
@Test public void t3() { ClassPathXmlApplicationContext context = new ClassPathXmlApplicationContext("/spring.xml"); Connection conn = (Connection) context.getBean("conn"); System.out.println(conn); }- 1
- 2
- 3
- 4
- 5
- 6
com.mysql.jdbc.JDBC4Connection@591ac8- 1
3.1.1、FactoryBean细节1
如果我们在获取是,在
id前加上“&”符号,那么获取的将不再是复杂对象,而是ConnectionFactoryBean对象@Test public void t4() { ClassPathXmlApplicationContext context = new ClassPathXmlApplicationContext("/spring.xml"); ConnectionFactoryBean conn = (ConnectionFactoryBean) context.getBean("&conn"); System.out.println(conn); }- 1
- 2
- 3
- 4
- 5
- 6
factorybean.ConnectionFactoryBean@18edcc5- 1
3.1.2、单例还是多例?
如果对象能够被公用,就设置为单例,即返回 true ,否则设置为多例,返回false,jdbc 的 Connection 对象在事务处理时,明显不可以公用,因此使用多例比较合适,而 MyBatis 的 SqlSessionFactory 是重量级的对象,因此使用单例更为合适,其他对象可以根据上述原则配置即可。
3.1.3、SSL证书错误处理
由于mysql版本问题,你可能会遇到报错说没有使用ssl证书,因为mysql为了保证更加安全,添加了ssl证书验证,当然我们是没有的哈,只需要在url上配置一下就不在提示了。
useSSL=false- 1
jdbc:mysql://localhost:3306/zhou?useSSL=false- 1
3.1.4、耦合优化
ConnectionFactoryBean中用户名,密码,url等等参数直接通过字符串的形式写在了程序里,使用了硬编码,耦合了,我们使用依赖注入来解决这块的耦合。
依赖这几个字符串,就把他们声明为成员变量,并提供set方法
package factorybean; import org.springframework.beans.factory.FactoryBean; import java.sql.Connection; import java.sql.DriverManager; public class ConnectionFactoryBean implements FactoryBean<Connection> { private String driverClassName; private String url; private String username; private String password; public String getDriverClassName() { return driverClassName; } public void setDriverClassName(String driverClassName) { this.driverClassName = driverClassName; } public String getUrl() { return url; } public void setUrl(String url) { this.url = url; } public String getUsername() { return username; } public void setUsername(String username) { this.username = username; } public String getPassword() { return password; } public void setPassword(String password) { this.password = password; } // 写创建复杂对象的代码 @Override public Connection getObject() throws Exception { Class.forName(driverClassName); return DriverManager.getConnection(url, username, password); } // 返回创建对象的Class对象 @Override public Class<?> getObjectType() { return Connection.class; } // 是否为单例 @Override public boolean isSingleton() { return true; } }- 1
- 2
- 3
- 4
- 5
- 6
- 7
- 8
- 9
- 10
- 11
- 12
- 13
- 14
- 15
- 16
- 17
- 18
- 19
- 20
- 21
- 22
- 23
- 24
- 25
- 26
- 27
- 28
- 29
- 30
- 31
- 32
- 33
- 34
- 35
- 36
- 37
- 38
- 39
- 40
- 41
- 42
- 43
- 44
- 45
- 46
- 47
- 48
- 49
- 50
- 51
- 52
- 53
- 54
- 55
- 56
- 57
- 58
- 59
- 60
- 61
- 62
- 63
- 64
- 65
- 66
在Spring配置文件中完成注入
<bean id="conn" class="factorybean.ConnectionFactoryBean"> <property name="driverClassName" value="com.mysql.jdbc.Driver"/> <property name="url" value="jdbc:mysql://localhost:3306/zhou?useSSL=false"/> <property name="username" value="root"/> <property name="password" value="root"/> bean>- 1
- 2
- 3
- 4
- 5
- 6
再次测试
@Test public void t3() { ClassPathXmlApplicationContext context = new ClassPathXmlApplicationContext("/spring.xml"); Connection conn = (Connection) context.getBean("conn"); System.out.println(conn); }- 1
- 2
- 3
- 4
- 5
- 6
没有任何问题
com.mysql.jdbc.JDBC4Connection@13f604a- 1
就这样,轻松的解决了耦合问题,这就是Spring。
3.1.5、FactoryBean实现原理
- 通过配置文件获取 conn 信息,并通过 instanceof 判断是否是
FactoryBean的实现类 - Spring 按照接口规定调用 getObject() —> Connection
- 返回 Connection
3.2、实例工厂
目的: 避免Spring框架的侵入,整合遗留系统
ConnectionFactory
package factorybean; import java.sql.Connection; import java.sql.DriverManager; import java.sql.SQLException; public class ConnectionFactory { public Connection getConnection() { Connection conn = null; try { Class.forName("com.mysql.jdbc.Driver"); conn = DriverManager.getConnection("jdbc:mysql://localhost:3306/zhou?useSSL=false", "root", "root"); } catch (ClassNotFoundException | SQLException e) { e.printStackTrace(); } return conn; } }- 1
- 2
- 3
- 4
- 5
- 6
- 7
- 8
- 9
- 10
- 11
- 12
- 13
- 14
- 15
- 16
- 17
- 18
- 19
- 20
spring.xml
<bean id="connectionFactory" class="factorybean.ConnectionFactory"/> <bean id="con" factory-bean="connectionFactory" factory-method="getConnection"/>- 1
- 2
- 3
test
@Test public void t5() { ClassPathXmlApplicationContext context = new ClassPathXmlApplicationContext("/spring.xml"); Connection conn = (Connection) context.getBean("con"); System.out.println(conn); }- 1
- 2
- 3
- 4
- 5
- 6
com.mysql.jdbc.JDBC4Connection@fcf36f- 1
3.3、静态工厂
StaticConnectionFactory
public class StaticConnectionFactory { public static Connection getConnection() { Connection connection = null; try { Class.forName("com.mysql.jdbc.Driver"); connection = DriverManager.getConnection("jdbc:mysql://localhost:3306/zhou?useSSL=false", "root", "root"); } catch (ClassNotFoundException e) { e.printStackTrace(); } catch (SQLException e) { e.printStackTrace(); } return connection; } }- 1
- 2
- 3
- 4
- 5
- 6
- 7
- 8
- 9
- 10
- 11
- 12
- 13
- 14
spring.xml
<bean id="conn" class="factorybean.StaticConnectionFactory" factory-method="getConnection"/>- 1
test
@Test public void t3() { ClassPathXmlApplicationContext context = new ClassPathXmlApplicationContext("/spring.xml"); Connection conn = (Connection) context.getBean("conn"); System.out.println(conn); }- 1
- 2
- 3
- 4
- 5
- 6
com.mysql.jdbc.JDBC4Connection@1aab8c6- 1
四、总结
五、写在最后
座右铭:不要在乎别人如何看你,要在乎你自己如何看未来,看梦想,看世界…!
一起学习的可以私信博主或添加博主微信哦。
-
相关阅读:
Linux系统零基础入门之基本操作
MQ---第六篇
openstack搭建
MBTI答题应用小程序
木耳炒什么好吃 木耳的做法
ObjectBox 初探
C# - XMLHelper :一个操作XML的简单类库
健身房如何管理与运营?
MySQL事务
Yukon 学习记录
- 原文地址:https://blog.csdn.net/m0_53321320/article/details/125854266
