-
6W+字记录实验全过程 | 探索Alluxio经济化数据存储策略

探索背景
随着大数据应用的不断发展,数据仓库、数据湖的大数据实践层出不穷;无论是电信、金融、政府,各个行业的大数据热潮蓬勃发展。在过去的4-5年中,我们不断看到企业用户大数据膨胀问题日益加剧,大数据创新下数据存储成本呈现线性增长,使得企业对于大数据的应用开始变得谨慎、变向放缓了企业内部数据化转型的速度。
核心的挑战:如何更加经济地构建数据湖存储体系。
大数据存储引擎从2006年发布以来,百花齐放,计算侧MapReduce、Spark、Hive、Impala、Presto、Storm、Flink的问世不断突破应用领域,不过在大数据存储方面反而显得慎重与沉稳。在过去十多年,在Apache Hadoop生态被广泛提及的主要还是HDFS与Ozone。
HDFS
Hadoop HDFS 是一种分布式文件系统,旨在在商用硬件上运行以提高其普适性。它与现有的分布式文件系统有很多相似之处。但是,HDFS的特点也是鲜明的:具备高度容错性、旨在部署在低成本硬件、允许水平扩缩容。HDFS提供对应用程序数据访问的高吞吐量,适用于需要处理海量数据集的应用服务。
Ozone
Apache Ozone 是一种高度可扩展的分布式存储,适用于分析、大数据和云原生应用程序。Ozone 支持 S3 兼容对象 API 以及 Hadoop 兼容文件系统协议。它针对高效的对象存储和文件系统操作进行了优化。
经济化数据存储策略,主要体现在两个关键特性上,只要实现了,其他的增强都会如虎添翼:
- 使用最合适的存储系统存储对应的数据分块;
- 数据存储策略对上层应用的侵入性越低越好;
比如HDFS典型场景下使用3副本的策略,一方面是确保数据块的高可用性,同时多个副本也可以更好地保障数据局部性的要求,提高数据访问的吞吐量;为了更好地提供数据服务,硬件环境也会选用相对更好的磁盘;对于早期的大数据实践而言,标准统一的软硬件选择可以提高对新技术栈的推动,但是随着数据的不断积累,很多数据的访问频率呈现指数级下降,尤其是针对合规检查的冷数据,不仅仅占据了生产集群的大量空间,可能一年到头都没有被访问过一次。这是对资源的极大浪费。
大数据发展的现阶段,精细化数据存储被提上了议程。需要一种分层的存储体系,在维系现有计算性能的同时,将温、冷数据实现对上层应用透明的自主迁移,控制数据存储与维护的成本。
关键特性验证
通过这篇文章,我们希望可以对经济化数据存储策略做一个初步探索,首先我们将先前提到的两个关键特性具象化,然后通过几组实验对技术可行性进行一个讨论。
关键特性一:使用一套存储系统作为热数据系统;使用另一套存储系统作为冷数据系统;
关键特性二:统一命名空间同时兼容多套存储系统,通过统一命名空间对上层应用提供数据访问服务;
技术选择:
- 计算引擎: Hive (大部分企业用户使用SQL引擎作为数据开发工具)
- 存储引擎: HDFS/Ozone (业界常用的Apache生态存储)
- 数据编排引擎: Alluxio (第三方开源组件,兼容大部分Apache生态组件)
Hive
Apache Hive ™ 数据仓库软件有助于使用 SQL 读取、写入和管理驻留在分布式存储中的大型数据集。结构可以投影到已经存储的数据上。提供了一个命令行工具和 JDBC 驱动程序允许用户连接到 Hive。
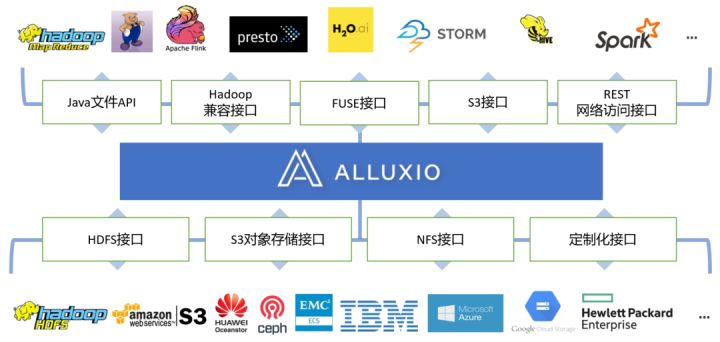
关于Alluxio
“Alluxio数据编排系统”是全球首个分布式超大规模数据编排系统,孵化于加州大学伯克利分校AMP实验室。自项目开源以来,已有超过来自300多个组织机构的1200多位贡献者参与开发。Alluxio能够在跨集群、跨区域、跨国家的任何云中将数据更紧密地编排到接近数据分析和AI/ML应用程序的集群中,从而向上层应用提供内存级别的数据访问速度。
作为大数据生态系统中的存储与计算分离技术标准,在阿里云、腾讯云、华为云、金山云等国内顶级云厂商服务中得到生产检验,是建设企业私有云的基石和核心技术。2021年成立后,先后荣登“中关村国际前沿科技创新大赛大数据与云计算领域TOP10”、“2021投资界数字科技VENTURE50”、“科创中国”开源创新榜等多项榜单。
技术可行性研究,我们分两个阶段进行:
阶段一:使用同一类型的存储系统HDFS,实现不同HDFS系统之间的冷热分层【模拟场景:使用新的HDFS3.0 EC或者用磁盘密集型的机器专门搭建冷数据HDFS】
阶段二:使用不同类型的存储系统,使用HDFS作为热数据存储系统;使用Ozone作为冷数据存储系统 【模拟场景:HDFS负责热数据/Ozone负责冷数据】
验证步骤
部署架构

软件版本:
- 计算引擎:Hive 2.3.9
- 存储引擎:Hadoop 2.10.1,Ozone 1.2.1,Alluxio 2.8
- 所有组件均为单机模式部署
集群规划:
主机 组件 ip-172-31-30-130.us-west-2.compute.internal Hive、HDFS1 ip-172-31-19-127.us-west-2.compute.internal HDFS2、Ozone ip-172-31-17-3.us-west-2.compute.internal Alluxio 实验一:基于Alluxio实现跨HDFS的透明数据冷热分层
## Step 1: 在Hive 中创建库、分区表,默认数据存储在 HDFS_1 上
- create database test location "/user/hive/test.db";
- create external table test.test_part(value string) partitioned by (dt string);
#创建库
- hive> create database test location '/user/hive/test.db';
- OK
- Time taken: 1.697 seconds
- hive>
#创建表
- hive> create external table test.test_part(value string) partitioned by (dt string);
- OK
- Time taken: 0.607 seconds
- hive>
## Step 2: Alluxio Union URI 实现跨HDFS集群统一命名空间集成
- alluxio fs mount \
- --option alluxio-union.hdfs1.uri=hdfs://namenode_1:8020/user/hive/test.db/test_part \
- --option alluxio-union.hdfs2.uri=hdfs://namenode_2:8020/user/hive/test.db/test_part \
- --option alluxio-union.priority.read=hdfs1,hdfs2 \
- --option alluxio-union.collection.create=hdfs1 \
- /user/hive/test.db/test_part union://test_part/
#以Alluxio Union URI 方式挂载测试目录
- [root@ip-172-31-17-3 ~]# alluxio fs mkdir /user/hive/test.db
- Successfully created directory /user/hive/test.db
- [root@ip-172-31-17-3 conf]# alluxio fs mount \
- > --option alluxio-union.hdfs1.uri=hdfs://ip-172-31-30-130.us-west-2.compute.internal:8020/user/hive/test.db/test_part \
- > --option alluxio-union.hdfs2.uri=hdfs://ip-172-31-19-127.us-west-2.compute.internal:8020/user/hive/test.db/test_part \
- > --option alluxio-union.priority.read=hdfs1,hdfs2 \
- > --option alluxio-union.collection.create=hdfs1 \
- > /user/hive/test.db/test_part union://test_part/
- Mounted union://test_part/ at /user/hive/test.db/test_part
- [root@ip-172-31-17-3 ~]#
## Step 3: 修改 Hive 表路径为 Union URI 路径,屏蔽跨异构存储的技术细节
alter table test.test_part set location "alluxio://alluxio:19998/user/hive/test.db/test_part";#修改Hive表格对应的路径
- hive> alter table test.test_part set location "alluxio://ip-172-31-17-3.us-west-2.compute.internal:19998/user/hive/test.db/test_part";
- OK
- Time taken: 0.143 seconds
- hive>
## Step 4: 模拟数据
- mkdir dt\=2022-06-0{1..6}
- echo 1abc > dt\=2022-06-01/000000_0
- echo 2def > dt\=2022-06-02/000000_0
- echo 3ghi > dt\=2022-06-03/000000_0
- echo 4jkl > dt\=2022-06-04/000000_0
- echo 5mno > dt\=2022-06-05/000000_0
- echo 6pqr > dt\=2022-06-06/000000_0
- hdfs dfs -put dt\=2022-06-0{1..3} hdfs://namenode_1:8020/user/hive/test.db/test_part
- hdfs dfs -put dt\=2022-06-0{4..6} hdfs://namenode_2:8020/user/hive/test.db/test_part
- [root@ip-172-31-17-3 ~]# mkdir dt\=2022-06-0{1..6}
- [root@ip-172-31-17-3 ~]# echo 1abc > dt\=2022-06-01/000000_0
- [root@ip-172-31-17-3 ~]# echo 2def > dt\=2022-06-02/000000_0
- [root@ip-172-31-17-3 ~]# echo 3ghi > dt\=2022-06-03/000000_0
- [root@ip-172-31-17-3 ~]# echo 4jkl > dt\=2022-06-04/000000_0
- [root@ip-172-31-17-3 ~]# echo 5mno > dt\=2022-06-05/000000_0
- [root@ip-172-31-17-3 ~]# echo 6pqr > dt\=2022-06-06/000000_0
#将模拟数据分别存入hdfs1、hdfs2
- [root@ip-172-31-17-3 ~]# hdfs dfs -put dt\=2022-06-0{1..3} hdfs://ip-172-31-30-130.us-west-2.compute.internal:8020/user/hive/test.db/test_part
- [root@ip-172-31-17-3 ~]# hdfs dfs -mkdir -p hdfs://ip-172-31-19-127.us-west-2.compute.internal:8020/user/hive/test.db/test_part
- [root@ip-172-31-17-3 ~]# hdfs dfs -put dt\=2022-06-0{4..6} hdfs://ip-172-31-19-127.us-west-2.compute.internal:8020/user/hive/test.db/test_part
#查询hdfs1和hdfs2,确认数据存入完成
- [root@ip-172-31-17-3 ~]# hdfs dfs -ls hdfs://ip-172-31-30-130.us-west-2.compute.internal:8020/user/hive/test.db/test_part
- Found 3 items
- drwxr-xr-x - root hdfsadmingroup 0 2022-07-13 08:09 hdfs://ip-172-31-30-130.us-west-2.compute.internal:8020/user/hive/test.db/test_part/dt=2022-06-01
- drwxr-xr-x - root hdfsadmingroup 0 2022-07-13 08:09 hdfs://ip-172-31-30-130.us-west-2.compute.internal:8020/user/hive/test.db/test_part/dt=2022-06-02
- drwxr-xr-x - root hdfsadmingroup 0 2022-07-13 08:09 hdfs://ip-172-31-30-130.us-west-2.compute.internal:8020/user/hive/test.db/test_part/dt=2022-06-03
- [root@ip-172-31-17-3 ~]# hdfs dfs -ls hdfs://ip-172-31-19-127.us-west-2.compute.internal:8020/user/hive/test.db/test_part
- Found 3 items
- drwxr-xr-x - root hdfsadmingroup 0 2022-07-13 08:10 hdfs://ip-172-31-19-127.us-west-2.compute.internal:8020/user/hive/test.db/test_part/dt=2022-06-04
- drwxr-xr-x - root hdfsadmingroup 0 2022-07-13 08:10 hdfs://ip-172-31-19-127.us-west-2.compute.internal:8020/user/hive/test.db/test_part/dt=2022-06-05
- drwxr-xr-x - root hdfsadmingroup 0 2022-07-13 08:10 hdfs://ip-172-31-19-127.us-west-2.compute.internal:8020/user/hive/test.db/test_part/dt=2022-06-06
#通过查询alluxio Union URI 再次确认数据存入hdfs1和hdfs2,以及Union URI跨存储关联生效
- [root@ip-172-31-17-3 ~]# alluxio fs ls /user/hive/test.db/test_part
- drwxr-xr-x root hdfsadmingroup 1 PERSISTED 07-13-2022 08:09:19:243 DIR /user/hive/test.db/test_part/dt=2022-06-02
- drwxr-xr-x root hdfsadmingroup 1 PERSISTED 07-13-2022 08:09:19:219 DIR /user/hive/test.db/test_part/dt=2022-06-01
- drwxr-xr-x root hdfsadmingroup 1 PERSISTED 07-13-2022 08:10:49:740 DIR /user/hive/test.db/test_part/dt=2022-06-06
- drwxr-xr-x root hdfsadmingroup 1 PERSISTED 07-13-2022 08:10:49:721 DIR /user/hive/test.db/test_part/dt=2022-06-05
- drwxr-xr-x root hdfsadmingroup 1 PERSISTED 07-13-2022 08:10:49:698 DIR /user/hive/test.db/test_part/dt=2022-06-04
- drwxr-xr-x root hdfsadmingroup 1 PERSISTED 07-13-2022 08:09:19:263 DIR /user/hive/test.db/test_part/dt=2022-06-03
- [root@ip-172-31-17-3 ~]#
## Step 5: 刷新Hive表元数据
MSCK REPAIR TABLE test.test_part;
- hive> MSCK REPAIR TABLE test.test_part;
- OK
- Partitions not in metastore: test_part:dt=2022-06-01 test_part:dt=2022-06-02 test_part:dt=2022-06-03 test_part:dt=2022-06-04 test_part:dt=2022-06-05 test_part:dt=2022-06-06
- Repair: Added partition to metastore test.test_part:dt=2022-06-01
- Repair: Added partition to metastore test.test_part:dt=2022-06-02
- Repair: Added partition to metastore test.test_part:dt=2022-06-03
- Repair: Added partition to metastore test.test_part:dt=2022-06-04
- Repair: Added partition to metastore test.test_part:dt=2022-06-05
- Repair: Added partition to metastore test.test_part:dt=2022-06-06
- Time taken: 1.677 seconds, Fetched: 7 row(s)
#通过select方式观察到Hive元数据刷新后,alluxio union URI关联生效体现到Hive表中
- hive> select * from test.test_part;
- OK
- 1abc 2022-06-01
- 2def 2022-06-02
- 3ghi 2022-06-03
- 4jkl 2022-06-04
- 5mno 2022-06-05
- 6pqr 2022-06-06
- Time taken: 1.624 seconds, Fetched: 6 row(s)
- hive>
## Step 6: 配置冷热自动分层策略
alluxio fs policy add /user/hive/test.db/test_part "ufsMigrate(olderThan(2m), UFS[hdfs1]:REMOVE, UFS[hdfs2]:STORE)"#设置策略:冷数据(本例中按生成超过2分钟的数据)自动从热存储(hdfs1)迁移到冷存储(hdfs2)
- [root@ip-172-31-17-3 ~]# alluxio fs policy add /user/hive/test.db/test_part "ufsMigrate(olderThan(2m), UFS[hdfs1]:REMOVE, UFS[hdfs2]:STORE)"
- Policy ufsMigrate-/user/hive/test.db/test_part is added to /user/hive/test.db/test_part.
#通过Alluxio命令行查看策略设置成功与否
- [root@ip-172-31-17-3 ~]# alluxio fs policy list
- id: 1657700423909
- name: "ufsMigrate-/user/hive/test.db/test_part"
- path: "/user/hive/test.db/test_part"
- created_at: 1657700423914
- scope: "RECURSIVE"
- condition: "olderThan(2m)"
- action: "DATA(UFS[hdfs1]:REMOVE, UFS[hdfs2]:STORE)"
- [root@ip-172-31-17-3 ~]#
#策略生效后分别查看hdfs1和hdfs2,可以观察到hdfs1里面超过2分钟的数据都迁移到hdfs2中
- [root@ip-172-31-17-3 logs]# hdfs dfs -ls hdfs://ip-172-31-30-130.us-west-2.compute.internal:8020/user/hive/test.db/test_part
- [root@ip-172-31-17-3 logs]# hdfs dfs -ls hdfs://ip-172-31-19-127.us-west-2.compute.internal:8020/user/hive/test.db/test_part
- Found 6 items
- drwxr-xr-x - root hdfsadmingroup 0 2022-07-13 08:26 hdfs://ip-172-31-19-127.us-west-2.compute.internal:8020/user/hive/test.db/test_part/dt=2022-06-01
- drwxr-xr-x - root hdfsadmingroup 0 2022-07-13 08:26 hdfs://ip-172-31-19-127.us-west-2.compute.internal:8020/user/hive/test.db/test_part/dt=2022-06-02
- drwxr-xr-x - root hdfsadmingroup 0 2022-07-13 08:26 hdfs://ip-172-31-19-127.us-west-2.compute.internal:8020/user/hive/test.db/test_part/dt=2022-06-03
- drwxr-xr-x - root hdfsadmingroup 0 2022-07-13 08:10 hdfs://ip-172-31-19-127.us-west-2.compute.internal:8020/user/hive/test.db/test_part/dt=2022-06-04
- drwxr-xr-x - root hdfsadmingroup 0 2022-07-13 08:10 hdfs://ip-172-31-19-127.us-west-2.compute.internal:8020/user/hive/test.db/test_part/dt=2022-06-05
- drwxr-xr-x - root hdfsadmingroup 0 2022-07-13 08:10 hdfs://ip-172-31-19-127.us-west-2.compute.internal:8020/user/hive/test.db/test_part/dt=2022-06-06
- [root@ip-172-31-17-3 logs]#
#策略生效,冷数据自动迁移过程中和完成后查Hive都得到如下预期查询结果:
- hive> select * from test.test_part;
- OK
- 1abc 2022-06-01
- 2def 2022-06-02
- 3ghi 2022-06-03
- 4jkl 2022-06-04
- 5mno 2022-06-05
- 6pqr 2022-06-06
- Time taken: 0.172 seconds, Fetched: 6 row(s)
- hive>
最后,我们将实验一的两个步骤:(1)通过Alluxio的Union URI实现跨两个HDFS存储系统的Hive表的数据联邦,和(2)通过Alluxio实现跨两个HDFS存储系统的透明数据冷热分层,在图1和图2中分别以简化示意图的方式展示,便于更好的理解实验目标、过程和结果。

图1:通过Alluxio的Union URI实现跨两个HDFS存储系统的Hive表的数据联邦的示意图

图2:通过Alluxio实现跨两个HDFS存储系统的透明数据冷热分层示意图
下一组实验只是将上一组实验设定中的两个HDFS存储系统更改成了两个异构存储系统HDFS(热存储)和Ozone(冷存储),从透明冷热分层功能层面效果是相同的。
实验二:基于Alluxio实现跨异构存储(HDFS和Ozone)的透明数据冷热分层
## step 1 : hive 创建库、表
- create database hdfsToOzone location '/user/hive/hdfsToOzone.db';
- create external table hdfsToOzone.test(value string) partitioned by (dt string);
#创建库
- hive> create database hdfsToOzone location '/user/hive/hdfsToOzone.db';
- OK
- Time taken: 0.055 seconds
- hive>
#创建表
- hive> create external table hdfsToOzone.test(value string) partitioned by (dt string);
- OK
- Time taken: 0.1 seconds
- hive>
## step 2: Alluxio Union URI实现跨HDFS/Ozone集群统一命名空间集成
- alluxio fs mount \
- --option alluxio-union.hdfs.uri=hdfs://HDFS1:8020/user/hive/hdfsToOzone.db/test \
- --option alluxio-union.ozone.uri=o3fs://bucket.volume/hdfsToOzone.db/test \
- --option alluxio-union.priority.read=hdfs,ozone \
- --option alluxio-union.collection.create=hdfs \
- --option alluxio.underfs.hdfs.configuration=/mnt1/ozone-1.2.1/etc/hadoop/ozone-site.xml \
- /user/hive/hdfsToOzone.db/test union://HDFS_TO_OZONE/
#在Ozone中使用命令行工具创建volume、bucket
- [root@ip-172-31-19-127 ~]# ozone sh volume create /v-alluxio
- [root@ip-172-31-19-127 ~]# ozone sh bucket create /v-alluxio/b-alluxio
- [root@ip-172-31-19-127 ~]# ozone fs -mkdir -p o3fs://b-alluxio.v-alluxio/hdfsToOzone.db/test
- [root@ip-172-31-19-127 ~]#
#先在Alluxio中创建实验目录,然后以 Union URI 方式挂载目录
- [root@ip-172-31-17-3 ~]# alluxio fs mkdir /user/hive/hdfsToOzone.db
- Successfully created directory /user/hive/hdfsToOzone.db
- [root@ip-172-31-17-3 ~]# alluxio fs mount \
- > --option alluxio-union.hdfs.uri=hdfs://ip-172-31-30-130.us-west-2.compute.internal:8020/user/hive/hdfsToOzone.db/test \
- > --option alluxio-union.ozone.uri=o3fs://b-alluxio.v-alluxio/hdfsToOzone.db/test \
- > --option alluxio-union.priority.read=hdfs,ozone \
- > --option alluxio-union.collection.create=hdfs \
- > --option alluxio.underfs.hdfs.configuration=/mnt1/ozone-1.2.1/etc/hadoop/ozone-site.xml \
- > /user/hive/hdfsToOzone.db/test union://HDFS_TO_OZONE/
- Mounted union://HDFS_TO_OZONE/ at /user/hive/hdfsToOzone.db/test
- [root@ip-172-31-17-3 ~]#
## step 3: 修改 Hive 表路径为 Union URI 路径,屏蔽跨异构存储的技术细节
alter table hdfsToOzone.test set location "alluxio://alluxio:19998/user/hive/hdfsToOzone.db/test";#修改Hive表格对应的路径
- hive> alter table hdfsToOzone.test set location "alluxio://ip-172-31-17-3.us-west-2.compute.internal:19998/user/hive/hdfsToOzone.db/test";
- OK
- Time taken: 1.651 seconds
- hive>
## step 4: 模拟数据
- ozone fs -put dt\=2022-06-0{1..3} o3fs://b-alluxio.v-alluxio.ozone:9862/hdfsToOzone.db/test
- hdfs dfs -put dt\=2022-06-0{4..6} hdfs://HDFS1:8020/user/hive/hdfsToOzone.db/test
#将数据存入ozone
- [root@ip-172-31-19-127 ~]# ozone fs -put dt\=2022-06-0{1..3} o3fs://b-alluxio.v-alluxio/hdfsToOzone.db/test
- 2022-07-13 10:00:38,920 [main] INFO impl.MetricsConfig: Loaded properties from hadoop-metrics2.properties
- 2022-07-13 10:00:38,981 [main] INFO impl.MetricsSystemImpl: Scheduled Metric snapshot period at 10 second(s).
- 2022-07-13 10:00:38,981 [main] INFO impl.MetricsSystemImpl: XceiverClientMetrics metrics system started
- 2022-07-13 10:00:39,198 [main] INFO metrics.MetricRegistries: Loaded MetricRegistries class org.apache.ratis.metrics.impl.MetricRegistriesImpl
#通过命令行查询ozone,确认数据存入完成
- [root@ip-172-31-19-127 ~]# ozone fs -ls o3fs://b-alluxio.v-alluxio/hdfsToOzone.db/test
- Found 3 items
- drwxrwxrwx - root root 0 2022-07-13 10:00 o3fs://b-alluxio.v-alluxio/hdfsToOzone.db/test/dt=2022-06-01
- drwxrwxrwx - root root 0 2022-07-13 10:00 o3fs://b-alluxio.v-alluxio/hdfsToOzone.db/test/dt=2022-06-02
- drwxrwxrwx - root root 0 2022-07-13 10:00 o3fs://b-alluxio.v-alluxio/hdfsToOzone.db/test/dt=2022-06-03
- [root@ip-172-31-19-127 ~]#
#将数据存入hdfs1,并通过命令行查询hdfs1,确认数据存入完成
- [root@ip-172-31-17-3 ~]# hdfs dfs -put dt\=2022-06-0{4..6} hdfs://ip-172-31-30-130.us-west-2.compute.internal:8020/user/hive/hdfsToOzone.db/test
- [root@ip-172-31-17-3 ~]# hdfs dfs -ls hdfs://ip-172-31-30-130.us-west-2.compute.internal:8020/user/hive/hdfsToOzone.db/test
- Found 3 items
- drwxr-xr-x - root hdfsadmingroup 0 2022-07-13 10:06 hdfs://ip-172-31-30-130.us-west-2.compute.internal:8020/user/hive/hdfsToOzone.db/test/dt=2022-06-04
- drwxr-xr-x - root hdfsadmingroup 0 2022-07-13 10:06 hdfs://ip-172-31-30-130.us-west-2.compute.internal:8020/user/hive/hdfsToOzone.db/test/dt=2022-06-05
- drwxr-xr-x - root hdfsadmingroup 0 2022-07-13 10:06 hdfs://ip-172-31-30-130.us-west-2.compute.internal:8020/user/hive/hdfsToOzone.db/test/dt=2022-06-06
- [root@ip-172-31-17-3 ~]#
#通过Alluxio命令行查询,再次确认数据存入hdfs1和ozone,以及Union URI跨存储关联生效
- [root@ip-172-31-17-3 ~]# alluxio fs ls /user/hive/hdfsToOzone.db/test
- drwxrwxrwx root root 0 PERSISTED 07-13-2022 10:00:40:670 DIR /user/hive/hdfsToOzone.db/test/dt=2022-06-02
- drwxrwxrwx root root 0 PERSISTED 07-13-2022 10:00:38:691 DIR /user/hive/hdfsToOzone.db/test/dt=2022-06-01
- drwxr-xr-x root hdfsadmingroup 0 PERSISTED 07-13-2022 10:06:29:206 DIR /user/hive/hdfsToOzone.db/test/dt=2022-06-06
- drwxr-xr-x root hdfsadmingroup 0 PERSISTED 07-13-2022 10:06:29:186 DIR /user/hive/hdfsToOzone.db/test/dt=2022-06-05
- drwxr-xr-x root hdfsadmingroup 0 PERSISTED 07-13-2022 10:06:29:161 DIR /user/hive/hdfsToOzone.db/test/dt=2022-06-04
- drwxrwxrwx root root 0 PERSISTED 07-13-2022 10:00:40:762 DIR /user/hive/hdfsToOzone.db/test/dt=2022-06-03
- [root@ip-172-31-17-3 ~]#
## step 5: 刷新Hive表元数据
MSCK REPAIR TABLE hdfsToOzone.test;
- hive> MSCK REPAIR TABLE hdfsToOzone.test;
- OK
- Partitions not in metastore: test:dt=2022-06-01 test:dt=2022-06-02 test:dt=2022-06-03 test:dt=2022-06-04 test:dt=2022-06-05 test:dt=2022-06-06
- Repair: Added partition to metastore hdfsToOzone.test:dt=2022-06-01
- Repair: Added partition to metastore hdfsToOzone.test:dt=2022-06-02
- Repair: Added partition to metastore hdfsToOzone.test:dt=2022-06-03
- Repair: Added partition to metastore hdfsToOzone.test:dt=2022-06-04
- Repair: Added partition to metastore hdfsToOzone.test:dt=2022-06-05
- Repair: Added partition to metastore hdfsToOzone.test:dt=2022-06-06
- Time taken: 0.641 seconds, Fetched: 7 row(s)
- hive>
#通过select方式观察到hive元数据刷新后,alluxio union URI关联生效体现到hive表中
- hive> select * from hdfsToOzone.test ;
- OK
- 1abc 2022-06-01
- 2def 2022-06-02
- 3ghi 2022-06-03
- 4jkl 2022-06-04
- 5mno 2022-06-05
- 6pqr 2022-06-06
- Time taken: 0.156 seconds, Fetched: 6 row(s)
- hive>
## step 6: 配置策略
alluxio fs policy add /user/hive/hdfsToOzone.db/test" ufsMigrate(olderThan(2m), UFS[hdfs]:REMOVE, UFS[ozone]:STORE)"#设置策略:冷数据(本例中按生成超过2分钟的数据)自动从热存储(hdfs1)迁移到冷存储(ozone)
- [root@ip-172-31-17-3 ~]# alluxio fs policy add /user/hive/hdfsToOzone.db/test/ "ufsMigrate(olderThan(2m), UFS[hdfs]:REMOVE, UFS[ozone]:STORE)"
- Policy ufsMigrate-/user/hive/hdfsToOzone.db/test is added to /user/hive/hdfsToOzone.db/test.
#通过Alluxio命令行查看策略设置成功与否
- [root@ip-172-31-17-3 ~]# alluxio fs policy list
- id: 1657707130843
- name: "ufsMigrate-/user/hive/hdfsToOzone.db/test"
- path: "/user/hive/hdfsToOzone.db/test"
- created_at: 1657707130843
- scope: "RECURSIVE"
- condition: "olderThan(2m)"
- action: "DATA(UFS[hdfs]:REMOVE, UFS[ozone]:STORE)"
- [root@ip-172-31-17-3 ~]#
#策略生效后分别查看hdfs1和ozone,可以观察到hdfs1里面超过2分钟的数据都迁移到ozone中
- [root@ip-172-31-17-3 ~]# ozone fs -ls o3fs://b-alluxio.v-alluxio/hdfsToOzone.db/test
- Found 6 items
- drwxrwxrwx - root root 0 2022-07-13 10:00 o3fs://b-alluxio.v-alluxio/hdfsToOzone.db/test/dt=2022-06-01
- drwxrwxrwx - root root 0 2022-07-13 10:00 o3fs://b-alluxio.v-alluxio/hdfsToOzone.db/test/dt=2022-06-02
- drwxrwxrwx - root root 0 2022-07-13 10:00 o3fs://b-alluxio.v-alluxio/hdfsToOzone.db/test/dt=2022-06-03
- drwxrwxrwx - root root 0 2022-07-13 10:21 o3fs://b-alluxio.v-alluxio/hdfsToOzone.db/test/dt=2022-06-04
- drwxrwxrwx - root root 0 2022-07-13 10:21 o3fs://b-alluxio.v-alluxio/hdfsToOzone.db/test/dt=2022-06-05
- drwxrwxrwx - root root 0 2022-07-13 10:21 o3fs://b-alluxio.v-alluxio/hdfsToOzone.db/test/dt=2022-06-06
- [root@ip-172-31-17-3 ~]# hdfs dfs -ls hdfs://ip-172-31-30-130.us-west-2.compute.internal:8020/user/hive/hdfsToOzone.db/test
- [root@ip-172-31-17-3 ~]#
#策略生效,冷数据自动迁移过程中和完成后查hive都得到如下预期查询结果:
- hive> select * from hdfsToOzone.test ;
- OK
- 1abc 2022-06-01
- 2def 2022-06-02
- 3ghi 2022-06-03
- 4jkl 2022-06-04
- 5mno 2022-06-05
- 6pqr 2022-06-06
- Time taken: 0.144 seconds, Fetched: 6 row(s)
- hive>
4. 实验小结
可以看出,实验二的执行过程和效果展示和实验一几乎是如出一辙,除了冷数据存储系统从hdfs2切换成了一个异构存储系统Ozone。
通过实验,我们充分验证了Alluxio数据编排是如何成功将上层应用 (比如基于Hive的数仓建设) 与底层数据持久化策略 (使用hdfs或者Ozone, 是否进行冷热分层等) 解耦合的。同时也体现了Alluxio对于异构存储系统的通用性和易用性。
最后希望这篇文章对各位如何使用Alluxio经济化数据存储策略有所启迪。
附录
Alluxio集成Hive及HDFS的方式
Alluxio 配置
echo 'export ALLX_HOME=/mnt1/alluxio' >> ~/.bashrc
echo 'export PATH=$PATH:$ALLX_HOME/bin' >> ~/.bashrc- alluxio.master.hostname=ip-172-31-17-3.us-west-2.compute.internal
- alluxio.underfs.address=hdfs://ip-172-31-30-130.us-west-2.compute.internal:8020/alluxio
- alluxio.worker.tieredstore.level0.dirs.path=/alluxio/ramdisk
- alluxio.worker.memory.size=4G
- alluxio.worker.tieredstore.levels=1
- alluxio.worker.tieredstore.level0.alias=MEM
- alluxio.user.file.readtype.default=CACHE
- alluxio.user.file.writetype.default=ASYNC_THROUGH
- alluxio.security.login.impersonation.username=_HDFS_USER_
- alluxio.master.security.impersonation.yarn.groups=*
- alluxio.master.security.impersonation.hive.groups=*
- alluxio.user.metrics.collection.enabled=true
- alluxio.user.block.size.bytes.default=64MB
- ######## Explore ########
- alluxio.user.block.write.location.policy.class=alluxio.client.block.policy.DeterministicHashPolicy
- alluxio.user.ufs.block.read.location.policy=alluxio.client.block.policy.DeterministicHashPolicy
- alluxio.user.ufs.block.read.location.policy.deterministic.hash.shards=1
- alluxio.user.file.persist.on.rename=true
- alluxio.master.persistence.blacklist=.staging,_temporary,.tmp
- alluxio.user.file.passive.cache.enabled=false
Hive 客户端core-site.xml
cp /hadoop_home/etc/hadoop/core-site.xml /hive_home/conf
## 拷贝 jar分别到hadoop和hive home下的lib子目录中
- cp /
/client/alluxio-enterprise-2.8.0-1.0-client.jar /hadoop_home/share/lib - cp /
/client/alluxio-enterprise-2.8.0-1.0-client.jar /hive_home/lib
## 配置alluxio文件系统
- vim /hive_home/conf/core-site.xml
- <property>
- <name>fs.alluxio.implname>
- <value>alluxio.hadoop.FileSystemvalue>
- property>
- <property>
- <name>alluxio.master.rpc.addressesname>
- <value>ip-172-31-17-3.us-west-2.compute.internal:19998value>
- property>
HDFS授权
## 查看hdfs 超级用户
- vim /hadoop_home/etc/hadoop/hdfs-site.xml
- <property>
- <name>dfs.permissions.superusergroupname>
- <value>hdfsadmingroupvalue>
- property>
## 将用户 Alluxio 增加到supergroup
- groupadd hdfsadmingroup
- usermod -a -G hdfsadmingroup root
## 同步系统的权限信息到 HDFS
su - hdfs -s /bin/bash -c "hdfs dfsadmin -refreshUserToGroupsMappings"## 开启hdfs acl
- vim /hadoop_home/etc/hadoop/hdfs-site.xml
- <property>
- <name>dfs.permissions.enabledname>
- <value>truevalue>
- property>
- <property>
- <name>dfs.namenode.acls.enabledname>
- <value>truevalue>
- property>
- su - hdfs -s /bin/bash -c "hdfs dfs -setfacl -R -m user:root:rwx /"
Ozone 部署
配置文件
- wget https://dlcdn.apache.org/ozone/1.2.1/ozone-1.2.1.tar.gz
- echo 'export OZONE_HOME=/mnt1/ozone-1.2.1' >> ~/.bashrc
- echo 'export PATH=$PATH:$OZONE_HOME/bin:$OZONE_HOME/sbin' >> ~/.bashrc
##在ozone-site.xml中加入必要配置信息
- <configuration>
- <property>
- <name>ozone.om.addressname>
- <value>ip-172-31-19-127.us-west-2.compute.internal:9862value>
- property>
- <property>
- <name>ozone.metadata.dirsname>
- <value>/mnt/ozone-1.2.1/metadata/ozonevalue>
- property>
- <property>
- <name>ozone.scm.client.addressname>
- <value>ip-172-31-19-127.us-west-2.compute.internal:9860value>
- property>
- <property>
- <name>ozone.scm.namesname>
- <value>ip-172-31-19-127.us-west-2.compute.internalvalue>
- property>
- <property>
- <name>ozone.scm.datanode.id.dirname>
- <value>/mnt/ozone-1.2.1/metadata/ozone/nodevalue>
- property>
- <property>
- <name>ozone.om.db.dirsname>
- <value>/mnt/ozone-1.2.1/metadata/ozone/omdbvalue>
- property>
- <property>
- <name>ozone.scm.db.dirsname>
- <value>/mnt/ozone-1.2.1/metadata/ozone/scmdbvalue>
- property>
- <property>
- <name>hdds.datanode.dirname>
- <value>/mnt/ozone-1.2.1/datanode/datavalue>
- property>
- <property>
- <name>ozone.om.ratis.enablename>
- <value>falsevalue>
- property>
- <property>
- <name>ozone.om.http-addressname>
- <value>ip-172-31-19-127.us-west-2.compute.internal:9874value>
- property>
- <property>
- <name>ozone.s3g.domain.namename>
- <value>s3g.internalvalue>
- property>
- <property>
- <name>ozone.replicationname>
- <value>1value>
- property>
- configuration>
初始化与启动(按照顺序)
- ozone scm --init
- ozone --daemon start scm
- ozone om --init
- ozone --daemon start om
- ozone --daemon start datanode
- ozone --daemon start s3g
ozone使用操作
#创建名称为v-alluxio的volume
- [root@ip-172-31-19-127 ~]# ozone sh volume create /v-alluxio
- [root@ip-172-31-19-127 ~]#
#在v-alluxio下创建名为b-alluxio的bucket
- [root@ip-172-31-19-127 ~]# ozone sh bucket create /v-alluxio/b-alluxio
- [root@ip-172-31-19-127 ~]#
#查看bucket的相关信息
- [root@ip-172-31-19-127 ~]# ozone sh bucket info /v-alluxio/b-alluxio
- {
- "metadata" : { },
- "volumeName" : "v-alluxio",
- "name" : "b-alluxio",
- "storageType" : "DISK",
- "versioning" : false,
- "usedBytes" : 30,
- "usedNamespace" : 6,
- "creationTime" : "2022-07-13T09:11:37.403Z",
- "modificationTime" : "2022-07-13T09:11:37.403Z",
- "quotaInBytes" : -1,
- "quotaInNamespace" : -1,
- "bucketLayout" : "LEGACY"
- }
- [root@ip-172-31-19-127 ~]#
#创建key,并放入相应的内容
- [root@ip-172-31-19-127 ~]# touch Dockerfile
- [root@ip-172-31-19-127 ~]# ozone sh key put /v-alluxio/b-alluxio/Dockerfile Dockerfile
- [root@ip-172-31-19-127 ~]#
#列出bucket下所有的key
- [root@ip-172-31-19-127 ~]# ozone sh key list /v-alluxio/b-alluxio/
- {
- "volumeName" : "v-alluxio",
- "bucketName" : "b-alluxio",
- "name" : "Dockerfile",
- "dataSize" : 0,
- "creationTime" : "2022-07-13T14:37:09.761Z",
- "modificationTime" : "2022-07-13T14:37:09.801Z",
- "replicationConfig" : {
- "replicationFactor" : "ONE",
- "requiredNodes" : 1,
- "replicationType" : "RATIS"
- },
- "replicationFactor" : 1,
- "replicationType" : "RATIS"
- }
- [root@ip-172-31-19-127 ~]#
#查看key的相关信息
- [root@ip-172-31-19-127 ~]# ozone sh key info /v-alluxio/b-alluxio/Dockerfile
- {
- "volumeName" : "v-alluxio",
- "bucketName" : "b-alluxio",
- "name" : "Dockerfile",
- "dataSize" : 0,
- "creationTime" : "2022-07-13T14:37:09.761Z",
- "modificationTime" : "2022-07-13T14:37:09.801Z",
- "replicationConfig" : {
- "replicationFactor" : "ONE",
- "requiredNodes" : 1,
- "replicationType" : "RATIS"
- },
- "ozoneKeyLocations" : [ ],
- "metadata" : { },
- "replicationFactor" : 1,
- "replicationType" : "RATIS"
- }
- [root@ip-172-31-19-127 ~]#
Alluxio 挂载 ozone
#方式一
- [root@ip-172-31-17-3 ~]# alluxio fs mount /ozone o3fs://b-alluxio.v-alluxio.ip-172-31-19-127.us-west-2.compute.internal:9862/
- Mounted o3fs://b-alluxio.v-alluxio.ip-172-31-19-127.us-west-2.compute.internal:9862/ at /ozone
- [root@ip-172-31-17-3 ~]#
#方式二(带option的mount)
- [root@ip-172-31-17-3 ~]# alluxio fs mount \
- > --option alluxio.underfs.hdfs.configuration=/mnt1/ozone-1.2.1/etc/hadoop/ozone-site.xml \
- > /ozone1 o3fs://b-alluxio.v-alluxio/
- Mounted o3fs://b-alluxio.v-alluxio/ at /ozone1
- [root@ip-172-31-17-3 ~]#
#验证Ozone挂载是否成功
- [root@ip-172-31-17-3 ~]# alluxio fs ls /
- drwxrwxrwx root root 0 PERSISTED 01-01-1970 00:00:00:000 DIR /ozone1
- drwxrwxrwx root root 0 PERSISTED 01-01-1970 00:00:00:000 DIR /ozone
- [root@ip-172-31-17-3 ~]#
-
相关阅读:
Python脚本:让工作自动化起来
深入剖析堆原理与堆排序
git push 总是需要输入密码或者个人访问令牌personal access token解决方案
稀疏数组举例详解(Java形式表示)
JS(二)数据类型,流程控制
【Vue】计算属性 监听属性 组件通信 动态组件 插槽 vue-cli脚手架
项目开发——【流程图】软件工程程序流程图详解《如何正确绘制项目开发流程图》
基于Vue+Express+ElementUI+MySQL的简单数据库应用
【go-zero】go-zero 脚手架 simple-admin 第一章:通过goctls生成rpc整个项目 | go-zero整合 ENT数据库orm框架
大数据毕业设计选题推荐-河长制大数据监测平台-Hadoop-Spark-Hive
- 原文地址:https://blog.csdn.net/Alluxio/article/details/125889650
