-
数据结构之顺序表

🎉🎉🎉写在前面:
博主主页:🌹🌹🌹戳一戳,欢迎大佬指点!
博主秋秋:QQ:1477649017 欢迎志同道合的朋友一起加油喔💪
目标梦想:进大厂,立志成为一个牛掰的Java程序猿,虽然现在还是一个小菜鸟嘿嘿
-----------------------------谢谢你这么帅气美丽还给我点赞!比个心-----------------------------

一,线性表
线性表是具有n个相同特性的元素的有序序列。常见的线性表有顺序表,链表,栈,队列…
线性表在 逻 辑 上 是 线 性 结 构 \color{red}{逻辑上是线性结构} 逻辑上是线性结构,也就是说是一条连续的直线(主管理念上认为它是连续的),但是在内存中存储的时候,也就是 物 理 上 不 一 定 是 连 续 的 \color{red}{物理上不一定是连续的} 物理上不一定是连续的。(线性表物理存储上一般是数组形式或者是链式结构的形式)。
二,顺序表
顺序表就是用一段连续的物理地址的存储空间依次存储数据元素的线性结构。连续的物理地址存储空间一般认为是数组,在数组上进行CRUD。
这里可能会有人疑惑,既然底层上就是一个数组,那顺序表存在的意思是啥,直接用数组不就好了。我们说顺序表是一种数据结构,现在数据在数组中是有了,但是组织数据的方法都还没有啊,我们虽然有了数组,但是对于操作数组元素,比如增删查改的方法都还没有,所以顺序表就是把数组元素以及操作的方法统筹到了一起。顺序表背后的数据结构就是一个动态增长的数组。
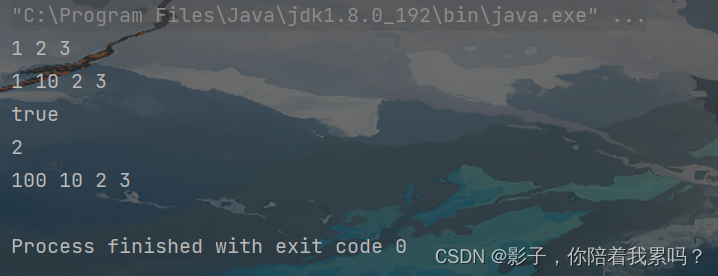
//模拟一个顺序表 import java.util.Arrays; class MyArraylist{ // 以下是数组 public int[] elem; public int UsedSize;//有效数据的个数 public static final int CAPACITY = 10;//定义一个初始数组长度的值 public MyArraylist(){ this.elem = new int[CAPACITY]; } // 以下是操作方法 // 打印顺序表 public void display() { for (int i = 0; i < this.UsedSize; i++) { System.out.print(this.elem[i] + " "); } System.out.println(); } // 在数据结构中插入数据的时候必须有一个前驱的信息,不能跳着放 // 新增元素,默认在数组最后新增 public boolean isFull(){ return this.elem.length == UsedSize; } public void add(int data) { // 新增数据,必须要先检查我们的数组是不是满了 if(isFull()){ //确定是满了,就需要扩容 this.elem = Arrays.copyOf(elem,2*elem.length);//将扩容的数组的引用还是赋值给elem } this.elem[UsedSize] = data; UsedSize++; } // 在 pos 位置新增元素 // 数据结构是一门严谨的学科,所以需要我们去分析好每一种情况 private void CheckAddPos(int pos){ if(pos < 0 || pos > this.UsedSize){//当pos == Usedsize时就是尾部插入,但是不能跳着插入,大于就不行了 throw new AddPosLegalException("pos不合法!插入元素过程"); } } public void add(int pos, int data) { // 判断我们的pos下标是否合法 try{ CheckAddPos(pos); // 首先判断数组是否满了 if(isFull()){ this.elem = this.elem = Arrays.copyOf(elem,2*elem.length); } for(int i = this.UsedSize - 1;i >= pos;i--){ this.elem[i+1] = this.elem[i]; } this.elem[pos] = data;//移动完元素后把data放到pos位置处 this.UsedSize++; }catch (AddPosLegalException e){ e.printStackTrace(); } } // 判定是否包含某个元素 public boolean contains(int toFind) { for(int i = 0;i < this.UsedSize;i++){//不需要判断顺序表是否为空,因为空的时候for循环进不去 if(this.elem[i] == toFind){ return true;//找到了就返回true } } return false; } // 查找某个元素对应的位置 public int indexOf(int toFind) { for(int i = 0;i < this.UsedSize;i++){//不需要判断顺序表是否为空,因为空的时候for循环进不去 if(this.elem[i] == toFind){ return i;//找到了就返回下标i } } return -1; } // 获取 pos 位置的元素 private void CheckGetPos(int pos){ if(pos < 0 || pos >= this.UsedSize){ throw new GetPosLegalException("pos位置不合法!取元素过程"); } } public int get(int pos) { // 首先也是判断pos是否合法,不过这个pos的合法条件与add的是不同的 try{ CheckGetPos(pos); }catch (GetPosLegalException e){ e.printStackTrace(); } return this.elem[pos]; } // 给 pos 位置的元素设为 value public void set(int pos, int value) { //首先检查pos位置的合法性 CheckGetPos(pos);//有异常直接扔给JVM this.elem[pos] = value; } //删除第一次出现的关键字key public void remove(int key) { //先找到key的位置 int pos = indexOf(key); if(pos == -1){ System.out.println("顺序表中没有你想要删除的元素!"); return; } for(int i = pos;i < this.UsedSize - 1;i++){ this.elem[i] = this.elem[i+1]; } // this.elem[UsedSize] = null;如果说数组中是引用类型的话,你删除后最后一个元素需要手动置为空,防止内存泄漏 this.UsedSize--; } // 获取顺序表长度 public int size() { return this.UsedSize; } // 清空顺序表 public void clear() { this.UsedSize = 0; } } public class TestDemo220625 { public static void main(String[] args) { MyArraylist myArraylist = new MyArraylist(); myArraylist.add(1); myArraylist.add(2); myArraylist.add(3); myArraylist.display(); myArraylist.add(1,10); myArraylist.display(); System.out.println(myArraylist.contains(10)); System.out.println(myArraylist.get(2)); myArraylist.set(0,100); myArraylist.display(); } }- 1
- 2
- 3
- 4
- 5
- 6
- 7
- 8
- 9
- 10
- 11
- 12
- 13
- 14
- 15
- 16
- 17
- 18
- 19
- 20
- 21
- 22
- 23
- 24
- 25
- 26
- 27
- 28
- 29
- 30
- 31
- 32
- 33
- 34
- 35
- 36
- 37
- 38
- 39
- 40
- 41
- 42
- 43
- 44
- 45
- 46
- 47
- 48
- 49
- 50
- 51
- 52
- 53
- 54
- 55
- 56
- 57
- 58
- 59
- 60
- 61
- 62
- 63
- 64
- 65
- 66
- 67
- 68
- 69
- 70
- 71
- 72
- 73
- 74
- 75
- 76
- 77
- 78
- 79
- 80
- 81
- 82
- 83
- 84
- 85
- 86
- 87
- 88
- 89
- 90
- 91
- 92
- 93
- 94
- 95
- 96
- 97
- 98
- 99
- 100
- 101
- 102
- 103
- 104
- 105
- 106
- 107
- 108
- 109
- 110
- 111
- 112
- 113
- 114
- 115
- 116
- 117
- 118
- 119
- 120
- 121
- 122
- 123
- 124
- 125
- 126
- 127
- 128
- 129
- 130
- 131
- 132
- 133
- 134
- 135
- 136
- 137
程序运行截图:
三,ArrayList简介
上面模拟实现了一下顺序表,那么现在就看看正宗的顺序表ArrayList是什么样的。ArrayList就是一个集合类,实现了List接口,它背后的数据结构是一个数组,ArrayList就是集合了数据以及对数据的操作方法的一个集合类。
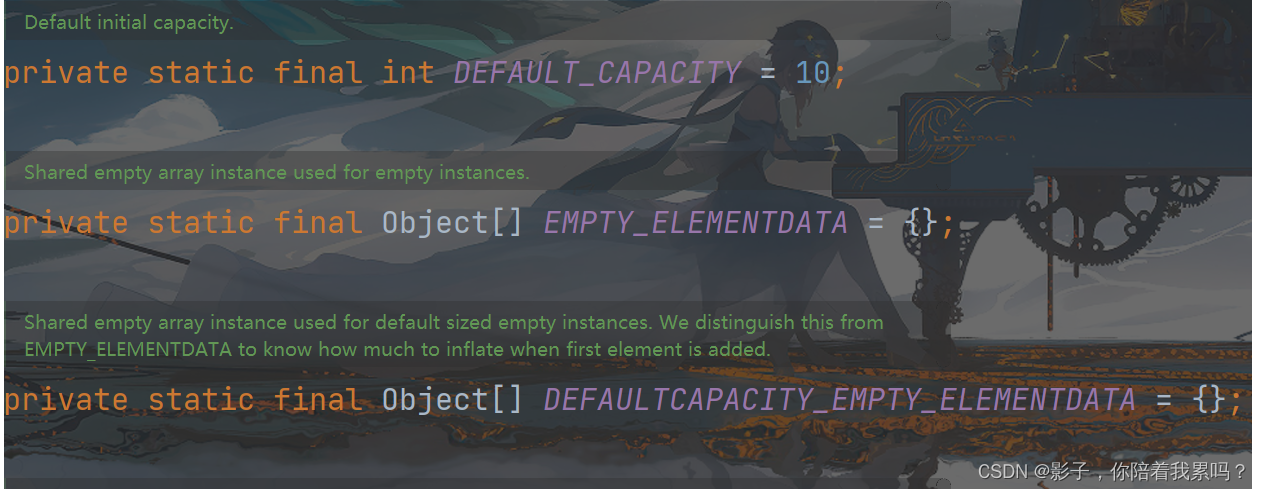
3.1,源码解析
public static void main(String[] args) { ArrayList<Integer> arrayList = new ArrayList<>(); arrayList.add(10); } //这里就只解析new ArrayList对象的时候,以及add元素时候的源码,这个点是最难的,其他的方法源码与我们上面自己模拟实现的差不多- 1
- 2
- 3
- 4
- 5
首先,看到构造方法:

add方法:

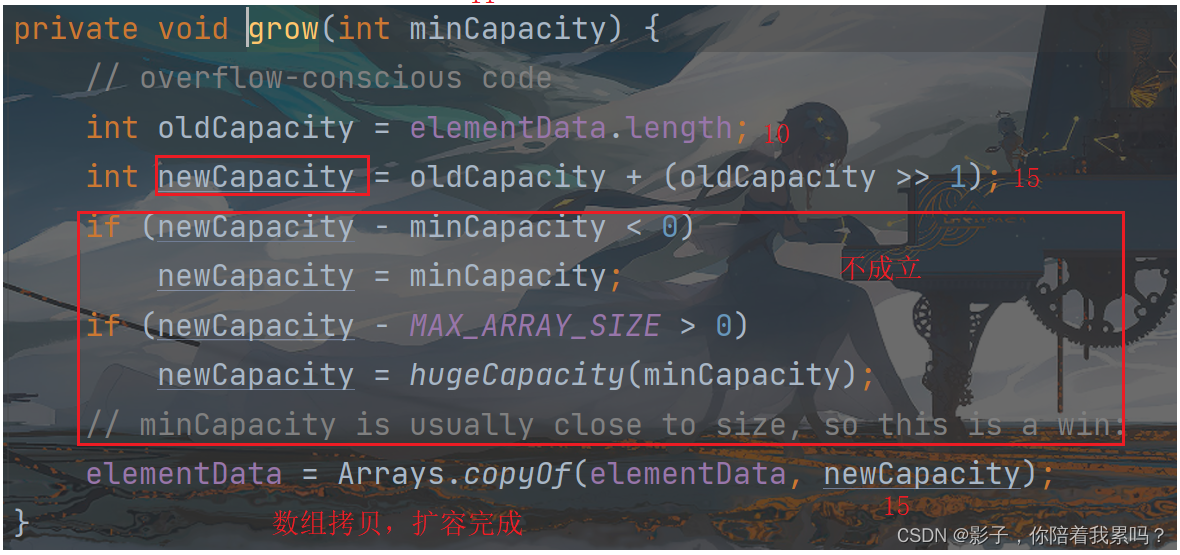
当我们add之后直至元素个数为10需要扩容的时候,我们初始size + 1就是11,然后再按照上面的流程走一遍的话,最终看grow函数
总结,通过上面的源码分析我们可以发现:
ArrayList<Integer> arrayList = new ArrayList<>();//这句代码执行完数组大小是0 arrayList.add(10);//这句话执行完数组大小就变成了10- 1
- 2
并且当放满之后,每一次的扩容都是原来的1.5大小。
上面说的构造方法是无参的构造方法,那么在ArrayList里面有有参构造吗,可以直接给我们的数组初始大小赋值,答案是有的。

这个时候就是直接给数组开辟了你指定的大小。
除此之外,ArrayList还有一个比较特殊的构造方法,你可以直接传入其他的任何实现了Collection接口的实现类作为参数来进行ArrayList的构造,源码如下:
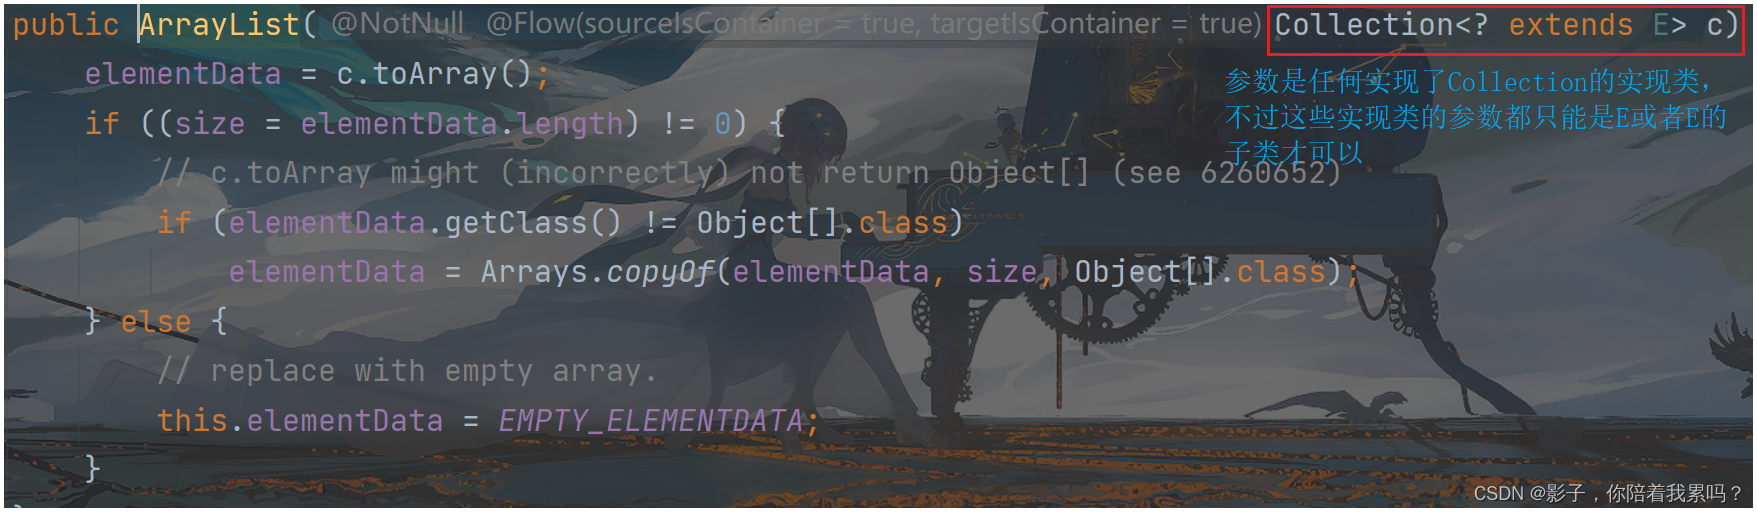
这个时候我们的ArrayList会根据传入的实现类进行构造我们的ArrayList,注意,二者的参数类型(泛型类型)必须要匹配。
public class TestDemo220625 { public static void main(String[] args) { ArrayList<Integer> arrayList1 = new ArrayList<>(15); arrayList1.add(10); System.out.println(arrayList1); ArrayList<Integer> arrayList2 = new ArrayList<>(arrayList1); System.out.println(arrayList2); } }- 1
- 2
- 3
- 4
- 5
- 6
- 7
- 8
- 9
程序运行截图:
3.2,ArrayList的常见操作
ArrayList的基本操作与我们之前自己模拟实现的功能都差不多,这里就不一一展示了,有兴趣的大家自己可以去查查API文档用一用,这里主要说一个特殊的操作函数。我们的ArrayList的方法还是很多的,自己独有的,以及实现的List接口里面的
List<E> subList(int fromIndex, int toIndex);用来截取部分list- 1
public class TestDemo220625 { public static void main(String[] args) { List<String> list1 = new ArrayList<>(); list1.add("haha"); list1.add("hehe"); list1.add("hoho"); list1.add("huhu"); List<String> ret = list1.subList(1,3); System.out.println(ret); ret.set(0,"haha"); System.out.println(list1); System.out.println(ret); } }- 1
- 2
- 3
- 4
- 5
- 6
- 7
- 8
- 9
- 10
- 11
- 12
- 13
- 14
程序运行截图:

注意,这个截取的范围还是左闭右开的区间范围。我们截取的过程,其实就是在原ArrayList中找到你指定的其实位置,然后把把地址返回出去,从这个指定位置到结束范围作为一个新的ArrayList,只不过这个数组的0下标是原来数组中的pos位置(你指定的截取开始位置)。所以正是因为这样,这两个ArrayList中的内容都是同一份,所以你改动其中的一个,另外的一个会跟着变动的。
【 为 什 么 用 L i s t 接 收 A r r a y L i s t 引 用 ? 】 \color{red}{【为什么用List接收ArrayList引用?】} 【为什么用List接收ArrayList引用?】
我们都知道,List是一个接口,它自己是不能实例化的,但是List有很多的实现类,所有的实现类都会重写List接口里面的抽象方法。所以,我们的List可以借助它的实现类来进行实例化。这样的List引用就可以访问到实现类里面重写的方法(实现类自己独有的方法是访问不到的)。
List<E> list = new ArrayList<>(); ArrayList<E> arraylist = new ArrayList<>();- 1
- 2
我们会更加倾向于用第一种方式,因为List有很多的1实现类,这样当我们需要将代码修改,更改实现类对象时,我们只需要将后面换掉就好,比如 List list = new LinkedList<>() 这样其余代码全部不用动。但是如果是上面第二种定义的方式,那么代码中凡是利用了ArrayList引用的要全部换成LinkedList的引用,十分的麻烦,利用第一种方式的定义算是一种很好的编程习惯。
3.3,ArrayList的遍历
public class TestDemo220625 { public static void main(String[] args) { List<Integer> list = new ArrayList<>(); list.add(1); list.add(2); list.add(3); // sout直接输出 System.out.println(list); // for循环遍历输出 for (int i = 0; i < list.size(); i++) { System.out.print(list.get(i) + " "); } System.out.println(); // foreach循环遍历输出 for (Integer tmp:list) { System.out.print(tmp + " "); } System.out.println(); // 迭代器1 Iterator<Integer> it = list.iterator(); while(it.hasNext()){ System.out.print(it.next() + " "); } System.out.println(); // 迭代器2 ListIterator<Integer> it1 = list.listIterator(); while(it1.hasNext()){ System.out.print(it1.next() + " "); } } }- 1
- 2
- 3
- 4
- 5
- 6
- 7
- 8
- 9
- 10
- 11
- 12
- 13
- 14
- 15
- 16
- 17
- 18
- 19
- 20
- 21
- 22
- 23
- 24
- 25
- 26
- 27
- 28
- 29
- 30
- 31
- 32
- 33
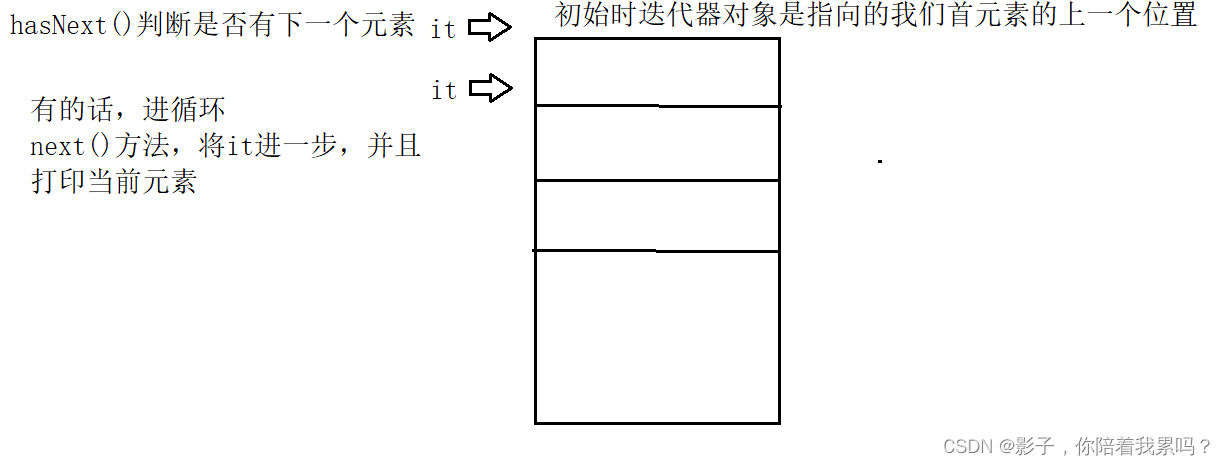
List里面有获取当前迭代器的方法,有两种,但是实际作用是一样的。工作原理如下:
最后,今天的文章分享比较简单,就到这了,如果大家觉得还不错的话,还请帮忙点点赞咯,十分感谢!🥰🥰🥰

-
相关阅读:
3. 并发编程概述
学编程的第二十二天
由浅到深认识C语言(13):共用体
网络安全(黑客)技术——自学2024
122页6万字消防大数据平台建设方案
大数据培训课程WordCount案例实操
经验分享丨中小企业如何低成本开发APP
el-data-picker限制日期可选范围
消息通讯-MQTT WebHook&SpringBoot案例
爱普生发布一款16位MCU产品用于大电流LED驱动
- 原文地址:https://blog.csdn.net/qq_61688804/article/details/125471169
