-
C++ 核心编程(2)
4.6.8 菱形继承


#include#include using namespace std; //菱形继承 //动物类 class Animal{ public: int mAge; }; //羊 class Sheep : public Animal{ }; //驼 class Tuo : public Animal{ }; //羊驼 class SheepTuo:public Sheep,public Tuo{ }; void test01(){ SheepTuo st; //编译出错 //st.mAge = 19; st.Sheep::mAge = 10; st.Tuo::mAge = 15; cout<<"st.Sheep::mAge:"<<st.Sheep::mAge<<endl; cout<<"st.Tuo::mAge:"<<st.Tuo::mAge<<endl; } int main() { test01(); return 0; } - 1
- 2
- 3
- 4
- 5
- 6
- 7
- 8
- 9
- 10
- 11
- 12
- 13
- 14
- 15
- 16
- 17
- 18
- 19
- 20
- 21
- 22
- 23
- 24
- 25
- 26
- 27
- 28
- 29
- 30
- 31
- 32
- 33
- 34
- 35
#include#include using namespace std; //菱形继承. vbptr:虚基类指针,指向vbtable(虚基类表),添加虚继承后子类继承的是 vbptr指针 //动物类 class Animal{ public: int mAge; }; //利用虚继承 解决菱形继承的问题 // 继承之前加上关键字 virtual 变为虚继承。 Animal为虚基类 //羊 class Sheep :virtual public Animal{ }; //驼 class Tuo :virtual public Animal{ }; //羊驼 class SheepTuo:public Sheep,public Tuo{ }; void test01(){ SheepTuo st; //编译出错 //st.mAge = 19; st.Sheep::mAge = 10; st.Tuo::mAge = 15; //加上虚继承后,年龄只有一份,下边输出都是 15 //菱形继承,两个父类有相同数据,需要加作用域区分 cout<<"st.Sheep::mAge:"<<st.Sheep::mAge<<endl; cout<<"st.Tuo::mAge:"<<st.Tuo::mAge<<endl; cout<<"st.mAge:"<<st.mAge<<endl; //实际年龄属性一份就行了,菱形继承导致数据有两份,资源浪费 } int main() { test01(); return 0; } - 1
- 2
- 3
- 4
- 5
- 6
- 7
- 8
- 9
- 10
- 11
- 12
- 13
- 14
- 15
- 16
- 17
- 18
- 19
- 20
- 21
- 22
- 23
- 24
- 25
- 26
- 27
- 28
- 29
- 30
- 31
- 32
- 33
- 34
- 35
- 36
- 37
- 38
- 39
4.7 多态
4.7.1 多态的基本概念
多态是C++面向对象三大特性之一
多态分为两类:
1.静态多态:函数重载 和 运算符重载 属于静态多态,服用函数名
2.动态多态:派生类和虚函数实现运行时多态静态多态和动态多态的区别:
1.静态多态的函数地址早绑定 ------ 编译阶段确定函数地址
2.动态多态的函数地址晚绑定 ------ 运行阶段确定函数地址#include#include using namespace std; //多态 class Animal{ public: void speak(){ cout<<"动物说话"<<endl; } }; class Cat : public Animal{ public: void speak(){ cout<<"小猫说话"<<endl; } }; //执行说话的函数 //地址早绑定 在编译阶段确定函数地址 //此时调用speak()执行的是 Animal的speak() void doSpeak(Animal &animal){ animal.speak(); } void test01(){ Cat cat; doSpeak(cat); //等价 Animal &animal = cat; } int main() { test01(); return 0; } - 1
- 2
- 3
- 4
- 5
- 6
- 7
- 8
- 9
- 10
- 11
- 12
- 13
- 14
- 15
- 16
- 17
- 18
- 19
- 20
- 21
- 22
- 23
- 24
- 25
- 26
- 27
- 28
- 29
- 30
- 31
#include#include using namespace std; //多态 // 动态多态满足条件: // 1.继承关系 // 2.子类要《重写》父类的虚函数 // 动态多态的使用: // 父类的指针或引用 执行子类对象 如 Animal &animal = cat; class Animal{ public: //重写: 函数返回值 函数名 参数列表 完全相同 virtual void speak(){ cout<<"动物说话"<<endl; } }; class Cat : public Animal{ public: //虚函数 void speak(){ cout<<"小猫说话"<<endl; } }; class Dog : public Animal{ public: //虚函数 void speak(){ cout<<"小狗说话"<<endl; } }; //执行说话的函数 //地址早绑定 在编译阶段确定函数地址 //此时调用speak()执行的是 Animal的speak() //如果想让 cat中speak()执行, 那么函数地址就不能提前绑定,需要在运行阶段进行绑定,地址晚绑定 (父类speak函数变为虚函数) void doSpeak(Animal &animal){ animal.speak(); } void test01(){ Cat cat; //输出小猫说话 doSpeak(cat); //等价 Animal &animal = cat; Dog dg; //输出小狗说话 doSpeak(dg); //等价 Animal &animal = dg; } int main() { test01(); return 0; } - 1
- 2
- 3
- 4
- 5
- 6
- 7
- 8
- 9
- 10
- 11
- 12
- 13
- 14
- 15
- 16
- 17
- 18
- 19
- 20
- 21
- 22
- 23
- 24
- 25
- 26
- 27
- 28
- 29
- 30
- 31
- 32
- 33
- 34
- 35
- 36
- 37
- 38
- 39
- 40
- 41
- 42
- 43
- 44
- 45
- 46
- 47
- 48
- 49
- 50

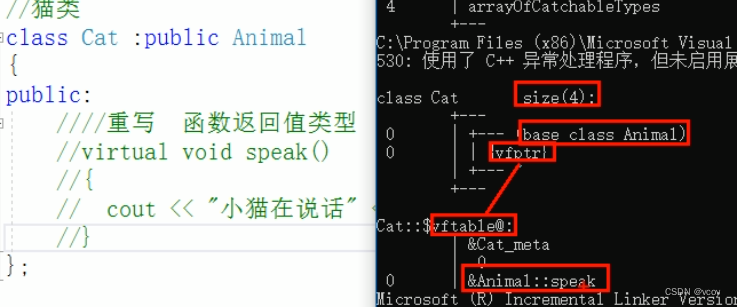
多态深入剖析
给父类函数添加 virtual 后,会有虚指针,和虚函数地址表,当发生继承时,会将该虚指针和虚函数地址表进行继承,此时若通过父类指针或引用指向子类对象时,会发生多态。调用重名函数时,会从子类的表中查找该函数。若不加virtual,通过父类指针或引用指向子类对象时,调用的还是父类的普通函数。


4.7.2 多态案例–计算器类
案例描述:
分别利用普通写法和多态计算,设计实现两个操作数进行运算的计算器类多态的优点:
1.代码组织结构清晰
2.可读性强
3.利于前期和后期的扩展及维护#include#include using namespace std; //多态-计算器 //普通写法 class Calculator{ public: int getResult(string oper){ if(oper == "+") return n1+n2; else if(oper == "-") return n1-n2; else if(oper == "*") return n1*n2; //若想要扩展新功能,需要修改源码 //实际开发:开闭原则:扩展进行开发,修改进行关闭 } int n1,n2; }; void test01(){ Calculator c; c.n1 = 10; c.n2 = 15; cout<<c.n1<<"+"<<c.n2<<"="<<c.getResult("+")<<endl; } //多态实现计算器 class AbstractCalculator{ public: virtual int getResult(){ return 0; } int n1,n2; }; //实现计算器加分 class AddCalculator:public AbstractCalculator{ public: int getResult(){ return n1+n2; } }; //乘法法 class MulCalculator:public AbstractCalculator{ public: int getResult(){ return n1*n2; } }; void test02(){ //多态实验条件,父类指针或引用指向子类对象 //加法 AbstractCalculator *abc = new AddCalculator; abc->n1 = 5;abc->n2 = 5; cout<<abc->n1<<"+"<<abc->n2<<"="<<abc->getResult()<<endl; //销毁 delete abc; //乘法 abc = new MulCalculator; abc->n1 = 5;abc->n2 = 5; cout<<abc->n1<<"*"<<abc->n2<<"="<<abc->getResult()<<endl; delete abc; } int main() { test02(); return 0; } - 1
- 2
- 3
- 4
- 5
- 6
- 7
- 8
- 9
- 10
- 11
- 12
- 13
- 14
- 15
- 16
- 17
- 18
- 19
- 20
- 21
- 22
- 23
- 24
- 25
- 26
- 27
- 28
- 29
- 30
- 31
- 32
- 33
- 34
- 35
- 36
- 37
- 38
- 39
- 40
- 41
- 42
- 43
- 44
- 45
- 46
- 47
- 48
- 49
- 50
- 51
- 52
- 53
- 54
- 55
- 56
- 57
- 58
- 59
- 60
- 61
- 62
- 63
- 64
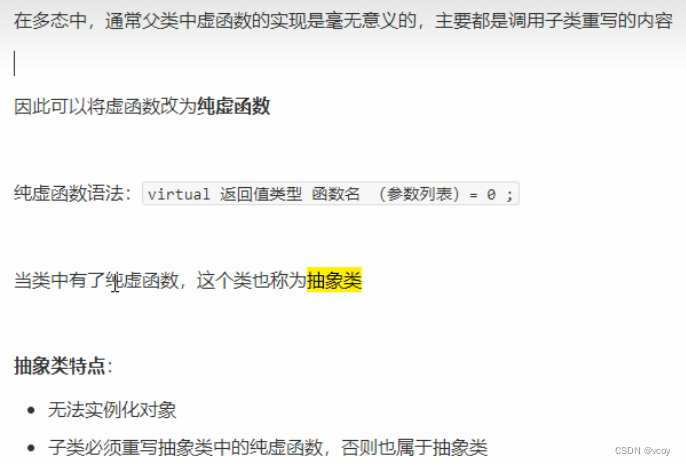
4.7.3 纯虚函数和抽象类
#include#include using namespace std; //纯虚函数和抽象类 class Base{ public: //纯虚函数 //只要有一个纯虚函数,这个类称为抽象类 //抽象类特点: //1.无法实例化对象 //2.抽象类的子类,必须重写父类的纯虚函数,否则也属于抽象类 virtual void func() = 0; }; class Son:public Base{ public: virtual void func(){cout<<"子类func调用"<<endl;}; }; void test01(){ //出错,抽象类无法实例化对象 /*Base b; Base *bb = new Base;*/ //子类必须重写父类中的纯虚函数,否则无法实例化对象 //Son s; Base *b = new Son; b->func(); } int main() { test01(); return 0; } - 1
- 2
- 3
- 4
- 5
- 6
- 7
- 8
- 9
- 10
- 11
- 12
- 13
- 14
- 15
- 16
- 17
- 18
- 19
- 20
- 21
- 22
- 23
- 24
- 25
- 26
- 27
- 28
- 29
- 30
- 31
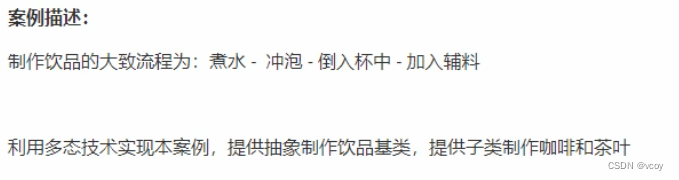
4.7.4 多态案例–制作饮品
#include#include using namespace std; //纯虚函数和抽象类 class AbstractDrinking{ public: //煮水 virtual void Boil() = 0; //冲泡 virtual void Brew() = 0; //倒入杯中 virtual void PourInCup() = 0; //加佐料 virtual void PourSome() = 0; //制作 void makeDrink(){ Boil();Brew();PourInCup();PourSome(); } }; //制作咖啡 class Coffee:public AbstractDrinking{ public: virtual void Boil(){ cout<<"煮农夫"<<endl; } virtual void Brew(){ cout<<"冲泡咖啡"<<endl; } virtual void PourInCup(){ cout<<"倒入杯子"<<endl; } virtual void PourSome(){ cout<<"加入糖"<<endl; } }; //制作茶叶 class Tee:public AbstractDrinking{ public: virtual void Boil(){ cout<<"煮矿泉水"<<endl; } virtual void Brew(){ cout<<"冲泡茶叶"<<endl; } virtual void PourInCup(){ cout<<"倒入杯子"<<endl; } virtual void PourSome(){ cout<<"加入柠檬"<<endl; } }; void doWork(AbstractDrinking *ab){ //AbstractDrinking *ab = new Coffee ab->makeDrink(); delete ab; } void test01(){ doWork(new Coffee); } int main() { test01(); return 0; } - 1
- 2
- 3
- 4
- 5
- 6
- 7
- 8
- 9
- 10
- 11
- 12
- 13
- 14
- 15
- 16
- 17
- 18
- 19
- 20
- 21
- 22
- 23
- 24
- 25
- 26
- 27
- 28
- 29
- 30
- 31
- 32
- 33
- 34
- 35
- 36
- 37
- 38
- 39
- 40
- 41
- 42
- 43
- 44
- 45
- 46
- 47
- 48
- 49
- 50
- 51
- 52
- 53
- 54
- 55
- 56
- 57
- 58
- 59
- 60
- 61
- 62
- 63
- 64
4.7.5 虚析构和纯虚析构
多态使用时,若子类中有属性开辟到堆区,那么父类指针在释放时无法调用到子类的析构代码
解决方式:将父类中的析构函数改为 虚析构 或者 纯虚析构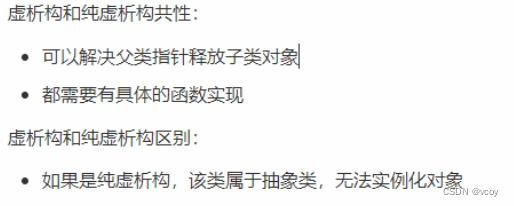
虚析构语法:virtual ~类名(){};
纯虚析构语法:声明:virtual ~类名()=0; 实现:类名::~类名(){};#include#include using namespace std; //虚析构和纯虚析构 class Animal{ public: Animal(){ cout<<"Animal构造调用"<<endl; } //利用 虚析构 可以解决父类指针释放子类对象时不干净问题 //此时使用虚析构没问题 /*virtual ~Animal(){ cout<<"Animal析构调用"< - 1
- 2
- 3
- 4
- 5
- 6
- 7
- 8
- 9
- 10
- 11
- 12
- 13
- 14
- 15
- 16
- 17
- 18
- 19
- 20
- 21
- 22
- 23
- 24
- 25
- 26
- 27
- 28
- 29
- 30
- 31
- 32
- 33
- 34
- 35
- 36
- 37
- 38
- 39
- 40
- 41
- 42
- 43
- 44
- 45
- 46
- 47
- 48
- 49
- 50
- 51
- 52
- 53
- 54
- 55
- 56
- 57
虚析构和纯虚析构总结:
1.虚析构和纯虚析构就是用来解决通过父类指针释放子类对象
2.若子类中没有堆区数据,可以不写为虚析构和纯虚析构
3.拥有纯虚析构函数的类也属于抽象类4.7.6 多态案例-电脑组装

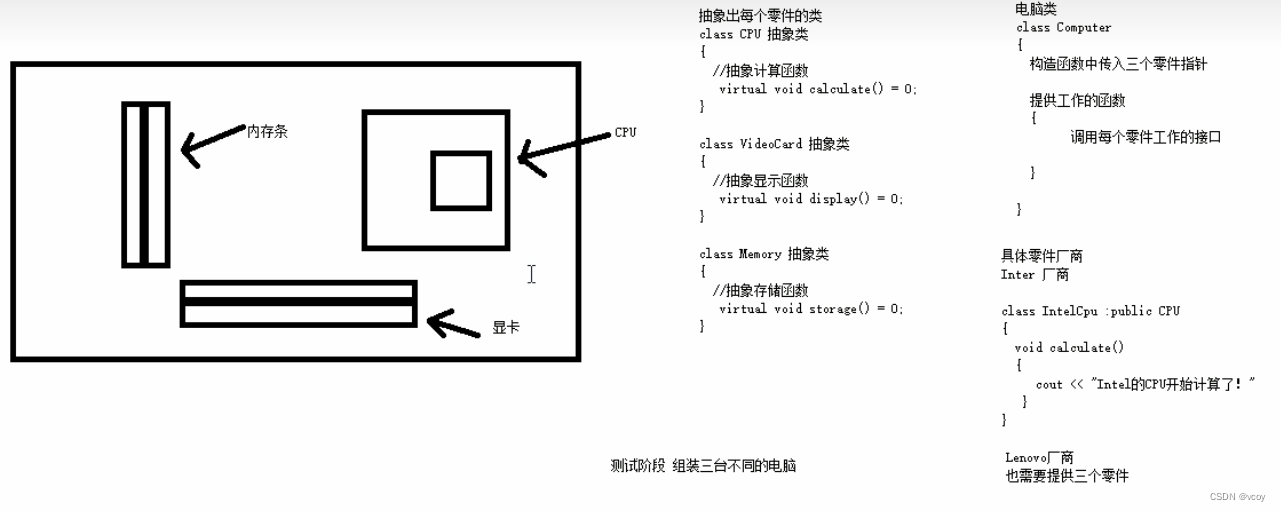
#include#include using namespace std; //抽象类的CPU类 class CPU{ public: //抽象类计算函数 virtual void calculate()=0; }; //显卡类 class VideoCard{ public: //抽象显示函数 virtual void display()=0; }; //内存条类 class Memory{ public: //抽象存储函数 virtual void storage()=0; }; //电脑类 class Computer{ public: Computer(CPU *cpu,VideoCard *vc,Memory *mm){ mcpu = cpu; mvc = vc; mmm = mm; } //提供工作函数 void work(){ mcpu->calculate(); mvc->display(); mmm->storage(); } //提供析构函数释放三个电脑零件 ~Computer(){ if(mcpu != NULL){ delete mcpu; mcpu = NULL; } if(mvc != NULL){ delete mvc; mvc = NULL; } if(mmm != NULL){ delete mmm; mmm = NULL; } } private: CPU *mcpu; VideoCard *mvc; Memory *mmm; }; //具体厂商 class IntelCpu:public CPU{ public: virtual void calculate(){ cout<<"Intel的CPU开始工作"<<endl; } }; class IntelVideoCard:public VideoCard{ public: virtual void display(){ cout<<"Intel的VideoCard开始工作"<<endl; } }; class IntelMemory:public Memory{ public: virtual void storage(){ cout<<"Intel的Memory开始工作"<<endl; } }; //联想厂商 class LenovoCpu:public CPU{ public: virtual void calculate(){ cout<<"Lenovo的CPU开始工作"<<endl; } }; class LenivoVideoCard:public VideoCard{ public: virtual void display(){ cout<<"Lenovo的VideoCard开始工作"<<endl; } }; class LenovoMemory:public Memory{ public: virtual void storage(){ cout<<"Lenovo的Memory开始工作"<<endl; } }; void test01(){ //第一台电脑零件 CPU *intelCpu = new IntelCpu; VideoCard *intelCard = new IntelVideoCard; Memory *intelMemory = new IntelMemory; //创建第一台电脑 Computer *comp = new Computer(intelCpu,intelCard,intelMemory); comp->work(); delete comp; cout<<endl; //第二台电脑 Computer *comp1 = new Computer(new LenovoCpu,new LenivoVideoCard,new LenovoMemory); comp1->work(); delete comp1; } int main() { test01(); return 0; } - 1
- 2
- 3
- 4
- 5
- 6
- 7
- 8
- 9
- 10
- 11
- 12
- 13
- 14
- 15
- 16
- 17
- 18
- 19
- 20
- 21
- 22
- 23
- 24
- 25
- 26
- 27
- 28
- 29
- 30
- 31
- 32
- 33
- 34
- 35
- 36
- 37
- 38
- 39
- 40
- 41
- 42
- 43
- 44
- 45
- 46
- 47
- 48
- 49
- 50
- 51
- 52
- 53
- 54
- 55
- 56
- 57
- 58
- 59
- 60
- 61
- 62
- 63
- 64
- 65
- 66
- 67
- 68
- 69
- 70
- 71
- 72
- 73
- 74
- 75
- 76
- 77
- 78
- 79
- 80
- 81
- 82
- 83
- 84
- 85
- 86
- 87
- 88
- 89
- 90
- 91
- 92
- 93
- 94
- 95
- 96
- 97
- 98
- 99
- 100
- 101
- 102
- 103
- 104
- 105
- 106
- 107
- 108
- 109
- 110
- 111
- 112
- 113
- 114
- 115
- 116
- 117
- 118
- 119
- 120
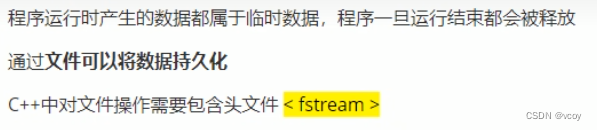
5.文件操作
文件类型分为两种:
1.文本文件:文件以文本的ASCII码形式存储在计算机中
2.二进制文件:文件以文本的二进制形式存储在计算机中,用户一般不能直接读懂它们操作文件的三大类:
1.ofstream:写操作
2.ifstream:读操作
3.fstream:读写操作5.1 文本文件
5.1.1 写文件
步骤如下:

文件打开方式:
打开方式 解释 ios:in 为读文件而打开文件 ios:out 为写文件而打开文件 ios:ate 初始位置:文件尾 ios:app 追加方式写文件 ios:trunc 若文件存在则先删除,再创建 ios:binary 二进制方式 注:文件打开方式可以配合使用,使用 | 操作符
例如:用二进制方式写文件 ios::binary | ios::out#include#include using namespace std; //文本文件 写文件 void test01(){ //2.创建流对象 ofstream ofs; //3.指定打开方式 ofs.open("test.txt",ios::out); //4.写内容 ofs<<"姓名:张三"<<endl; ofs<<"性别:男"<<endl; //5.关闭 ofs.close(); } int main() { test01(); return 0; } - 1
- 2
- 3
- 4
- 5
- 6
- 7
- 8
- 9
- 10
- 11
- 12
- 13
- 14
- 15
- 16
- 17
- 18
- 19
- 20

5.1.2 读文件

#include#include using namespace std; //文本文件 写文件 void test01(){ //2.创建流对象 ifstream ifs; //3.打开文件并判断文件是否打开成功 // 文件路径 打开方式 ifs.open("test.txt",ios::in); //4.读数据 if(!ifs.is_open()){ cout<<"打开失败"<<endl; return; } // 第一种 /*char buf[1024] = {0}; while(ifs>>buf){ cout< - 1
- 2
- 3
- 4
- 5
- 6
- 7
- 8
- 9
- 10
- 11
- 12
- 13
- 14
- 15
- 16
- 17
- 18
- 19
- 20
- 21
- 22
- 23
- 24
- 25
- 26
- 27
- 28
- 29
- 30
- 31
- 32
- 33
- 34
- 35
- 36
- 37
- 38
- 39
- 40
- 41
- 42
- 43

5.2 二进制文件
以二进制的方式对文件进行读写操作。
打开方式要指定为ios::binary5.2.1 写文件
二进制方式写文件主要利用流对象调用成员函数write。
函数原型: ostream& write(const char * buffer,int len);
参数解释:字符指针buffer指向内存中一段存储框架。len是读写的字节数。#include#include using namespace std; //二进制文件 写文件 class Person{ public: char mname[64]; int mage; }; void test01(){ //1.头文件 //2.创建流对象 ofstream ofs; //3.打开文件 ofs.open("person.txt",ios::out | ios::binary); //4.写文件 Person p = {"张三",18}; //核心,使用write函数 ofs.write((const char*)&p, sizeof(Person)); //5.关闭文件 ofs.close(); } int main() { test01(); return 0; } - 1
- 2
- 3
- 4
- 5
- 6
- 7
- 8
- 9
- 10
- 11
- 12
- 13
- 14
- 15
- 16
- 17
- 18
- 19
- 20
- 21
- 22
- 23
- 24
- 25
- 26
5.2.2 读文件
二进制方式读文件主要利用流对象调用成员函数read。
函数原型:istream & read(char *buffer,int len)。
参数解释:字符指针buffer指向内存中一段存储空间,len是读写的字节数。#include#include using namespace std; //二进制文件 读文件 class Person{ public: char mname[64]; int mage; }; void test01(){ //1.头文件 //2.创建流对象 ifstream ifs; //3.打开文件 判断文件是否打开成功 ifs.open("person.txt",ios::in | ios::binary); if(!ifs.is_open()){ cout<<"文件打开失败"<<endl; return; } //4.读文件 Person p; ifs.read((char*)&p,sizeof(Person)); cout<<p.mname<<"-"<<p.mage<<endl; //5.关闭文件 ifs.close(); } int main() { test01(); return 0; } - 1
- 2
- 3
- 4
- 5
- 6
- 7
- 8
- 9
- 10
- 11
- 12
- 13
- 14
- 15
- 16
- 17
- 18
- 19
- 20
- 21
- 22
- 23
- 24
- 25
- 26
- 27
- 28
- 29
- 30
案例 职工管理系统
1.管理系统需求

2 创建管理类

2.1 创建文件

//WorkerManger.h #pragma once //防止头文件重复包含 #include#include using namespace std; class WorkerManager { //构造 WorkerManager(); //析构 ~WorkerManager(); }; //WorkerManger.cpp #include "WorkerManager.h" WorkerManager::WorkerManager() { } WorkerManager::~WorkerManager() { } - 1
- 2
- 3
- 4
- 5
- 6
- 7
- 8
- 9
- 10
- 11
- 12
- 13
- 14
- 15
- 16
- 17
- 18
3 菜单功能
与用户的沟通界面。
3.1 添加成员函数

4 创建职工类
4.1 创建职工抽象类

创建worker.h文件
#pragma once //防止头文件重复包含 #include#include using namespace std; //职工抽象类 class Worker { public: //显示个人信息 virtual void showInf() = 0; //获取岗位名称 virtual string getDeptName() = 0; //职工编号 int m_id; //职工姓名 string m_name; //部门编号 int m_depId; }; - 1
- 2
- 3
- 4
- 5
- 6
- 7
- 8
- 9
- 10
- 11
- 12
- 13
- 14
- 15
- 16
- 17
- 18
- 19
- 20
5 创建职工类
employee.h emplyee.cpp
#pragma once //防止头文件重复包含 #include#include using namespace std; #include "worker.h" class Employee :public Worker { public: Employee(int eid,string ename,int edepId); //显示个人信息 virtual void showInf(); //获取岗位名称 virtual string getDeptName(); }; - 1
- 2
- 3
- 4
- 5
- 6
- 7
- 8
- 9
- 10
- 11
- 12
- 13
- 14
#include "employee.h" Employee::Employee(int id,string name,int dId){ this->m_id = id; this->m_name = name; this->m_depId = dId; } //显示个人信息 void Employee::showInf() { cout << "职工编号:" << this->m_id << "\t职工姓名:" << this->m_name << "\t岗位:" << this->getDeptName() << "\t岗位职责:完成经理的任务" << endl; } //获取岗位名称 string Employee::getDeptName() { return "员工"; }- 1
- 2
- 3
- 4
- 5
- 6
- 7
- 8
- 9
- 10
- 11
- 12
- 13
- 14
- 15
- 16
- 17
- 18
- 19
6 创建经理类

//manager.h和manager.cpp 同职工类,只需要改类名- 1
- 2
7 创建老板类
同职工类和经理类
#pragma once //防止头文件重复包含 #include#include using namespace std; #include "worker.h" //老板类 class Boss :public Worker { public: Boss(int id, string name, int dId); //显示个人信息 virtual void showInf(); //显示岗位信息 virtual string getDeptName(); }; - 1
- 2
- 3
- 4
- 5
- 6
- 7
- 8
- 9
- 10
- 11
- 12
- 13
- 14
- 15
- 16
#pragma once //防止头文件重复包含 #include#include using namespace std; #include "boss.h" Boss::Boss(int id, string name, int dId) { this->m_id = id; this->m_name = name; this->m_depId = dId; } //显示个人信息 void Boss::showInf() { cout << "职工编号:" << this->m_id << "\t职工姓名:" << this->m_name << "\t岗位:" << this->getDeptName() << "\t岗位职责:老板,给经理分配任务" << endl; } //显示岗位信息 string Boss::getDeptName() { return "老板"; } - 1
- 2
- 3
- 4
- 5
- 6
- 7
- 8
- 9
- 10
- 11
- 12
- 13
- 14
- 15
- 16
- 17
- 18
- 19
- 20
- 21
- 22
- 23
int main() { //测试代码 Worker* work = NULL; work = new Employee(1,"张三",2); work->showInf(); delete work; work = new Manager(2,"张三", 3); work->showInf(); delete work; work = new Boss(4, "张三", 25); work->showInf(); }- 1
- 2
- 3
- 4
- 5
- 6
- 7
- 8
- 9
- 10
- 11
- 12
- 13
- 14
8 添加职工
描述:批量添加职工,并保存到文件中。
8.1 功能分析
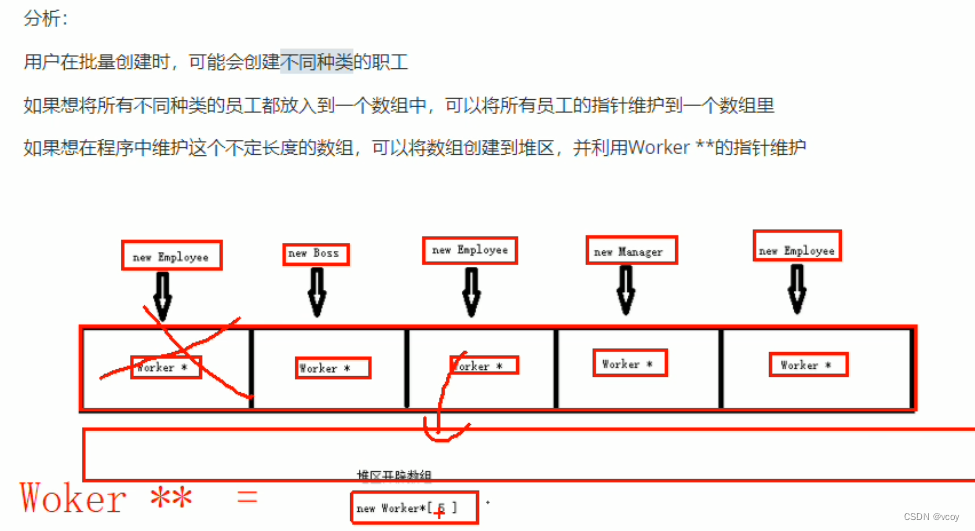
因为数组中每个子类职工类型不同,因此统一使用父类指针指向子类对象。
8.2 功能实现
class WorkerManager { public: //构造 WorkerManager(); //析构 ~WorkerManager(); //展示菜单 void Show_Menu(); //退出 void ExitSystem(); //7.2功能实现 //记录职工人数 int mEmpNum; //职工数组指针 Worker** mEmpArray; //添加职工 void Add_Emp(); };- 1
- 2
- 3
- 4
- 5
- 6
- 7
- 8
- 9
- 10
- 11
- 12
- 13
- 14
- 15
- 16
- 17
- 18
- 19
- 20
//添加职工 void WorkerManager::Add_Emp() { cout << "请输入添加职工的数量" << endl; int addNum = 0; cin >> addNum; if (addNum > 0) { //添加 //计算添加新空间大小 int newSize = this->mEmpNum + addNum; //新空间人数 = 原来记录人数 + 新增人数 //开辟新空间 Worker** newSpace = new Worker * [newSize]; //将原来空间下数据,,拷贝到新空间下 if (this->mEmpArray != NULL) { for (int i = 0; i < this->mEmpNum; i++) { newSpace[i] = this->mEmpArray[i]; } } //添加新数据 for (int i = 0; i < addNum; i++) { int id; string name; int dSelect; cout << "请输入第" << i + 1 << " 个新职工编号:" << endl; cin >> id; cout << "请输入第" << i + 1 << " 个新职工姓名:" << endl; cin >> name; cout << "请选择该职工岗位"<<endl; cout << "1.普通职工" << endl; cout << "2.经理" << endl; cout << "3.老板" << endl; cin >> dSelect; Worker* worker = NULL; switch (dSelect) { case 1: worker = new Employee(id,name,1); break; case 2: worker = new Manager(id, name, 2); break; case 3: worker = new Boss(id, name, 3); break; default: break; } //将创建的职工,保存到数组 newSpace[this->mEmpNum + i] = worker; } //释放原有空间 delete[] this->mEmpArray; //更改新空间指向 this->mEmpArray = newSpace; this->mEmpNum = newSize; cout << "成功添加" << addNum << "名职工" << endl; } else { cout << "输入有误" << endl; } //按任意键后 清屏回到上级目录 system("pause"); system("cls"); }- 1
- 2
- 3
- 4
- 5
- 6
- 7
- 8
- 9
- 10
- 11
- 12
- 13
- 14
- 15
- 16
- 17
- 18
- 19
- 20
- 21
- 22
- 23
- 24
- 25
- 26
- 27
- 28
- 29
- 30
- 31
- 32
- 33
- 34
- 35
- 36
- 37
- 38
- 39
- 40
- 41
- 42
- 43
- 44
- 45
- 46
- 47
- 48
- 49
- 50
- 51
- 52
- 53
- 54
- 55
- 56
- 57
- 58
- 59
- 60
- 61
8.3 文件交互-写文件

void save();- 1
void WorkerManager::save() { ofstream ofs; ofs.open(FILENAME, ios::out); //将每个人数据写入到文件中 for (int i = 0; i < this->mEmpNum; i++) { ofs << this->mEmpArray[i]->m_id << " " << this->mEmpArray[i]->m_name << " " << this->mEmpArray[i]->m_depId << endl; } //关闭 ofs.close(); }- 1
- 2
- 3
- 4
- 5
- 6
- 7
- 8
- 9
- 10
- 11
- 12
9 文件交互-读文件

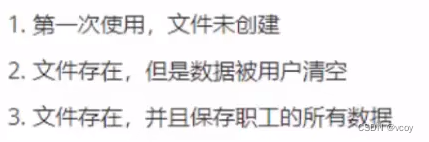
9.1 文件未创建
1.在workerManager.h中添加新的成员属性 m_FileIsEmpty标志文件是否为空。
2.修改WorkerManager.cpp 中构造函数代码,加载文件//判断文件是否为空 bool mFileIsEmpty;- 1
- 2
WorkerManager::WorkerManager() { //1.文件不存在情况 ifstream ifs; ifs.open(FILENAME, ios::in); //读文件 if (!ifs.is_open()) { cout << "文件不存在" << endl; this->mEmpArray = NULL; this->mEmpNum = 0; //是否为空 this->mFileIsEmpty = true; ifs.close(); return; } }- 1
- 2
- 3
- 4
- 5
- 6
- 7
- 8
- 9
- 10
- 11
- 12
- 13
- 14
- 15
9.2 文件存在且数据为空
workerManager.cpp中的构造函数追加代码
WorkerManager::WorkerManager() { //1.文件不存在情况 ifstream ifs; ifs.open(FILENAME, ios::in); //读文件 if (!ifs.is_open()) { cout << "文件不存在" << endl; this->mEmpArray = NULL; this->mEmpNum = 0; //是否为空 this->mFileIsEmpty = true; ifs.close(); return; } //2.文件存在,数据为空 char ch; ifs >> ch; if (ifs.eof()) { //文件为空 cout << "文件为空!" << endl; this->mEmpArray = NULL; this->mEmpNum = 0; //是否为空 this->mFileIsEmpty = true; ifs.close(); return; } }- 1
- 2
- 3
- 4
- 5
- 6
- 7
- 8
- 9
- 10
- 11
- 12
- 13
- 14
- 15
- 16
- 17
- 18
- 19
- 20
- 21
- 22
- 23
- 24
- 25
- 26
- 27
9.3 文件存在且保存职工数据
9.3.1 获取记录的职工人数
在workerManager.h中添加成员函数 int get_EmpNum();
WorkerManager::WorkerManager() { //1.文件不存在情况 ifstream ifs; ifs.open(FILENAME, ios::in); //读文件 if (!ifs.is_open()) { cout << "文件不存在" << endl; this->mEmpArray = NULL; this->mEmpNum = 0; //是否为空 this->mFileIsEmpty = true; ifs.close(); return; } //2.文件存在,数据为空 char ch; ifs >> ch; if (ifs.eof()) { //文件为空 cout << "文件为空!" << endl; this->mEmpArray = NULL; this->mEmpNum = 0; //是否为空 this->mFileIsEmpty = true; ifs.close(); return; } //3.文件存在,且有数据 int num = this->get_EmpNum(); cout << "职工人数为:" << num << endl; this->mEmpNum = num; }- 1
- 2
- 3
- 4
- 5
- 6
- 7
- 8
- 9
- 10
- 11
- 12
- 13
- 14
- 15
- 16
- 17
- 18
- 19
- 20
- 21
- 22
- 23
- 24
- 25
- 26
- 27
- 28
- 29
- 30
- 31
//统计文件中的人数 int WorkerManager::get_EmpNum() { ifstream ifs; ifs.open(FILENAME, ios::in); //打开文件 读 int id; string name; int dId; int num = 0; while (ifs >> id && ifs >> name && ifs >> dId) { //统计人数 num++; } return num; }- 1
- 2
- 3
- 4
- 5
- 6
- 7
- 8
- 9
- 10
- 11
- 12
- 13
- 14
- 15
9.3.2 初始化数组


//初始化员工 void WorkerManager::init_Emp() { ifstream ifs; ifs.open(FILENAME, ios::in); //读取 int id; string name; int dId; int index = 0; while (ifs >> id && ifs >> name && ifs >> dId) { Worker* worker = NULL; if (dId == 1) { //普通职工 worker = new Employee(id, name, dId); } else if (dId == 2) { worker = new Manager(id, name, dId); } else if (dId == 3) { worker = new Boss(id, name, dId); } this->mEmpArray[index] = worker; ++index; } ifs.close(); }- 1
- 2
- 3
- 4
- 5
- 6
- 7
- 8
- 9
- 10
- 11
- 12
- 13
- 14
- 15
- 16
- 17
- 18
- 19
- 20
- 21
- 22
- 23
10 显示员工
10.1 函数声明与实现
workerManager.h中添加成员函数 void Show_Emp();
void WorkerManager::Show_Emp() { if (this->mFileIsEmpty) { cout << "文件不存在或记录为空" << endl; } else { for (int i = 0; i < this->mEmpNum; i++) { //利用多态调用接口 this->mEmpArray[i]->showInf(); } } //按任意键清屏 system("pause"); system("cls"); }- 1
- 2
- 3
- 4
- 5
- 6
- 7
- 8
- 9
- 10
- 11
- 12
- 13
- 14
11 删除职工
按照职工编号进行删除职工操作
11.1 函数声明与实现
//workerManager中添加 void Del_Emp(); //删除 int IsExist(int id); //判断存在- 1
- 2
- 3
void WorkerManager::Del_Emp() { if (this->mFileIsEmpty) { cout << "文件不存在或记录为空!" << endl; } else { //按照职工编号删除 cout << "请输入要删除的职工编号" << endl; int id = 0; cin >> id; int index = this->IsExist(id); if (index != -1) { //存在 //数据前移 for (int i = index; i < this->mEmpNum-1; i++) { this->mEmpArray[i] = this->mEmpArray[i + 1]; } //更新数组中记录人员个数 this->mEmpNum--; //数据同步更新到文件 this->save(); cout << "删除成功" << endl; } else { cout << "删除失败,未找到该职工" << endl; } //按任意键清屏 system("pause"); system("cls"); } }- 1
- 2
- 3
- 4
- 5
- 6
- 7
- 8
- 9
- 10
- 11
- 12
- 13
- 14
- 15
- 16
- 17
- 18
- 19
- 20
- 21
- 22
- 23
- 24
- 25
- 26
- 27
- 28
- 29
- 30
12 修改职工
按照职工编号对职工信息进行修改保存
12.1 修改职工函数
//workerManager.h中添加成员函数 void Mod_Emp(); void WorkerManager::Mod_Emp() { if (this->mFileIsEmpty) { //文件不存在 cout << "文件不存在或为空" << endl; } else { cout << "请输入要修改职工的编号:" << endl; int id; cin >> id; int ret = this->IsExist(id); if (ret != -1) { //查找该编号职工 delete this->mEmpArray[ret]; int newId = 0; string newName = ""; int dSelect = 0; cout << "查到:" << id << " 号职工,请输入新职工号;" << endl; cin >> newId; cout << "请选择该职工岗位" << endl; cout << "1.普通职工" << endl; cout << "2.经理" << endl; cout << "3.老板" << endl; cin >> dSelect; Worker* worker = NULL; switch (dSelect) { case 1: worker = new Employee(newId, newName, 1); break; case 2: worker = new Manager(newId, newName, 2); break; case 3: worker = new Boss(newId, newName, 3); break; default: break; } //更新到数组中 this->mEmpArray[ret] = worker; cout << "修改成功" << endl; //保存到文件 this->save(); } else { cout << "查无此人" << endl; } } system("pause"); system("cls"); }- 1
- 2
- 3
- 4
- 5
- 6
- 7
- 8
- 9
- 10
- 11
- 12
- 13
- 14
- 15
- 16
- 17
- 18
- 19
- 20
- 21
- 22
- 23
- 24
- 25
- 26
- 27
- 28
- 29
- 30
- 31
- 32
- 33
- 34
- 35
- 36
- 37
- 38
- 39
- 40
- 41
- 42
- 43
- 44
- 45
- 46
- 47
- 48
- 49
- 50
- 51
- 52
- 53
13 查找职工
两种方式:一种按职工编号,一种按职工姓名
13.1 查找职工函数
//workerManager.h中声明workerManager.cpp实现 void Find_Emp();- 1
- 2
void WorkerManager::Find_Emp() { if (this->mFileIsEmpty) { cout << "文件不存在或记录为空" << endl; } else { cout << "请输入查找的方式:" << endl; cout << "1.按照职工编号查找" << endl; cout << "2.按照职工姓名查找" << endl; int select = 0; cin >> select; if (select == 1) { //按照编号查 int id; cout << "请输入查找的职工编号:" << endl; cin >> id; int ret = IsExist(id); if (ret != -1) { //找到职工 cout << "查找成功!该职工信息如下:" << endl; this->mEmpArray[ret]->showInf(); } } else if (select == 2) { //按照姓名查找 string name; cout << "请输入查找的姓名:" << endl; cin >> name; //是否查到标志 bool flag = false; //默认未找到 for (int i = 0; i < this->mEmpNum; i++) { if (this->mEmpArray[i]->m_name == name) { flag = true; cout << "查找成功,职工编号为:" << this->mEmpArray[i]->m_id << "号职工信息如下:" << endl; //调用显示信息接口 this->mEmpArray[i]->showInf(); } } if (!flag) { cout << "查无此人~" << endl; } } else { cout << "输入选项有误" << endl; } system("pause"); system("cls"); } }- 1
- 2
- 3
- 4
- 5
- 6
- 7
- 8
- 9
- 10
- 11
- 12
- 13
- 14
- 15
- 16
- 17
- 18
- 19
- 20
- 21
- 22
- 23
- 24
- 25
- 26
- 27
- 28
- 29
- 30
- 31
- 32
- 33
- 34
- 35
- 36
- 37
- 38
- 39
- 40
- 41
- 42
- 43
- 44
- 45
- 46
- 47
- 48
- 49
- 50
14 排序
按照职工编号排序,排序的顺序由用户指定
14.1 排序函数实现
//workerManager.h 声明 workerManager.cpp实现 void Sort_Emp();- 1
- 2
//按照编号排序 void WorkerManager::Sort_Emp() { if (this->mFileIsEmpty) { cout << "文件不存在或记录为空" << endl; system("pause"); system("cls"); } else { cout << "请选择排序方式:" << endl; cout << "1.按照工号进行升序" << endl; cout << "2.按照工号进行降序" << endl; int select = 0; cin >> select; for (int i = 0; i < this->mEmpNum; i++) { int minOrMax = i; //声明最小值 或 最大值下标 for (int j = i + 1; j < this->mEmpNum; j++) { if (select == 1) { //升序 if (this->mEmpArray[minOrMax]->m_id > this->mEmpArray[j]->m_id) { minOrMax = j; } } else { if (this->mEmpArray[minOrMax]->m_id < this->mEmpArray[j]->m_id) { minOrMax = j; } } } //判断一开始认定 最小值或最大值 是不是计算的最小值或者最大值,若不是,交换数据 if (i != minOrMax) { Worker* temp = this->mEmpArray[i]; this->mEmpArray[i] = this->mEmpArray[minOrMax]; this->mEmpArray[minOrMax] = temp; ; } } cout << "排序成功,排序后的结果为:" << endl; this->save(); //排序后数据写入文件 this->Show_Emp(); //展示所有职工 } }- 1
- 2
- 3
- 4
- 5
- 6
- 7
- 8
- 9
- 10
- 11
- 12
- 13
- 14
- 15
- 16
- 17
- 18
- 19
- 20
- 21
- 22
- 23
- 24
- 25
- 26
- 27
- 28
- 29
- 30
- 31
- 32
- 33
- 34
- 35
- 36
- 37
- 38
- 39
- 40
- 41
15 清空文件
将文件中记录数据清空
15.1 清空函数
//workerManager.h 声明 workerManager.cpp实现 void Clean_File();- 1
- 2
void WorkerManager::Clean_File() { cout << "确定清空吗?" << endl; cout << "1.确定" << endl; cout << "2.返回" << endl; int select = 0; cin >> select; if (select == 1) { //清空文件 ofstream ofs(FILENAME, ios::trunc); //删除文件后重新创建 ofs.close(); if (this->mEmpArray != NULL) { //删除堆区的每个职工对象 for (int i = 0; i < this->mEmpNum; i++) { delete this->mEmpArray[i]; this->mEmpArray[i] = NULL; } //删除堆区数组指针 delete[] this->mEmpArray; this->mEmpNum = 0; this->mFileIsEmpty = true; this->mEmpArray = NULL; } cout << "清空成功" << endl; } system("pause"); system("cls"); }- 1
- 2
- 3
- 4
- 5
- 6
- 7
- 8
- 9
- 10
- 11
- 12
- 13
- 14
- 15
- 16
- 17
- 18
- 19
- 20
- 21
- 22
- 23
- 24
- 25
- 26
- 27
- 28
- 29
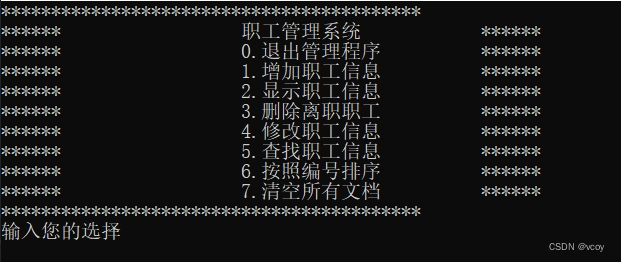
实现截图
完整代码可到
https://download.csdn.net/download/weixin_43917045/89216587下载
-
相关阅读:
Ubuntu开机无法进入系统,文件根系统目录空间不足导致?
032-第三代软件开发-Popup弹窗
C# 查找迷宫路径
每日学习笔记:C++ STL 的队列Deque
win10桌面图标全部变成白色的怎么办
带你学会指针进阶
硬盘如何正确使用
ScrollView如何裁剪粒子特效
centos7安装yum的暴力直接办法
C语言实例_5
- 原文地址:https://blog.csdn.net/weixin_43917045/article/details/138094283
