-
Ribbon实现Cloud负载均衡
安装Zookeeper要先安装JDK环境

解压
tar -zxvf /usr/local/develop/jdk-8u191-linux-x64.tar.gz -C /usr/local/develop
配置JAVA_HOME
vim /etc/profile
export JAVA_HOME=/usr/local/develop/jdk1.8.0_191
export PATH=$JAVA_HOME/bin:$PATH
export CLASSPATH=.:$JAVA_HOME/lib

让环境变量生效
source /etc/profile
java -version 查看jdk版本 至此JDK安装完成
which java 查看调用的是安装在哪里的java

做Zookeeper做服务治理(安装Zookeeper)
Apache ZooKeeper
 https://zookeeper.apache.org/


进入Zookeeper 包目录
cd /usr/local/develop/
解压
tar -zxvf apache-zookeeper-3.9.1-bin.tar.gz -C /usr/local/develop
进入配置文件
cd /usr/local/develop/apache-zookeeper-3.9.1-bin/conf
复制文件
cp zoo_sample.cfg zoo.cfg
编辑文件
vim zoo.cfg

现在可以进入bin目录直接启动
cd /usr/local/develop/apache-zookeeper-3.9.1-bin/bin
启动Zookeeper
./zkServer.sh start
如果需要配置Zookeeper为系统服务
vim /etc/systemd/system/zookeeper.service

[Unit]
Description=Apache ZooKeeper server
After=network.target[Service]
Type=forking
ExecStart=/usr/local/develop/apache-zookeeper-3.9.1-bin/bin/zkServer.sh start
ExecStop=/usr/local/develop/apache-zookeeper-3.9.1-bin/bin/zkServer.sh stop
User=root
Group=root
Restart=on-failure
Environment="JAVA_HOME=/usr/local/develop/jdk1.8.0_191"[Install]
WantedBy=multi-user.target是配置生效
systemctl daemon-reload
开机自启 看自己实际需要
systemctl enable zookeeper.service
systemctl start zookeeper.service 启动
systemctl stop zookeeper.service 停止
systemctl restart zookeeper.service 重启
systemctl status zookeeper.service 查看状态admin.serverPort=8888指定了ZooKeeper的管理服务器端口。这个管理服务器提供了一个简单的HTTP接口,用于获取ZooKeeper服务的状态和性能指标等信息。通过访问这个端口,你可以获取到ZooKeeper实例的各种管理信息,比如运行状态、连接数、节点数量等。
默认情况下,ZooKeeper的管理界面并不提供一个全面的Web界面来浏览这些信息,而是提供了一个简单的HTTP服务,通过发送HTTP请求到这个端口,可以获取到JSON格式的状态信息。
IP:8888/commands/stat
搭建Cloud项目
创建父项目,只做依赖版本管理


pom.xml
- <!-- 统一管理jar包版本 -->
- <properties>
- <project.build.sourceEncoding>UTF-8</project.build.sourceEncoding>
- <maven.compiler.source>1.8</maven.compiler.source>
- <maven.compiler.target>1.8</maven.compiler.target>
- <junit.version>4.12</junit.version>
- <log4j.version>1.2.17</log4j.version>
- <lombok.version>1.16.18</lombok.version>
- <mysql.version>5.1.47</mysql.version>
- <druid.version>1.1.16</druid.version>
- <mybatis.spring.boot.version>1.3.0</mybatis.spring.boot.version>
- </properties>
- <!-- 子模块继承之后,提供作用:锁定版本+子modlue不用写groupId和version -->
- <dependencyManagement>
- <dependencies>
- <!--spring boot 2.2.2-->
- <dependency>
- <groupId>org.springframework.boot</groupId>
- <artifactId>spring-boot-dependencies</artifactId>
- <version>2.2.2.RELEASE</version>
- <type>pom</type>
- <scope>import</scope>
- </dependency>
- <!--spring cloud Hoxton.SR1-->
- <dependency>
- <groupId>org.springframework.cloud</groupId>
- <artifactId>spring-cloud-dependencies</artifactId>
- <version>Hoxton.SR1</version>
- <type>pom</type>
- <scope>import</scope>
- </dependency>
- <!--spring cloud alibaba 2.1.0.RELEASE-->
- <dependency>
- <groupId>com.alibaba.cloud</groupId>
- <artifactId>spring-cloud-alibaba-dependencies</artifactId>
- <version>2.1.0.RELEASE</version>
- <type>pom</type>
- <scope>import</scope>
- </dependency>
- <dependency>
- <groupId>mysql</groupId>
- <artifactId>mysql-connector-java</artifactId>
- <version>${mysql.version}</version>
- </dependency>
- <dependency>
- <groupId>com.alibaba</groupId>
- <artifactId>druid</artifactId>
- <version>${druid.version}</version>
- </dependency>
- <dependency>
- <groupId>org.mybatis.spring.boot</groupId>
- <artifactId>mybatis-spring-boot-starter</artifactId>
- <version>${mybatis.spring.boot.version}</version>
- </dependency>
- <dependency>
- <groupId>junit</groupId>
- <artifactId>junit</artifactId>
- <version>${junit.version}</version>
- </dependency>
- <dependency>
- <groupId>log4j</groupId>
- <artifactId>log4j</artifactId>
- <version>${log4j.version}</version>
- </dependency>
- <dependency>
- <groupId>org.projectlombok</groupId>
- <artifactId>lombok</artifactId>
- <version>${lombok.version}</version>
- <optional>true</optional>
- </dependency>
- </dependencies>
- </dependencyManagement>
- <build>
- <plugins>
- <plugin>
- <groupId>org.springframework.boot</groupId>
- <artifactId>spring-boot-maven-plugin</artifactId>
- <version>2.2.2.RELEASE</version>
- <configuration>
- <fork>true</fork>
- <addResources>true</addResources>
- </configuration>
- </plugin>
- </plugins>
- </build>
生产者模块


pom.xml
- <dependencies>
- <!-- https://mvnrepository.com/artifact/org.springframework.boot/spring-boot-starter-web -->
- <dependency>
- <groupId>org.springframework.boot</groupId>
- <artifactId>spring-boot-starter-web</artifactId>
- </dependency>
- <!-- https://mvnrepository.com/artifact/org.springframework.cloud/spring-cloud-starter-zookeeper-discovery -->
- <dependency>
- <groupId>org.springframework.cloud</groupId>
- <artifactId>spring-cloud-starter-zookeeper-discovery</artifactId>
- </dependency>
- <!-- https://mvnrepository.com/artifact/org.springframework.boot/spring-boot-devtools -->
- <dependency>
- <groupId>org.springframework.boot</groupId>
- <artifactId>spring-boot-devtools</artifactId>
- <scope>runtime</scope>
- <optional>true</optional>
- </dependency>
- <!-- https://mvnrepository.com/artifact/org.projectlombok/lombok -->
- <dependency>
- <groupId>org.projectlombok</groupId>
- <artifactId>lombok</artifactId>
- <optional>true</optional>
- </dependency>
- <!-- https://mvnrepository.com/artifact/org.springframework.boot/spring-boot-starter-test -->
- <dependency>
- <groupId>org.springframework.boot</groupId>
- <artifactId>spring-boot-starter-test</artifactId>
- <scope>test</scope>
- </dependency>
- </dependencies>
application.yml
- server:
- port: 8081
- spring:
- application:
- name: cloud-provider-payment
- cloud:
- zookeeper:
- connect-string: 222.22.22.2:2181
启动类

业务类

按相同套路 再创建个8082

消费者模块

依赖
- <dependencies>
- <!-- https://mvnrepository.com/artifact/org.springframework.boot/spring-boot-starter-web -->
- <dependency>
- <groupId>org.springframework.boot</groupId>
- <artifactId>spring-boot-starter-web</artifactId>
- </dependency>
- <!-- https://mvnrepository.com/artifact/org.springframework.cloud/spring-cloud-starter-zookeeper-discovery -->
- <dependency>
- <groupId>org.springframework.cloud</groupId>
- <artifactId>spring-cloud-starter-zookeeper-discovery</artifactId>
- </dependency>
- <!-- https://mvnrepository.com/artifact/org.springframework.boot/spring-boot-devtools -->
- <dependency>
- <groupId>org.springframework.boot</groupId>
- <artifactId>spring-boot-devtools</artifactId>
- <scope>runtime</scope>
- <optional>true</optional>
- </dependency>
- <!-- https://mvnrepository.com/artifact/org.projectlombok/lombok -->
- <dependency>
- <groupId>org.projectlombok</groupId>
- <artifactId>lombok</artifactId>
- <optional>true</optional>
- </dependency>
- <!-- https://mvnrepository.com/artifact/org.springframework.boot/spring-boot-starter-test -->
- <dependency>
- <groupId>org.springframework.boot</groupId>
- <artifactId>spring-boot-starter-test</artifactId>
- <scope>test</scope>
- </dependency>
- </dependencies>
启动类

业务类
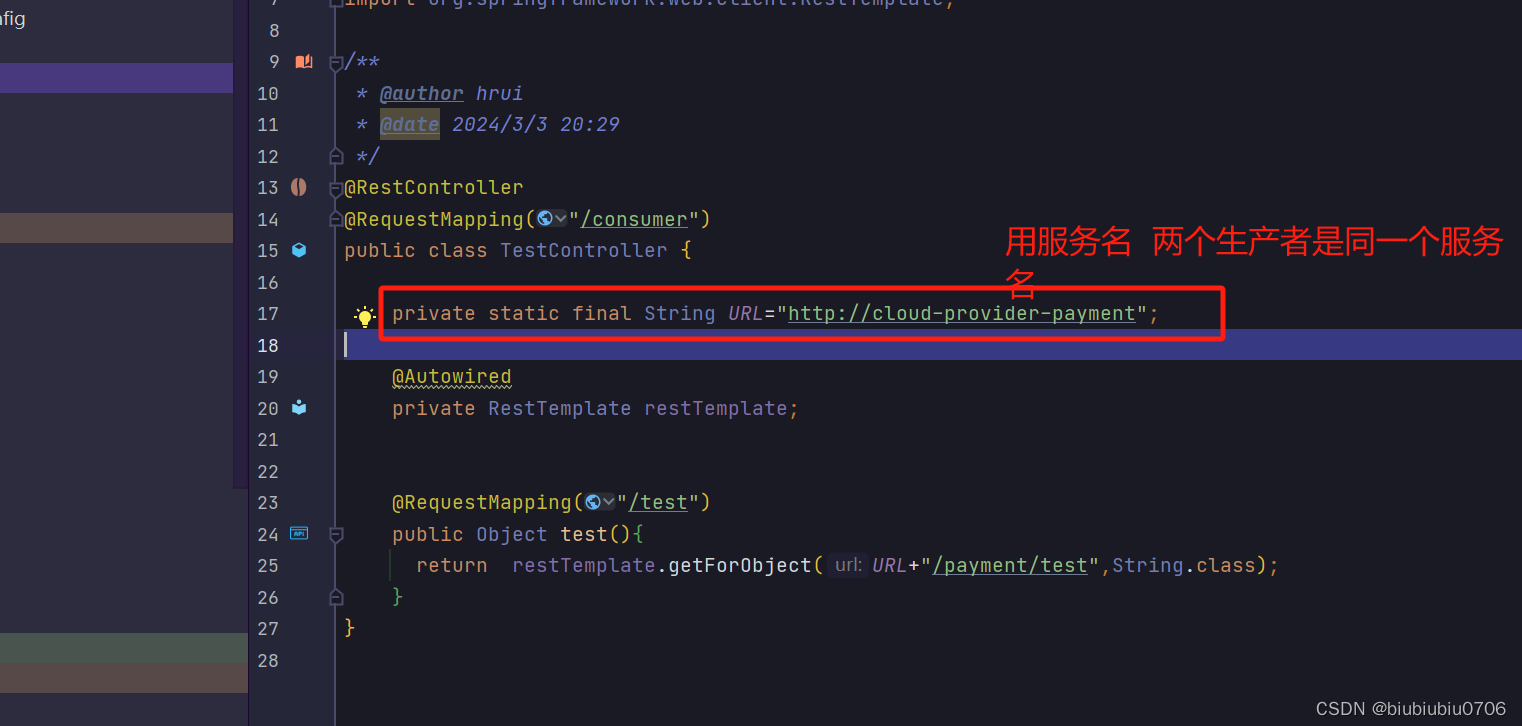
配置类
虽然没有直接引入Ribbon Ribbon依赖通过以下依赖已经在了
org.springframework.cloud
spring-cloud-starter-zookeeper-discovery

application.yml

如何改变Ribbon负载均衡策略


啥意思??
就是要放在启动类扫描不到的地方


重启8083消费者 可以自己多点点 现在是随机的

如果需要恢复轮询可以将启动类上的@RibbonClient注释掉
这样即使MySlefRule这个类存在,也没有效果 因为在启动类所在包以外

Ribbon负载均衡原理
负载均衡算法:rest接口第几次请求数%服务器集群总数量=实际调用服务器位置下标,每次服务重启后Rest接口计数从1开始
上面 生产者总共2个实例
List 2个实例
index=1
1%2=1 这个1 做为list.get(1%2)
index变成2
2%2=0 这个0 做为list.get(1%2)
index变成3
3%2=1 这个1 做为list.get(3%2)
index变成4
4%2=0 这个0 做为list.get(4%2)
以此类推
-
相关阅读:
了解web框架
linux-windows10使用wsl运行linux子系统
SD模块上线切换-问题预判及对策清单
MySQL (2)
uniapp如何在页面中只展示一条随机数据
八、kotlin的高阶函数
MySQL优化、锁、总结常见问题
Sumati GameFi生态纵览,神奇世界中的元素设计
Linux常用命令
SAP SMARTFORMS打印文本内容手动换行
- 原文地址:https://blog.csdn.net/tiantiantbtb/article/details/136436212