-
[ Python+OpenCV+Mediapipe ] 实现对象识别
一、写在前面
本文所用例子为个人学习的小结,如有不足之处请各位多多海涵,欢迎小伙伴一起学习进步,如果想法可在评论区指出,我会尽快回复您,不胜感激!
所公布代码或截图均为运行成功后展示。
二、本文内容
使用OpenCV和Mediapipe提供的库,通过摄像头捕捉画面,调用mpp的模型识别库,识别对象的是什么,并标注可信度。
如下图识别泰迪熊等。

官方给出的模型库中还有很多目标,我整理在下方表格里:
https://storage.googleapis.com/mediapipe-tasks/object_detector/labelmap.txt
person 人 elephant 大象 wine glass 酒杯 dining table 餐桌 bicycle 自行车 bear 熊 cup 杯子 toilet 坐便器 car 汽车 zebra 斑马 fork 叉 tv 电视 motorcycle 摩托车 giraffe 长颈鹿 knife 刀 laptop 笔记本电脑 airplane 飞机 backpack 背包 spoon 勺子 mouse 老鼠 bus 公共汽车 umbrella 雨伞 bowl 碗 remote 遥远的 train 火车 handbag 手提包 banana 香蕉 keyboard 键盘 truck 卡车 tie 领带 apple 苹果 cell phone 手机 boat 船 suitcase 手提箱 sandwich 三明治 microwave 微波炉 traffic light 交通灯 frisbee 飞盘 orange 橙色 oven 烤箱 fire hydrant 消防栓 skis 滑雪板 broccoli 西兰花 toaster 烤面包机 stop sign 停车标志 snowboard 滑雪板 carrot 胡萝卜 sink 下沉 parking meter 停车收费表 sports ball 运动球 hot dog 热狗 refrigerator 冰箱 bench 长凳 kite 风筝 pizza 披萨 book 书 bird 鸟 baseball bat 棒球棍 donut 甜甜圈 clock 时钟 cat 猫 baseball glove 棒球手套 cake 糕饼 vase 花瓶 dog 狗 skateboard 滑板 chair 椅子 scissors 剪刀 horse 马 surfboard 冲浪板 couch 沙发 teddy bear 泰迪熊 sheep 羊 tennis racket 网球拍 potted plant 盆栽植物 hair drier 吹风机 cow 母牛 bottle 瓶子 bed 床 toothbrush 牙刷 三、开发环境
1.Python 3.9
2.OpenCV
3.Mediapipe:https://developers.google.com/mediapipe/solutions/vision/hand_landmarker
4.comtypes
5.numpy
IDE:
1.Pycharm
四、代码实现
4.1 引入所需包
引入后报红,则说明缺少对应module,可以通过pip install xx解决,如果pip install失败,可以尝试更换镜像源
#更换为豆瓣的镜像源
pip config set global.index-url https://pypi.douban.com/simple
- import mediapipe as mp
- from mediapipe.tasks import python
- import cv2
- import numpy as np
- from mediapipe.tasks.python import vision
4.2 定义图像框标注的方法:
初始化mediapipe的一些属性。
- '''
- 用于在图像上绘制目标检测结果的边界框和标签:
- 函数接受两个参数:image 表示要绘制目标检测结果的图像,detection_result 是包含检测结果的对象。
- 对于每个检测到的对象,函数会执行以下操作:
- 绘制边界框:根据检测到的对象的边界框信息,使用 cv2.rectangle 在图像上绘制一个矩形框,框的颜色为 TEXT_COLOR,线宽为 3。
- 绘制标签和置信度:从检测结果中获取对象的类别和置信度信息,然后将类别名称和置信度值格式化为文本,将其放置在边界框的左上角,以便在图像上显示对象的标签和置信度。
- 最后,函数返回经过绘制标框和标识后的图像。
- '''
- # 图像解析标框及标识
- def visualize(
- image,
- detection_result
- ) -> np.ndarray:
- for detection in detection_result.detections:
- # Draw bounding_box
- bbox = detection.bounding_box
- start_point = bbox.origin_x, bbox.origin_y
- end_point = bbox.origin_x + bbox.width, bbox.origin_y + bbox.height
- cv2.rectangle(image, start_point, end_point, TEXT_COLOR, 3)
- # Draw label and score
- category = detection.categories[0]
- category_name = category.category_name
- probability = round(category.score, 2)
- result_text = category_name + ' (' + str(probability) + ')'
- text_location = (MARGIN + bbox.origin_x,
- MARGIN + ROW_SIZE + bbox.origin_y)
- cv2.putText(image, result_text, text_location, cv2.FONT_HERSHEY_PLAIN,
- FONT_SIZE, TEXT_COLOR, FONT_THICKNESS)
- return image
4.3 定义并调用模型库
将下载好的模型放在项目同级目录下
- '''
- 调用识别对象模型
- 模型下载地址:https://storage.googleapis.com/mediapipe-models/object_detector/efficientdet_lite0/float32/latest/efficientdet_lite0.tflite
- '''
- base_options = python.BaseOptions(model_asset_path='efficientdet_lite0.tflite')
- options = vision.ObjectDetectorOptions(base_options=base_options,
- score_threshold=0.5)
- with vision.ObjectDetector.create_from_options(options) as detector:
4.4 转换图像并识别
将摄像头捕捉到的每一帧图片转换为mediapipe可用的格式,并在检测后返回检测结果,调用图像标识方法绘制对象识别框及名称标注,显示于界面上
- #创建mediapipe格式的图片
- mp_image = mp.Image(image_format=mp.ImageFormat.SRGB, data=frame)
- #检测该图片
- detection_result = detector.detect(mp_image)
- #复制图片数据到np数组中,以便进行数据分析
- image_copy = np.copy(mp_image.numpy_view())
- #调用图像标识方法
- annotated_image = visualize(image_copy, detection_result)
- #加载模型到界面上
- cv2.imshow("Object detection", annotated_image) # CV2窗体
五、看一看实际效果吧
还可以识别更多的目标,请自己尝试一下吧
5.1 识别人脸
(没错!我是彦祖!)

5.2 识别手机
1+8Pro 512G 金色传说品质~

5.3 泰迪熊
鬼知道官方为什么要识别泰迪熊?

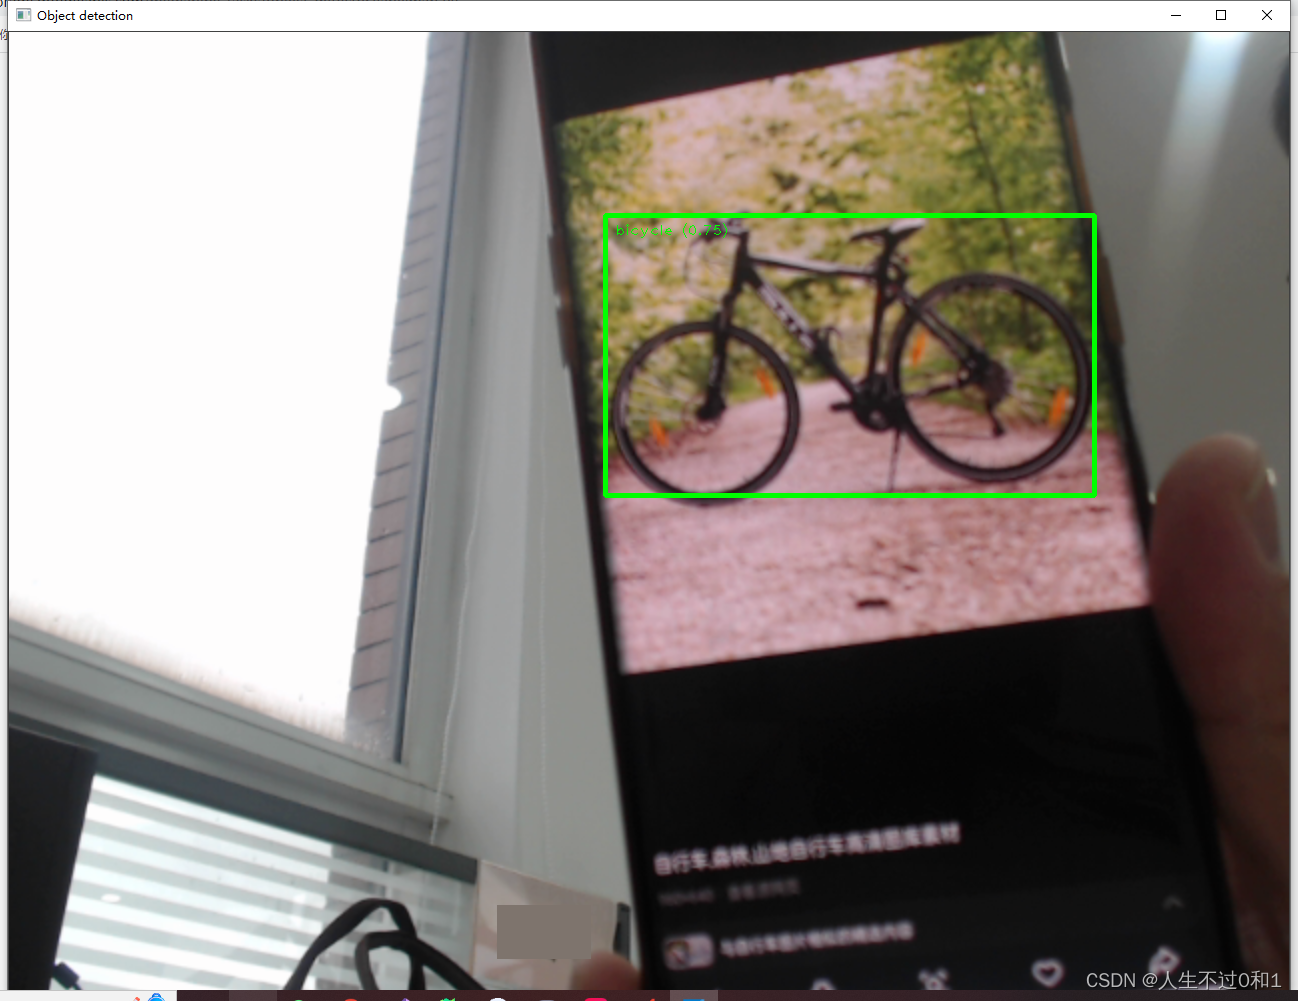
5.4 自行车
是时候锻炼身体了!
5.5 修狗
乖巧金毛,我爱修狗

5.6 修猫
小猫小猫,天下第一好!

六、完整代码
- import mediapipe as mp
- from mediapipe.tasks import python
- import cv2
- import numpy as np
- from mediapipe.tasks.python import vision
- MARGIN = 10 # pixels
- ROW_SIZE = 10 # pixels
- FONT_SIZE = 1
- FONT_THICKNESS = 1
- TEXT_COLOR = (0, 255, 0)
- # 视频分辨率
- resize_w = 1280
- resize_h = 960
- '''
- 用于在图像上绘制目标检测结果的边界框和标签:
- 函数接受两个参数:image 表示要绘制目标检测结果的图像,detection_result 是包含检测结果的对象。
- 对于每个检测到的对象,函数会执行以下操作:
- 绘制边界框:根据检测到的对象的边界框信息,使用 cv2.rectangle 在图像上绘制一个矩形框,框的颜色为 TEXT_COLOR,线宽为 3。
- 绘制标签和置信度:从检测结果中获取对象的类别和置信度信息,然后将类别名称和置信度值格式化为文本,将其放置在边界框的左上角,以便在图像上显示对象的标签和置信度。
- 最后,函数返回经过绘制标框和标识后的图像。
- '''
- # 图像解析标框及标识
- def visualize(
- image,
- detection_result
- ) -> np.ndarray:
- for detection in detection_result.detections:
- # Draw bounding_box
- bbox = detection.bounding_box
- start_point = bbox.origin_x, bbox.origin_y
- end_point = bbox.origin_x + bbox.width, bbox.origin_y + bbox.height
- cv2.rectangle(image, start_point, end_point, TEXT_COLOR, 3)
- # Draw label and score
- category = detection.categories[0]
- category_name = category.category_name
- probability = round(category.score, 2)
- result_text = category_name + ' (' + str(probability) + ')'
- text_location = (MARGIN + bbox.origin_x,
- MARGIN + ROW_SIZE + bbox.origin_y)
- cv2.putText(image, result_text, text_location, cv2.FONT_HERSHEY_PLAIN,
- FONT_SIZE, TEXT_COLOR, FONT_THICKNESS)
- return image
- '''
- 调用识别对象模型
- 模型下载地址:https://storage.googleapis.com/mediapipe-models/object_detector/efficientdet_lite0/float32/latest/efficientdet_lite0.tflite
- '''
- base_options = python.BaseOptions(model_asset_path='efficientdet_lite0.tflite')
- options = vision.ObjectDetectorOptions(base_options=base_options,
- score_threshold=0.5)
- with vision.ObjectDetector.create_from_options(options) as detector:
- # 初始化摄像头
- cap = cv2.VideoCapture(0, cv2.CAP_DSHOW)
- while cap.isOpened():
- #获取每一帧画面
- success, frame = cap.read()
- # 如果读取到空帧,继续循环
- if not success:
- print("空帧.")
- continue
- # 重置该图片的大小
- frame = cv2.resize(frame, (resize_w, resize_h))
- #创建mediapipe格式的图片
- mp_image = mp.Image(image_format=mp.ImageFormat.SRGB, data=frame)
- #检测该图片
- detection_result = detector.detect(mp_image)
- #复制图片数据到np数组中,以便进行数据分析
- image_copy = np.copy(mp_image.numpy_view())
- #调用图像标识方法
- annotated_image = visualize(image_copy, detection_result)
- #加载模型到界面上
- cv2.imshow("Object detection", annotated_image) # CV2窗体
- # 按下'q'键退出循环
- if cv2.waitKey(1) & 0xFF == ord('q'):
- break
- cap.release()
七、小结
Mediapipe还有很多库可以探索,目前我也只是在使用,之前通过opencv训练了人脸模型,后续还需要再深入研究一下模型训练之类的。想学的有很多,还要加油啊!
八、感谢
感谢各位大佬的莅临,学习之路漫漫,吾将上下而求索。有任何想法请在评论区留言哦!
再次感谢!

-
相关阅读:
Word处理控件Aspose.Words功能演示:使用Java合并MS Word文档
Worthington肽合成应用丨胰凝乳蛋白酶方案
JavaSE编程题目练习(一)
机器学习笔记1
目标检测 Faster RCNN全面解读复现
【CSS3】media,伪类与伪元素,outline,font-face,resize,svg,多列布局
深入理解强化学习——多臂赌博机:梯度赌博机算法的数学证明
java 记录传参和返回值
elementUi实现动态表格单元格合并span-method方法
Java项目:基于ssm智能餐厅管理系统
- 原文地址:https://blog.csdn.net/wxf5522/article/details/136203881
