-
温故知新:探究Android UI 绘制刷新流程
一、说明:
-
基于之前的了解知道ui的绘制最终会走到Android的
ViewRootImpl中scheduleTraversals进行发送接收vsync信号绘制,在ViewRootImpl中还会进行主线程检测,也就是我们所谓子线程更新ui会抛出异常。 -
像我们常用的刷新ui,
invalidate,和requestLayout方法,(按我之前的理解在ViewRootImpl初始化添加后,在子线程中刷新ui一定会崩溃:如下图)

二、问题:invalidate一定会导致异常崩溃?
2.1、例子:子线程更新TextView文本(注意这里是TextView,为什么是它而不是ImageView,因为我的背景就是使用的TextView,使用它的时候发现了
invalidate,和requestLayout方法的区别 )某天我在
onResume中利用子线程更新了TextView的一段代码,发现并没有抛出异常崩溃,代码如下:override fun onResume() { super.onResume() mBind.btTest.setOnClickListener{ lifecycleScope.launch(Dispatchers.IO) { mBind.btTest.text = "子线程点击改变:${Thread.currentThread().name}" } } }- 1
- 2
- 3
- 4
- 5
- 6
- 7
- 8
我在想为什么呢?,看代码: 一步步
debug:TextView控件中:1.、 public final void setText(CharSequence text) { setText(text, mBufferType); } 2.、 public void setText(CharSequence text, BufferType type) { setText(text, type, true, 0); if (mCharWrapper != null) { mCharWrapper.mChars = null; } } 3.、 private void setText(CharSequence text, BufferType type, boolean notifyBefore, int oldlen) { ...省略 if (mLayout != null) { checkForRelayout(); } ...省略 }- 1
- 2
- 3
- 4
- 5
- 6
- 7
- 8
- 9
- 10
- 11
- 12
- 13
- 14
- 15
- 16
- 17
- 18
- 19
- 20
- 21
- 22
以上主要看第三步中的
checkForRelayout()检测是否需要重绘,方法如下@UnsupportedAppUsage private void checkForRelayout() { // If we have a fixed width, we can just swap in a new text layout // if the text height stays the same or if the view height is fixed. if ((mLayoutParams.width != LayoutParams.WRAP_CONTENT || (mMaxWidthMode == mMinWidthMode && mMaxWidth == mMinWidth)) && (mHint == null || mHintLayout != null) && (mRight - mLeft - getCompoundPaddingLeft() - getCompoundPaddingRight() > 0)) { // Static width, so try making a new text layout. int oldht = mLayout.getHeight(); int want = mLayout.getWidth(); int hintWant = mHintLayout == null ? 0 : mHintLayout.getWidth(); /* * No need to bring the text into view, since the size is not * changing (unless we do the requestLayout(), in which case it * will happen at measure). */ makeNewLayout(want, hintWant, UNKNOWN_BORING, UNKNOWN_BORING, mRight - mLeft - getCompoundPaddingLeft() - getCompoundPaddingRight(), false); //1.检测文本的显示类型,就是我们的过长省略号这种 if (mEllipsize != TextUtils.TruncateAt.MARQUEE) { // In a fixed-height view, so use our new text layout. if (mLayoutParams.height != LayoutParams.WRAP_CONTENT && mLayoutParams.height != LayoutParams.MATCH_PARENT) { autoSizeText(); invalidate(); return; } // Dynamic height, but height has stayed the same, // so use our new text layout. if (mLayout.getHeight() == oldht && (mHintLayout == null || mHintLayout.getHeight() == oldht)) { autoSizeText(); invalidate(); return; } } // We lose: the height has changed and we have a dynamic height. // Request a new view layout using our new text layout. requestLayout(); invalidate(); } else { // Dynamic width, so we have no choice but to request a new // view layout with a new text layout. nullLayouts(); requestLayout(); invalidate(); } }- 1
- 2
- 3
- 4
- 5
- 6
- 7
- 8
- 9
- 10
- 11
- 12
- 13
- 14
- 15
- 16
- 17
- 18
- 19
- 20
- 21
- 22
- 23
- 24
- 25
- 26
- 27
- 28
- 29
- 30
- 31
- 32
- 33
- 34
- 35
- 36
- 37
- 38
- 39
- 40
- 41
- 42
- 43
- 44
- 45
- 46
- 47
- 48
- 49
- 50
- 51
- 52
- 53
- 54
- 55
- 56
从上面的
checkForRelayout()方法中的if (mEllipsize != TextUtils.TruncateAt.MARQUEE)条件知道成立,因为我们没有设置过mEllipsize = 跑马灯效果,所以走了invalidate()方法然后直接return截断,不会走后面的requestLayout()方法,至于requestLayout() 与 invalidate()的区别我就不讲了2.2、分析requestLayout方法
基于之前的知识我知道调用requestLayout()方法会崩溃,至于为什么调用requestLayout()方法会崩溃?
我们先看
requestLayout()方法,暂停一会invalidate()的跟进:requestLayout()方法代码如下:public void requestLayout() { if (mMeasureCache != null) mMeasureCache.clear(); if (mAttachInfo != null && mAttachInfo.mViewRequestingLayout == null) { // Only trigger request-during-layout logic if this is the view requesting it, // not the views in its parent hierarchy ViewRootImpl viewRoot = getViewRootImpl(); if (viewRoot != null && viewRoot.isInLayout()) { if (!viewRoot.requestLayoutDuringLayout(this)) { return; } } mAttachInfo.mViewRequestingLayout = this; } mPrivateFlags |= PFLAG_FORCE_LAYOUT; mPrivateFlags |= PFLAG_INVALIDATED; if (mParent != null && !mParent.isLayoutRequested()) { mParent.requestLayout(); } if (mAttachInfo != null && mAttachInfo.mViewRequestingLayout == this) { mAttachInfo.mViewRequestingLayout = null; } }- 1
- 2
- 3
- 4
- 5
- 6
- 7
- 8
- 9
- 10
- 11
- 12
- 13
- 14
- 15
- 16
- 17
- 18
- 19
- 20
- 21
- 22
- 23
- 24
- 25
requestLayout()方法中会循环递归调用mParent.requestLayout()方法,直到找到ViewRootImpl中的requestLayout()方法,而它的方法做了线程检测如下图:这就是requestLayout()方法会崩溃的原因。
验证猜想: 为
TextView设置跑马灯属性,使上面的if (mEllipsize != TextUtils.TruncateAt.MARQUEE)不成立,走下面的requestLayout()方法,代码如下:override fun onResume() { super.onResume() mBind.btTest.ellipsize = TextUtils.TruncateAt.valueOf("MARQUEE") mBind.btTest.setOnClickListener{ lifecycleScope.launch(Dispatchers.IO) { mBind.btTest.text = "子线程点击改变:${Thread.currentThread().name}" } } }- 1
- 2
- 3
- 4
- 5
- 6
- 7
- 8
- 9
果然点击后崩溃:

2.3、继续分析
invalidate()方法,为什么不会导致textview的更新崩溃看代码在
View.java文件中public void invalidate() { invalidate(true); }- 1
- 2
- 3
public void invalidate(boolean invalidateCache) { invalidateInternal(0, 0, mRight - mLeft, mBottom - mTop, invalidateCache, true); }- 1
- 2
- 3
void invalidateInternal(int l, int t, int r, int b, boolean invalidateCache, boolean fullInvalidate) { if (mGhostView != null) { mGhostView.invalidate(true); return; } if (skipInvalidate()) { return; } // Reset content capture caches mPrivateFlags4 &= ~PFLAG4_CONTENT_CAPTURE_IMPORTANCE_MASK; mContentCaptureSessionCached = false; if ((mPrivateFlags & (PFLAG_DRAWN | PFLAG_HAS_BOUNDS)) == (PFLAG_DRAWN | PFLAG_HAS_BOUNDS) || (invalidateCache && (mPrivateFlags & PFLAG_DRAWING_CACHE_VALID) == PFLAG_DRAWING_CACHE_VALID) || (mPrivateFlags & PFLAG_INVALIDATED) != PFLAG_INVALIDATED || (fullInvalidate && isOpaque() != mLastIsOpaque)) { if (fullInvalidate) { mLastIsOpaque = isOpaque(); mPrivateFlags &= ~PFLAG_DRAWN; } mPrivateFlags |= PFLAG_DIRTY; if (invalidateCache) { mPrivateFlags |= PFLAG_INVALIDATED; mPrivateFlags &= ~PFLAG_DRAWING_CACHE_VALID; } // Propagate the damage rectangle to the parent view. final AttachInfo ai = mAttachInfo; final ViewParent p = mParent; if (p != null && ai != null && l < r && t < b) { final Rect damage = ai.mTmpInvalRect; damage.set(l, t, r, b); p.invalidateChild(this, damage); } // Damage the entire projection receiver, if necessary. if (mBackground != null && mBackground.isProjected()) { final View receiver = getProjectionReceiver(); if (receiver != null) { receiver.damageInParent(); } } } }- 1
- 2
- 3
- 4
- 5
- 6
- 7
- 8
- 9
- 10
- 11
- 12
- 13
- 14
- 15
- 16
- 17
- 18
- 19
- 20
- 21
- 22
- 23
- 24
- 25
- 26
- 27
- 28
- 29
- 30
- 31
- 32
- 33
- 34
- 35
- 36
- 37
- 38
- 39
- 40
- 41
- 42
- 43
- 44
- 45
- 46
- 47
- 48
- 49
核心代码是上面第三段
invalidateInternal方法中的invalidateChild方法它回调到
ViewGroup中的invalidateChild方法看:
invalidateChild如下图:我们知道if (attachInfo != null && attachInfo.mHardwareAccelerated)条件成立attachInfo不为空 ,且硬件加速被开启(从API 14 (3.0)起。硬件加速默认开启)。attachInfo是一个view在attach至其父window被赋值的一系列信息。
所以条件成立后走的
onDescendantInvalidated方法 如下:@CallSuper public void onDescendantInvalidated(@NonNull View child, @NonNull View target) { /* * HW-only, Rect-ignoring damage codepath * * We don't deal with rectangles here, since RenderThread native code computes damage for * everything drawn by HWUI (and SW layer / drawing cache doesn't keep track of damage area) */ // if set, combine the animation flag into the parent mPrivateFlags |= (target.mPrivateFlags & PFLAG_DRAW_ANIMATION); if ((target.mPrivateFlags & ~PFLAG_DIRTY_MASK) != 0) { // We lazily use PFLAG_DIRTY, since computing opaque isn't worth the potential // optimization in provides in a DisplayList world. mPrivateFlags = (mPrivateFlags & ~PFLAG_DIRTY_MASK) | PFLAG_DIRTY; // simplified invalidateChildInParent behavior: clear cache validity to be safe... mPrivateFlags &= ~PFLAG_DRAWING_CACHE_VALID; } // ... and mark inval if in software layer that needs to repaint (hw handled in native) if (mLayerType == LAYER_TYPE_SOFTWARE) { // Layered parents should be invalidated. Escalate to a full invalidate (and note that // we do this after consuming any relevant flags from the originating descendant) mPrivateFlags |= PFLAG_INVALIDATED | PFLAG_DIRTY; target = this; } if (mParent != null) { mParent.onDescendantInvalidated(this, target); } }- 1
- 2
- 3
- 4
- 5
- 6
- 7
- 8
- 9
- 10
- 11
- 12
- 13
- 14
- 15
- 16
- 17
- 18
- 19
- 20
- 21
- 22
- 23
- 24
- 25
- 26
- 27
- 28
- 29
- 30
- 31
- 32
- 33
上面一段代码核心是
mParent.onDescendantInvalidated(this, target);类似于requestLayout()方法onDescendantInvalidated中会循环递归调用mParent.onDescendantInvalidated(this, target);方法,直到找到ViewRootImpl中的onDescendantInvalidated(this, target)方法,而它的方法没做线程检测如下图:这就是开了硬件加速后invalidate方法不会崩溃的原因。如下图:直接走scheduleTraversals绘制刷新有兴趣可看: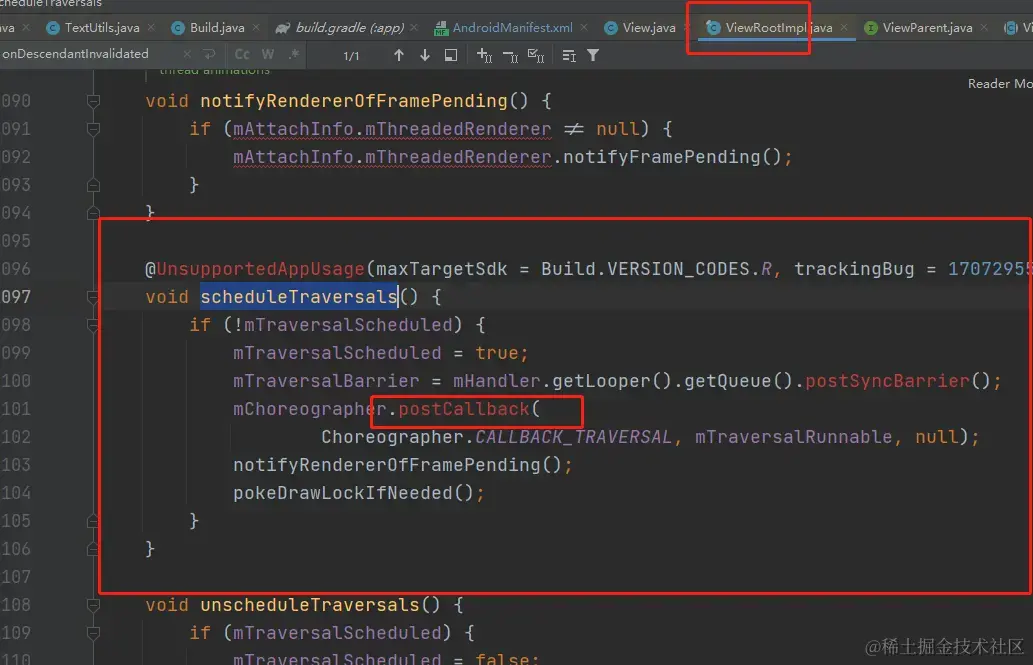

而关闭硬件加速后会怎样呢? 继续看
invalidateChild方法@Deprecated @Override public final void invalidateChild(View child, final Rect dirty) { final AttachInfo attachInfo = mAttachInfo; if (attachInfo != null && attachInfo.mHardwareAccelerated) { // HW accelerated fast path onDescendantInvalidated(child, child); return; } ViewParent parent = this; if (attachInfo != null) { ... do { .... parent = parent.invalidateChildInParent(location, dirty); .... } while (parent != null); } }- 1
- 2
- 3
- 4
- 5
- 6
- 7
- 8
- 9
- 10
- 11
- 12
- 13
- 14
- 15
- 16
- 17
- 18
- 19
- 20
- 21
- 22
- 23
上面一段核心是
parent = parent.invalidateChildInParent(location, dirty);方法 同理while循环不停调用invalidateChildInParent方法直到找到ViewRootImpl中的invalidateChildInParent(int[] location, Rect dirty)方法,如下图内部进行了线程检测
**验证猜想关闭硬件加速:
android:hardwareAccelerated="false"**果然崩溃了。
三、总结
这就是我遇到的问题:单纯的根据TextView在子线程可以更新得出的结论,总的来说要想不崩溃还得绕过
ViewRootImpl中的checkThread的检测。至于研究它有什么用,只有知道理解源码的流程,才能写出更好的东西。Android 学习笔录
Android 性能优化篇:
https://qr18.cn/FVlo89
Android Framework底层原理篇:https://qr18.cn/AQpN4J
Android 车载篇:https://qr18.cn/F05ZCM
Android 逆向安全学习笔记:https://qr18.cn/CQ5TcL
Android 音视频篇:https://qr18.cn/Ei3VPD
Jetpack全家桶篇(内含Compose):https://qr18.cn/A0gajp
OkHttp 源码解析笔记:https://qr18.cn/Cw0pBD
Kotlin 篇:https://qr18.cn/CdjtAF
Gradle 篇:https://qr18.cn/DzrmMB
Flutter 篇:https://qr18.cn/DIvKma
Android 八大知识体:https://qr18.cn/CyxarU
Android 核心笔记:https://qr21.cn/CaZQLo
Android 往年面试题锦:https://qr18.cn/CKV8OZ
2023年最新Android 面试题集:https://qr18.cn/CgxrRy
Android 车载开发岗位面试习题:https://qr18.cn/FTlyCJ
音视频面试题锦:https://qr18.cn/AcV6Ap -
-
相关阅读:
【Redis-08】面试题之Redis数据结构与对象-RedisObject(上篇)
构建知识库的核心要义,试试我的工具和方法吧!
华为数通方向HCIP-DataCom H12-831题库(多选题:141-160)
TexFormula2Word: 将Latex公式转换为MathML的Chrome扩展
Gin路由基础
利用快速排序的思想寻找第k小的元素
Java版企业电子招标采购系统源码—企业战略布局下的采购寻源
一不小心酿成错,做到4点,少上厕所多睡觉,孕期“尿频”别大意
跨平台Android和IOS百度语音在线识别原生插件
内点法(interior point method)求解二次规划,附python代码
- 原文地址:https://blog.csdn.net/maniuT/article/details/134313775
