-
07-React-redux和redux的使用
07.react-redux和redux的使用
1.redux的使用
1).redux的理解
a.redux是什么
- redux是一个专门用于做状态管理的JS库(不是react插件库)。
- 它可以用在react, angular, vue等项目中, 但基本与react配合使用。
- 作用: 集中式管理react应用中多个组件共享的状态。
b.什么情况下需要使用redux
- 某个组件的状态,需要让其他组件可以随时拿到(共享)。
- 一个组件需要改变另一个组件的状态(通信)。
- 总体原则:能不用就不用, 如果不用比较吃力才考虑使用。
c.redux工作流程

2).redux的三个核心概念
a.action
-
动作的对象
-
包含2个属性
-
type:标识属性, 值为字符串, 唯一, 必要属性
-
data:数据属性, 值类型任意, 可选属性
-
例子: { type: 'ADD_STUDENT',data:{name: 'tom',age:18} }- 1
- 2
b.reducer
- 用于初始化状态、加工状态。
- 加工时,根据旧的
state和action, 产生新的state的纯函数。
c.store
-
将state、action、reducer联系在一起的对象
-
如何得到此对象?
-
import {createStore} from 'redux'- 1
-
import reducer from './reducers'- 1
-
const store = createStore(reducer)- 1
-
-
此对象的功能?
getState(): 得到statedispatch(action): 分发action, 触发reducer调用, 产生新的statesubscribe(listener): 注册监听, 当产生了新的state时, 自动调用
3).redux的使用
需求:

实现:
a.纯react实现:
// Count.jsx export default class Count extends Component { state = { count: 0 } // 加法 increment = () => { const { value } = this.seleteNumber; const { count } = this.state; this.setState({ count: count + (+value) }) } // 减法 decrement = () => { const { value } = this.seleteNumber; const { count } = this.state; this.setState({ count: count - (+value) }) } // 当前求和为奇数再加 incrementIfOdd = () => { const { value } = this.seleteNumber; const { count } = this.state; if (count%2!=0) { this.setState({ count: count + (+value) }) } } // 异步加 incrementAsync = () => { const { value } = this.seleteNumber; const { count } = this.state; setInterval(()=>{ this.setState({ count: count + (+value) }) },500) } render() { const { count } = this.state; return () } }当前求和为:{count}
- 1
- 2
- 3
- 4
- 5
- 6
- 7
- 8
- 9
- 10
- 11
- 12
- 13
- 14
- 15
- 16
- 17
- 18
- 19
- 20
- 21
- 22
- 23
- 24
- 25
- 26
- 27
- 28
- 29
- 30
- 31
- 32
- 33
- 34
- 35
- 36
- 37
- 38
- 39
- 40
- 41
- 42
- 43
- 44
- 45
- 46
- 47
- 48
- 49
- 50
- 51
b.redux实现:
-
去除Count组件自身的状态
// Count.jsx export default class Count extends Component { // 加法 increment = () => { const { value } = this.seleteNumber; } // 减法 decrement = () => { const { value } = this.seleteNumber; } // 当前求和为奇数再加 incrementIfOdd = () => { const { value } = this.seleteNumber; } // 异步加 incrementAsync = () => { const { value } = this.seleteNumber; } render() { return () } }当前求和为:???
- 1
- 2
- 3
- 4
- 5
- 6
- 7
- 8
- 9
- 10
- 11
- 12
- 13
- 14
- 15
- 16
- 17
- 18
- 19
- 20
- 21
- 22
- 23
- 24
- 25
- 26
- 27
- 28
- 29
- 30
- 31
- 32
- 33
- 34
- 35
-
根据
redux的原理图,现在src文件夹下新建一个redux文件夹,然后在这个文件夹中新建store.js和count_reducer.js
-
在
store.js引入redux中的legacy_createStore函数,创建一个store,并将其暴露 (旧版中的createStore被弃用了,这里使用新版的legacy_createStore)//该文件专门用于暴露一个store对象,整个应用只有一个store对象 // 引入legacy_createStore,专门用于创建redux中最为核心的store对象 import { legacy_createStore } from "redux"; // 暴露store export default legacy_createStore(countReducer)- 1
- 2
- 3
- 4
- 5
- 6
store对象
- 作用: redux库最核心的管理对象
- 它内部维护着:
- state
- reducer
-
legacy_createStore调用时要传入一个为其服务的reducer,count_reducer.js用于创建一个为Count组件服务的reducer,reducer的本质就是一个函数// count_reducer.js const initState=0 // reducer函数会接到两个参数,分别为:之前的状态(preState),动作对象(action) export default function countReducer(preState=initState,action) { console.log(preState,action); // 从action对象中获取:type、data const {type,data}=action switch (type) { case 'increment': return preState+data; case 'decrement': return preState-data; default: return preState; } }- 1
- 2
- 3
- 4
- 5
- 6
- 7
- 8
- 9
- 10
- 11
- 12
- 13
- 14
- 15
- 16
注意点:
reducer的本质是一个函数,接收:preState、action,返回加工后的状态reducer有两个作用:初始化状态,加工状态reducer被第一次调用时,是store自动触发的,传递的preState是undefined
// store.js // 引入为Count组件服务的reducer import countReducer from './count_reducer'- 1
- 2
- 3
-
在
Count组件中分发给store对应的action对象// 引入store,用于获取redux中保存状态 import store from '../../redux/store'; export default class Count extends Component { // 加法 increment = () => { const { value } = this.seleteNumber; store.dispatch({ type: 'increment', data: (+value) }) } // 减法 decrement = () => { const { value } = this.seleteNumber; store.dispatch({ type: 'decrement', data: (+value) }) } // 当前求和为奇数再加 incrementIfOdd = () => { const { value } = this.seleteNumber; const count = store.getState(); if (count % 2 !== 0) { store.dispatch({ type: 'increment', data: (+value) }) } } // 异步加 incrementAsync = () => { const { value } = this.seleteNumber; setInterval(() => { store.dispatch({ type: 'increment', data: (+value) }) }, 500) } render() { return () } }当前求和为:{store.getState()}
- 1
- 2
- 3
- 4
- 5
- 6
- 7
- 8
- 9
- 10
- 11
- 12
- 13
- 14
- 15
- 16
- 17
- 18
- 19
- 20
- 21
- 22
- 23
- 24
- 25
- 26
- 27
- 28
- 29
- 30
- 31
- 32
- 33
- 34
- 35
- 36
- 37
- 38
- 39
- 40
- 41
- 42
- 43
- 44
- 45
注意点:
store.dispatch()是用来分发action对象给redux,需要传入一个对象,里面type属性指定状态,data属性存储需要变化的数值store.getState()用来读取redux中reducer存储的数据
-
在
index.js中检测store中状态的改变,一旦发生改变重新渲染redux只负责管理状态,至于状态的改变驱动着页面的展示,要靠我们自己写。createRoot(document.getElementById('root')).render(<App />) store.subscribe(() => { createRoot(document.getElementById('root')).render(<App />) })- 1
- 2
- 3
- 4
-
新建一个
count_action.js文件,count_action.js专门用于创建action对象按照上面的写法不符合
redux完整的工作流程,没有经过创建action对象这个过程//count_action.js // 表达式返回一个对象用小括号包着 export const createIncrementAction = data => ({ type: 'increment', data }) export const createDecrementAction = data => ({ type: 'decrement', data })- 1
- 2
- 3
- 4
为了便于管理,符合集体开发环境,可以将
action对象中type类型的常量值进行定义,便于管理的同时防止程序员单词写错,创建constant.js// constant.js export const INCREMENT='increment' export const DECREMENT='decrement'- 1
- 2
- 3
//count_action.js // 引入变量名常量 import { INCREMENT, DECREMENT } from './constant' export const createIncrementAction = data => ({ type: INCREMENT, data }) export const createDecrementAction = data => ({ type: DECREMENT, data })- 1
- 2
- 3
- 4
- 5
import { INCREMENT, DECREMENT } from './constant' const initState = 0 export default function countReducer(preState = initState, action) { const { type, data } = action switch (type) { case INCREMENT: return preState + data; case DECREMENT: return preState - data; default: return preState; } }- 1
- 2
- 3
- 4
- 5
- 6
- 7
- 8
- 9
- 10
- 11
- 12
- 13
-
实现异步
action——修改“异步加”功能1.明确:延迟的动作不想交给组件自身,想交给
action
2.何时需要异步action:想要对状态进行操作,但是具体的数据靠异步任务返回。//count_action.js // 引入变量名常量 import { INCREMENT, DECREMENT } from './constant' // 同步action,就是指action的值为Object类型的一般对象 export const createIncrementAction = data => ({ type: INCREMENT, data }) export const createDecrementAction = data => ({ type: DECREMENT, data }) // 异步action,就是指action的值为函数,异步action中一般都会调用同步action,异步action不是必须要用的。 export const createIncrementAsyncAction = (data,time) => { return (dispatch) => { setTimeout(() => { dispatch(createIncrementAction(data)) },time) } }- 1
- 2
- 3
- 4
- 5
- 6
- 7
- 8
- 9
- 10
- 11
- 12
- 13
- 14
redux异步编程理解:
- redux默认是不能进行异步处理的,
- 某些时候应用中需要在redux中执行异步任务(ajax, 定时器)
-
redux不能直接处理异步action,需要下载redux-thunk插件进行处理,在store的legacy_createStore中传入作为第二个参数的函数applyMiddleware中npm i redux-thunk- 1
// store.js import { applyMiddleware, legacy_createStore } from "redux"; // 引入为Count组件服务的reducer import countReducer from './count_reducer' // 引入redux-thunk,用于支持异步action import thunk from 'redux-thunk' // 暴露store export default legacy_createStore(countReducer,applyMiddleware(thunk))- 1
- 2
- 3
- 4
- 5
- 6
- 7
- 8
处理异步
action步骤:- 安装
redux-thunk,thunk配置在store中 - 创建
action的函数不再返回一般对象,而是一个函数,该函数中写异步任务。 - 异步任务有结果后,分发一个同步的
action去真正操作数据。 - 备注:异步
action不是必须要写的,完全可以自己等待异步任务的结果了再去分发同步action。
注意点:
applyMiddleware()作用:应用上基于redux的中间件(插件库)
2.react-redux的使用
1).react-redux理解
- 一个react插件库
- 专门用来简化react应用中使用redux
2).react-redux的工作流程
a.react-redux的原理图
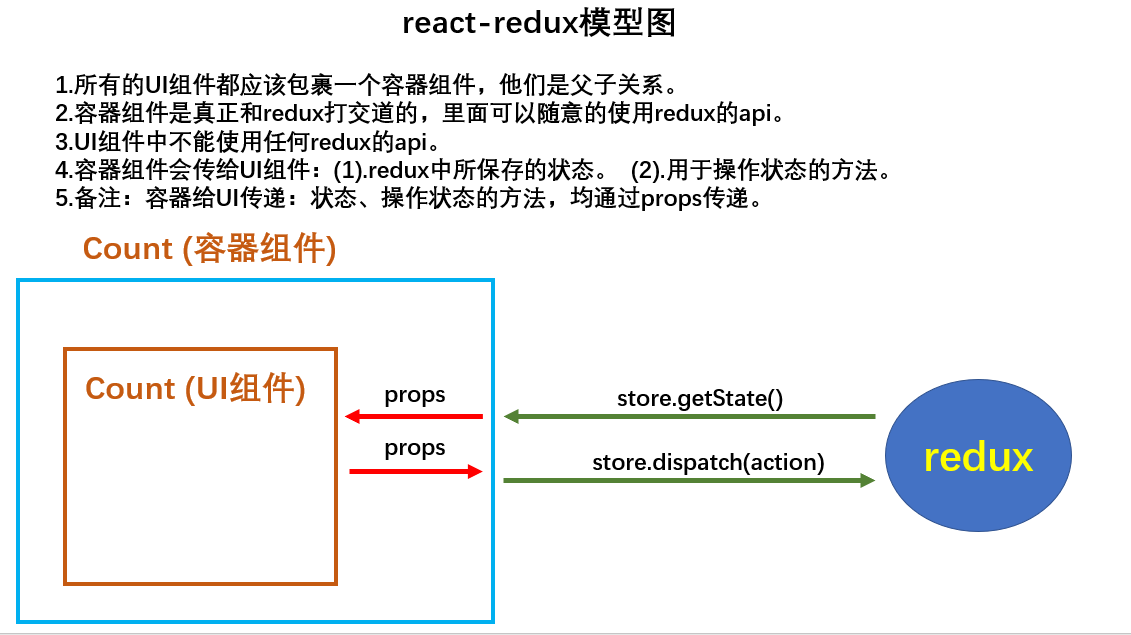
b.react-redux将所有组件分成两大类
- UI组件
- 只负责 UI 的呈现,不带有任何业务逻辑
- 通过
props接收数据(一般数据和函数) - 不使用任何 Redux 的 API
- 一般保存在
components文件夹下
- 容器组件
- 负责管理数据和业务逻辑,不负责UI的呈现
- 使用 Redux 的 API
- 一般保存在
containers文件夹下
3).react-redux的使用
a.需求一
-
分别创建
component和containers文件夹,并都文件夹中创建一个Count文件夹,分别用来编写UI组件和容器组件明确两个概念:
- UI组件:不能使用任何
redux的api,只负责页面的呈现、交互等。 - 容器组件:负责和
redux通信,将结果交给UI组件。

- UI组件:不能使用任何
-
编写UI组件
export default class Count extends Component { // 加法 increment = () => { const { value } = this.seleteNumber; } // 减法 decrement = () => { const { value } = this.seleteNumber; } // 当前求和为奇数再加 incrementIfOdd = () => { const { value } = this.seleteNumber; } // 异步加 incrementAsync = () => { const { value } = this.seleteNumber; } render() { return () } }当前求和为:???
- 1
- 2
- 3
- 4
- 5
- 6
- 7
- 8
- 9
- 10
- 11
- 12
- 13
- 14
- 15
- 16
- 17
- 18
- 19
- 20
- 21
- 22
- 23
- 24
- 25
- 26
- 27
- 28
- 29
- 30
- 31
- 32
- 33
- 34
-
创建容器组件且关联UI组件
-
容器组件不用手动编写,通过
react-redux编写 -
首先引入容器组件的“左右手”——UI组件和
redux// 引入CountUI组件 import CountUI from '../../component/Count' // 引入redux中的store import store from '../../redux/store'- 1
- 2
- 3
- 4
-
其次需要连接“左右手”——UI组件和
redux,可以使用react-redux中的connect方法进行连接// 引入connect用于连接UI组件与redux import { connect } from 'react-redux' const CountContainer=connect()()- 1
- 2
- 3
connect函数的返回值仍然是一个函数,而CountContainer变量可以接收到一个容器组件,为了让CountContainer容器组件与CountUI组件建立联系,需要将CountUI传入到connect()()的第二个括号中const CountContainer=connect()(CountUI)- 1
-
然后将容器组件进行暴露,并在App组件中进行引用
export default connect()(CountUI)- 1
//App.js import Count from './containers/Count' export default class App extends Component { render() { return ( <div> <Count/> </div> ) } }- 1
- 2
- 3
- 4
- 5
- 6
- 7
- 8
- 9
- 10
- 11
-
最后需要连接“左右手”中的
redux,也就是store容器组件中的
store需要通过props进行传递,不能在容器组件中手动引入//App.js import Count from './containers/Count' import store from './redux/store' export default class App extends Component { render() { return ( <div> {/* 给容器组件传递store */} <Count store={store}/> </div> ) } }- 1
- 2
- 3
- 4
- 5
- 6
- 7
- 8
- 9
- 10
- 11
- 12
- 13
-
-
容器组件向UI组件传递状态与操作状态的方法
-
容器组件与UI组件是父子组件,但是状态与操作状态的方法不能像其他父子组件一样通过给子组件添加属性的方式传递
-
connect函数在第一次调用时,也就是connect()时需要传递两个值,并且两个值都要为functionfunction a() {} function b() {} export default connect(a,b)(CountUI)- 1
- 2
- 3
-
a函数返回的对象中的key就作为传递给UI组件
props的key,value就作为传递给UI组件props的value——状态function a() { return { count: 900 } }- 1
- 2
- 3
-
b函数返回的对象中的
key就作为传递给UI组件props的key,value就作为传递给UI组件props的value——操作状态的方法function b() { return {jia:(data) => { console.log(1); }} }- 1
- 2
- 3
-
容器组件在
connect函数第一次执行后传递了a、b两个函数的返回值,即是状态和操作状态的方法export default class Count extends Component { render() { console.log('UI组件接收到到props',this.props); return () } }当前求和为:???
- 1
- 2
- 3
- 4
- 5
- 6
- 7
- 8
- 9
- 10
- 11
- 12
- 13
- 14
- 15
- 16
- 17
- 18
- 19

-
容器组件可以向UI组件传递数值后,就需要向
redux也就是store传递state和action-
首先需要在a函数中拿到
store中的state,也就是状态的数值,因为a函数是用来传递状态的,所以react-redux设计a函数会自动传入state,可以直接使用state取值function mapStateToProps(state) { return { count: state } }- 1
- 2
- 3
-
然后在b函数中通知
redux执行加法,因为b函数是用来传递操作状态方法的,所以react-redux设计b函数会自动传入store,可以直接使用dispatch分发action对象function mapDispatchToProps(dispatch) { // 通知redux执行加法 return { jia: number =>dispatch({type:'increment',data:number}) } }- 1
- 2
- 3
- 4
- 5
- 6
-
通过引入已经编写好的
action,避免在b函数中手动创造传递action对象// 引入action import { createIncrementAction, createDecrementAction,createIncrementAsyncAction } from '../../redux/count_action' function b(dispatch) { // 通知redux执行加法 return { jia: number => dispatch(createIncrementAction(number)), jian: number => dispatch(createDecrementAction(number)), jianAsync:(number,time) => dispatch(createIncrementAsyncAction(number,time)) } }- 1
- 2
- 3
- 4
- 5
- 6
- 7
- 8
- 9
- 10
-
-
整理容器组件代码
// 引入CountUI组件 import CountUI from '../../component/Count' // 引入action import { createIncrementAction, createDecrementAction,createIncrementAsyncAction } from '../../redux/count_action' // 引入connect用于连接UI组件与redux import { connect } from 'react-redux' function mapStateToProps(state) { return { count: state } } function mapDispatchToProps(dispatch) { // 通知redux执行加法 return { jia: number =>dispatch(createIncrementAction(number)), jian: number => dispatch(createDecrementAction(number)), jianAsync:(number,time) => dispatch(createIncrementAsyncAction(number,time)) } } // 使用connect()()创建并暴露一个Count的容器组件 export default connect(mapStateToProps, mapDispatchToProps)(CountUI)- 1
- 2
- 3
- 4
- 5
- 6
- 7
- 8
- 9
- 10
- 11
- 12
- 13
- 14
- 15
- 16
- 17
- 18
- 19
注意点:
- mapStateToProps函数返回的是一个对象;
- 返回的对象中的key就作为传递给UI组件props的key,value就作为传递给UI组件props的value
- mapStateToProps.用于传递状态
- mapDispatchToProps函数返回的是一个对象;
- 返回的对象中的key就作为传递给UI组件props的key,value.就作为传递给UI组件props的value
- mapDispatchToProps.用于传递操作状态的方法
-
在UI组件读取状态的数值和调用操作状态的方法
export default class Count extends Component { state = { count: 0 } // 加法 increment = () => { const { value } = this.seleteNumber; this.props.jia(+value) } // 减法 decrement = () => { const { value } = this.seleteNumber; this.props.jian(+value) } // 当前求和为奇数再加 incrementIfOdd = () => { const { value } = this.seleteNumber; if (this.props.count!==2) { this.props.jia(+value) } } // 异步加 incrementAsync = () => { const { value } = this.seleteNumber; this.props.jianAsync(+value,500) } render() { console.log('UI组件接收到到props',this.props); return () } }当前求和为:{this.props.count}
- 1
- 2
- 3
- 4
- 5
- 6
- 7
- 8
- 9
- 10
- 11
- 12
- 13
- 14
- 15
- 16
- 17
- 18
- 19
- 20
- 21
- 22
- 23
- 24
- 25
- 26
- 27
- 28
- 29
- 30
- 31
- 32
- 33
- 34
- 35
- 36
- 37
- 38
- 39
- 40
- 41
- 42
- 43
- 44
-
-
简写容器组件
-
将
mapStateToProps函数和mapDispatchToProps函数简写到connect函数中export default connect( state => ({ count: state }), dispatch => ({ jia: number => dispatch(createIncrementAction(number)), jian: number => dispatch(createDecrementAction(number)), jianAsync: (number, time) => dispatch(createIncrementAsyncAction(number, time)) }) )(CountUI)- 1
- 2
- 3
- 4
- 5
- 6
- 7
- 8
-
在
react-redux底层判断中只要传递的mapDispatchToProps是一个对象,那么就会自动dispatch。 -
给UI组件传递操作状态的方法就是传递其对应的
atcion, 只需要调用操作状态的方法的时候准备好action对象,react-redux就会自动分发dispatch
export default connect( state => ({ count: state }), { jia: createIncrementAction, jian: createDecrementAction, jianAsync: createIncrementAsyncAction } )(CountUI)- 1
- 2
- 3
- 4
- 5
- 6
- 7
- 8
-
-
将容器组件和UI组件整合到一个文件
import React, { Component } from 'react' // 引入action import { createIncrementAction, createDecrementAction, createIncrementAsyncAction } from '../../redux/count_action' // 引入connect用于连接UI组件与redux import { connect } from 'react-redux' class Count extends Component { // 加法 increment = () => { const { value } = this.seleteNumber; this.props.jia(+value) } // 减法 decrement = () => { const { value } = this.seleteNumber; this.props.jian(+value) } // 当前求和为奇数再加 incrementIfOdd = () => { const { value } = this.seleteNumber; if (this.props.count % 2 !== 0) { this.props.jia(+value) } } // 异步加 incrementAsync = () => { const { value } = this.seleteNumber; this.props.jianAsync(+value, 500) } render() { return () } } export default connect( state => ({ count: state }), { jia: createIncrementAction, jian: createDecrementAction, jianAsync: createIncrementAsyncAction } )(Count)当前求和为:{this.props.count}
- 1
- 2
- 3
- 4
- 5
- 6
- 7
- 8
- 9
- 10
- 11
- 12
- 13
- 14
- 15
- 16
- 17
- 18
- 19
- 20
- 21
- 22
- 23
- 24
- 25
- 26
- 27
- 28
- 29
- 30
- 31
- 32
- 33
- 34
- 35
- 36
- 37
- 38
- 39
- 40
- 41
- 42
- 43
- 44
- 45
- 46
- 47
- 48
- 49
- 50
- 51
- 52
- 53
-
使用
Provider组件优化index.jsimport {Provider} from 'react-redux' // Provider组件会给整个应用需要用到store的容器组件传递store createRoot(document.getElementById('root')).render(- 1
- 2
- 3
- 无需自己给容器组件传递
store,给 - 使用了
react-redux后也不用再自己检测redux中状态的改变了,容器组件可以自动完成这个工作。
b.需求二

-
在
containers文件夹分别创建名为Count和Person的文件夹存放两个组件的文件(容器组件+UI组件),在redux文件夹中创建action和reducer文件夹分别创建Count和Person组件相关的action和reducer文件
-
完成
person组件的action文件// redux/action/person.js import { ADD_PERSON } from '../constant' // 创建增加一个人的action动作对象 export const createAddPersonAction = personObj => ({ type: ADD_PERSON, data: personObj })- 1
- 2
- 3
- 4
-
完成
person组件的reducer文件// redux/reducer/person.js import { ADD_PERSON } from '../constant' const initState = [{ id: '001', name: 'tome', age: 18 }] export default function personReducer(preState = initState, action) { console.log('personReducer执行了'); const { type, data } = action switch (type) { case ADD_PERSON: return [data, ...preState]; default: return preState; } }- 1
- 2
- 3
- 4
- 5
- 6
- 7
- 8
- 9
- 10
- 11
- 12
- 13
关于这里使用[data, …preState]而不使用
push、unshift等JS数组的方法的原因:personReducer必须要为一个纯函数 -
在
store文件中引入为Person组件服务的reducerimport { applyMiddleware, legacy_createStore ,combineReducers} from "redux"; // 引入为Count组件服务的reducer import countReducer from './reducer/count' // 引入为Person组件服务的reducer import personReducer from './reducer/person' // 引入redux-thunk,用于支持异步action import thunk from 'redux-thunk' // 暴露store export default legacy_createStore(countReducer,applyMiddleware(thunk))- 1
- 2
- 3
- 4
- 5
- 6
- 7
- 8
- 9
因为
legacy_createStore函数只能传入两个参数,而第二个参数已经固定为applyMiddleware(thunk),所以需要将为两个组件服务的reducer集合在一个总reducer,然后传给legacy_createStore函数// 引入applyMiddleware import { applyMiddleware, legacy_createStore ,combineReducers} from "redux"; // 引入为Count组件服务的reducer import countReducer from './reducer/count' // 引入为Person组件服务的reducer import personReducer from './reducer/person' // 引入redux-thunk,用于支持异步action import thunk from 'redux-thunk' // 传入combineReducers中的对象是redux保存的总状态对象 const allReducer=combineReducers({ he:countReducer, rens:personReducer }) // 暴露store export default legacy_createStore(allReducer,applyMiddleware(thunk))- 1
- 2
- 3
- 4
- 5
- 6
- 7
- 8
- 9
- 10
- 11
- 12
- 13
- 14
- 15
-
完成
person组件的整合组件文件// containers/Person/index.js import React, { Component } from 'react' import { nanoid } from 'nanoid' import { connect } from 'react-redux' import { createAddPersonAction } from '../../redux/action/person' class Person extends Component { addPerson = () => { const name = this.nameNode.value const age = +this.ageNode.value // console.log(name,age); const personObj = { id: nanoid(), name, age } console.log(personObj); this.props.jiaren(personObj) this.nameNode.value = '' this.ageNode.value = '' } render() { return ( <div> <h1>我是Person组件</h1> <h2>上方的组件求和为{this.props.he}</h2> <input ref={c => this.nameNode = c} type="text" placeholder='请输入名字' /> <input ref={c => this.ageNode = c} type="text" placeholder='请输入年龄' /> <button onClick={this.addPerson}>添加</button> <ul> { this.props.ren.map((ren) => { return (<li key={ren.id}>名字{ren.name}——年龄{ren.age}</li>) }) } </ul> </div> ) } } export default connect( state => ({ ren: state.rens,he:state.he }), { jiaren: createAddPersonAction } )(Person)- 1
- 2
- 3
- 4
- 5
- 6
- 7
- 8
- 9
- 10
- 11
- 12
- 13
- 14
- 15
- 16
- 17
- 18
- 19
- 20
- 21
- 22
- 23
- 24
- 25
- 26
- 27
- 28
- 29
- 30
- 31
- 32
- 33
- 34
- 35
- 36
- 37
- 38
- 39
- 40
- 41
-
将所有组件的
reducer集中在一个文件中引入并暴露-
在
redux文件夹下的reducer文件夹中创建一个index.js文件,专门用于汇总所有的reducer为一个总的reducer// 引入combineReducers,用于汇总多个reducer import { combineReducers } from 'redux' // 引入为Count组件服务的reducer import count from './count' // 引入为Count组件服务的reducer import persons from './person' // 传入combineReducers中的对象是redux保存的总状态对象 export default combineReducers({ count, persons })- 1
- 2
- 3
- 4
- 5
- 6
- 7
- 8
- 9
- 10
- 11
-
在
redux文件夹下的store.js文件里引入总reducer// 引入汇总之后的reducer import reducer from "./reducer"- 1
- 2
-
3.redux开发者工具
1).使用准备:
-
安装浏览器插件

-
下载工具依赖包
npm install --save-dev redux-devtools-extension- 1
-
store中进行配置
import {composewithDevTools}from 'redux-devtools-extension' const store createStore(allReducer,composewithDevTools(applyMiddleware(thunk)))- 1
- 2
2).使用效果:

-
相关阅读:
生态系统长期观测数据产品体系
举例说明自然语言处理(NLP)技术
CentOS下对安装不同ModSecurity版本的Nginx的并发性能测试
Redis Lua Java 随机编号 用户编号
加密excel(Python)
IPWorks Encrypt Delphi强加密的一整套组件
Python文本处理:初探《三国演义》
Spark RDD机制(持久化、依赖关系、checkpoint)
HTML+CSS+JavaScript仿京东购物网站制作 html静态网页设计制作 dw静态网页成品模板素材网页 web前端网页设计与制作 div静态网页设计
关于volatile与指令重排序的探讨
- 原文地址:https://blog.csdn.net/m0_57262196/article/details/133954307
