-
React18入门(第二篇)——React18+Ts项目配置husky、eslint、pretttier、commitLint
前言
我的项目版本如下:
- React: V18.2.0
- Node.js: V16.14.0
- TypeScript:最新版
- 工具: VsCode
本文将采用图文详解的方式,手把手带你快速完成在React项目中配置husky、prettier、commitLint,实现编码规范的统一,git提交规范的统一。
一、使用 eslint
1.1 装包
npm install eslint @typescript-eslint/parser @typescript-eslint/eslint-plugin --save-dev- 1
1.2 ESLint 插件安装

1.3 创建命令并使用
新增命令
"lint": "eslint \"src/**/*.+(js|ts|jsx|tsx)\"",- 1

执行npm run lint:

二、使用 prettier
2.1 装包
npm install prettier eslint-config-prettier eslint-plugin-prettier --save-dev- 1

2.2 创建配置文件
在根目录中创建
.eslintrc.js文件,写入如下代码module.exports = { "env": { "browser": true, "es2021": true }, "extends": [ "eslint:recommended", "plugin:react/recommended", "plugin:@typescript-eslint/recommended", "plugin:prettier/recommended" ], "overrides": [ ], "parser": "@typescript-eslint/parser", "parserOptions": { "ecmaVersion": "latest", "sourceType": "module" }, "plugins": [ "react", "@typescript-eslint" ], "settings": { "react": { "version": '18.2.0', // 指定你的 React 版本,可以是具体版本号或 "detect" 自动检测 }, }, "rules": { } }- 1
- 2
- 3
- 4
- 5
- 6
- 7
- 8
- 9
- 10
- 11
- 12
- 13
- 14
- 15
- 16
- 17
- 18
- 19
- 20
- 21
- 22
- 23
- 24
- 25
- 26
- 27
- 28
- 29
- 30
- 31
2.3 安装插件
Prettier - Code formatter- 1

安装成功后:

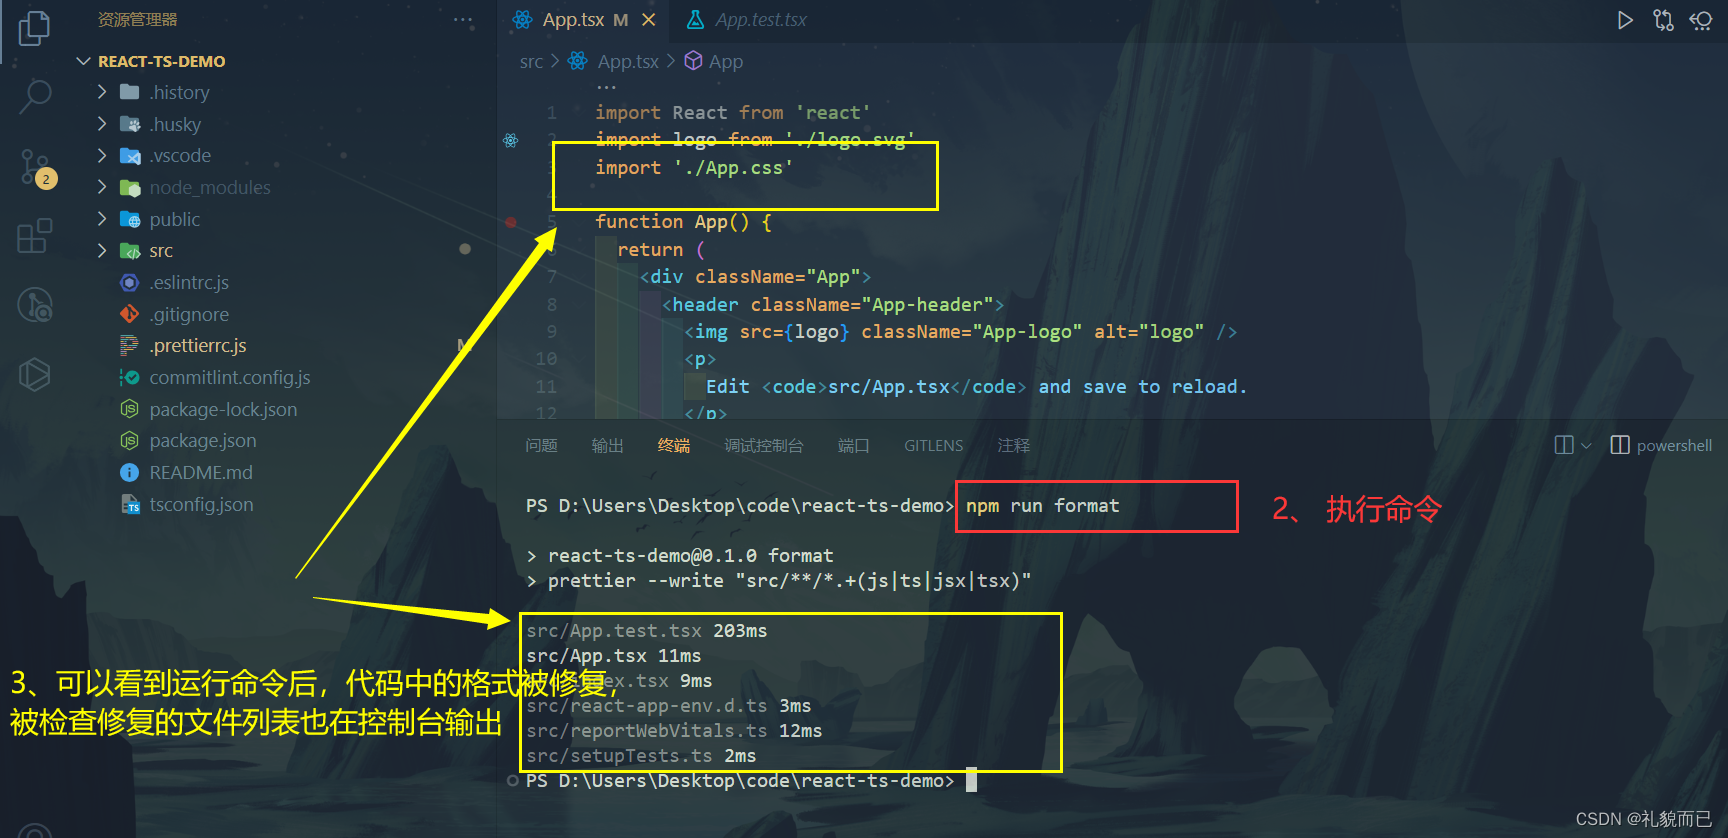
2.3 创建命令并使用
新增命令:表示扫描文件格式,并将文件中的代码修改为正确的格式
"format": " prettier --write \"src/**/*.+(js|ts|jsx|tsx)\"",- 1

运行命令:
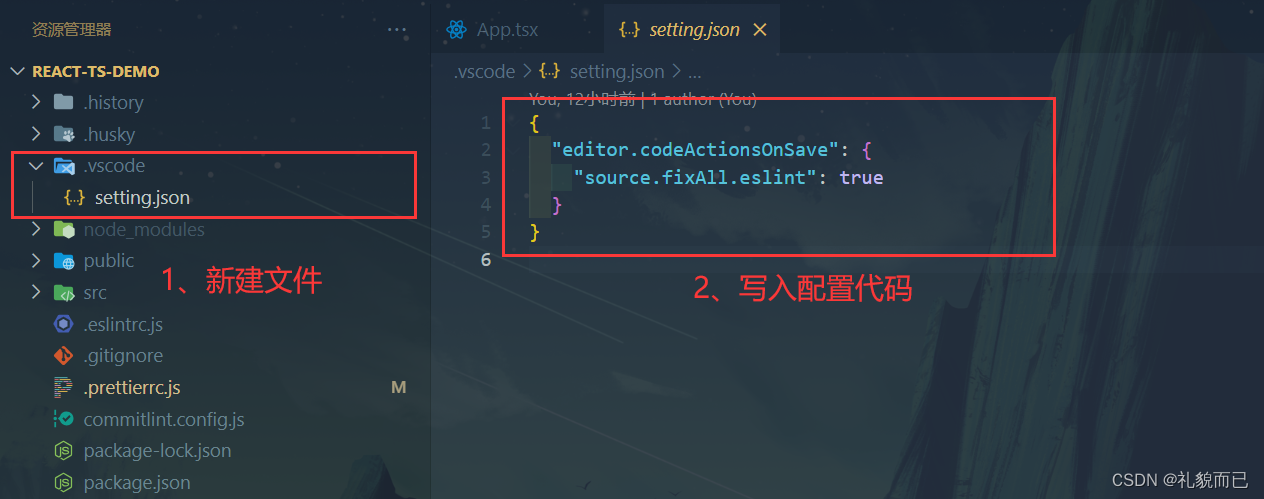
2.4 vscode 配置
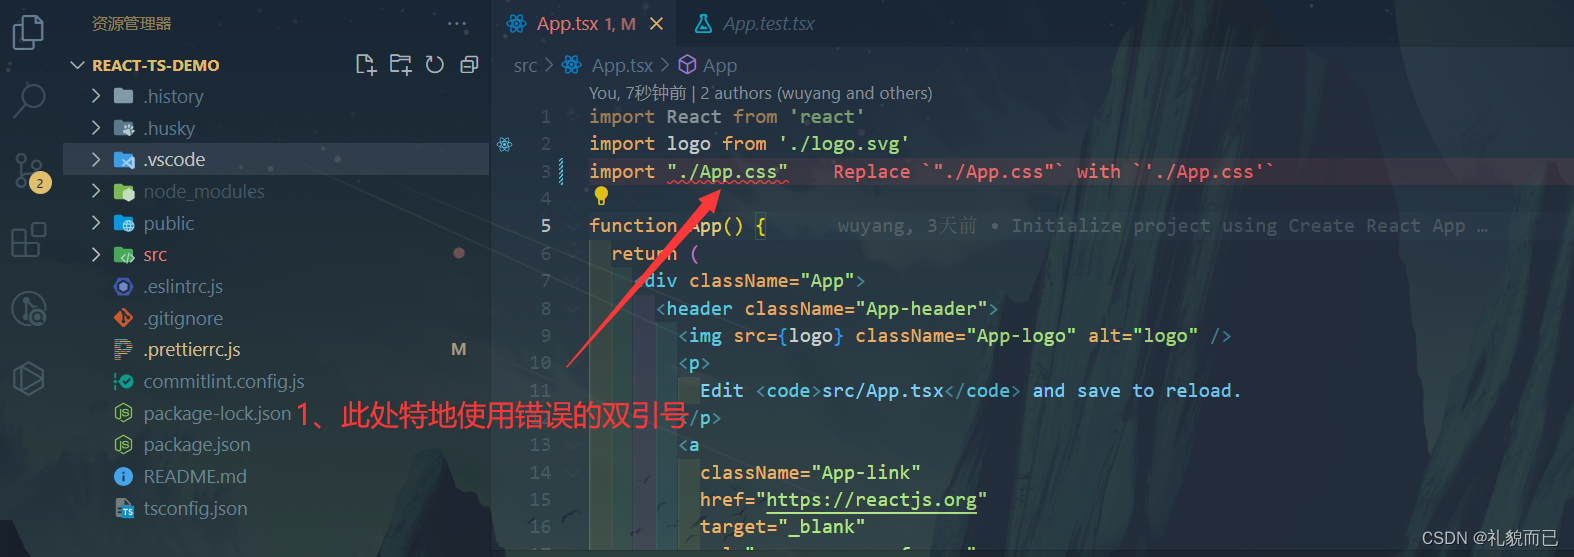
配置成功后,之前讲的通过 npm run format 可以将双引号格式化为 单引号,现在仅需使用 ctrl + s 保存文件,vscode 即可自行格式化
{ "editor.codeActionsOnSave": { "source.fixAll.eslint": true } }- 1
- 2
- 3
- 4
- 5
2.5 代码风格配置
根目录下新建
.prettierrc.js文件,并写入如下代码:module.exports = { // 箭头函数只有一个参数的时候可以忽略括号 arrowParens: 'avoid', // 括号内部不要出现空格 bracketSpacing: true, // 行结束符 endOfLine: 'auto', // 行宽 printWidth: 100, // 换行方式 proseWrap: 'preserve', // 分号 semi: false, // 使用单引号 singleQuote: true, // 缩进 tabWidth: 2, // 使用tab缩进 useTabs: false, // 后置逗号,多行对象、数组在最后一行增加逗号 trailingComma: 'es5', parser: 'typescript', }- 1
- 2
- 3
- 4
- 5
- 6
- 7
- 8
- 9
- 10
- 11
- 12
- 13
- 14
- 15
- 16
- 17
- 18
- 19
- 20
- 21
- 22
- 23
2.6 重启 vscode
重启 vscode 后,我们在 .prettierrc.js 文件中配置的代码风格才会生效
三、将代码提交到 git 仓库
如何使用 vscode 将代码推送至 git 仓库👉:http://t.csdnimg.cn/t7YT9
四、使用 husky
4.1 简介
- 一个 git hook 工具
- 在 git commit 之前执行自定义的命令
- 如执行代码风格的检查,避免提交非规范代码
最终实现的是,即使多人协同开发项目,最终提交到远程仓库中的,也是符合规范的、风格统一的代码。
4.2 安装
npm install husky -D- 1
4.3 编辑package.json >准备脚本并运行一次
npm pkg set scripts.prepare="husky install"- 1
npm run prepare- 1
4.4 增加钩子函数
// 表示 git commit 之前执行 npm run lint npx husky add .husky/pre-commit "npm run lint"- 1
- 2
// 表示 git commit 之前执行 npm run format npx husky add .husky/pre-commit "npm run format"- 1
- 2
// 表示 git commit 之前执行 npm run git add . npx husky add .husky/pre-commit "git add ."- 1
- 2
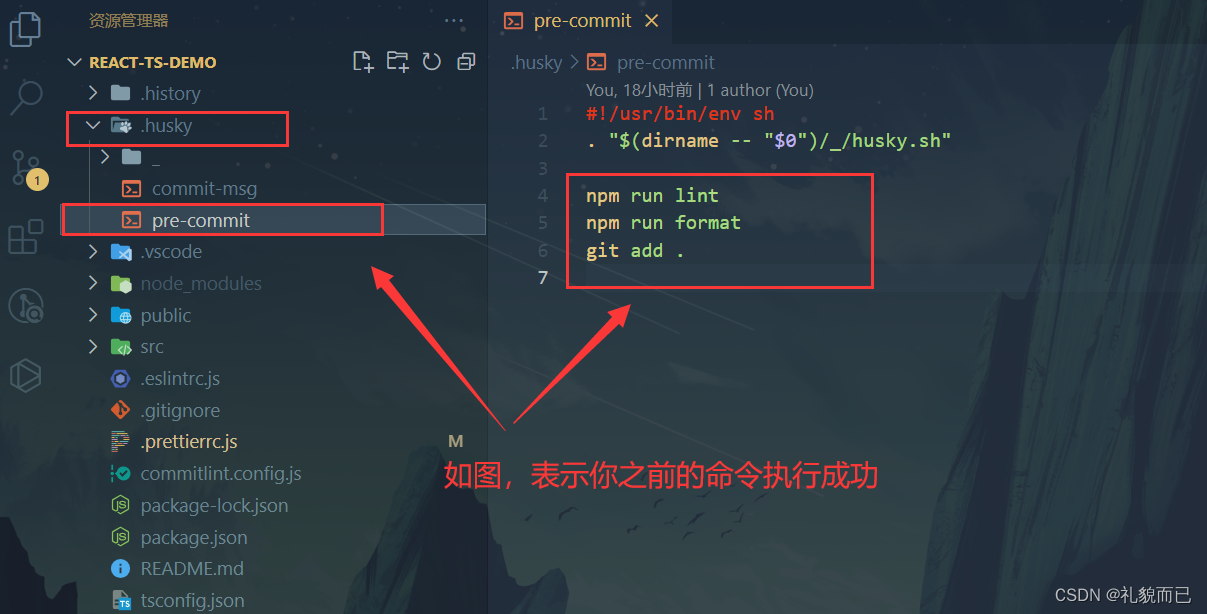
简单测试一下:
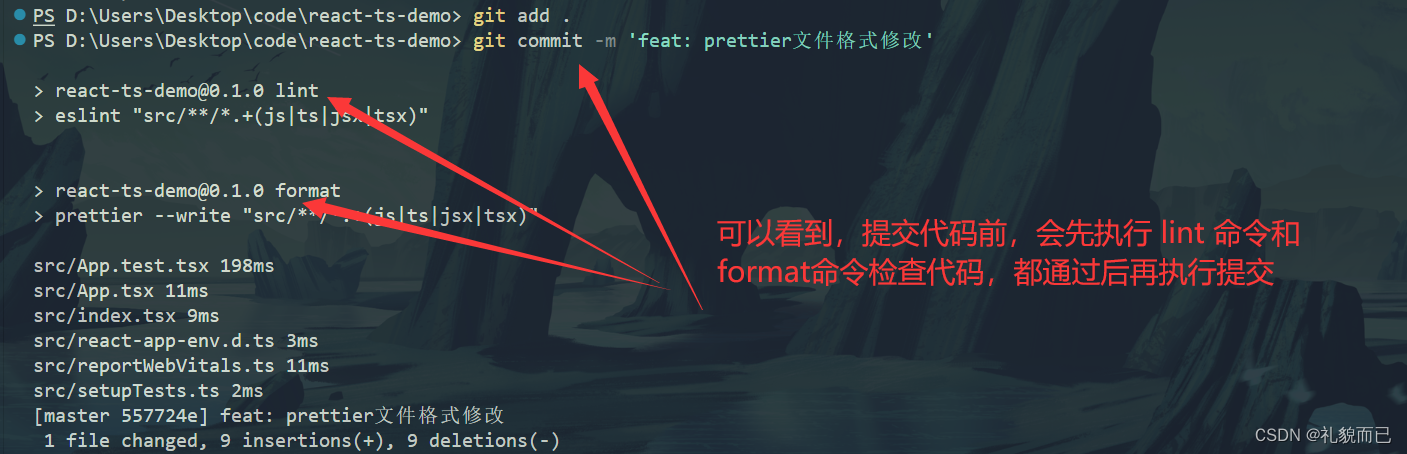
五、使用 commitlint
5.1 安装
windows:
npm install --save-dev @commitlint/config-conventional @commitlint/cli- 1
mac:
npm install --save-dev @commitlint/{config-conventional,cli}- 1
5.2 配置
echo "module.exports = {extends: ['@commitlint/config-conventional']}" > commitlint.config.js- 1
5.3 安装 husky
注:已安装 husky 的不用重复安装
npm:npm install husky --save-dev- 1
yarn
yarn add husky --dev- 1
5.4 增加 hook
npx husky add .husky/commit-msg 'npx --no -- commitlint --edit ${1}'- 1
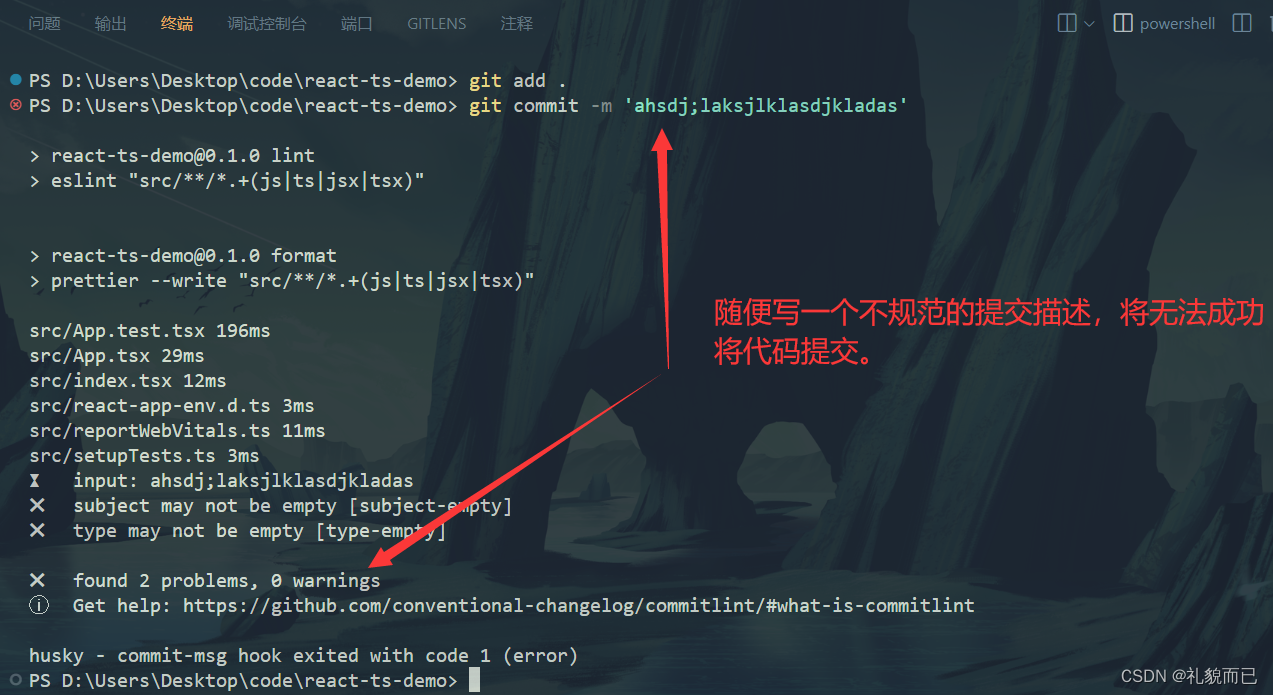
5.5 测试一下
随便写一个提交描述,将无法成功提交
5.6 正确且优雅的提及
参考 git 上的开源项目
vue-pure-admin

参考大家熟知的
vue.js:

5.7 提交格式
前缀 + 冒号 +
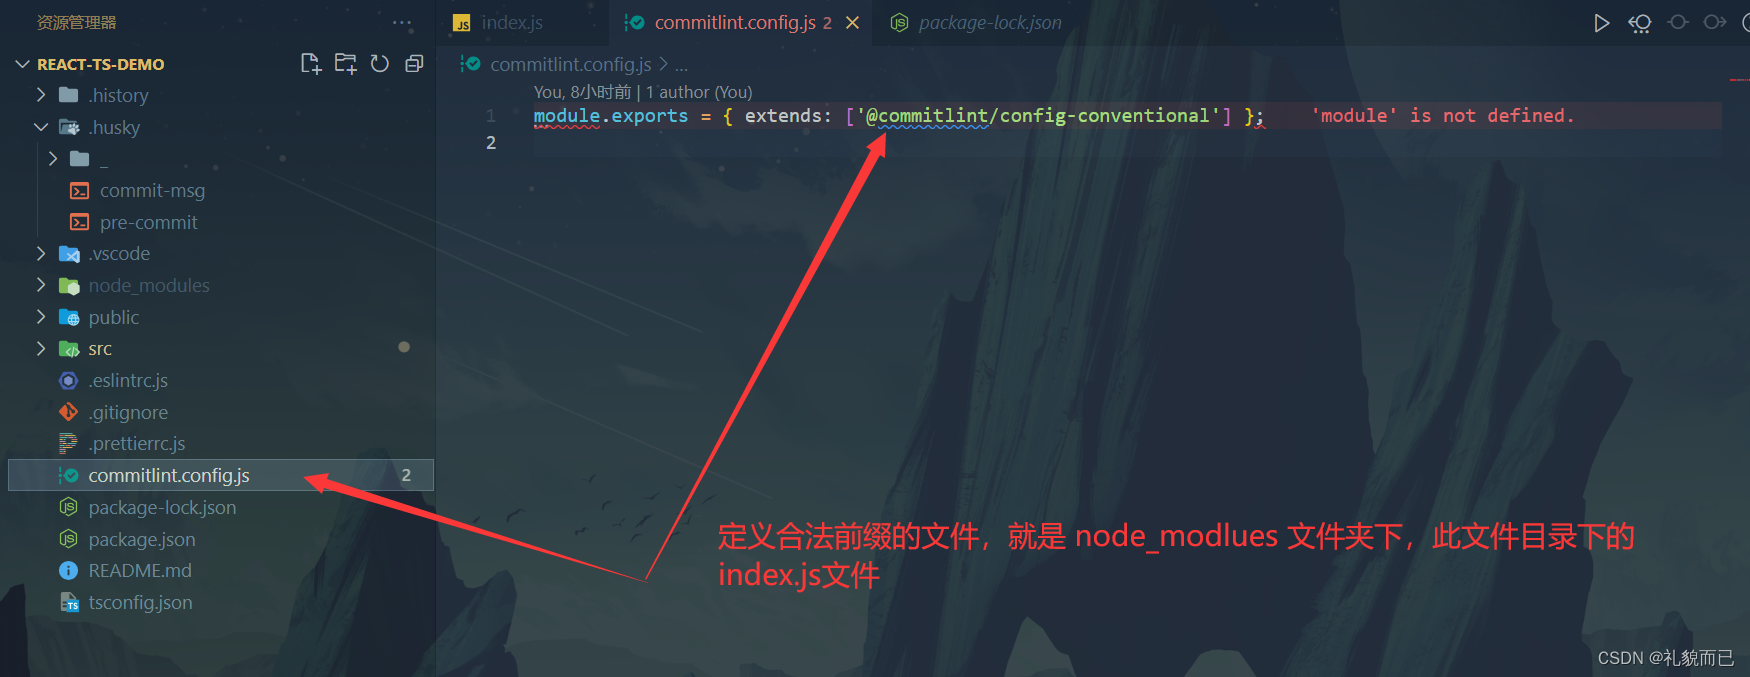
一个空格+ 本次提交描述5.8 查看合法的提交前缀
六、授人以渔
6.1 以上步骤如何来的?
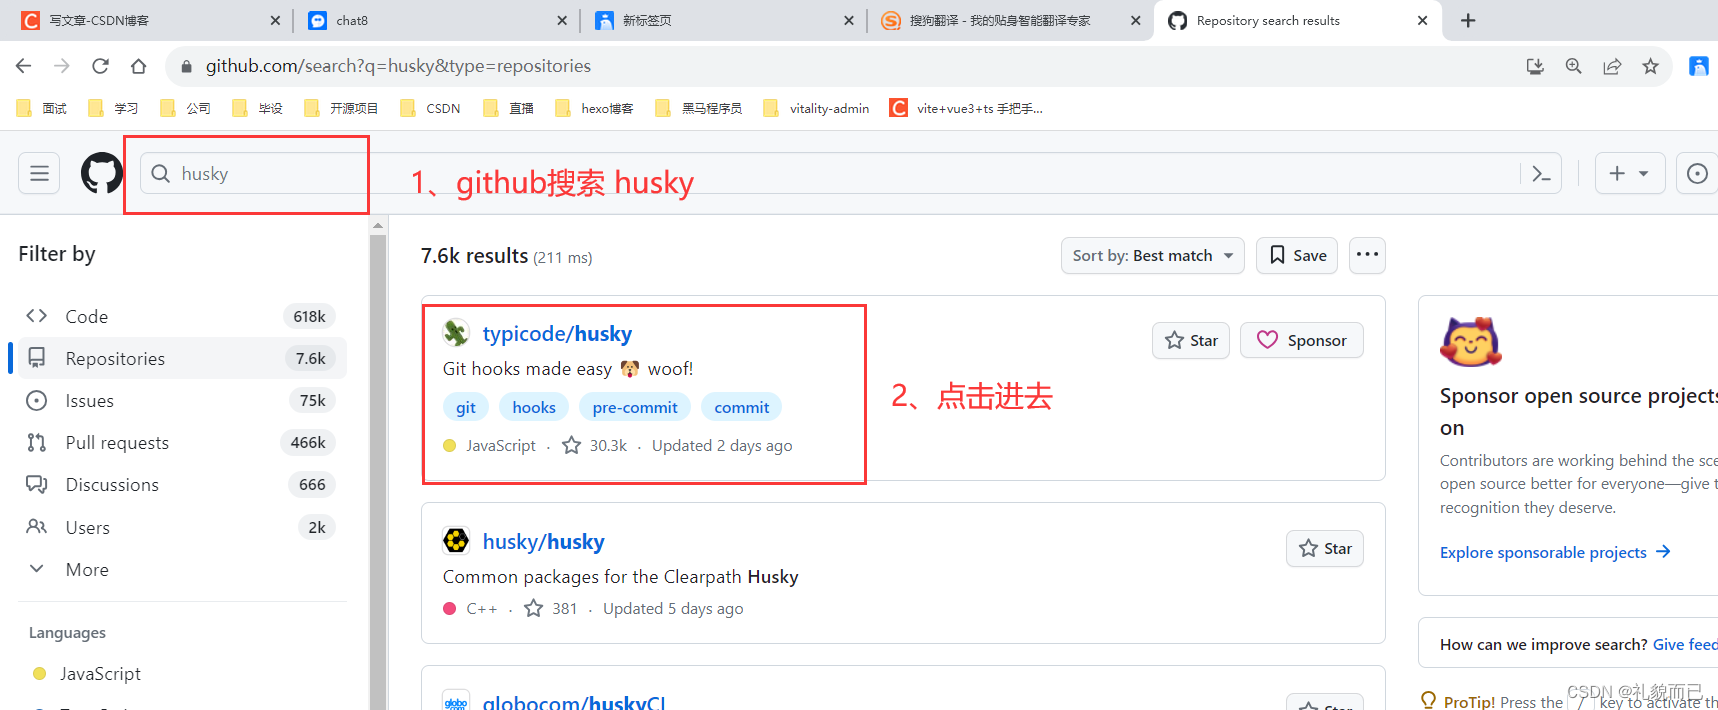
或许屏幕前的你,会好奇,为啥我就知道是这些命令,然后这样配置就能成功,其实这些步骤,在 github 上都有写, 而且比你在网上找的博客帖子更加准确。
6.2 以 husky 为例

七、创作不易,点赞收藏不迷路
-
相关阅读:
C++:迭代器的封装思想
EBS利用虚拟列及hint 提示优化sql案例一则
Excel中如何用计算公式或表达式直接计算出结果?
数据挖掘 知识发现过程与应用结构
算法竞赛进阶指南 基本算法 0x03 前缀和与差分
【Java从入门到精通】这也许就是Java火热的原因吧!
GAMES101 作业0 环境配置 超详细小白教程
python每日一练(5)
Intellij Debugger slow: Method breakpoints may dramatically slow down debugging
Typora基础篇
- 原文地址:https://blog.csdn.net/qq_61402485/article/details/133467731
