-
【C++进阶】二叉树进阶之二叉搜索树

👦个人主页:@Weraphael
✍🏻作者简介:目前学习C++和算法
✈️专栏:C++航路
🐋 希望大家多多支持,咱一起进步!😁
如果文章对你有帮助的话
欢迎 评论💬 点赞👍🏻 收藏 📂 加关注✨
一、什么是二叉搜索树
二叉搜索树(
Binary Search Tree)是基于普通二叉树的一种改进版本。因为普通二叉树没有实际价值,插入、删除等操作没有意义,但二叉搜索树就不一样了。二叉搜索树又称二叉查找树。如果不为空则满足一下性质:
- 左子树上所有节点的值都小于根节点的值
- 右子树上所有节点的值都大于根节点的值
因此,二叉搜索树的查找效率极高。(有点类似二分查找)
下图展示了二叉搜索树

除此之外,二叉搜索树又称做二叉排序树。中序遍历(
左子树 根 右子树)的结果为升序。二、二叉搜索树的实现(迭代版)
2.1 定义结点结构
一般来说,二叉树使用链表来定义,不同的是,由于二叉树每个结点都存在两条出边,因此指针域变为两个,分别指向左子树和右子树的根结点的指针,因此又把这种链表叫做二叉链表。

2.2 定义二叉树结构

2.3 默认构造函数
为了防止出现野指针问题,我们直接将根结点初始化为空
nullptr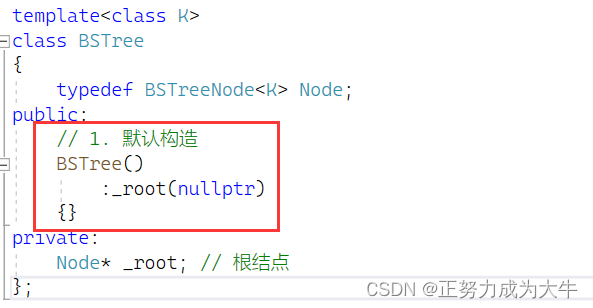
2.4 插入操作Insert
步骤:
-
当插入一个值时,必须先找到满足二叉搜索性质的位置
-
如果找到满足条件的位置并且为空,则结束循环。进行插入:创建新节点、判断需要插在左边还是右边、链接新节点

- 注意:插入的值不能和已有的值重复(出现冗余),否则插入失败。

【代码实现】

new对于自定义类型除了开空间,还会调用构造函数。因此我们可以在BSTreeNode中写一个构造函数初始化_key。
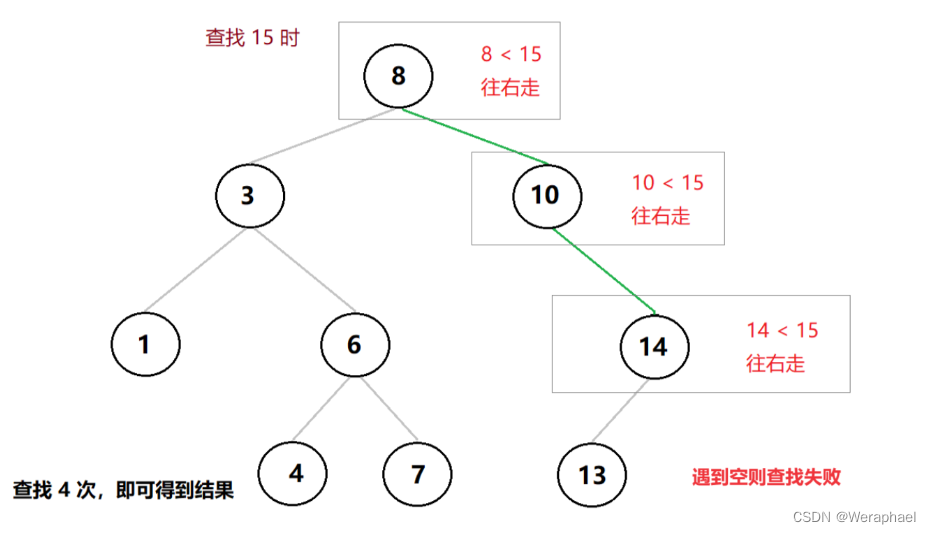
2.5 查找操作Find
步骤:
- 从根结点开始比较,比根大的则往右查找;比根小的往左查找。
- 走到空还没找到,说明值不存在。否则就是存在
【查找成功】

【查找失败】
【代码实现】

3.6 删除操作Erase
二叉搜索树的删除是个麻烦事,需要考虑很多情况,因此大多数面试都会考察搜索二叉树的删除操作。
首先我们需要考虑,被删除的那个结点是否有孩子
因此可能会存在四种情况:
- 没有孩子
- 只有一个左孩子
- 只有一个右孩子
- 既有左孩子,也有右孩子
- 对于只有一个孩子的情况很简单,我们直接将被删除的那个结点的孩子托孤给老父亲即可。并且没有孩子的情况也可以纳入此情况中

- 如果既有左孩子,也有右孩子。那么就应该找一个合适的结点来替代被删除结点的位置。我们称这种方法叫:替换法。那么谁能胜任这种位置呢?左子树的最右节点(左子树中最大的)或者右子树的最左节点(右子树中最小的),将这两个值中的任意一个覆盖待删除节点的值,都能确保符合要求。最后交换两结点中的值,再删除。

【代码实现】

3.7 中序遍历
二叉搜索树的遍历操作和二叉树一模一样的,因此可以有前序遍历、中序遍历以及后序遍历。但是除了中序遍历以为,其他的遍历都没有什么意义。详细遍历解析请看这篇博客 -> 点击跳转
- 搜索二叉树的 中序遍历(
左子树 根 右子树)的结果为升序。

由于封装的缘故,面临着一个尴尬的问题:二叉搜索树的根
_root是私有,在main函数中无法直接获取解决办法:
-
公有化(破坏类的封装性,不推荐)
-
将这种需要用到根的函数再封装(推荐)。

四、二叉搜索树的实现 (递归版)
4.1 查找操作
递归查找逻辑:
- 如果当前根的值
<查找值,递归至右树查找 - 如果当前根的值
>查找值,递归至左树查找
注意:二叉树的递归常常是通过将问题分解为更小规模的子问题来解决的。通过传递根节点作为参数,我们可以在每次递归中处理当前节点,并将问题分解为处理左子树和右子树的子问题。所以,递归中用到根节点是不可避免的。因此,还需要对函数进行封装。
template <class K> class template <class K> class BSTree { typedef BSTreeNode<K> Node; public: bool Find(const K& key) { return _Find(_root, key); } private: bool _Find(Node* root, const K& key) { if (root == nullptr) return false; // 查找的值比当前结点大,递归至右树查找 if (root->_key < key) { return _Find(root->_right, key); } // 查找的值比当前结点小,递归至左树查找 else if (root->_key > key) { return _Find(root->_left, key); } // 最后一种情况就是找到了 else { return true; } } Node* _root; };- 1
- 2
- 3
- 4
- 5
- 6
- 7
- 8
- 9
- 10
- 11
- 12
- 13
- 14
- 15
- 16
- 17
- 18
- 19
- 20
- 21
- 22
- 23
- 24
- 25
- 26
- 27
- 28
- 29
- 30
- 31
- 32
- 33
- 34
- 35
- 36
4.2 插入操作
这里和其它不同的是,在传参的时候使用了 引用。传引用是为了在递归查找过程中能够修改目标节点的
这么说有点抽象,可以先看代码理解;过会画完递归展开图大家就能够理解了。
template <class K> class template <class K> class BSTree { typedef BSTreeNode<K> Node; public: bool Insert(const K& key) { return _Insert(_root, key); } private: bool _Insert(Node*& root, const K& key) { // 当走到空,说明找到了合适的位置 if (root == nullptr) { // 还得找到父亲,为什么加个引用就搞定了? root = new Node(key); return true; } // 插入的值比当前结点大,往右找 if (root->_key < key) { return _Insert(root->_right, key); } // 插入的值比当前结点小,往左找 else if (root->_key > key) { return _Insert(root->_left, key); } // 当插入的值和树发生冗余,直接返回false else { return false; } } Node* _root; };- 1
- 2
- 3
- 4
- 5
- 6
- 7
- 8
- 9
- 10
- 11
- 12
- 13
- 14
- 15
- 16
- 17
- 18
- 19
- 20
- 21
- 22
- 23
- 24
- 25
- 26
- 27
- 28
- 29
- 30
- 31
- 32
- 33
- 34
- 35
- 36
- 37
- 38
- 39
- 40
- 41

【递归展开图】

4.3 删除操作
递归删除时也使用了引用,其想法和插入一样,不需要找删除结点的父亲,直接修改目标节点的指针值
template <class K> class template <class K> class BSTree { typedef BSTreeNode<K> Node; public: bool Earse(const K& key) { return _Erase(root, key); } private: bool _Erase(Node* root, const K& key) { // 如果是空结点,说明删除失败 if (root == nullptr) return false; if (root->_key < key) { return _Erase(root->_right, key); } else if (root->_key > key) { return _Erase(root->_left, key); } // 找到key else { Node* del = root; // 还是分四种情况 // 1. 删除结点的左孩子为空(包含没有孩子的情况) if (root->_left == nullptr) { root = root->_right; } // 2. 删除结点的右孩子为空 else if (root->_right == nullptr) { root = root->_left; } // 3. 删除结点孩子都不为空 else { //递归为小问题去处理 Node* maxLeft = root->_left; while (maxLeft->_right) { maxLeft = maxLeft->_right; } //注意:需要交换 std::swap(root->_key, maxLeft->_key); //注意:当前找的是左子树的最右节点,所以递归从左子树开始 return _Erase(root->_left, key); } delete del; //释放节点 return true; } return false; } Node* _root; };- 1
- 2
- 3
- 4
- 5
- 6
- 7
- 8
- 9
- 10
- 11
- 12
- 13
- 14
- 15
- 16
- 17
- 18
- 19
- 20
- 21
- 22
- 23
- 24
- 25
- 26
- 27
- 28
- 29
- 30
- 31
- 32
- 33
- 34
- 35
- 36
- 37
- 38
- 39
- 40
- 41
- 42
- 43
- 44
- 45
- 46
- 47
- 48
- 49
- 50
- 51
- 52
- 53
- 54
- 55
- 56
- 57
- 58
- 59
- 60
- 61
- 62
- 63
- 64
- 65
- 66
五、其他接口
5.1 释放结点delete
释放结点有很多种方式,比如可以先删除根结点,再删除其子结点,但是这样有点麻烦,因为删除了根结点,就要记录其子结点。这里有一个非常简便的方式:使用后序遍历的思想,先释放孩子,再释放双亲结点。
template <class K> class template <class K> class BSTree { typedef BSTreeNode<K> Node; public: ~BSTree() { _destory(_root); } private: void _destory(Node*& root) { if (root == nullptr) return; //后序遍历销毁 destory(root->_left); destory(root->_right); delete root; root = nullptr; } Node* _root; };- 1
- 2
- 3
- 4
- 5
- 6
- 7
- 8
- 9
- 10
- 11
- 12
- 13
- 14
- 15
- 16
- 17
- 18
- 19
- 20
- 21
- 22
- 23
- 24
- 25
- 26
- 27
5.2 拷贝构造
销毁问题考虑完以后,就要想是否会有浅拷贝问题,因为浅拷贝问题会导致一个结点析构两次,程序就崩了。而我们在类和对象中说过,如果类中有动态分配内存的指针变量,则需要手动编写深拷贝的拷贝构造函数。
深拷贝逻辑:前序遍历的思想,逐个创建好节点,链接后才返回
template <class K> class template <class K> class BSTree { typedef BSTreeNode<K> Node; public: BSTree(const BSTree<K>& t) :_root(nullptr) { _root = CopyTree(t._root); } private: Node *CopyTree(Node *root) { if (root == nullptr) { return nullptr; } Node *newroot = new Node(root->_key); newroot->_left = CopyTree(root->_left); newroot->_right = CopyTree(root->_right); return newroot; } Node* _root; };- 1
- 2
- 3
- 4
- 5
- 6
- 7
- 8
- 9
- 10
- 11
- 12
- 13
- 14
- 15
- 16
- 17
- 18
- 19
- 20
- 21
- 22
- 23
- 24
- 25
- 26
- 27
- 28
- 29
5.3 赋值运算符重载
和拷贝构造同理,需要实现深拷贝
直接写现代写法
template <class K> class template <class K> class BSTree { typedef BSTreeNode<K> Node; public: BSTree<K>& operator=(BSTree<K> t) { if (this != &tree) { std::swap(_root, tree._root); return *this; } } private: Node* _root; };- 1
- 2
- 3
- 4
- 5
- 6
- 7
- 8
- 9
- 10
- 11
- 12
- 13
- 14
- 15
- 16
- 17
- 18
六、二叉搜索树性能分析
我们在一开始说过,二叉搜索树的查找效率极高,具有一定的实际价值。
搜索二叉树的时间复杂度取决于树的高度。因此当是一颗平衡二叉搜索树时,时间复杂度是
O(log n)。因为每次搜索都可以通过比较目标值与当前节点的值来确定向左子树还是右子树进行搜索,这样每次都可以将搜索范围减半。
是不是有点类似于二分查找,但二分查找不是一个很实用的算法。因为对比二叉搜索树来说,二分查找(底层是一个数组)的删除和插入的效率低0(n)(特别是中间插入和删除)
二叉搜索树看起来这么完美,但下限没有保障。在最坏的情况下,当搜索二叉树是一个不平衡的树时,时间复杂度为
O(n),其中n是树中节点的数量。这是因为在最坏情况下,每次搜索都要遍历树的所有节点。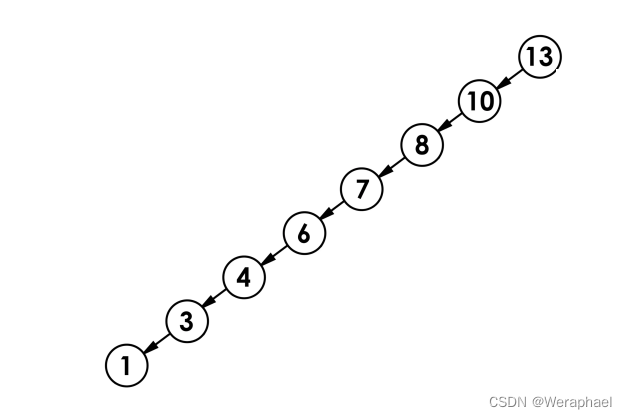
因此,为了解决这个问题,引入了
AVL树和红黑树(后续会讲解)七、二叉搜索树的应用
7.1 key的查找模型
只有
key作为关键码,结构中只需要存储Key即可,关键码即为需要搜索到的值。Key模型的应用场景:快速判断在不在的场景
比如,
- 门禁系统。(把住户的信息录入一颗树,如果用户在这颗树里,就会开门)
- 小区车辆出入系统。(是户主就开闸)
- 检查单词拼写是否正确
以第三个为例,词库中所有单词集合中的每个单词作为
key,构建一棵二叉搜索树。在二叉搜索树中检索该单词是否存在,存在则拼写正确,不存在则拼写错误刚刚实现的二叉搜索树就是一个
key的查找模型#include#include "BSTree.h" #include using namespace std; int main() { vector<string> words = { "apple", "hello", "world", "c++" }; BSTree<string> bs; // 存入搜索二叉树中 for (auto x : words) { bs.Insert(x); } string s; while (cin >> s) { if (bs.Find(s)) { cout << "拼写正确" << endl; } else { cout << "拼写错误" << endl; } } return 0; } - 1
- 2
- 3
- 4
- 5
- 6
- 7
- 8
- 9
- 10
- 11
- 12
- 13
- 14
- 15
- 16
- 17
- 18
- 19
- 20
- 21
- 22
- 23
- 24
- 25
- 26
- 27
- 28
【程序结果】

7.2 key / value 的模型
key / value的模型:通过一个值找到另一个值
注:即使是
key / value模型,也只是将key作为查找、插入、删除的依据,基本逻辑与value没有任何关系,value仅仅起到一个存储额外值的作用。key / value代码实现
只展现修改部分
【结点结构】

【二叉树结构】
- 查找时返回的不再是
bool,而是指向当前节点的指针,因为value可以被修改。当然还有插入操作
template<class K, class V> struct BSTNode { BSTNode<K,V>* _left; BSTNode<K,V>* _right; K _key; V _value; BSTNode(const K& key, const V& value) :_left(nullptr) , _right(nullptr) , _key(key) , _value(value) {} }; template<class K, class V> class BSTree { typedef BSTNode<K, V> Node; public: BSTree() :_root(nullptr) {} Node* Find(const K& key) { return _Find(_root, key); } bool Insert(const K& key, const V& value) { return _Insert(_root, key, value); } private: Node* _Find(Node* root, const K& key) { if (root == nullptr) return nullptr; if (root->_key < key) { return _Find(root->_right, key); } else if (root->_key > key) { return _Find(root->_left, key); } else return root; } bool _Insert(Node*& root, const K& key, const V& value) { if (root == nullptr) { root = new Node(key, value); return true; } if (root->_key < key) { return _Insert(root->_right, key, value); } else if (root->_key > key) { return _Insert(root->_left, key, value); } else { return false; } } private: Node* _root; };- 1
- 2
- 3
- 4
- 5
- 6
- 7
- 8
- 9
- 10
- 11
- 12
- 13
- 14
- 15
- 16
- 17
- 18
- 19
- 20
- 21
- 22
- 23
- 24
- 25
- 26
- 27
- 28
- 29
- 30
- 31
- 32
- 33
- 34
- 35
- 36
- 37
- 38
- 39
- 40
- 41
- 42
- 43
- 44
- 45
- 46
- 47
- 48
- 49
- 50
- 51
- 52
- 53
- 54
- 55
- 56
- 57
- 58
- 59
- 60
- 61
- 62
- 63
- 64
- 65
- 66
- 67
- 68
- 69
- 70
- 71
- 72
- 73
- 74
- 75
- 76
- 77
- 78
常见场景:
- 停车场的收费系统。进场的时候会把车辆的时间和车牌存下来,出场的时候会去找入场时间,然后进行计时收费
- 查找单词的翻译
#include#include #include "Kval.h" using namespace std; int main() { // 输入单词,查找单词对应的中文翻译 BSTree<string, string> dict; dict.Insert("string", "字符串"); dict.Insert("tree", "树"); dict.Insert("left", "左边、剩余"); dict.Insert("right", "右边"); dict.Insert("sort", "排序"); // 插入词库中所有单词 string str; while (cin >> str) { BSTNode<string, string>* ret = dict.Find(str); if (ret == nullptr) { cout << "单词拼写错误,词库中没有这个单词:" << str << endl; } else { cout << str << "中文翻译:" << ret->_value << endl; } } return 0; } - 1
- 2
- 3
- 4
- 5
- 6
- 7
- 8
- 9
- 10
- 11
- 12
- 13
- 14
- 15
- 16
- 17
- 18
- 19
- 20
- 21
- 22
- 23
- 24
- 25
- 26
- 27
- 28
- 29
- 30
- 31
【输出结果】

除此之外,还可以再带一个值用于统计,这其实就是哈希的思想(建立映射关系)
int main() { // 统计水果出现的次数 string arr[] = { "苹果", "西瓜", "苹果", "西瓜", "苹果", "苹果", "西瓜", "苹果", "香蕉", "苹果", "香蕉" }; BSTree<string, int> countTree; for (const auto& str : arr) { // 先查找水果在不在搜索树中 // 1、不在,说明水果第一次出现,则插入<水果, 1> // 2、在,则查找到的节点中水果对应的次数++ //BSTreeNode<string, int>* ret = countTree.Find(str); auto ret = countTree.Find(str); if (ret == NULL) { countTree.Insert(str, 1); } else { ret->_value++; } } countTree.InOrder(); }- 1
- 2
- 3
- 4
- 5
- 6
- 7
- 8
- 9
- 10
- 11
- 12
- 13
- 14
- 15
- 16
- 17
- 18
- 19
- 20
- 21
- 22
- 23
- 24
【输出结果】

八、源代码
Gitee代码仓库:点击跳转 -
相关阅读:
jsp旅行社管理系统Myeclipse开发mysql数据库web结构java编程计算机网页项目
从零开始Blazor Server(1)--项目搭建
线性代数学习笔记11-2:总复习Part2(相似对角化、对称矩阵、奇异值分解SVD)
大模型分布式训练并行技术(六)-多维混合并行
centos7安装mysql5.7
OpenGL ES学习(8)——剪裁测试认识
【C语言】【排序算法】----- 归并排序
mysql buffer pool详解
C语言深度解刨(一)——关键字
解决导入maven工程时cannot resolve依赖问题
- 原文地址:https://blog.csdn.net/Weraphael/article/details/132776493
