-
一文学会Canal怎么用
一.概念
1.什么是Canal
canal是用java开发的基于数据库增量日志解析,提供增量数据订阅&消费的中间件。目前,canal主要支持了MySQL的binlog解析,解析完成后才利用canal client 用来处理获得的相关数据。
2.Canal的基本原理
想了解canal的工作原理,首先你得知道什么是主从复制?
- Master主库将改变记录,写到二进制日志(binary log)中
- Slave从库向mysql master发送dump协议,将master主库的binary log events拷贝到它的中继日志(relay log);
- Slave从库读取并重做中继日志中的事件,将改变的数据同步到自己的数据库。
binlog的格式有三种:STATEMENT,MIXED,ROW

canal的工作原理就是把自己伪装成MySQL slave,模拟MySQL slave的交互协议向MySQL Mater发送 dump协议,MySQL mater收到canal发送过来的dump请求,开始推送binary log给canal,然后canal解析binary log,再发送到存储目的地,比如MySQL,Kafka,Elastic Search等等。
canal的数据同步不是全量的,而是增量。基于binary log增量订阅和消费,canal可以做:


二.Mysql配置
1. 安装
参考教程:添加链接描述
2. 开启mysql的binlog
[client] default_character_set=utf8 [mysqld] collation_server = utf8_general_ci character_set_server = utf8 ##局域网内唯一id server_id=111 ##指定不需要同步的数据库名称 binlog-ignore-db=mysql ##开启二进制日志功能 log-bin=mysql-bin ##设置二进制日志使用内存大小 binlog_cache_size=1M ## 二进制日志格式 binlog-format=ROW ## 二进制日志过期清理时间 默认值为0 表示不自动清理 expire_logs_days=7 ## 跳过主从复制中遇到的错误 slave_skip_errors=1062- 1
- 2
- 3
- 4
- 5
- 6
- 7
- 8
- 9
- 10
- 11
- 12
- 13
- 14
- 15
- 16
- 17
- 18
- 19
- 20
配置完成后重启mysql,并查询是否配置生效:ON就是开启

注意:
不是执行命令后binlog显示ON就开启了
监听多个MySQL数据库需要在mysql配置添加多个binlog-do-db3.mysql创建cannl用户并授权
CREATE USER canal IDENTIFIED BY '123456'; GRANT SELECT, REPLICATION SLAVE, REPLICATION CLIENT ON *.* TO 'canal'@'%'; FLUSH PRIVILEGES;- 1
- 2
- 3
 ue
ue三.安装配置ES,kibana
略
四.安装canal-server
可以直接监听MySQL的binlog,把自己伪装成MySQL的从库,只负责接收数据,并不做处理。

-
解压
tar -zxvf canal.deployer-1.1.4.tar.gz -
canal.properties的common属性前四个配置项
canal.id= 1 #canal的编号,在集群环境下,不同canal的id不同,注意它和mysql的server_id不同。 canal.ip= # ip这里不指定,默认为本机 canal.port= 11111 # 端口号,是给tcp模式(netty)时候用的,如果用了kafka或者rocketmq,就不会去起这个端口了 canal.zkServers= # zk用于canal cluster canal.serverMode = tcp # 用于指定什么模式拉取数据- 1
- 2
- 3
- 4
- 5


-
查看监听的数据库状态

-
修改conf/example/instance.properties
canal.instance.gtidon=false # position info #数据库地址 ##slaveId 不能与 my.cnf 中的 server-id 项重复 ## canal.instance.mysql.slaveId = 1234 canal.instance.master.address=192.168.111.5:3306 #binlog日志名称 canal.instance.master.journal.name=mysql-bin.000005 #binlog偏移量 canal.instance.master.position=154 canal.instance.master.timestamp= canal.instance.master.gtid= # rds oss binlog canal.instance.rds.accesskey= canal.instance.rds.secretkey= canal.instance.rds.instanceId= # table meta tsdb info canal.instance.tsdb.enable=true #canal.instance.tsdb.url=jdbc:mysql://127.0.0.1:3306/canal_tsdb #canal.instance.tsdb.dbUsername=canal #canal.instance.tsdb.dbPassword=canal #canal.instance.standby.address = #canal.instance.standby.journal.name = #canal.instance.standby.position = #canal.instance.standby.timestamp = #canal.instance.standby.gtid= # username/password #mysql授权用户 canal.instance.dbUsername=canal canal.instance.dbPassword=123456 canal.instance.connectionCharset = UTF-8 canal.instance.defaultDatabaseName =test_canal # enable druid Decrypt database password canal.instance.enableDruid=false #canal.instance.pwdPublicKey=MFwwDQYJKoZIhvcNAQEBBQADSwAwSAJBALK4BUxdDltRRE5/zXpVEVPUgunvscYFtEip3pmLlhrWpacX7y7GCMo2/JM6LeHmiiNdH1FWgGCpUfircSwlWKUCAwEAAQ== # table regex canal.instance.filter.regex=.*\\..* # table black regex canal.instance.filter.black.regex= # mq config #canal.mq.topic=example # 多主题 canal会将对应表的数据推送到“库名—表名”的主题队列里面 canal.mq.dynanicTopic=.*\\..* canal.mq.partition=0 # hash partition config #canal.mq.partitionsNum=3 #canal.mq.partitionHash=mytest.person:id,mytest.role:id- 1
- 2
- 3
- 4
- 5
- 6
- 7
- 8
- 9
- 10
- 11
- 12
- 13
- 14
- 15
- 16
- 17
- 18
- 19
- 20
- 21
- 22
- 23
- 24
- 25
- 26
- 27
- 28
- 29
- 30
- 31
- 32
- 33
- 34
- 35
- 36
- 37
- 38
- 39
- 40
- 41
- 42
- 43
- 44
- 45
- 46
- 47
- 48
- 49
- 50
- 51
- 52
- 53
- 54
- 55
- 56


- 启动
sh bin/startup.sh- 1

- 测试
创建数据库表

创建对应的队列并绑定到相应的交换机上

消费队列里面同步数据
canal发送到mq的数据为byte[]类型@RabbitListener(queues = {"test_canal_stu"}) public void stu(byte[] input) throws IOException { JSONObject o = JSON.parseObject(input, JSONObject.class); String action = o.getString("type"); System.out.println("=============stu-action================="); System.out.println(action); List<testStu> data = JSON.parseArray(o.getString("data"), testStu.class); System.out.println("============stu-data=================="); System.out.println(data); }- 1
- 2
- 3
- 4
- 5
- 6
- 7
- 8
- 9
- 10
- 11
- 12

五.安装canal-admin
-
解压canal.admin-1.1.6.tar.gz
-
初始化脚本: conf/canal_manager.sql

-
修改conf/application.yml:

-
启动
./bin/startup.sh
cat logs/admin.log

- 修改canal-server配置文件
vi conf/canal_local.properties- 1

- 启动canal-server服务
指定启动配置为local,或者将canal_local.properties替换掉canal.properties ./bin/startup.sh local- 1
- 2
-
canal-server启动成功后,刷新admin的server管理列表,canal-server会自动注册到admin

-
新建server

-
载入server模板

-
添加instance
配置

在server配置里面添加

- 坑
canal-admin Handler dispatch failed; nested exception is java.lang.NoSuchMethodError: java.nio.ByteBuffer.clear()Ljava/nio/ByteBuffer;- 1
无法启动成功

jdk版本问题,官方写的是1.5以上,使用的jdk1.8不行,后面采用了11测试通过,其它版本大家可以自行测试
- 密码需要加密
select password('123456');- 1
- Caused by: com.alibaba.otter.canal.common.CanalException: requestGet for canal config error: auth :admin is failed
赋予数据库权限
grant select, insert, update, delete on canal_manager.* to canal@'%'- 1
六.安装canal-adapter
相当于canal的客户端,会从canal-server中获取数据,然后对数据进行同步,可以同步到MySQL、Elasticsearch和HBase等存储中去。

-
解压:
tar -zxvf canal.adapter-1.1.2.tar.gz -
修改canal-adapter/conf/application.yml
server: port: 8081 spring: jackson: date-format: yyyy-MM-dd HH:mm:ss time-zone: GMT+8 default-property-inclusion: non_null canal.conf: mode: tcp #tcp kafka rocketMQ rabbitMQ flatMessage: true zookeeperHosts: syncBatchSize: 1000 retries: 0 timeout: accessKey: secretKey: consumerProperties: # canal tcp consumer canal.tcp.server.host: 127.0.0.1:11111 # 之前起的 canal-server 地址 url canal.tcp.zookeeper.hosts: canal.tcp.batch.size: 500 canal.tcp.username: canal.tcp.password: # kafka consumer # kafka.bootstrap.servers: 127.0.0.1:9092 # kafka.enable.auto.commit: false # kafka.auto.commit.interval.ms: 1000 # kafka.auto.offset.reset: latest # kafka.request.timeout.ms: 40000 # kafka.session.timeout.ms: 30000 # kafka.isolation.level: read_committed # kafka.max.poll.records: 1000 # rocketMQ consumer # rocketmq.namespace: # rocketmq.namesrv.addr: 127.0.0.1:9876 # rocketmq.batch.size: 1000 # rocketmq.enable.message.trace: false # rocketmq.customized.trace.topic: # rocketmq.access.channel: # rocketmq.subscribe.filter: # rabbitMQ consumer # rabbitmq.host: # rabbitmq.virtual.host: # rabbitmq.username: # rabbitmq.password: # rabbitmq.resource.ownerId: srcDataSources: defaultDS: url: jdbc:mysql://127.0.0.1:3306/mytest?useUnicode=true # 你的数据库地址 最好填写公网地址 username: root # 数据库账号 password: admin # 数据库密码 canalAdapters: - instance: example # canal instance Name or mq topic name groups: - groupId: g1 outerAdapters: - name: logger - name: es7 # 你的es配置 hosts: 127.0.0.1:9200 # 你的es配置 最好是公网地址 properties: mode: rest # 你的es配置 cluster.name: test-es # 你的es配置 之前第一步在elasticsearch中配置的 cluster.name- 1
- 2
- 3
- 4
- 5
- 6
- 7
- 8
- 9
- 10
- 11
- 12
- 13
- 14
- 15
- 16
- 17
- 18
- 19
- 20
- 21
- 22
- 23
- 24
- 25
- 26
- 27
- 28
- 29
- 30
- 31
- 32
- 33
- 34
- 35
- 36
- 37
- 38
- 39
- 40
- 41
- 42
- 43
- 44
- 45
- 46
- 47
- 48
- 49
- 50
- 51
- 52
- 53
- 54
- 55
- 56
- 57
- 58
- 59
- 60
- 61
- 62
- 63
- 64
- 65
- 修改canal-adapter/conf/es7/test.yml
dataSourceKey: defaultDS destination: .*\\..* groupId: g1 esMapping: _index: test_adapter _id: _id # upsert: true # pk: id sql: "SELECT id as _id,user_id as user_id,name as name,unit as unit FROM test_adapter" # objFields: # _labels: array:; etlCondition: "where a.c_time>={}" commitBatch: 3000- 1
- 2
- 3
- 4
- 5
- 6
- 7
- 8
- 9
- 10
- 11
- 12
- 13
- 添加索引
PUT /test_adapter/ { "mappings": { "properties": { "id": { "type": "keyword" }, "user_id": { "type": "integer" }, "name": { "type": "text" }, "unit": { "type": "text" }, "record_date":{ "type": "date" } } } }- 1
- 2
- 3
- 4
- 5
- 6
- 7
- 8
- 9
- 10
- 11
- 12
- 13
- 14
- 15
- 16
- 17
- 18
- 19
- 20
- 21
- 22
七.通过canal和RabbitMQ将mysql数据同步ES
- 1.修改canal-server 的conf/canal.properties文件


- 2.修改conf/example/instance.properties文件


- 3创建数据库表,交换机和主题队列
CREATE TABLE `stu` ( `id` int(11) NOT NULL, `stu_no` int(11) DEFAULT NULL, `createdAt` date DEFAULT NULL, PRIMARY KEY (`id`) ) ENGINE=InnoDB DEFAULT CHARSET=utf8 COLLATE=utf8_bin;- 1
- 2
- 3
- 4
- 5
- 6

只需要在mq中创建对应的队列并以’数据库名_表名’为topic,canal就会监听mysql的binlog日志并将其发送到对应的队列@Data public class testStu implements Serializable { private String id; private String stuNo; private Date createdAt; }- 1
- 2
- 3
- 4
- 5
- 6
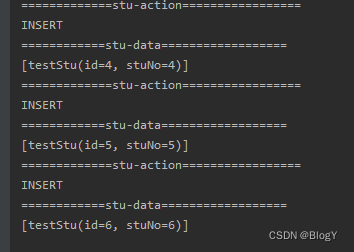
- 3.测试同步代码
@RabbitListener(queues = {"test_canal_stu"}) public void stu(byte[] input) throws IOException { JSONObject o = JSON.parseObject(input, JSONObject.class); String action = o.getString("type"); System.out.println("=============stu-action================="); System.out.println(action); List<testStu> data = JSON.parseArray(o.getString("data"), testStu.class); System.out.println("============stu-data=================="); System.out.println(data); }- 1
- 2
- 3
- 4
- 5
- 6
- 7
- 8
- 9
- 10
- 11
- 12
- 4.同步ES测试代码
@RabbitListener(queues = {"test_canal_stu"}) public void stu(byte[] input) throws IOException { JSONObject o = JSON.parseObject(input, JSONObject.class); String action = o.getString("type"); List<testStu> data = JSON.parseArray(o.getString("data"), testStu.class); try { esTest(action,data); } catch (Exception e) { e.printStackTrace(); } } private void esTest(String action,List<testStu> stuList) throws Exception { if ("DELETE".equals(action)) { //数据库表进行硬删除 batchDeleteFromEs(stuList); } else { batchSaveToEs(stuList); } } //根据时间进行分片 并批量删除 public void batchDeleteFromEs(List<testStu> data) throws Exception { Map<String, List<String>> map = data.stream().collect( Collectors.groupingBy(dto -> getIndex(dto.getCreatedAt()), Collectors.mapping(testStu::getId, Collectors.toList())) ); for (Map.Entry<String, List<String>> entry : map.entrySet()) { String index = entry.getKey(); List<String> ids = entry.getValue(); batchDeleteByIds(index, ids); } } //保存 public void batchSaveToEs(List<testStu> data) throws Exception { List<Object> appointLog = new ArrayList<>(); for (testStu dto : data) { testStu esDto = new testStu(); BeanUtils.copyProperties(dto, esDto); //处理相关数据 dealDate(esDto); appointLog.add(esDto); } esOperation.batchUpdateOrCreate(getIndex(data.getCreatdAt), appointLog); } //通过创建时间生成对应索引 将数据进行分片处理 public String getIndex(Date date) { String index = "test_stu"; DateFormat format = new SimpleDateFormat("yyyy"); return index + "_" + format.format(date); }- 1
- 2
- 3
- 4
- 5
- 6
- 7
- 8
- 9
- 10
- 11
- 12
- 13
- 14
- 15
- 16
- 17
- 18
- 19
- 20
- 21
- 22
- 23
- 24
- 25
- 26
- 27
- 28
- 29
- 30
- 31
- 32
- 33
- 34
- 35
- 36
- 37
- 38
- 39
- 40
- 41
- 42
- 43
- 44
- 45
- 46
- 47
- 48
- 49
- 50
- 51
- 52
- 53
- 54
- 55
- 56
- 57
- 58
- 59
-
相关阅读:
时间、空间复杂度的例题详解
Jmeter常用功能-参数化介绍
MySQL索引及事物
vue做的一个一点就转的转盘(音乐磁盘),点击停止时会在几秒内缓慢停止,再次点击按钮可以再次旋转,
【十问十答】回归模型知识点
Redis6.2.1版本集群新加副本
特殊SQL的执行(模糊查询、批量删除、动态设置表名、添加功能获取自增的主键)
SpringSecurity入门
数据卷(Data Volumes)&简单介绍Dockerfile
【深入】k-means和FCM的差别
- 原文地址:https://blog.csdn.net/weixin_45081813/article/details/127700726
