-
NLP自然语言处理学习笔记(十二)(转自咕泡AI)
问答机器人排序模型
目标
- 知道模型中排序中的概念和目的
- 知道模型中排序的实现方法
1. 排序模型的介绍
前面的课程中为了完成一个问答机器人,我们先进行了召回,相当于是通过海选的方法找到呢大致相似的问题。
通过现在的排序模型,我们需要精选出最相似的哪一个问题,返回对应的答案
2. 排序模型的实现思路
我们需要实现的排序模型是两个输入,即两个问题,输出的是一个相似度。所以和之前的深度学习模型一样,我们需要实现的步骤如下:
- 准备数据
- 构建模型
- 模型评估
- 对外提供接口返回结果
2.1 准备数据
这里的数据,我们使用之前采集的百度问答的相似问题和手动构造的数据。那么,我们需要把他格式化为最终模型需要的格式,即两个输入和输出的相似度。
2.1.1 两个输入
这里的输入,我们可以使用单个字作为特征,也可以使用一个分词之后的词语作为特征。所以在实现准备输入数据方法的过程中,可以提前准备。
2.1.2 相似度准备
这里我们使用每个问题搜索结果的前两页认为他们是相似的,相似度为1,最后两页的结果是不相似的,相似度为0。
2.2 构建模型
介绍模型的构建之前,我们先介绍下孪生神经网络(Siamese Network)和其名字的由来。
Siamese和Chinese有点像。Siamese是古时候泰国的称呼,中文译作暹罗。Siamese在英语中是“孪生”、“连体”的意思。为什么孪生和泰国有关系呢?
十九世纪泰国出生了一对连体婴儿,当时的医学技术无法使两人分离出来,于是两人顽强地生活了一生,1829年被英国商人发现,进入马戏团,在全世界各地表演,1839年他们访问美国北卡罗莱那州后来成为马戏团的台柱,最后成为美国公民。1843年4月13日跟英国一对姐妹结婚,恩生了10个小孩,昌生了12个,姐妹吵架时,兄弟就要轮流到每个老婆家住三天。1874年恩因肺病去世,另一位不久也去世,两人均于63岁离开人间。两人的肝至今仍保存在费城的马特博物馆内。从此之后“暹罗双胞胎”(Siamese twins)就成了连体人的代名词,也因为这对双胞胎让全世界都重视到这项特殊疾病。
所以孪生神经网络就是有两个共享权值的网络的组成,或者只用实现一个,另一个直接调用,有两个输入,一个输出。1993年就已经被用来进行支票签名的验证。
孪生神经网络通过两个输入,被DNN进行编码,得到向量的表示之后,根据实际的用途来制定损失函数。比如我们需要计算相似度的时候,可以使用余弦相似度,或者使用 e x p − ∣ ∣ h l e f t − h r i g h t ∣ ∣ exp^{-||h^{left}-h^{right}||} exp−∣∣hleft−hright∣∣来确定向量的距离。
孪生神经网络被用于有多个输入和一个输出的场景,比如手写字体识别、文本相似度检验、人脸识别等
在计算相似度之前,我们可以考虑在传统的孪生神经网络的基础上,在计算相似度之前,把我们的编码之后的向量通过多层神经网络进行非线性的变化,结果往往会更加好,那么此时其网络结构大致如下:

其中Network1和network2为权重参数共享的两个形状相同的网络,用来对输入的数据进行编码,包括(
word-embedding,GRU,biGRU等),Network3部分是一个深层的神经网络,包含(batchnorm、dropout、relu、Linear等层)2.3 模型的评估
编写预测和评估的代码,预测的过程只需要修改获得结果,不需要上图中的损失计算的过程
3. 代码实现
3.1 数据准备
3.1.1 对文本进行分词分开存储
这里的分词可以对之前的分词方法进行修改
def cut_sentence_by_word(sentence): # 对中文按照字进行处理,对英文不分为字母 letters = string.ascii_lowercase + "+" + "/" # c++,ui/ue result = [] temp = "" for word in line: if word.lower() in letters: temp += word.lower() else: if temp != "": result.append(temp) temp = "" result.append(word) if temp != "": result.append(temp) return result def jieba_cut(sentence,by_word=False,with_sg=False,use_stopwords=False): if by_word: return cut_sentence_by_word(sentence) ret = psg.lcut(sentence) if use_stopwords: ret = [(i.word, i.flag) for i in ret if i.word not in stopwords_list] if not with_sg: ret = [i[0] for i in ret] return ret- 1
- 2
- 3
- 4
- 5
- 6
- 7
- 8
- 9
- 10
- 11
- 12
- 13
- 14
- 15
- 16
- 17
- 18
- 19
- 20
- 21
- 22
- 23
- 24
- 25
- 26
3.1.2 准备
word Sequence代码该处的代码和seq2seq中的代码相同,直接使用
3.1.3 准备
Dataset和DataLoader和seq2seq中的代码大致相同
3.2 模型的搭建
前面做好了准备工作之后,就需要开始进行模型的搭建。
虽然我们知道了整个结构的大致情况,但是我们还是不知道其中具体的细节。
2016年
AAAI会议上,有一篇Siamese Recurrent Architectures for Learning Sentence Similarity的论文(地址:https://www.aaai.org/ocs/index.php/AAAI/AAAI16/paper/download/12195/12023)。整个结构如下图:
可以看到word 经过embedding之后进行LSTM的处理,然后经过exp来确定相似度,可以看到整个模型是非常简单的,之后很多人在这个结构上增加了更多的层,比如加入attention、dropout、pooling等层。
那么这个时候,请思考下面几个问题:
-
attention在这个网络结构中该如何实现
-
之前我们的attention是用在decoder中,让decoder的hidden和encoder的output进行运算,得到attention的weight,再和decoder的output进行计算,作为下一次decoder的输入
-
那么在当前我们可以把
句子A的output理解为句子B的encoder的output,那么我们就可以进行attention的计算了和这个非常相似的有一个attention的变种,叫做
self attention。前面所讲的Attention是基于source端和target端的隐变量(hidden state)计算Attention的,得到的结果是源端的每个词与目标端每个词之间的依赖关系。Self Attention不同,它分别在source端和target端进行,仅与source input或者target input自身相关的Self Attention,捕捉source端或target端自身的词与词之间的依赖关系。
-
-
dropout用在什么地方
- dropout可以用在很多地方,比如embedding之后
- BiGRU结构中
- 或者是相似度计算之前
-
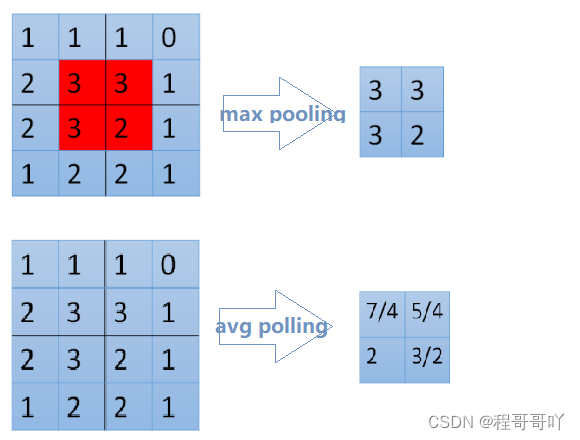
pooling是什么如何使用
- pooling叫做池化,是一种降采样的技术,用来减少特征(feature)的数量。常用的方法有
max pooling或者是average pooling
- pooling叫做池化,是一种降采样的技术,用来减少特征(feature)的数量。常用的方法有
3.2.1 编码部分
def forward(self, *input): sent1, sent2 = input[0], input[1] #这里使用mask,在后面计算attention的时候,让其忽略pad的位置 mask1, mask2 = sent1.eq(0), sent2.eq(0) # embeds: batch_size * seq_len => batch_size * seq_len * batch_size x1 = self.embeds(sent1) x2 = self.embeds(sent2) # batch_size * seq_len * dim => batch_size * seq_len * hidden_size output1, _ = self.lstm1(x1) output2, _ = self.lstm1(x2) # 进行Attention的操作,同时进行形状的对齐 # batch_size * seq_len * hidden_size q1_align, q2_align = self.soft_attention_align(output1, output2, mask1, mask2) # 拼接之后再传入LSTM中进行处理 # batch_size * seq_len * (8 * hidden_size) q1_combined = torch.cat([output1, q1_align, self.submul(output1, q1_align)], -1) q2_combined = torch.cat([output2, q2_align, self.submul(output2, q2_align)], -1) # batch_size * seq_len * (2 * hidden_size) q1_compose, _ = self.lstm2(q1_combined) q2_compose, _ = self.lstm2(q2_combined) # 进行Aggregate操作,也就是进行pooling # input: batch_size * seq_len * (2 * hidden_size) # output: batch_size * (4 * hidden_size) q1_rep = self.apply_pooling(q1_compose) q2_rep = self.apply_pooling(q2_compose) # Concate合并到一起,用来进行计算相似度 x = torch.cat([q1_rep, q2_rep], -1) def submul(self,x1,x2): mul = x1 * x2 sub = x1 - x2 return torch.cat([sub,mul],dim=-1)- 1
- 2
- 3
- 4
- 5
- 6
- 7
- 8
- 9
- 10
- 11
- 12
- 13
- 14
- 15
- 16
- 17
- 18
- 19
- 20
- 21
- 22
- 23
- 24
- 25
- 26
- 27
- 28
- 29
- 30
- 31
- 32
- 33
- 34
- 35
- 36
- 37
- 38
- 39
- 40
atttention的计算
实现思路:
- 先获取attention_weight
- 在使用attention_weight和encoder_output进行相乘
def soft_attention_align(self, x1, x2, mask1, mask2): ''' x1: batch_size * seq_len_1 * hidden_size x2: batch_size * seq_len_2 * hidden_size mask1:x1中pad的位置为1,其他为0 mask2:x2中pad 的位置为1,其他为0 ''' # attention: batch_size * seq_len_1 * seq_len_2 attention_weight = torch.matmul(x1, x2.transpose(1, 2)) #mask1 : batch_size,seq_len1 mask1 = mask1.float().masked_fill_(mask1, float('-inf')) #mask2 : batch_size,seq_len2 mask2 = mask2.float().masked_fill_(mask2, float('-inf')) # weight: batch_size * seq_len_1 * seq_len_2 weight1 = F.softmax(attention_weight + mask2.unsqueeze(1), dim=-1) #batch_size*seq_len_1*hidden_size x1_align = torch.matmul(weight1, x2) #同理,需要对attention_weight进行permute操作 weight2 = F.softmax(attention_weight.transpose(1, 2) + mask1.unsqueeze(1), dim=-1) x2_align = torch.matmul(weight2, x1)- 1
- 2
- 3
- 4
- 5
- 6
- 7
- 8
- 9
- 10
- 11
- 12
- 13
- 14
- 15
- 16
- 17
- 18
- 19
- 20
- 21
- 22
Pooling实现
池化的过程有一个
窗口的概念在其中,所以max 或者是average指的是窗口中的值取最大值还是取平均估值。整个过程可以理解为拿着窗口在源数据上取值窗口有窗口大小(kernel_size,窗口多大)和步长(stride,每次移动多少)两个概念
-
>>> input = torch.tensor([[[1,2,3,4,5,6,7]]]) >>> F.avg_pool1d(input, kernel_size=3, stride=2) tensor([[[ 2., 4., 6.]]]) #[1,2,3] [3,4,5] [5,6,7]的平均估值- 1
- 2
- 3
def apply_pooling(self, x): # input: batch_size * seq_len * (2 * hidden_size) #进行平均池化 p1 = F.avg_pool1d(x.transpose(1, 2), x.size(1)).squeeze(-1) #进行最大池化 p2 = F.max_pool1d(x.transpose(1, 2), x.size(1)).squeeze(-1) # output: batch_size * (4 * hidden_size) return torch.cat([p1, p2], 1)- 1
- 2
- 3
- 4
- 5
- 6
- 7
- 8
3.2.2 相似度计算部分
相似度的计算我们可以使用一个传统的距离计算公式,或者是exp的方法来实现,但是其效果不一定好,所以这里我们使用一个深层的神经网络来实现,使用pytorch中的Sequential对象来实现非常简单
self.fc = nn.Sequential( nn.BatchNorm1d(self.hidden_size * 8), nn.Linear(self.hidden_size * 8, self.linear_size), nn.ELU(inplace=True), nn.BatchNorm1d(self.linear_size), nn.Dropout(self.dropout), nn.Linear(self.linear_size, self.linear_size), nn.ELU(inplace=True), nn.BatchNorm1d(self.linear_size), nn.Dropout(self.dropout), nn.Linear(self.linear_size, 2), nn.Softmax(dim=-1) )- 1
- 2
- 3
- 4
- 5
- 6
- 7
- 8
- 9
- 10
- 11
- 12
- 13
- 14
- 15
- 16
在上述过程中,我们使用了激活函数ELU,而没有使用RELU,因为在有噪声的数据中ELU的效果往往会更好。
E L U ( ∗ x ∗ ) = m a x ( 0 , x ) + m i n ( 0 , α ∗ ( e x p ( x ) − 1 ) ) ELU(*x*)=max(0,x)+min(0,α∗(exp(x)−1)) ELU(∗x∗)=max(0,x)+min(0,α∗(exp(x)−1)),其中 α \alpha α在torch中默认值为1。
通过下图可以看出他和RELU的区别,RELU在小于0的位置全部为0,但是ELU在小于零的位置是从0到-1的。可以理解为正常的数据汇总难免出现噪声,小于0的值,而RELU会直接把他处理为0,认为其实正常值,但是ELU却会保留他,所以ELU比RELU更有鲁棒性

3.2.3 损失函数部分
在孪生神经网络中我们经常会使用对比损失(Contrastive Loss),作为损失函数,对比损失是
Yann LeCun提出的用来判断数据降维之后和源数据是否相似的问题。在这里我们用它来判断两个句子的表示是否相似。对比损失的计算公式如下:
L = 1 2 N ∑ n = 1 N ( y d 2 + ( 1 − y ) m a x ( m a r g i n − d , 0 ) 2 ) L = \frac{1}{2N}\sum^N_{n=1}(yd^2 + (1-y)max(margin-d,0)^2) L=2N1n=1∑N(yd2+(1−y)max(margin−d,0)2)
其中 d = ∣ ∣ a n − b n ∣ ∣ 2 d = ||a_n-b_n||_2 d=∣∣an−bn∣∣2,代表两个两本特征的欧氏距离,y表示是否匹配,y=1表示匹配,y=0表示不匹配,margin是一个阈值,比如margin=1。上式可分为两个部分,即:
- y = 1时,只剩下左边, ∑ y d 2 \sum yd^2 ∑yd2,即相似的样本,如果距离太大,则效果不好,损失变大
- y=0的时候,只剩下右边部分,即样本不相似的时候,如果距离小的话,效果反而不好,损失变大
下图红色是相似样本的损失,蓝色是不相似样本的损失

但是前面我们已经计算出了相似度,所以在这里我们有两个操作
- 使用前面的相似度的结果,把整个问题转化为分类(相似,不相似)的问题,或者是转化为回归问题(相似度是多少)
- 不是用前面相似度的计算结果部分,只用编码之后的结果,然后使用对比损失。最后在获取距离的时候使用欧氏距离来计算器相似度
使用DNN+均方误差来计算得到结果
def train(model,optimizer,loss_func,epoch): model.tarin() for batch_idx, (q,simq,q_len,simq_len,sim) in enumerate(train_loader): optimizer.zero_grad() output = model(q.to(config.device),simq.to(config.device)) loss = loss_func(output,sim.to(config.deivce)) loss.backward() optimizer.step() if batch_idx%100==0: print("...") torch.save(model.state_dict(), './DNN/data/model_paramters.pkl') torch.save(optimizer.state_dict(),"./DNN/data/optimizer_paramters.pkl") model = SiameseNetwork().cuda() loss = torch.nn.MSELoss() optimizer = optim.Adam(model.parameters(), lr=0.001) for epoch in range(1,config.epoch+1): train(model,optimizer,loss,epoch)- 1
- 2
- 3
- 4
- 5
- 6
- 7
- 8
- 9
- 10
- 11
- 12
- 13
- 14
- 15
- 16
- 17
- 18
- 19
使用对比损失来计算得到结果
#contrastive_loss.py import torch import torch.nn class ContrastiveLoss(torch.nn.Module): """ Contrastive loss function. """ def __init__(self, margin=1.0): super(ContrastiveLoss, self).__init__() self.margin = margin def forward(self, x0, x1, y): # 欧式距离 diff = x0 - x1 dist_sq = torch.sum(torch.pow(diff, 2), 1) dist = torch.sqrt(dist_sq) mdist = self.margin - dist #clamp(input,min,max),和numpy中裁剪的效果相同 dist = torch.clamp(mdist, min=0.0) loss = y * dist_sq + (1 - y) * torch.pow(dist, 2) loss = torch.sum(loss) / 2.0 / x0.size()[0] return loss- 1
- 2
- 3
- 4
- 5
- 6
- 7
- 8
- 9
- 10
- 11
- 12
- 13
- 14
- 15
- 16
- 17
- 18
- 19
- 20
- 21
- 22
- 23
- 24
之后只需要把原来的损失函数改为当前的损失函数即可
3.3 不同模型的结果对比
代码封装和对外提供接口
目标
- 能够完成封装的代码
- 能够使用grpc对外提供接口
- 能够使用supervisord完成服务的管理
1. 完成代码的封装
代码封装过程中,需要注意,在整个结构中,我们有很多的结算结果是dump到本地的,为了防止后续每次的重复计算。所以laod的结果,应该提前加载到内容,而不是每次调用load义词
1.1 完成意图识别代码封装
完成判断用户意图的代码,即在使用fasttext的模型,判断用户输入句子的分类
import fastText import re from lib import jieba_cut fc_word_mode = fastText.load_model("./classify/data/ft_classify.model") fc_word_mode = fastText.load_model("./classify/data/ft_classify_words.model") def is_QA(sentence_info): python_qs_list = [" ".join(sentence_info["cuted_sentence"])] result = fc_word_mode.predict(python_qs_list) python_qs_list = [" ".join(sentence_info["cuted_word_sentence"])] words_result = fc_word_mode.predict(python_qs_list) for index, (label,acc,word_label,word_acc) in enumerate(zip(*result,*words_result)): label = label[0] acc = acc[0] word_label = word_label[0] word_acc = word_acc[0] #以label_qa为准,如果预测结果是label_chat,则label_qa的概率=1-labele_chat if label == "__label__chat": label = "__label__QA" acc = 1-acc if word_label == "__label__chat": word_label = "__label__QA" word_acc = 1 - word_acc if acc>0.95 or word_acc>0.95: #是QA return True else: return False- 1
- 2
- 3
- 4
- 5
- 6
- 7
- 8
- 9
- 10
- 11
- 12
- 13
- 14
- 15
- 16
- 17
- 18
- 19
- 20
- 21
- 22
- 23
- 24
- 25
- 26
- 27
- 28
- 29
- 30
- 31
- 32
1.2 完成对chatbot代码的封装
提供predict的接口
""" 准备闲聊的模型 """ import pickle from lib import jieba_cut import numpy as np from chatbot import Sequence2Sequence class Chatbot: def __init__(self,ws_path="./chatbot/data/ws.pkl",save_path="./chatbot/model/seq2seq_chatbot.ckpt"): self.ws_chatbot = pickle.load(open(ws_path, "rb")) self.save_path = save_path #TODO ..... def predict(self,s): """ :param s:没有分词的 :param ws: :param ws_words: :return: """ #TODO ... return ans- 1
- 2
- 3
- 4
- 5
- 6
- 7
- 8
- 9
- 10
- 11
- 12
- 13
- 14
- 15
- 16
- 17
- 18
- 19
- 20
- 21
- 22
- 23
- 24
1.3 完成对问答系统召回的封装
""" 进行召回的方法 """ import os import pickle class Recall: def __init__(self,topk=20): # 准备问答的mode等模块 self.topk = topk def predict(self,sentence): """ :param sentence: :param debug: :return: [recall list],[entity] """ #TODO recall return recall_list def get_answer(self,s): return self.QA_dict[s]- 1
- 2
- 3
- 4
- 5
- 6
- 7
- 8
- 9
- 10
- 11
- 12
- 13
- 14
- 15
- 16
- 17
- 18
- 19
- 20
- 21
- 22
- 23
- 24
1.4 完成对问答排序模型的封装
""" 深度学习排序 """ import tensorflow as tf import pickle from DNN2 import SiamsesNetwork from lib import jieba_cut class DNNSort(): def __init__(self): #使用词语和单字两个模型的均值作为最后的结果 self.dnn_sort_words = DNNSortWords() self.dnn_sort_single_word = DNNSortSingleWord() def predict(self,s,c_list): sort1 = self.dnn_sort_words.predict(s,c_list) sort2 = self.dnn_sort_single_word.predict(s,c_list) for i in sort1: sort1[i] = (sort1[i]+ sort2[i])/2 sorts = sorted(sort1.items(),key=lambda x:x[-1],reverse=True) return sorts[0][0],sorts[0][1] class DNNSortWords: def __init__(self,ws_path="./DNN2/data/ws_80000.pkl",save_path="./DNN2/model_keras/esim_model_softmax.ckpt"): self.ws = pickle.load(open(ws_path, "rb")) self.save_path = save_path #TOOD ... def predict(self,s,c_list): """ :param s:没有分词的 :param c_list: 带比较的列表 :param ws: :param ws_words: :return: """ #TOOD ... return sim_dict class DNNSortSingleWord: def __init__(self,ws_path="./DNN2/data/ws_word.pkl",save_path="./DNN2/data/esim_word_model_softmax.ckpt"): self.ws = pickle.load(open(ws_path, "rb")) self.save_path = save_path #TOOD ... def predict(self,s,c_list): """ :param s:没有分词的 :param c_list: 带比较的列表 :param ws: :param ws_words: :return: """ #TOOD ... return sim_dict- 1
- 2
- 3
- 4
- 5
- 6
- 7
- 8
- 9
- 10
- 11
- 12
- 13
- 14
- 15
- 16
- 17
- 18
- 19
- 20
- 21
- 22
- 23
- 24
- 25
- 26
- 27
- 28
- 29
- 30
- 31
- 32
- 33
- 34
- 35
- 36
- 37
- 38
- 39
- 40
- 41
- 42
- 43
- 44
- 45
- 46
- 47
- 48
- 49
- 50
- 51
- 52
- 53
- 54
- 55
- 56
1.5 实现对聊天记录的保存
不同的用户,连续10分钟内的对话认为是一轮对话,如果10分还没有下一次对话,认为该轮对话结束,如果10分钟后开始对话,认为是下一轮对话。是要是为了保存不同轮中的聊天主题,后续可以实现基本的对话管理。比如用户刚问了python相关的问题,后续如果问题中不带主体,那么就把redis中的python作为其主体
主要实现逻辑为:
- 使用redis存储用户基本的数据
- 使用mongodb存储对话记录
具体思路如下:
- 根据用户id,获取对话id,根据对话id判断当前的对话是否存在
- 如果对话id存在:
- 更新对话的entity,上一次对话的时间,设置对话id的过期时间
- 保存数据到mongodb
- 如果对话id不存在:
- 创建用户的基础信息(user_id,entity,对话时间)
- 把用户的基础信息存入redis,同时设置对话id和过期时间
- 保存数据到mongodb中
""" 获取,更新用户的信息 """ from pymongo import MongoClient import redis from uuid import uuid1 import time import json """ ### redis { user_id:"id", user_background:{} last_entity:[] last_conversation_time:int(time): } userid_conversation_id:"" ### monodb 存储对话记录 {user_id:,conversion_id:,from:user/bot,message:"",create_time,entity:[],attention:[]} """ HOST = "localhost" CNVERSION_EXPERID_TIME = 60 * 10 # 10分钟,连续10分钟没有通信,意味着会话结束 class MessageManager: def __init__(self): self.client = MongoClient(host=HOST) self.m = self.client["toutiao"]["dialogue"] self.r = redis.Redis(host=HOST, port=6379, db=10) def last_entity(self, user_id): """最近一次的entity""" return json.loads(self.r.hget(user_id, "entity")) def gen_conversation_id(self): return uuid1().hex def bot_message_pipeline(self, user_id, message): """保存机器人的回复记录""" conversation_id_key = "{}_conversion_id".format(user_id) conversation_id = self.user_exist(conversation_id_key) if conversation_id: # 更新conversation_id的过期时间 self.r.expire(conversation_id_key, CNVERSION_EXPERID_TIME) data = {"user_id": user_id, "conversation_id": conversation_id, "from": "bot", "message": message, "create_time": int(time.time()), } self.m.save(data) else: raise ValueError("没有会话id,但是机器人尝试回复....") def user_message_pipeline(self, user_id, message, create_time, attention, entity=[]): # 确定用户相关的信息 # 1. 用户是否存在 # 2.1 用户存在,返回用户的最近的entity,存入最近的对话 # 3.1 判断是否为新的对话,如果是新对话,开启新的回话,update用户的对话信息 # 3.2 如果不是新的对话,update用户的对话信息 # 3. 更新用户的基本信息 # 4 返回用户相关信息 # 5. 调用预测接口,发来对话的结构 # 要保存的data数据,缺少conversation_id data = { "user_id": user_id, "from": "user", "message": message, "create_time": create_time, "entity": json.dumps(entity), "attention": attention, } conversation_id_key = "{}_conversion_id".format(user_id) conversation_id = self.user_exist(conversation_id_key) print("conversation_id",conversation_id) if conversation_id: if entity: # 更新当前用户的 last_entity self.r.hset(user_id, "last_entity", json.dumps(entity)) # 更新最后的对话时间 self.r.hset(user_id, "last_conversion_time", create_time) # 设置conversation id的过期时间 self.r.expire(conversation_id_key, CNVERSION_EXPERID_TIME) # 保存聊天记录到mongodb中 data["conversation_id"] = conversation_id self.m.save(data) print("mongodb 保存数据成功") else: # 不存在 user_basic_info = { "user_id": user_id, "last_conversion_time": create_time, "last_entity": json.dumps(entity) } self.r.hmset(user_id, user_basic_info) print("redis存入 user_basic_info success") conversation_id = self.gen_conversation_id() print("生成conversation_id",conversation_id) # 设置会话的id self.r.set(conversation_id_key, conversation_id, ex=CNVERSION_EXPERID_TIME) # 保存聊天记录到mongodb中 data["conversation_id"] = conversation_id self.m.save(data) print("mongodb 保存数据成功") def user_exist(self, conversation_id_key): """ 判断用户是否存在 :param user_id:用户id :return: """ conversation_id = self.r.get(conversation_id_key) if conversation_id: conversation_id = conversation_id.decode() print("load conversation_id",conversation_id) return conversation_id- 1
- 2
- 3
- 4
- 5
- 6
- 7
- 8
- 9
- 10
- 11
- 12
- 13
- 14
- 15
- 16
- 17
- 18
- 19
- 20
- 21
- 22
- 23
- 24
- 25
- 26
- 27
- 28
- 29
- 30
- 31
- 32
- 33
- 34
- 35
- 36
- 37
- 38
- 39
- 40
- 41
- 42
- 43
- 44
- 45
- 46
- 47
- 48
- 49
- 50
- 51
- 52
- 53
- 54
- 55
- 56
- 57
- 58
- 59
- 60
- 61
- 62
- 63
- 64
- 65
- 66
- 67
- 68
- 69
- 70
- 71
- 72
- 73
- 74
- 75
- 76
- 77
- 78
- 79
- 80
- 81
- 82
- 83
- 84
- 85
- 86
- 87
- 88
- 89
- 90
- 91
- 92
- 93
- 94
- 95
- 96
- 97
- 98
- 99
- 100
- 101
- 102
- 103
- 104
- 105
- 106
- 107
- 108
- 109
- 110
- 111
- 112
- 113
- 114
- 115
- 116
- 117
- 118
- 119
- 120
- 121
- 122
- 123
- 124
- 125
- 126
- 127
- 128
- 129
2. 使用GRPC对外提供服务
2.1 安装grpc相关环境
gRPC 的安装:`pip install grpcio` 安装 ProtoBuf 相关的 python 依赖库:`pip install protobuf` 安装 python grpc 的 protobuf 编译工具:`pip install grpcio-tools`- 1
- 2
- 3
2.2 定义GRPC的接口
//chatbot.proto 文件 syntax = "proto3"; message ReceivedMessage { string user_id = 1; //用户id string user_message = 2; //当前用户传递的消息 int32 create_time = 3; //当前消息发送的时间 } message ResponsedMessage { string user_response = 1; //返回给用户的消息 int32 create_time = 2; //返回给用户的时间 } service ChatBotService { rpc Chatbot (ReceivedMessage) returns (ResponsedMessage); }- 1
- 2
- 3
- 4
- 5
- 6
- 7
- 8
- 9
- 10
- 11
- 12
- 13
- 14
- 15
- 16
- 17
2.3 编译生成protobuf文件
使用下面的命令编译,得到
chatbot_pb2.py和chatbot_pb2_grpc.py文件python -m grpc_tools.protoc -I. –python_out=. –grpc_python_out=. ./chatbot.proto- 1
2.4 使用grpc提供服务
import dialogue from classify import is_QA from dialogue.process_sentence import process_user_sentence from chatbot_grpc import chatbot_pb2_grpc from chatbot_grpc import chatbot_pb2 import time class chatServicer(chatbot_pb2_grpc.ChatBotServiceServicer): def __init__(self): #提前加载各种模型 self.recall = dialogue.Recall(topk=20) self.dnnsort = dialogue.DNNSort() self.chatbot = dialogue.Chatbot() self.message_manager = dialogue.MessageManager() def Chatbot(self, request, context): user_id = request.user_id message = request.user_message create_time = request.create_time #对用户的输出进行基础的处理,如分词 message_info = process_user_sentence(message) if is_QA(message_info): attention = "QA" #实现对对话数据的保存 self.message_manager.user_message_pipeline(user_id, message, create_time, attention, entity=message_info["entity"]) recall_list,entity = self.recall.predict(message_info) line, score = self.dnnsort.predict(message,recall_list) if score > 0.7: ans = self.recall.get_answer(line) user_response = ans["ans"] else: user_response = "不好意思,这个问题我还没学习到..." else: attention = "chat" # 实现对对话数据的保存 self.message_manager.user_message_pipeline(user_id,message,create_time,attention,entity=message_info["entity"]) user_response = self.chatbot.predict(message) self.message_manager.bot_message_pipeline(user_id,user_response) user_response = user_response create_time = int(time.time()) return chatbot_pb2.ResponsedMessage(user_response=user_response,create_time=create_time) def serve(): import grpc from concurrent import futures # 多线程服务器 server = grpc.server(futures.ThreadPoolExecutor(max_workers=10)) # 注册本地服务 chatbot_pb2_grpc.add_ChatBotServiceServicer_to_server(chatServicer(), server) # 监听端口 server.add_insecure_port("[::]:9999") # 开始接收请求进行服务 server.start() # 使用 ctrl+c 可以退出服务 try: time.sleep(1000) except KeyboardInterrupt: server.stop(0) if __name__ == '__main__': serve()- 1
- 2
- 3
- 4
- 5
- 6
- 7
- 8
- 9
- 10
- 11
- 12
- 13
- 14
- 15
- 16
- 17
- 18
- 19
- 20
- 21
- 22
- 23
- 24
- 25
- 26
- 27
- 28
- 29
- 30
- 31
- 32
- 33
- 34
- 35
- 36
- 37
- 38
- 39
- 40
- 41
- 42
- 43
- 44
- 45
- 46
- 47
- 48
- 49
- 50
- 51
- 52
- 53
- 54
- 55
- 56
- 57
- 58
- 59
- 60
- 61
- 62
- 63
- 64
- 65
- 66
- 67
- 68
- 69
3. 使用supervisor完成对服务的管理
3.1 编写简单的执行脚本
#!/bin/bash cd `$dirname`|exit 0 #source activate ds python grpc_predict.py- 1
- 2
- 3
- 4
- 5
添加可执行权限:
chmod +x 文件名3.2 安装、配置supervisor
supervisor现在的官方版本还是python2的,但是可以使用下面的命令安装python3版本
pip3 install git+https://github.com/Supervisor/supervisor- 1
-
完成supervisor的配置文件的编写,conf中使用分号作为注释符号
;conf.d [program:chat_service] command=/root/chat_service/run.sh ;执行的命令 stdout_logfile=/root/chat_service/log/out.log ;log的位置 stderr_logfile=/root/chat_service/log/error.log ;错误log的位置 directory=/root/chat_service ;路径 autostart=true ;是否自动启动 autorestart=true ;是否自动重启 startretries=10 ;失败的最大尝试次数- 1
- 2
- 3
- 4
- 5
- 6
- 7
- 8
- 9
- 10
- 11
- 12
- 13
- 14
- 15
- 16
-
在supervisor的基础配置中添加上述配置文件
;/etc/supervisord/supervisor.conf [include] files=/root/chat_service/conf.d- 1
- 2
- 3
-
运行supervisord
supervisord -c /etc/supervisord/supervisor.conf- 1
-
相关阅读:
(有代码示例)Vue 或 JavaScript中使用全局通信的3种方式
Pytest运行指定的case,这个方法真的很高效……
非递归算法——快速排序、归并排序
从永远到永远-吉他和弦替代原理
利用低代码从0到1开发一款小程序
Redis主从复制流程
[论文阅读]NeurIPS 2021论文预讲会总结
Symfony 保留表单值
从零使用TensorFlow搭建CNN(卷积)神经网络
YOLOv5算法改进(22)— 更换主干网络MobileNetv3 + 添加CA注意力机制
- 原文地址:https://blog.csdn.net/weixin_42200347/article/details/127818916
