-
【Android Studio学习】第一篇、制作一个拥有登录和注册功能的简易APP
目录
第一部分、前言
这段时间由于导师的任务安排,我需要做一个简易的APP,来接收单片机上传的数据,并画出数据的波形。因为之前搞过那种特别简单的APP(就新建一个工程就得到的那种APP),这次为了让APP看起来还算是个APP,所以这段时间就学了一下APP的登录和注册、APP的底部导航栏的实现及应用、APP画简易的波形图等。为了防止自己忘记,这次做了一些简易的笔记并将其分享出来,希望能够给你带来一点小小的灵感。
那么这一篇文章先讲一下,小白如何从零做一个拥有登录和注册功能的APP?
1、目标效果
讲了那么多,首先来看一下这篇文章实现的功能视频是怎样的吧!
2、准备知识
首先,你的电脑需要装上Android Studio这个软件,并且能够正常工作,关于软件的下载和安装可以百度,太多了,不做介绍。
其次,目前我电脑上装的版本是Android Studio 3.5.2这还是2019版,已经有点老了,和目前最新的版本还是有点差距,所以小伙伴如果之前一点都没接触过这个软件,那么我还是建议你装最新版本的Android Studio,因为B站的大部分教学视频都是基于最新版本的。
最后,对于这个软件完全陌生的小白,你先按照博客的方法一步一步来,如果按照我的方式实现不了效果的,我这里推荐两个干货入门视频,第一个是正哥的视频,第二个是我这篇文章参考的视频。(注意:如果按照博客的步骤往下走,各种文件名称尽量保持一致,这样不容易出错)
第一个、【7天Java0基础速成安卓开发】Day1 Android工程代码是怎么运行的_哔哩哔哩_bilibili
第二个、1 as布局介绍和重要文件说明_哔哩哔哩_bilibili
第二部分、详细步骤
1、新建Empty工程
第一步、新建一个Empty Activity工程

第二步、新建完成后的界面
第一步、去values文件下的colors.xml文件添加这行代码
- <color name="colorBlack">#000000color>
- <color name="colorBlue">#78BDF1color>

第二步、保存下面这个图标,并将其添加到工程当中,命名为box


第三步、添加Drawable Resource文件,作为登录框的背景

命名为user_background

将文件内部代码,替换成以下代码
- "1.0" encoding="utf-8"?>
- <shape xmlns:android="http://schemas.android.com/apk/res/android">
- <stroke
- android:width="1dp"
- android:color="@color/colorBlack"
- android:background="#CCCCCC"/>
- <corners
- android:radius="100dp"/>
- shape>
得到最终的效果图

3、搭建注册界面
第一步、在com.example.myapplication文件夹下,新建一个Empty Activity

第二步、将新的Activity命名为:LoginActivity,点击确认

第三步、重复上述的步骤新建一个Activity,命名为RegisterActivity

第四步、编写注册界面

第五步、更改原始代码如下,目的是改为线性布局,且布局的排序方式为垂直

第六步、注册界面布局代码
- "1.0" encoding="utf-8"?>
- <LinearLayout xmlns:android="http://schemas.android.com/apk/res/android"
- xmlns:app="http://schemas.android.com/apk/res-auto"
- xmlns:tools="http://schemas.android.com/tools"
- android:layout_width="match_parent"
- android:layout_height="match_parent"
- android:orientation="vertical"
- tools:context=".RegisterActivity">
- <LinearLayout
- android:layout_width="match_parent"
- android:layout_height="wrap_content">
- <TextView
- android:layout_width="match_parent"
- android:layout_height="match_parent"
- android:text="欢迎注册账号"
- android:textSize="35sp"
- android:gravity="center"
- android:textColor="@color/colorBlack"
- android:layout_marginTop="50dp"
- >TextView>
- LinearLayout>
- <LinearLayout
- android:layout_width="match_parent"
- android:layout_height="wrap_content"
- android:layout_marginTop="20dp"
- android:layout_marginLeft="10dp"
- android:layout_marginRight="10dp"
- >
- <TextView
- android:layout_width="wrap_content"
- android:layout_height="wrap_content"
- android:layout_gravity="center"
- android:text="请输入用户名称:"
- android:layout_marginLeft="10dp"
- android:textSize="20sp"
- >TextView>
- <EditText
- android:id="@+id/zhuce_user_name"
- android:layout_width="match_parent"
- android:layout_height="60dp"
- android:layout_marginRight="30dp"
- android:textColor="@color/colorBlack"
- android:maxLines="1"
- >EditText>
- LinearLayout>
- <LinearLayout
- android:layout_width="match_parent"
- android:layout_height="wrap_content"
- android:layout_marginTop="20dp"
- android:layout_marginLeft="10dp"
- android:layout_marginRight="10dp"
- >
- <TextView
- android:layout_width="wrap_content"
- android:layout_height="wrap_content"
- android:layout_gravity="center"
- android:text="请输入账户密码:"
- android:layout_marginLeft="10dp"
- android:textSize="20sp"
- >TextView>
- <EditText
- android:id="@+id/zhuce_user_password"
- android:layout_width="match_parent"
- android:layout_height="60dp"
- android:layout_marginRight="30dp"
- android:textColor="@color/colorBlack"
- android:maxLines="1"
- android:inputType="textPassword"
- >EditText>
- LinearLayout>
- <LinearLayout
- android:layout_width="match_parent"
- android:layout_height="wrap_content"
- android:layout_marginTop="20dp"
- android:layout_marginLeft="10dp"
- android:layout_marginRight="10dp"
- >
- <TextView
- android:layout_width="wrap_content"
- android:layout_height="wrap_content"
- android:layout_gravity="center"
- android:text="请再次输入密码:"
- android:layout_marginLeft="10dp"
- android:textSize="20sp"
- >TextView>
- <EditText
- android:id="@+id/zhuce_user_password_again"
- android:layout_width="match_parent"
- android:layout_height="60dp"
- android:layout_marginRight="30dp"
- android:textColor="@color/colorBlack"
- android:maxLines="1"
- android:inputType="textPassword"
- >EditText>
- LinearLayout>
- <LinearLayout
- android:layout_width="wrap_content"
- android:layout_height="wrap_content"
- android:layout_marginTop="40dp"
- android:layout_gravity="center">
- <Button
- android:id="@+id/zhuce_success"
- android:layout_width="200dp"
- android:layout_height="wrap_content"
- android:text="注册完成"
- android:textSize="25dp"
- android:textColor="@color/colorBlack"
- android:background="@color/colorBlue"
- >Button>
- LinearLayout>
- LinearLayout>
第七步、最终效果
第一步、登录界面的布局编写方式也和上面一样,复制下方代码

第二步、登录界面布局代码
- "1.0" encoding="utf-8"?>
- <LinearLayout xmlns:android="http://schemas.android.com/apk/res/android"
- xmlns:app="http://schemas.android.com/apk/res-auto"
- xmlns:tools="http://schemas.android.com/tools"
- android:layout_width="match_parent"
- android:layout_height="match_parent"
- android:orientation="vertical"
- tools:context=".LoginActivity">
- <LinearLayout
- android:layout_width="match_parent"
- android:layout_height="wrap_content"
- android:gravity="center"
- android:layout_marginTop="50dp">
- <ImageView
- android:layout_width="64dp"
- android:layout_height="64dp"
- android:background="@mipmap/box"
- >ImageView>
- <TextView
- android:layout_width="wrap_content"
- android:layout_height="wrap_content"
- android:text="智能药箱"
- android:textColor="@color/colorBlack"
- android:textSize="30dp"
- >TextView>
- LinearLayout>
- <LinearLayout
- android:layout_width="match_parent"
- android:layout_height="wrap_content"
- android:layout_marginTop="20dp"
- android:layout_marginLeft="30dp"
- android:layout_marginRight="30dp"
- android:background="@drawable/user_background">
- <TextView
- android:layout_width="wrap_content"
- android:layout_height="wrap_content"
- android:layout_gravity="center"
- android:text="用户名:"
- android:layout_marginLeft="10dp"
- android:textSize="25sp"
- >TextView>
- <EditText
- android:id="@+id/user_name"
- android:layout_width="match_parent"
- android:layout_height="60dp"
- android:layout_marginRight="30dp"
- android:textColor="@color/colorBlack"
- android:maxLines="1"
- >EditText>
- LinearLayout>
- <LinearLayout
- android:layout_width="match_parent"
- android:layout_height="wrap_content"
- android:layout_marginTop="20dp"
- android:layout_marginLeft="30dp"
- android:layout_marginRight="30dp"
- android:background="@drawable/user_background">
- <TextView
- android:layout_width="wrap_content"
- android:layout_height="wrap_content"
- android:layout_gravity="center"
- android:text="密 码:"
- android:layout_marginLeft="10dp"
- android:textSize="25sp"
- >TextView>
- <EditText
- android:id="@+id/user_password"
- android:layout_width="match_parent"
- android:layout_height="60dp"
- android:layout_marginRight="30dp"
- android:textColor="@color/colorBlack"
- android:maxLines="1"
- android:inputType="textPassword"
- >EditText>
- LinearLayout>
- <LinearLayout
- android:layout_width="match_parent"
- android:layout_height="wrap_content"
- android:layout_marginTop="40dp"
- android:orientation="horizontal">
- <Button
- android:id="@+id/denglu"
- android:layout_width="0dp"
- android:layout_weight="1"
- android:layout_marginLeft="25dp"
- android:layout_height="wrap_content"
- android:text="登录"
- android:textSize="25sp"
- android:layout_gravity="center"
- >Button>
- <Button
- android:id="@+id/zhuce"
- android:layout_width="0dp"
- android:layout_weight="1"
- android:layout_marginRight="25dp"
- android:layout_marginLeft="50dp"
- android:layout_height="wrap_content"
- android:text="注册"
- android:textSize="25dp"
- >Button>
- LinearLayout>
- LinearLayout>
第三步、最终效果

5、编写注册界面和登录界面的代码
第一步、在com.example.myapplication文件夹下,新建一个Java Class文件

命名为Mysql

将内部的代码全部替换为以下代码
- package com.example.myapplication;
- import android.content.Context;
- import android.database.sqlite.SQLiteDatabase;
- import android.database.sqlite.SQLiteOpenHelper;
- import androidx.annotation.Nullable;
- //数据库
- public class Mysql extends SQLiteOpenHelper {
- public Mysql(@Nullable Context context, @Nullable String name, @Nullable SQLiteDatabase.CursorFactory factory, int version) {
- super(context, name, factory, version);
- }
- @Override
- public void onCreate(SQLiteDatabase db) {
- String sql = "create table logins(id integer primary key autoincrement,usname text,uspwd text)";
- db.execSQL(sql);
- }
- @Override
- public void onUpgrade(SQLiteDatabase db, int oldVersion, int newVersion) {
- }
- }
替换后的结果

第二步、编辑RegisterActivity.java文件内部的代码,替换为以下代码
- package com.example.myapplication;
- import androidx.appcompat.app.AppCompatActivity;
- import android.content.ContentValues;
- import android.content.Intent;
- import android.content.SharedPreferences;
- import android.database.sqlite.SQLiteDatabase;
- import android.os.Bundle;
- import android.view.View;
- import android.widget.Button;
- import android.widget.EditText;
- import android.widget.Toast;
- public class RegisterActivity extends AppCompatActivity {
- //注册界面的控件
- Button zhuce_success;//注册界面的按键
- EditText zhuce_user_name;//注册界面的用户名
- EditText zhuce_user_password; //注册界面的密码
- EditText zhuce_user_password_again; //注册界面的密
- Mysql mysql;
- SQLiteDatabase db;
- @Override
- protected void onCreate(Bundle savedInstanceState) {
- super.onCreate(savedInstanceState);
- setContentView(R.layout.activity_register);
- //寻找控件ID
- zhuce_success = this.findViewById(R.id.zhuce_success);
- zhuce_user_name = this.findViewById(R.id.zhuce_user_name);
- zhuce_user_password = this.findViewById(R.id.zhuce_user_password);
- zhuce_user_password_again= this.findViewById(R.id.zhuce_user_password_again);
- mysql = new Mysql(this,"Userinfo",null,1); //建数据库
- db = mysql.getReadableDatabase();
- zhuce_success.setOnClickListener(new View.OnClickListener() {
- @Override
- public void onClick(View view) {
- //保存注册数据的字符串
- String name = zhuce_user_name.getText().toString(); //用户名
- String pwd01 = zhuce_user_password.getText().toString(); //密码
- String pwd02 = zhuce_user_password_again.getText().toString(); //二次输入的密码
- //判断注册内容
- if(name.equals("")||pwd01 .equals("")||pwd02.equals("")){
- //显示弹窗
- Toast.makeText(getApplicationContext(),"用户名或密码不能为空!!",Toast.LENGTH_SHORT).show();
- }
- else {
- //如果注册时第一次输入的密码和第二次输入的密码一致
- if(pwd01.equals(pwd02)){
- //ContentValues是一种基本的存储类型
- ContentValues cv = new ContentValues();
- //放入数据
- cv.put("usname",name);
- cv.put("uspwd",pwd01);
- db.insert("logins",null,cv);
- //从当前界面跳转到登录页面
- Intent intent = new Intent();
- intent.setClass(RegisterActivity.this,LoginActivity.class);
- startActivity(intent);
- //弹窗
- Toast.makeText(getApplicationContext(),"账号注册成功!!",Toast.LENGTH_SHORT).show();
- }
- else {
- Toast.makeText(getApplicationContext(),"两次输入的密码不一致!!",Toast.LENGTH_SHORT).show();
- }
- }
- }
- });
- }
- }
RegisterActivity.java文件替换后的界面

第三步、编辑LoginActivity.java文件内部的代码,替换为以下代码
- package com.example.myapplication;
- import androidx.appcompat.app.AppCompatActivity;
- import android.content.Intent;
- import android.database.Cursor;
- import android.database.sqlite.SQLiteDatabase;
- import android.os.Bundle;
- import android.view.View;
- import android.widget.Button;
- import android.widget.EditText;
- import android.widget.Toast;
- public class LoginActivity extends AppCompatActivity {
- //声明控件
- //登陆界面的控件
- EditText user_name;
- EditText user_password;
- Button denglu;
- Button zhuce;
- //声明数据库
- Mysql mysql;
- SQLiteDatabase db;
- @Override
- protected void onCreate(Bundle savedInstanceState) {
- super.onCreate(savedInstanceState);
- setContentView(R.layout.activity_login);
- //找到当且xml文件内的控件ID
- //数据编辑框的ID
- user_name = this.findViewById(R.id.user_name);
- user_password = this.findViewById(R.id.user_password);
- //按键属性的ID
- denglu = this.findViewById(R.id.denglu);
- zhuce = this.findViewById(R.id.zhuce);
- //取出数据库内的数据
- mysql = new Mysql(this,"Userinfo",null,1);
- db = mysql.getReadableDatabase();
- //登录按键按下之后处理的事情
- denglu.setOnClickListener(new View.OnClickListener() {
- @Override
- public void onClick(View view) {
- //需要获取的输入的用户名和密码
- String storage_username = user_name.getText().toString();//用户控件.得到数据.转换为字符串;
- String storage_userpassword = user_password.getText().toString();//用户控件.得到数据.转换为字符串;
- //查询用户名和密码相同的数据
- Cursor cursor = db.query("logins",new String[]{"usname","uspwd"}," usname=? and uspwd=?",
- new String[]{storage_username,storage_userpassword},null,null,null);
- int flag = cursor.getCount(); //查询出来的记录项的条数,若没有该用户则为0条
- //登录成功后响应的数据
- if (flag!=0){
- Toast.makeText(getApplicationContext(), "登录成功!", Toast.LENGTH_SHORT).show();//显示登录成功的弹窗,简单写法
- Intent intent = null; //这个变量初始申明为空
- intent = new Intent(LoginActivity.this, MainActivity.class);
- startActivity(intent);
- }
- else {
- //假设正确的账号和密码分别是(VIP账号,没有写入数据库,无需注册账号)
- if (storage_username.equals("DPT") && storage_userpassword.equals("123456")) {
- //如果正确
- Toast.makeText(getApplicationContext(), "超级VIP登录成功!", Toast.LENGTH_SHORT).show();//显示登录成功的弹窗,简单写法
- Intent intent = null; //这个变量初始申明为空
- intent = new Intent(LoginActivity.this, MainActivity.class);
- startActivity(intent);
- }
- else{
- Toast.makeText(getApplicationContext(), "用户名输入错误或密码不正确,请重新登录!", Toast.LENGTH_SHORT).show();//获取显示的内容
- }
- }
- }
- });
- //注册按键按下之后,响应的事件
- zhuce.setOnClickListener(new View.OnClickListener() {
- @Override
- public void onClick(View view) {
- //实现界面跳转,从登录界面跳转到注册界面
- Intent intent = null; //这个变量初始申明为空
- intent = new Intent(LoginActivity.this, RegisterActivity.class);//跳转界面
- startActivity(intent);
- }
- });
- }
- }
LoginActivity.java文件替换后的界面

6、设置APP初始界面
第一步、更改manifests文件夹下AndroidManifest.xml,如下

第二步、设置APP图标和名称

第三步、AndroidManifest.xml代码
- "1.0" encoding="utf-8"?>
- <manifest xmlns:android="http://schemas.android.com/apk/res/android"
- xmlns:tools="http://schemas.android.com/tools"
- package="com.example.myapplication">
- <application
- android:allowBackup="true"
- android:icon="@mipmap/box"
- android:label="智能药箱"
- android:roundIcon="@mipmap/ic_launcher_round"
- android:supportsRtl="true"
- android:theme="@style/AppTheme"
- tools:ignore="GoogleAppIndexingWarning">
- <activity android:name=".RegisterActivity"/>
- <activity android:name=".LoginActivity" >
- <intent-filter>
- <action android:name="android.intent.action.MAIN" />
- <category android:name="android.intent.category.LAUNCHER" />
- intent-filter>
- activity>
- <activity android:name=".MainActivity">
- activity>
- application>
- manifest>
7、连接手机,编译工程
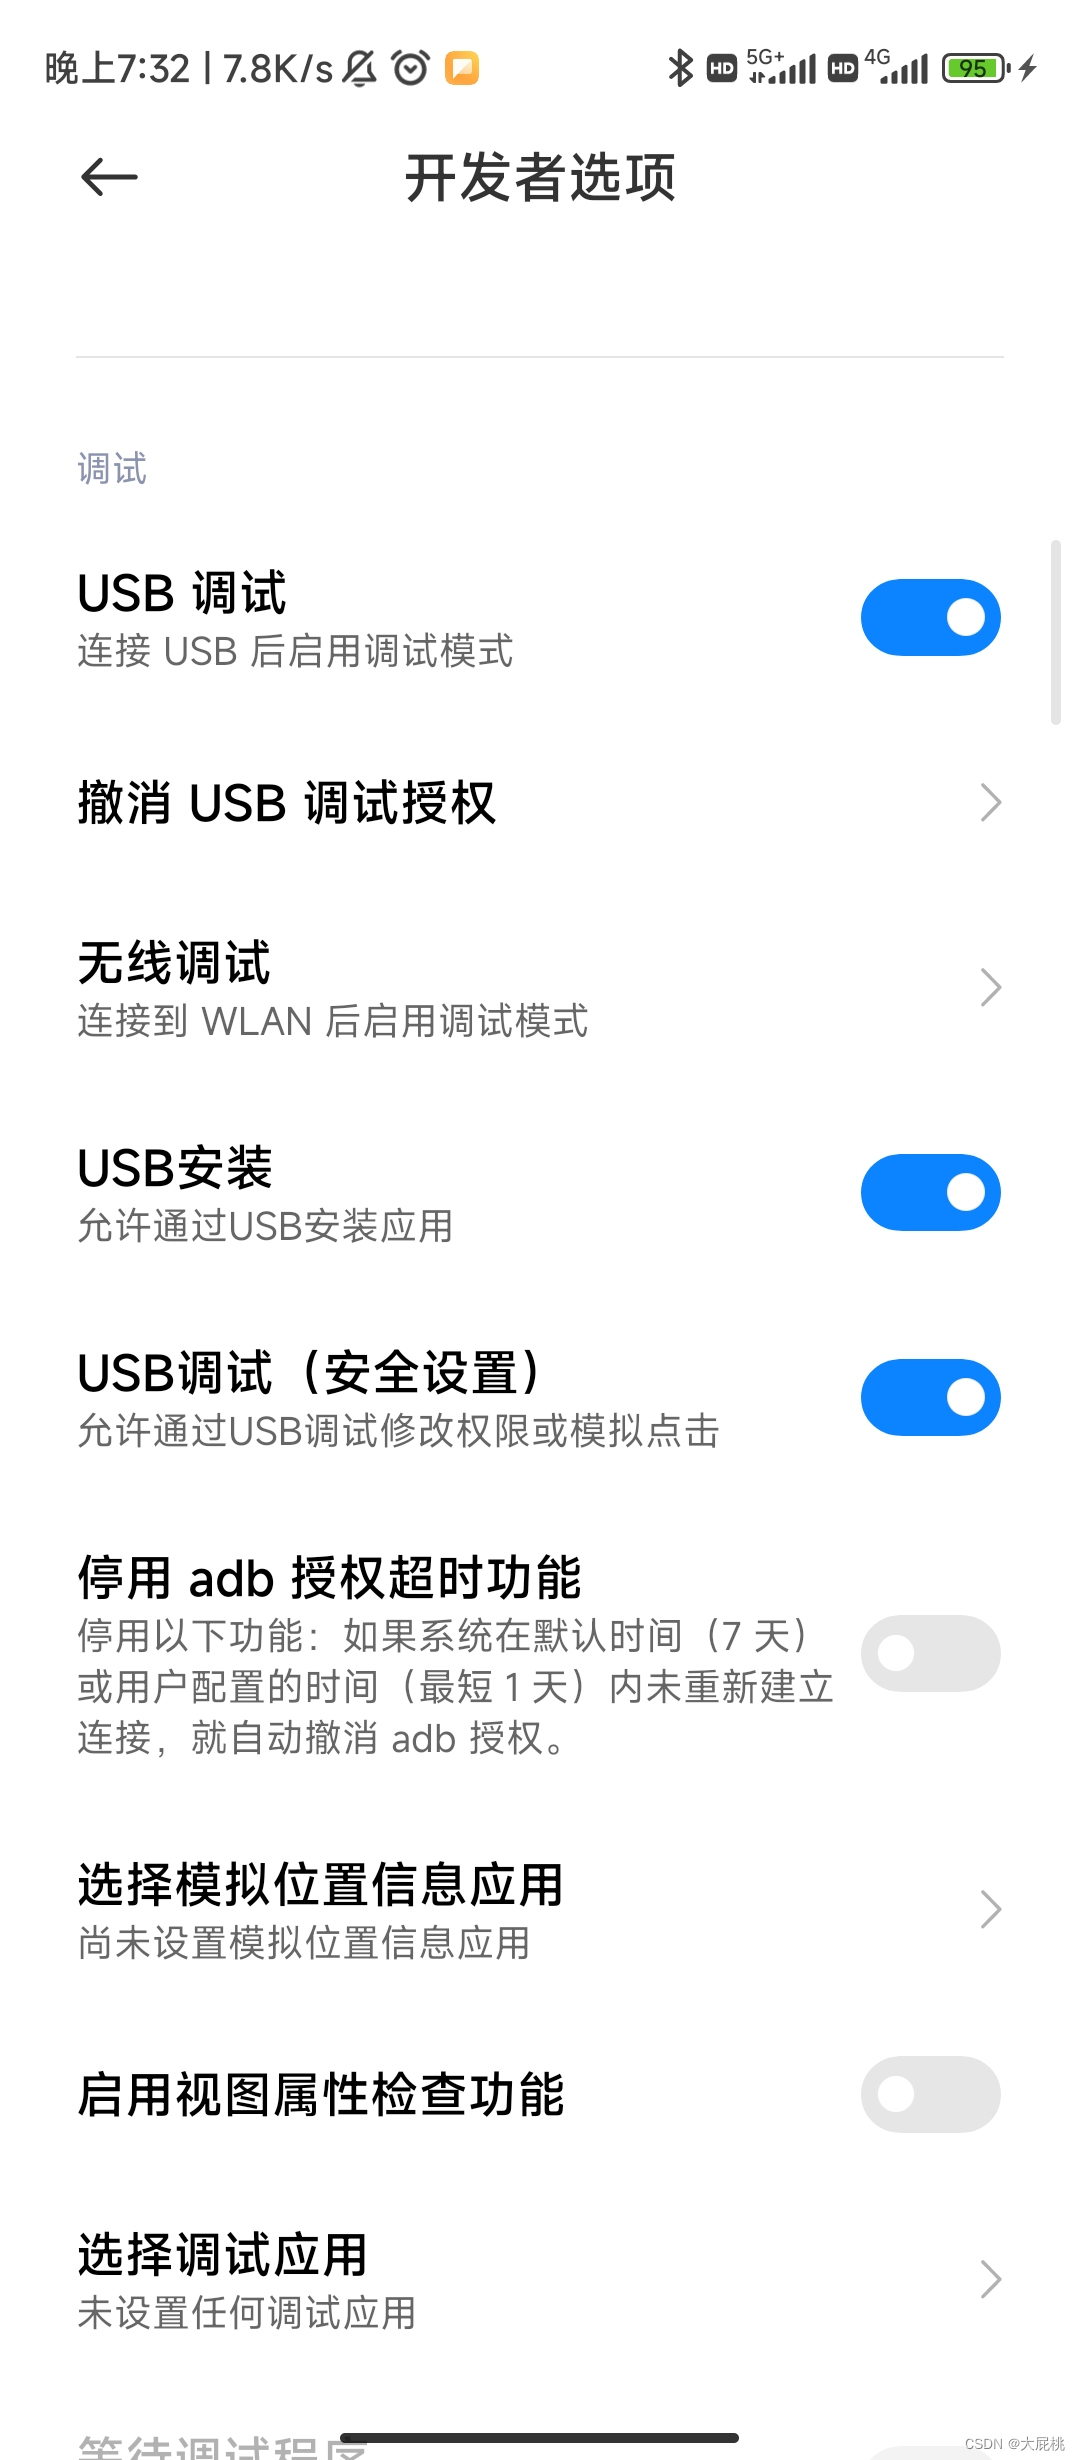
第一步、小米手机打开开发者模式,允许USB调试,允许USB安装。
第二步、编译工程

第三部分、总结
1、参考资料
我在实现这个功能的过程中也参考了很多篇博客,最推荐大家看的就是这一篇:
(9条消息) Android studio 编写一个登录页面,并且具有注册功能_东尃的博客-CSDN博客_android studio登录注册界面实现
然后关于寻找手机APP图标的网址:iconfont-阿里巴巴矢量图标库
关于Android Studio开发过程中配色:网页设计常用色彩搭配表 | 网页配色表
2、完整工程和代码
这是博主的完整的代码,可以直接下载,但是你是不是要关注点赞收藏,然后再下载?👍👍👍我的APP工程
有问题的小伙伴欢迎进Q群交流:1020775171
-
相关阅读:
别乱用了!文件写入的6种方法
【Unity ShaderGraph】| 快速制作一个 钛金化不锈钢效果
「Spring」Boot Docker 认证指南(上)
链上物理资产「规模化」或将推动产业协作互联网迎来爆发
B - Dungeon Master
Spring Data JPA 中的分页和排序
离子液体修饰的纳米金光学探针,荧光量子点
Mysql多表练习题30道
Delphi中关于PChar、Char数组、string[](ShortString)及结构体长度及占用空间的一些特性说明和测试
常用 Git 命令
- 原文地址:https://blog.csdn.net/Learning1232/article/details/127634795

