-
Ubuntu22.04Desktop桌面版设置静态Ip 221027记录
Ubuntu22.04Desktop桌面版静态Ip设置 221027记录
Ubuntu22.04Desktop桌面版可以用图形界面配置Ip, 图形界面有桌面的和控制台的
nmtui,
也能用nmcli一步设置sudo nmcli c m '有线连接 1' ipv4.method 'manual' ipv4.addr "192.168.168.224/24" ipv4.gateway "192.168.168.2" ipv4.dns "192.168.168.2 , 8.8.4.4 , 223.6.6.6 , 180.76.76.76, 123.125.81.6, 1.1.1.1,8.8.8.8,114.114.114.114" ipv4.ignore-auto-dns 'true' ipv4.dns-search "baidu.com" ; sudo systemctl restart NetworkManager- 1
也可以像Server版一样用
netplan,
但它们底层的Ip配置工具是不一样的,- desktop版用
NetworkManager - server版用
systemd-networkd
查看
NetworkManager的状态systemctl status NetworkManager- 1
- Desklop桌面版的
NetworkManager.service默认启用并处于活跃状态 - Server服务版默认没有
NetworkManager.service这项服务
查看
systemd-networkd的状态systemctl status systemd-networkd- 1
- Desklop桌面版有
systemd-networkd.service这项服务, 但默认没有启用 - Server服务版有
systemd-networkd.service这项服务, 默认启用并处于活跃状态
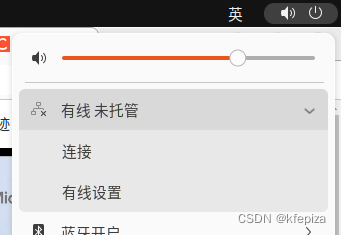
在图形界面设置静态Ip
点右上角, 有线 下的 有线设置


设置为这样

/etc/NetworkManager/system-connections/'有线连接 1.nmconnection'文件也相应发生变化sudo cat /etc/NetworkManager/system-connections/'有线连接 1.nmconnection'- 1

[connection] id=有线连接 1 uuid=fdae7e35-2f0e-3c31-8717-2b998d902f57 type=ethernet autoconnect-priority=-999 interface-name=ens33 timestamp=1665711319 [ethernet] [ipv4] address1=192.168.168.224/24,192.168.168.2 dns=192.168.168.2;114.114.114.114;8.8.8.8;223.6.6.6;101.226.4.6;180.76.76.76;119.29.29.29;8.8.4.4; ignore-auto-dns=true method=manual [ipv6] addr-gen-mode=stable-privacy method=auto [proxy]- 1
- 2
- 3
- 4
- 5
- 6
- 7
- 8
- 9
- 10
- 11
- 12
- 13
- 14
- 15
- 16
- 17
- 18
- 19
- 20
- 21
- 22
但是,反向从该文件修改却不行, 图形界面的配置并不会随之更改…
好吧, 是我把权限改成chmod 777le
把权限改回只有所属用户可以读写sudo chmod 600 /etc/NetworkManager/system-connections/'有线连接 1.nmconnection'- 1
sudo chmod 600 *.nmconnection- 1
编辑
*.nmconnection, 因为是桌面版, 所以可以用 gedit, 要有管理员权限, 所以在控制台sudo gedit,
也可以直接打开sudo gedit /etc/NetworkManager/system-connections/'有线连接 1.nmconnection'- 1
sudo gedit /etc/NetworkManager/system-connections/*.nmconnection- 1
[connection] id=有线连接 1 uuid=fdae7e35-2f0e-3c31-8717-2b998d902f57 type=ethernet autoconnect-priority=-999 interface-name=ens33 timestamp=1665711319 [ethernet] [ipv4] address1=192.168.168.224/24,192.168.168.2 dns=192.168.168.2;8.8.4.4;223.6.6.6;101.226.4.6;180.76.76.76;119.29.29.29;114.114.114.114;8.8.8.8;1.1.1.1 ignore-auto-dns=true method=manual [ipv6] addr-gen-mode=stable-privacy method=auto [proxy]- 1
- 2
- 3
- 4
- 5
- 6
- 7
- 8
- 9
- 10
- 11
- 12
- 13
- 14
- 15
- 16
- 17
- 18
- 19
- 20
- 21
修改保存后
sudo systemctl restart NetworkManager- 1
图形界面也随之变成了


修改成功
,
再来试一试netplan
,
, 一开始, 在/etc/netplan/文件夹下 ,有个01-network-manager-all.yamlcat /etc/netplan/01-network-manager-all.yaml- 1
内容为
# Let NetworkManager manage all devices on this system network: version: 2 renderer: NetworkManager- 1
- 2
- 3
- 4
这是用
netplan来配置网络的配置文件sudo vi /etc/netplan/01-network-manager-all.yaml sudo nano /etc/netplan/01-network-manager-all.yaml sudo gedit /etc/netplan/01-network-manager-all.yaml- 1
- 2
- 3
将其修改为
network: version: 2 #renderer: NetworkManager ethernets: ens33: addresses: [192.168.168.224/24] routes: - to: default # default 等效 0.0.0.0/0 等效 0/0 # could be 0/0 or 0.0.0.0/0 optionally via: 192.168.168.2 # 网关 nameservers: addresses: # DNS的ip [ 192.168.168.2 , 8.8.4.4 , 223.6.6.6 , 114.114.114.114, 180.76.76.76 , 119.29.29.29 , 8.8.8.8 , 101.226.4.6, 123.125.81.6, 1.1.1.1] search: [ 192.168.168.2 , 8.8.4.4 , 223.6.6.6 , 114.114.114.114, 180.76.76.76 , 119.29.29.29 , 8.8.8.8 , 101.226.4.6, 123.125.81.6, 1.1.1.1]- 1
- 2
- 3
- 4
- 5
- 6
- 7
- 8
- 9
- 10
- 11
- 12
- 13
- 14
注意 #renderer: NetworkManager 被注释了
sudo netplan try- 1
sudo netplan apply- 1
图形界面的 有线 变成了 为托管
但网络是好的, 可以上网, 也可以远程
查看ipip a ip ad ip add ip addr ip addre ip addres ip address- 1
- 2
- 3
- 4
- 5
- 6
- 7
z@U224d:/$ ip add 1: lo: <LOOPBACK,UP,LOWER_UP> mtu 65536 qdisc noqueue state UNKNOWN group default qlen 1000 link/loopback 00:00:00:00:00:00 brd 00:00:00:00:00:00 inet 127.0.0.1/8 scope host lo valid_lft forever preferred_lft forever inet6 ::1/128 scope host valid_lft forever preferred_lft forever 2: ens33: <BROADCAST,MULTICAST,UP,LOWER_UP> mtu 1500 qdisc fq_codel state UP group default qlen 1000 link/ether 00:0c:29:4b:7d:6d brd ff:ff:ff:ff:ff:ff altname enp2s1 inet 192.168.168.224/24 brd 192.168.168.255 scope global ens33 valid_lft forever preferred_lft forever- 1
- 2
- 3
- 4
- 5
- 6
- 7
- 8
- 9
- 10
- 11
- 12
ip 是正常的
查看
NetworkManager和systemd-networkd的状态systemctl status NetworkManager- 1
systemctl status systemd-networkd- 1
z@U224d:/$ systemctl status NetworkManager ● NetworkManager.service - Network Manager Loaded: loaded (/lib/systemd/system/NetworkManager.service; enabled; vendor preset: enabled) Active: active (running) since Mon 2022-10-17 16:23:41 CST; 6min ago Docs: man:NetworkManager(8) Main PID: 9289 (NetworkManager) Tasks: 3 (limit: 9415) Memory: 3.0M CPU: 96ms CGroup: /system.slice/NetworkManager.service └─9289 /usr/sbin/NetworkManager --no-daemon 10月 17 16:23:41 U224d NetworkManager[9289]: <info> [1665995021.9998] ifupdown: interfaces file /etc/network/interfaces doesn't exist 10月 17 16:23:42 U224d NetworkManager[9289]:[1665995022.0007] dhcp-init: Using DHCP client ' internal' 10月 17 16:23:42 U224d NetworkManager[9289]: <info> [1665995022.0008] device (lo): carrier: link connected 10月 17 16:23:42 U224d NetworkManager[9289]: <info> [1665995022.0009] manager: (lo): new Generic device (/org/freedesktop/NetworkManager/Devices/1) 10月 17 16:23:42 U224d NetworkManager[9289]: <info> [1665995022.0013] device (ens33): carrier: link connected 10月 17 16:23:42 U224d NetworkManager[9289]: <info> [1665995022.0015] manager: (ens33): new Ethernet device (/org/freedesktop/NetworkManager/Devic> 10月 17 16:23:42 U224d NetworkManager[9289]: <info> [1665995022.0103] failed to open /run/network/ifstate 10月 17 16:23:42 U224d NetworkManager[9289]: <info> [1665995022.0276] modem-manager: ModemManager available 10月 17 16:23:42 U224d NetworkManager[9289]: <info> [1665995022.0344] manager: startup complete 10月 17 16:23:42 U224d NetworkManager[9289]: <info> [1665995022.1451] agent-manager: agent[7fa0626e63224f7a,:1.38/org.gnome.Shell.NetworkAgent/100> z@U224d:/$ z@U224d:/$ z@U224d:/$ systemctl status systemd-networkd ● systemd-networkd.service - Network Configuration Loaded: loaded (/lib/systemd/system/systemd-networkd.service; enabled-runtime; vendor preset: enabled) Active: active (running) since Mon 2022-10-17 09:06:41 CST; 7h ago TriggeredBy: ● systemd-networkd.socket Docs: man:systemd-networkd.service(8) Main PID: 684 (systemd-network) Status: "Processing requests..." Tasks: 1 (limit: 9415) Memory: 3.0M CPU: 222ms CGroup: /system.slice/systemd-networkd.service └─684 /lib/systemd/systemd-networkd 10月 17 09:06:41 U224d systemd-networkd[684]: ens33: Gained carrier 10月 17 09:06:43 U224d systemd-networkd[684]: ens33: Gained IPv6LL 10月 17 15:48:46 U224d systemd-networkd[684]: ens33: Gained IPv6LL 10月 17 15:49:01 U224d systemd-networkd[684]: ens33: Gained IPv6LL 10月 17 15:49:46 U224d systemd-networkd[684]: ens33: Gained IPv6LL 10月 17 15:49:51 U224d systemd-networkd[684]: ens33: Gained IPv6LL 10月 17 16:23:41 U224d systemd-networkd[684]: ens33: Re-configuring with /run/systemd/network/10-netplan-ens33.network 10月 17 16:23:41 U224d systemd-networkd[684]: ens33: DHCPv6 lease lost 10月 17 16:23:41 U224d systemd-networkd[684]: ens33: Re-configuring with /run/systemd/network/10-netplan-ens33.network 10月 17 16:23:41 U224d systemd-networkd[684]: ens33: DHCPv6 lease lost- 1
- 2
- 3
- 4
- 5
- 6
- 7
- 8
- 9
- 10
- 11
- 12
- 13
- 14
- 15
- 16
- 17
- 18
- 19
- 20
- 21
- 22
- 23
- 24
- 25
- 26
- 27
- 28
- 29
- 30
- 31
- 32
- 33
- 34
- 35
- 36
- 37
- 38
- 39
- 40
- 41
- 42
- 43
- 44
- 45
- 46
- 47
- 48
- 49
NetworkManager仍然是启用并活跃的,systemd-networkd由禁用变为了启用活跃状态查看
/etc/resolv.confsudo less /etc/resolv.conf- 1
# This is /run/systemd/resolve/stub-resolv.conf managed by man:systemd-resolved(8). # Do not edit. # # This file might be symlinked as /etc/resolv.conf. If you're looking at # /etc/resolv.conf and seeing this text, you have followed the symlink. # # This is a dynamic resolv.conf file for connecting local clients to the # internal DNS stub resolver of systemd-resolved. This file lists all # configured search domains. # # Run "resolvectl status" to see details about the uplink DNS servers # currently in use. # # Third party programs should typically not access this file directly, but only # through the symlink at /etc/resolv.conf. To manage man:resolv.conf(5) in a # different way, replace this symlink by a static file or a different symlink. # # See man:systemd-resolved.service(8) for details about the supported modes of # operation for /etc/resolv.conf. nameserver 127.0.0.53 options edns0 trust-ad search 192.168.168.2 8.8.4.4 223.6.6.6 114.114.114.114 180.76.76.76 119.29.29.29 8.8.8.8 101.226.4.6 123.125.81.6 1.1.1.1- 1
- 2
- 3
- 4
- 5
- 6
- 7
- 8
- 9
- 10
- 11
- 12
- 13
- 14
- 15
- 16
- 17
- 18
- 19
- 20
- 21
- 22
- 23
sudo gedit /etc/netplan/01-network-manager-all.yaml- 1
去掉
renderer: NetworkManager的注释, 启用network: version: 2 renderer: NetworkManager ethernets: ens33: addresses: [192.168.168.224/24] routes: - to: default # default 等效 0.0.0.0/0 等效 0/0 # could be 0/0 or 0.0.0.0/0 optionally via: 192.168.168.2 # 网关 nameservers: addresses: # DNS的ip [ 192.168.168.2 , 8.8.4.4 , 223.6.6.6 , 114.114.114.114, 180.76.76.76 , 119.29.29.29 , 8.8.8.8 , 101.226.4.6, 123.125.81.6, 1.1.1.1] search: [ 192.168.168.2 , 8.8.4.4 , 223.6.6.6 , 114.114.114.114, 180.76.76.76 , 119.29.29.29 , 8.8.8.8 , 101.226.4.6, 123.125.81.6, 1.1.1.1]- 1
- 2
- 3
- 4
- 5
- 6
- 7
- 8
- 9
- 10
- 11
- 12
- 13
- 14
sudo netplan try- 1
sudo netplan apply- 1
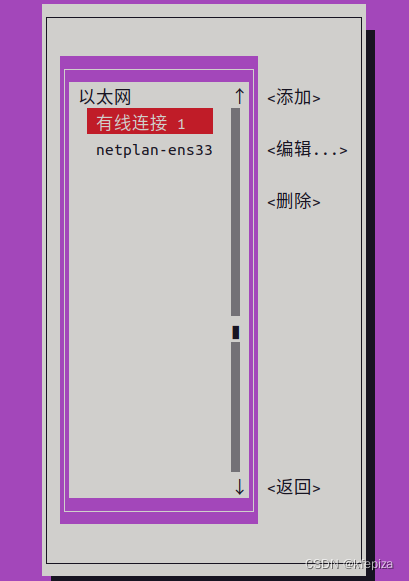
图形界面的连接又生效了, 而且显示两个, 可以点击切换


两个网络设置都能用, 分别对应
/etc/netplan/01-network-manager-all.yaml和/etc/NetworkManager/system-connections/'有线连接 1.nmconnection'切换两个网络时,
/etc/resolv.conf也相应发生改变为方便对照, 再次修改配置
sudo vi /etc/NetworkManager/system-connections/'有线连接 1.nmconnection'- 1
sudo nano /etc/NetworkManager/system-connections/'有线连接 1.nmconnection'- 1
sudo gedit /etc/NetworkManager/system-connections/'有线连接 1.nmconnection'- 1
[connection] id=有线连接 1 uuid=fdae7e35-2f0e-3c31-8717-2b998d902f57 type=ethernet autoconnect-priority=-999 interface-name=ens33 timestamp=1665711319 [ethernet] [ipv4] address1=192.168.168.112/24,192.168.168.2 dns=8.8.8.8;8.8.4.4;223.6.6.6;6.6.6.6;101.226.4.6;180.76.76.76;119.29.29.29;114.114.114.114;1.1.1.1; ignore-auto-dns=true method=manual [ipv6] addr-gen-mode=stable-privacy method=auto [proxy]- 1
- 2
- 3
- 4
- 5
- 6
- 7
- 8
- 9
- 10
- 11
- 12
- 13
- 14
- 15
- 16
- 17
- 18
- 19
- 20
- 21
sudo vi /etc/netplan/01-network-manager-all.yaml- 1
sudo nano /etc/netplan/01-network-manager-all.yaml- 1
sudo gedit /etc/netplan/01-network-manager-all.yaml- 1
network: version: 2 renderer: NetworkManager ethernets: ens33: addresses: [192.168.168.224/24] routes: - to: 0.0.0.0/0 # default 等效 0.0.0.0/0 # could be 0/0 or 0.0.0.0/0 optionally via: 192.168.168.2 # 网关 nameservers: addresses: # DNS的ip [223.6.6.6,114.114.114.114,180.76.76.76 , 119.29.29.29 , 8.8.8.8 , 101.226.4.6, 123.125.81.6, 1.1.1.1] search: [ www.baidu.com , www.goole.com , www.sogou.com, hello , world,a,b,c,d,e,f,g]- 1
- 2
- 3
- 4
- 5
- 6
- 7
- 8
- 9
- 10
- 11
- 12
- 13
- 14
sudo netplan try- 1
sudo netplan apply- 1
当使用 netplan-ens33 时

ip address
z@U224d:/etc/NetworkManager/system-connections$ ip a 1: lo: <LOOPBACK,UP,LOWER_UP> mtu 65536 qdisc noqueue state UNKNOWN group default qlen 1000 link/loopback 00:00:00:00:00:00 brd 00:00:00:00:00:00 inet 127.0.0.1/8 scope host lo valid_lft forever preferred_lft forever inet6 ::1/128 scope host valid_lft forever preferred_lft forever 2: ens33: <BROADCAST,MULTICAST,UP,LOWER_UP> mtu 1500 qdisc fq_codel state UP group default qlen 1000 link/ether 00:0c:29:4b:7d:6d brd ff:ff:ff:ff:ff:ff altname enp2s1 inet 192.168.168.224/24 brd 192.168.168.255 scope global noprefixroute ens33 valid_lft forever preferred_lft forever inet6 fe80::20c:29ff:fe4b:7d6d/64 scope link valid_lft forever preferred_lft forever- 1
- 2
- 3
- 4
- 5
- 6
- 7
- 8
- 9
- 10
- 11
- 12
- 13
- 14
sudo nano /etc/resolv.conf- 1
# This is /run/systemd/resolve/stub-resolv.conf managed by man:systemd-resolved(8). # Do not edit. # # This file might be symlinked as /etc/resolv.conf. If you're looking at # /etc/resolv.conf and seeing this text, you have followed the symlink. # # This is a dynamic resolv.conf file for connecting local clients to the # internal DNS stub resolver of systemd-resolved. This file lists all # configured search domains. # # Run "resolvectl status" to see details about the uplink DNS servers # currently in use. # # Third party programs should typically not access this file directly, but only # through the symlink at /etc/resolv.conf. To manage man:resolv.conf(5) in a # different way, replace this symlink by a static file or a different symlink. # # See man:systemd-resolved.service(8) for details about the supported modes of # operation for /etc/resolv.conf. nameserver 127.0.0.53 options edns0 trust-ad search 1.1.1.1 www.baidu.com www.goole.com www.sogou.com hello world a b c d e f g- 1
- 2
- 3
- 4
- 5
- 6
- 7
- 8
- 9
- 10
- 11
- 12
- 13
- 14
- 15
- 16
- 17
- 18
- 19
- 20
- 21
- 22
- 23
/etc/resolv.conf的nameserver始终都是127.0.0.53/etc/resolv.conf的search与/etc/netplan/01-network-manager-all.yaml的search保持一致
当切换到 有线连接1 时

ip address- 1
z@U224d:/etc/NetworkManager/system-connections$ ip addre 1: lo: <LOOPBACK,UP,LOWER_UP> mtu 65536 qdisc noqueue state UNKNOWN group default qlen 1000 link/loopback 00:00:00:00:00:00 brd 00:00:00:00:00:00 inet 127.0.0.1/8 scope host lo valid_lft forever preferred_lft forever inet6 ::1/128 scope host valid_lft forever preferred_lft forever 2: ens33: <BROADCAST,MULTICAST,UP,LOWER_UP> mtu 1500 qdisc fq_codel state UP group default qlen 1000 link/ether 00:0c:29:4b:7d:6d brd ff:ff:ff:ff:ff:ff altname enp2s1 inet 192.168.168.112/24 brd 192.168.168.255 scope global noprefixroute ens33 valid_lft forever preferred_lft forever inet6 fe80::6464:ad23:9a7d:3aa8/64 scope link noprefixroute valid_lft forever preferred_lft forever- 1
- 2
- 3
- 4
- 5
- 6
- 7
- 8
- 9
- 10
- 11
- 12
- 13
- 14
地址变为了
/etc/NetworkManager/system-connections/'有线连接 1.nmconnection'设置的地址sudo nano /etc/resolv.conf- 1
# This is /run/systemd/resolve/stub-resolv.conf managed by man:systemd-resolved(8). # Do not edit. # # This file might be symlinked as /etc/resolv.conf. If you're looking at # /etc/resolv.conf and seeing this text, you have followed the symlink. # # This is a dynamic resolv.conf file for connecting local clients to the # internal DNS stub resolver of systemd-resolved. This file lists all # configured search domains. # # Run "resolvectl status" to see details about the uplink DNS servers # currently in use. # # Third party programs should typically not access this file directly, but only # through the symlink at /etc/resolv.conf. To manage man:resolv.conf(5) in a # different way, replace this symlink by a static file or a different symlink. # # See man:systemd-resolved.service(8) for details about the supported modes of # operation for /etc/resolv.conf. nameserver 127.0.0.53 options edns0 trust-ad search www.goole.com www.sogou.com hello world a b c d e f g- 1
- 2
- 3
- 4
- 5
- 6
- 7
- 8
- 9
- 10
- 11
- 12
- 13
- 14
- 15
- 16
- 17
- 18
- 19
- 20
- 21
- 22
- 23
/etc/resolv.conf的nameserver始终都是127.0.0.53/etc/resolv.conf的search发生了改变, 但看不出对应关系, 网络连接是正常的
翻译其注释
这是man管理的/run/systemd/resolve/stub-resolv.conf:system -resolved(8)。 #不要编辑。 # #该文件可能被符号链接为/etc/resolv.conf。如果你在看 # /etc/resolv.conf和看到这段文本,您已经遵循符号链接。 # 这是一个动态的resolv.conf文件,用于连接本地客户端到 # system -resolved的内部DNS存根解析器。此文件列出所有 #配置的搜索域。 # #执行“resolvectl status”命令查看上行DNS服务器的详细信息 #目前正在使用。 # 第三方程序通常不应该直接访问该文件,而只是 通过/etc/resolv.conf中的符号链接。要管理man:resolv.conf(5)在a #不同的方式,替换这个符号链接的静态文件或不同的符号链接。 # 的支持模式的详细信息请参见man:system -resolved.service(8) /etc/resolv.conf. #操作- 1
- 2
- 3
- 4
- 5
- 6
- 7
- 8
- 9
- 10
- 11
- 12
- 13
- 14
- 15
- 16
- 17
- 18
- 19
- 20
- 21
- 22
- 23
- 24
- 25
- 26
- 27
- 28
- 29
- 30
- 31
- 32
- 33
- 34
- 35
- 36
- 37
- 不要编辑修改这个文件
/etc/resolv.conf是一个符号链接 , (CentOS7,9,Fedora中的这个文件不是符号链接)resolvectl status可以查看DNS
👇 摘自 systemd-resolved.service, systemd-resolved — Network Name Resolution manager
/etc/resolv.conf Four modes of handling /etc/resolv.conf (see resolv.conf(5)) are supported: systemd-resolved maintains the /run/systemd/resolve/stub-resolv.conf file for compatibility with traditional Linux programs. This file lists the 127.0.0.53 DNS stub (see above) as the only DNS server. It also contains a list of search domains that are in use by systemd-resolved. The list of search domains is always kept up-to-date. Note that /run/systemd/resolve/stub-resolv.conf should not be used directly by applications, but only through a symlink from /etc/resolv.conf. This file may be symlinked from /etc/resolv.conf in order to connect all local clients that bypass local DNS APIs to systemd-resolved with correct search domains settings. This mode of operation is recommended. A static file /usr/lib/systemd/resolv.conf is provided that lists the 127.0.0.53 DNS stub (see above) as only DNS server. This file may be symlinked from /etc/resolv.conf in order to connect all local clients that bypass local DNS APIs to systemd-resolved. This file does not contain any search domains. systemd-resolved maintains the /run/systemd/resolve/resolv.conf file for compatibility with traditional Linux programs. This file may be symlinked from /etc/resolv.conf and is always kept up-to-date, containing information about all known DNS servers. Note the file format's limitations: it does not know a concept of per-interface DNS servers and hence only contains system-wide DNS server definitions. Note that /run/systemd/resolve/resolv.conf should not be used directly by applications, but only through a symlink from /etc/resolv.conf. If this mode of operation is used local clients that bypass any local DNS API will also bypass systemd-resolved and will talk directly to the known DNS servers. Alternatively, /etc/resolv.conf may be managed by other packages, in which case systemd-resolved will read it for DNS configuration data. In this mode of operation systemd-resolved is consumer rather than provider of this configuration file. Note that the selected mode of operation for this file is detected fully automatically, depending on whether /etc/resolv.conf is a symlink to /run/systemd/resolve/resolv.conf or lists 127.0.0.53 as DNS server.- 1
- 2
- 3
- 4
- 5
- 6
- 7
- 8
- 9
- 10
- 11
- 12
- 13
etc/netplan/*.yaml中的rendererrenderer (scalar) Use the given networking backend for this definition. Currently supported are networkd and NetworkManager. This property can be specified glob‐ ally in network:, for a device type (in e. g. ethernets:) or for a particular device definition. Default is networkd. (Since 0.99) The renderer property has one additional acceptable value for vlan objects (i. e. defined in vlans:): sriov. If a vlan is defined with the sriov renderer for an SR-IOV Virtual Function interface, this causes netplan to set up a hardware VLAN filter for it. There can be only one defined per VF.- 1
- 2
- 3
- 4
- 5
- 6
- 7
renderer : 呈现器,渲染器
renderer用于定义网络后端。目前支持的是networkd和NetworkManager。此属性可以在网络中全局指定,用于设备类型(例如以太网)或特定设备定义。。默认值是
networkd。(自0.99起)
renderer属性有一个额外的可接受值用于vlan对象(即在vlans:中定义):sriov。如果使用
sriov renderer为SR-IOV虚拟功能接口定义vlan,这会使netplan为其设置硬件vlan筛选器。每个VF只能定义一个。后来知道
etc/netplan/*.yaml中的nameservers中的search
search可以翻译成搜索域
搜索域的用途就是:当域名搜索不到时, 将域名加上搜索域设置的名称再次搜索
比如设置了search: [ baidu.com ]后,ping www就能达到ping www.baidu.com的效果network: version: 2 renderer: NetworkManager ethernets: ens33: addresses: [192.168.168.224/24] routes: - to: 0.0.0.0/0 # default 等效 0.0.0.0/0 # could be 0/0 or 0.0.0.0/0 optionally via: 192.168.168.2 # 网关 nameservers: addresses: # DNS的ip [180.76.76.76, 8.8.4.4, 223.6.6.6, 119.29.29.29, 101.226.4.6, 123.125.81.6, 8.8.8.8 ,114.114.114.114,1.1.1.1] search: [ baidu.com ]- 1
- 2
- 3
- 4
- 5
- 6
- 7
- 8
- 9
- 10
- 11
- 12
- 13
- 14

Ubuntu22.04桌面版,还可以使用
nmcli和nmtui命令来配置网络, Server版默认不可以
对于使用NetworkManager的系统, 还可以使用nmcli和nmtui命令来配置网络
使用nmtui可以获得命令行的图形界面sudo nmtui- 1

用
nmcli配置sudo nmcli con mod "有线连接 1" ipv4.method manual ipv4.addr '192.168.168.224/24' ipv4.gateway '192.168.168.2' ipv4.dns '192.168.168.2' ipv4.ignore-auto-dns true ipv4.dns-search 'baidu.com'- 1
sudo nmcli con mod "netplan-ens33" ipv4.method 'manual' ipv4.addr "192.168.168.225/24" ipv4.gateway "192.168.168.2" ipv4.dns "192.168.168.2" ipv4.ignore-auto-dns "true" ipv4.dns-search "taobao.com"- 1
nmcli connection modify 可以修改现有连接
con可以写成c到connection之间的字段mod可以写成m到modify之间的字段nmcli connection modify nmcli connec modify nmcli conne modif nmcii conn modi nmcli con mod nmcli co mo nmcli c m nmcli c modify nmcli connection m- 1
- 2
- 3
- 4
- 5
- 6
- 7
- 8
- 9
ipv4.可以接 [method, dns, dns-search, dns-options, dns-priority, addresses, gateway, routes, route-metric, route-table, routing-rules, ignore-auto-routes, ignore-auto-dns, dhcp-client-id, dhcp-iaid, dhcp-timeout, dhcp-send-hostname, dhcp-hostname, dhcp-fqdn, dhcp-hostname-flags, never-default, may-fail, required-timeout, dad-timeout, dhcp-vendor-class-identifier, dhcp-reject-servers] 。-
ipv4.method的可选]值有 [auto, link-local, manual, shared, disabled] ,ipv4.method最简可写成ipv.me
-
ipv4.addresses设置IP地址, 最简可写成ipv4.a, 可设置多个地址,以逗号分隔, 也可多次用+ipv4.a
ipv4.a(ipv4.addresses)可以设置多个(,逗号分隔,可以有空格),但只能出现一次,+ipv4.a(+ipv4.addresses)可以设置多个(,逗号分隔)可以出现多次
-
- 网关
ipv4.g(ipv4.gateway)只能有一个, (在图形界面也只能设置一个), 如果没设置网关就不能上网,但只要有ip地址,就能让网段内其它主机访问,比如ssh连接,没有网关就是能进不能出
- 网关
-
ipv4.dns不能简写,可一次设置多个,+ipv4.dns可多次设置多个
-
ipv4.dns-search可简写为ipv4.dns-s, 搜索域
-
ipv4.ignore-auto-dns取值true|fasle是否跳过自动域名 , 最简只能写成ipv4.ignore-auto-d
对应图形界面


ipv4.x前面可以加(加号或减号±),ipv4.x表示设置+ipv4.x表示新增,-ipv4.x表示移除
一句中只能出现一次ipv4.x,后面的ipv4.x会覆盖前面的ipv4.x
一句中可以出现多次+ipv4.x和-ipv4.x
sudo nmcli c m "netplan-ens33" ipv4.method manual ipv4.addr 192.168.168.224/24 ipv4.gateway 192.168.168.2 ipv4.dns 192.168.168.2- 1
最好加上单引号或双引号
sudo nmcli connection modify "有线连接 1" ipv4.method 'manual' ipv4.addr "192.168.168.225/24" ipv4.gateway "192.168.168.2" ipv4.dns '192.168.168.2'- 1
也可以分成多句
sudo nmcli c m "有线连接 1" ipv4.addr "192.168.168.224/24" sudo nmcli connection modify "有线连接 1" ipv4.gateway "192.168.168.2" sudo nmcli co mo "有线连接 1" ipv4.method 'manual'- 1
- 2
- 3
自动获取ip
sudo nmcli co mo "有线连接 1" ipv4.method 'auto'- 1
手动指定ip地址和网关,静态IP
sudo nmcli co mo "有线连接 1" ipv4.method 'manual' ipv4.addresses "192.168.168.224/24" ipv4.gateway "192.168.168.2"- 1
手动指定的dns, 跳过自动获取dns
sudo nmcli co mo "有线连接 1" ipv4.ignore-auto-d 'true'- 1
设置dns , 相同的dns不会重复
sudo nmcli co mo "有线连接 1" ipv4.dns "192.168.168.2 , 8.8.4.4 , 223.6.6.6 , 180.76.76.76" sudo nmcli co mo "有线连接 1" +ipv4.dns "123.125.81.6 ,1.1.1.1,8.8.8.8,114.114.114.114" sudo nmcli co mo "有线连接 1" +ipv4.dns "192.168.168.2 , 6.6.6.6" # 不会重复 sudo nmcli co mo "有线连接 1" -ipv4.dns "6.6.6.6"- 1
- 2
- 3
- 4
设置搜索域
sudo nmcli co mo "有线连接 1" ipv4.dns-search 'baidu.com , google.cn , qq.com'- 1
一句设置
method,addresses,gateway,dns, 跳过自动DNS ,searchsudo nmcli c m "有线连接 1" ipv4.method 'manual' ipv4.addresses "192.168.168.224/24" ipv4.gateway "192.168.168.2" ipv4.dns "192.168.168.2 , 8.8.4.4 , 223.6.6.6 , 180.76.76.76, 123.125.81.6, 1.1.1.1,8.8.8.8,114.114.114.114" ipv4.ignore-auto-dns 'true' ipv4.dns-search 'baidu.com' ; sudo systemctl restart NetworkManager- 1
method可写成me , addresses可写成a , gateway可写成g , dns不能简写 , dns-serarch可写成dns-s
sudo nmcli c m "有线连接 1" ipv4.me manual ipv4.a "192.168.168.224/24" ipv4.g "192.168.168.1" ipv4.dns "192.168.168.2 , 223.6.6.6 , 180.76.76.76, 123.125.81.6, 1.1.1.1,8.8.8.8,114.114.114.114,8.8.4.4" ipv4.ignore-auto-d 'true' ipv4.dns-s 'baidu.com' ; sudo systemctl restart NetworkManager- 1
没有空格等一些特殊字符的话, 也可以不加引号, 点号不影响
sudo nmcli c m "有线连接 1" ipv4.me manual ipv4.a 192.168.168.224/24 ipv4.g 192.168.168.2 ipv4.dns 192.168.168.2,223.6.6.6,180.76.76.76,123.125.81.6,1.1.1.1,8.8.8.8,114.114.114.114,8.8.4.4 ipv4.ignore-auto-d true ipv4.dns-s baidu.com ; sudo systemctl restart NetworkManager- 1
对于使用
NetworkManager的系统, 一般用GNOME桌面图形界面的系统都默认用NetworkManager, 如 CentOS7,8,9 , Fedora36 等 都可以使用nmcli和nmtui命令来配置网络
可以用nmcli help,nmcli c help和nmcli c m help查看对应的帮助$ nmcli help 用法:nmcli [选项] 对象 { 命令 | help } 选项 -a, --ask 询问缺少的参数 -c, --colors auto|yes|no 是否在输出中使用颜色 -e, --escape yes|no 转义值中的列分隔符 -f, --fields <字段,...>|all|common 指定要输出的字段 -g, --get-values <字段,...>|all|common -m tabular -t -f 的快捷方式 -h, --help 打印此帮助 -m, --mode tabular|multiline 输出模式 -o, --overview 概览模式 -p, --pretty 美化输出 -s, --show-secrets 允许显示密码 -t, --terse 简介输出 -v, --version 显示程序版本 -w, --wait <秒数> 设定操作完成的等待超时 对象 g[eneral] NetworkManager 的常规状态和操作 n[etworking] 整体网络控制 r[adio] NetworkManager 无线电开关 c[onnection] NetworkManager 的连接 d[evice] NetworkManager 管理的设备 a[gent] NetworkManager 机密(secret)或 polkit 代理 m[onitor] 监视 NetworkManager 更改- 1
- 2
- 3
- 4
- 5
- 6
- 7
- 8
- 9
- 10
- 11
- 12
- 13
- 14
- 15
- 16
- 17
- 18
- 19
- 20
- 21
- 22
- 23
- 24
- 25
- 26
- 27
$ nmcli connection help 用法:nmcli connection { 命令 | help } 命令 := { show | up | down | add | modify | clone | edit | delete | monitor | reload | load | import | export } show [--active] [--order <排序规则>] show [--active] [id | uuid | path | apath] <ID> ... up [[id | uuid | path] <ID>] [ifname <接口名称>] [ap <BSSID>] [passwd-file <密码文件>] down [id | uuid | path | apath] <ID> ... add 常用选项 类型特定选项 从选项 IP_选项 [-- ([+|-]<设置>.<属性> <值>)+] modify [--temporary] [id | uuid | path] <ID> ([+|-]<设置>.<属性> <值>)+ clone [--temporary] [id | uuid | path ] <ID> <新名称> edit [id | uuid | path] <ID> edit [type <新连接类型>] [con-name <新连接名称>] delete [id | uuid | path] <ID> monitor [id | uuid | path] <ID> ... reload load <文件名> [ <文件名>... ] import [--temporary] type <类型> file <要导入的文件>- 1
- 2
- 3
- 4
- 5
- 6
- 7
- 8
- 9
- 10
- 11
- 12
- 13
- 14
- 15
- 16
- 17
- 18
- 19
- 20
- 21
- 22
- 23
- 24
- 25
- 26
- 27
- 28
- 29
- 30
- 31
$ nmcli connection modify help 用法:nmcli connection modify { 参数 | help } 参数 := [id | uuid | path] <ID> ([+|-]<设置>.<属性> <值>)+ 修改连接配置集的一个或多个属性。 配置集由它的名称、UUID 或 D-Bus 路径代表。对于有多个值 的属性,可以使用 "+" 或 "-" 为属性名加前缀。 "+" 代表附加项而不是覆盖整个值。 "-"代表删除选项的项而不是整个值。 参数 := remove <设置> 从连接配置集中删除一个设置。 示例: nmcli con mod home-wifi wifi.ssid rakosnicek nmcli con mod em1-1 ipv4.method manual ipv4.addr "192.168.1.2/24, 10.10.1.5/8" nmcli con mod em1-1 +ipv4.dns 8.8.4.4 nmcli con mod em1-1 -ipv4.dns 1 nmcli con mod em1-1 -ipv6.addr "abbe::cafe/56" nmcli con mod bond0 +bond.options mii=500 nmcli con mod bond0 -bond.options downdelay nmcli con mod em1-1 remove sriov- 1
- 2
- 3
- 4
- 5
- 6
- 7
- 8
- 9
- 10
- 11
- 12
- 13
- 14
- 15
- 16
- 17
- 18
- 19
- 20
- 21
- 22
- 23
- 24
NetworkManager官网
NetworkManager官网—man pagesArchlinux的nmcli用例—nmcli-examples - usage examples of nmcli
Archlinux的NMCLI(1)—nmcli - command-line tool for controlling NetworkManagernmcli connection add 可以创建新连接
ARGUMENTS := COMMON_OPTIONS TYPE_SPECIFIC_OPTIONS SLAVE_OPTIONS IP_OPTIONS [-- ([+|-]. )+] COMMON_OPTIONS: type ifname | "*" [con-name ] [autoconnect yes|no] [save yes|no] [master ] [slave-type ] - 1
- 2
- 3
- 4
- 5
- 6
- 7
- 8
- 9
- 10
nmcli connection add等效nmcli c asudo nmcli c a con-name 'ens33ConnTest001' ifname 'ens33' type ethernet ipv4.method 'manual' ipv4.addresses "192.168.168.224/24 , 192.168.168.225/24,192.168.168.226/24" +ipv4.address '192.168.168.227/24' +ipv4.a '192.168.168.228/24' +ipv4.addre '192.168.168.229/24 , 192.168.168.230/24 , 192.168.168.231/24' +ipv4.addr "192.168.168.232/24" +ipv4.ad '192.168.168.233/24' +ipv4.a 192.168.168.234/24,192.168.168.235/24 ipv4.gate 192.168.168.2 ipv4.dns 192.168.168.2,119.29.29.29,180.76.76.76,223.6.6.6,8.8.4.4,114.114.115.115 +ipv4.dns '223.5.5.5 , 8.8.8.8 , 1.1.1.1 , 114.114.114.114' +ipv4.dns 101.226.4.6,123.125.81.6 ipv4.ignore-auto-dns true ipv4.dns-search qq.com- 1
ipv4.a(ipv4.addresses)可以设置多个(,逗号分隔,可以有空格),但只能出现一次,+ipv4.a(+ipv4.addresses)可以设置多个(,逗号分隔)可以出现多次
网关ipv4.g(ipv4.gateway)只能有一个, (在图形界面也只能设置一个)
ipv4.dns不能简写,可一次设置多个,+ipv4.dns可多次设置多个
ipv4.dns-search可简写为ipv4.dns-s, 搜索域
ipv4.ignore-auto-dns取值true|fasle是否跳过自动域名 , 最简只能写成ipv4.ignore-auto-d
上面的nmcli控制台语句会在/etc/NetworkManager/system-connections/目录生成con-name指定的名称加上.nmconnection后缀的配置文件, 如果同名文件已存在, 就会再加一个UID
上面的nmcli控制台语句生成的对应的配置文件的内容为[connection] id=ens33ConnTest001 uuid=47b1917a-5eea-4160-b56f-680654c338c9 type=ethernet interface-name=ens33 [ethernet] [ipv4] address1=192.168.168.224/24,192.168.168.2 address2=192.168.168.225/24 address3=192.168.168.226/24 address4=192.168.168.227/24 address5=192.168.168.228/24 address6=192.168.168.229/24 address7=192.168.168.230/24 address8=192.168.168.231/24 address9=192.168.168.232/24 address10=192.168.168.233/24 address11=192.168.168.234/24 address12=192.168.168.235/24 dns=192.168.168.2;119.29.29.29;180.76.76.76;223.6.6.6;8.8.4.4;114.114.115.115;223.5.5.5;8.8.8.8;1.1.1.1;114.114.114.114;101.226.4.6;123.125.81.6; dns-search=qq.com; ignore-auto-dns=true method=manual [ipv6] addr-gen-mode=stable-privacy method=auto [proxy]- 1
- 2
- 3
- 4
- 5
- 6
- 7
- 8
- 9
- 10
- 11
- 12
- 13
- 14
- 15
- 16
- 17
- 18
- 19
- 20
- 21
- 22
- 23
- 24
- 25
- 26
- 27
- 28
- 29
- 30
- 31
netplan可以从配置文件创建连接,NetworkManager暂时不知可否从配置文件创建连接,只能从图形界面或nmtui或nmcli c a创建新连接,nmcli c load只能加载已创建连接的配置文件, 不能加载自己添加的配置文件后来发现
NetworkManager的nmcli也可以从配置文件创建新连接 , 不是用nmcli connection load, 而是用nmcli connection reloadnmcli connection reload会扫描加载所有/etc/NetworkManager/system-connections/目录下(不包括子目录).nmconnection结尾的配置文件, 然后用nmcli connection up 连接名激活连接*.nmconnection必须符合chmod 600权限-rw-------root@ud224:/etc/NetworkManager/system-connections# ll /etc/NetworkManager/system-connections/ 总用量 80 drwxr-xr-x 1 root root 940 10月 27 07:48 ./ drwxr-xr-x 1 root root 194 10月 27 07:35 ../ -rw------- 1 root root 344 10月 26 05:56 360电信移动铁通dns.nmconnection -rw------- 1 root root 313 10月 26 05:58 360联通dns.nmconnection -rw------- 1 root root 350 10月 26 04:10 阿里dns.nmconnection -rw------- 1 root root 298 10月 26 04:34 百度dns.nmconnection -rw------- 1 root root 301 10月 26 04:25 谷歌dns.nmconnection -rw------- 1 root root 315 10月 26 06:13 四川联通dns.nmconnection -rw------- 1 root root 295 10月 26 04:53 腾讯dns.nmconnection -rw------- 1 root root 300 10月 26 06:06 微软dns.nmconnection -rw------- 1 root root 427 10月 26 00:39 '有线连接 1.nmconnection' -rw------- 1 root root 315 10月 26 05:37 CloudflareDNS.nmconnection -rw------- 1 root root 311 10月 26 05:26 CNNICdns.nmconnection -rw------- 1 root root 276 10月 26 02:14 Concise.nmconnection -rw------- 1 root root 236 10月 26 03:42 con-name.nmconnection -rw------- 1 root root 203 10月 26 03:45 ens33自动获取IP.nmconnection -rw------- 1 root root 741 10月 26 01:55 ens33ConnTest001.nmconnection -rw------- 1 root root 268 10月 26 05:01 IBMdns.nmconnection -rw------- 1 root root 312 10月 26 06:16 OpenDNS.nmconnection -rw------- 1 root root 1069 10月 27 07:48 t001.nmconnection -rw------- 1 root root 729 10月 27 07:43 t002.nmconnection -rw------- 1 root root 345 10月 27 07:33 t003.nmconnection drwxr-xr-x 1 root root 34 10月 27 07:27 test/- 1
- 2
- 3
- 4
- 5
- 6
- 7
- 8
- 9
- 10
- 11
- 12
- 13
- 14
- 15
- 16
- 17
- 18
- 19
- 20
- 21
- 22
- 23
- 24
- 25
添加一个简洁的,可当基础模板
sudo nmcli connection add con-name 'Concise' ifname 'ens33' type 'ethernet' ipv4.method 'manual' ipv4.addresses "192.168.168.224/24" ipv4.gateway '192.168.168.2' ipv4.dns '192.168.168.2' ipv4.ignore-auto-dns false ipv4.dns-search google.cn- 1
con-name,ifname,type没法简写 , 区分大小写可以添加几个连接可用于做试验,或者方便快速切换
sudo nmcli c a con-name 'con-name' ifname 'ens33' type 'EtherneT' ipv4.me 'manual' ipv4.a 192.168.168.224/24 ipv4.g 192.168.168.2- 1
EtHeRnEt 不区分大小写 , 到配置文件会变为小写 ethernet
sudo nmcli c a con-name 'ens33自动获取IP' ifname 'ens33' type EtHeRnEt ipv4.me auto- 1
ipv4.xxx 也不区分大小写, 到配置文件都变小写
sudo nmcli c a con-name '阿里dns' ifname ens33 type ethernet IpV4.me ManuaL iPV4.A 192.168.168.224/24 IPv4.g 192.168.168.2 ipv4.ignore-auto-dns true ipv4.dns 223.6.6.6,223.5.5.5- 1
sudo nmcli c m '阿里dns' iPv4.iGnore-aUto-dNs true Ipv4.dnS 223.6.6.6,223.5.5.5 iPv4.dNs-SeArCh alibaba.com,aliyun.com,taobao.com- 1
con-name,ifname,type没法简写 , 而且区分大小写sudo nmcli c a con-name '谷歌dns' ifname ens33 type ETHERnet iPV4.mE mANuAl IpV4.aDDr 192.168.168.224/24 ipV4.GAte 192.168.168.2 IpV4.IgNorE-AUto-DnS TruE ipV4.dNS 8.8.4.4,8.8.8.8 ipV4.DnS-sEaRcH google.cn- 1
sudo nmcli c a con-name 百度dns ifname ens33 type ethernet ipv4.me manual ipv4.a 192.168.168.224/24 ipv4.g 192.168.168.2 ipv4.ignore-auto-dns true ipv4.dns 180.76.76.76 ipv4.dns-search baidu.com- 1
单引号
sudo nmcli c a con-name '腾讯dns' ifname 'ens33' type 'ethernet' ipv4.me 'manual' ipv4.a '192.168.168.224/24' ipv4.g '192.168.168.2' ipv4.ignore-auto-dns 'true' ipv4.dns '119.29.29.29' ipv4.dns-search 'qq.com'- 1
双引号
sudo nmcli c a con-name "114dns" ifname "ens33" type "ethernet" ipv4.me "manual" ipv4.a "192.168.168.224/24" ipv4.g "192.168.168.2" ipv4.ignore-auto-dns "true" ipv4.dns "114.114.114.114,114.114.115.115"- 1
大写
sudo nmcli c a con-name 'IBMdns' ifname 'ens33' type 'ethernet' IPV4.ME manual IPV4.A 192.168.168.224/24 IPV4.G 192.168.168.2 IPV4.IGNORE-AUTO-DNS true IPV4.DNS '9.9.9.9'- 1
全名大写
sudo nmcli c a con-name 'CNNICdns' ifname 'ens33' type 'ethernet' IPV4.METHOD 'manual' IPV4.ADDRESSES 192.168.168.224/24 IPV4.GATEWAY 192.168.168.2 IPV4.IGNORE-AUTO-DNS 'true' IPV4.DNS '1.2.4.8,210.2.4.8' IPV4.DNS-SEARCH 'baidu.com,google.cn'- 1
全名小写
sudo nmcli c a con-name 'CloudflareDNS' ifname 'ens33' type 'ethernet' ipv4.method 'manual' ipv4.addresses '192.168.168.224/24' ipv4.gateway '192.168.168.2' ipv4.ignore-auto-dns 'true' ipv4.dns '1.1.1.1,1.0.0.1' ipv4.dns-search 'baidu.com,google.cn'- 1
sudo nmcli c a con-name "360电信移动铁通dns" ifname "ens33" type "ethernet" ipv4.method "manual" ipv4.addresses "192.168.168.224/24" ipv4.gateway "192.168.168.2" ipv4.ignore-auto-dns "true" ipv4.dns "101.226.4.6 , 218.30.118.6" ipv4.dns-search "360.com"- 1
sudo nmcli c a con-name 360联通dns ifname ens33 type ethernet ipv4.method manual ipv4.addresses 192.168.168.224/24 ipv4.gateway 192.168.168.2 ipv4.ignore-auto-dns true ipv4.dns 123.125.81.6,140.207.198.6 ipv4.dns-search "360.com"- 1
sudo nmcli c a con-name 微软dns ifname ens33 type ethernet ipv4.me manual ipv4.a 192.168.168.224/24 ipv4.g 192.168.168.2 ipv4.ignore-auto-dns true ipv4.dns 4.2.2.1,4.2.2.2 ipv4.dns-s bing.com- 1
sudo nmcli c a con-name OpenDNS ifname ens33 type ethernet ipv4.me manual ipv4.a 192.168.168.224/24 ipv4.g 192.168.168.2 ipv4.ignore-auto-dns true ipv4.dns 208.67.222.222,208.67.220.220 ipv4.dns-s bing.com- 1
修改为手动DNS
sudo nmcli c m 'ens33ConnTest001' ipv4.ignore-auto-dns true- 1
修改自动DNS
sudo nmcli c m 'ens33ConnTest001' ipv4.ignore-auto-dns false- 1
resolvectl命令可以查看 dns另外, Ubuntu22,desktop和server版, 默认都没有
/etc/network/interfaces文件 , 没有networking服务z@U224d:/$ sudo cat /etc/network/interfaces cat: /etc/network/interfaces: 没有那个文件或目录- 1
- 2
root@ud224:/etc/NetworkManager/system-connections# systemctl status networking Unit networking.service could not be found.- 1
- 2
DNS默认用端口
53resolvectl命令可以查看 dns -
相关阅读:
Seata四大模式之XA模式详解及代码实现
Java注释
Unity3d bounds包围盒 和collider碰撞器区别
uni vuex 组件及常用api
计算机毕设 SpringBoot+Vue幼儿园管理系统 幼儿园信息管理系统 智慧幼儿园管理系统Java Vue MySQL数据库 远程调试 代码讲解
Lua-http库写一个爬虫程序怎么样 ?
数据集划分——train_test_split函数使用说明
寻找两个正序数组中的中位数
LeetCode99之恢复二叉搜索树(相关话题:中序遍历)
并发编程7:线程池的使用
- 原文地址:https://blog.csdn.net/kfepiza/article/details/127544738
