-
【浅学Java】Seervlet小项目——MessageWall
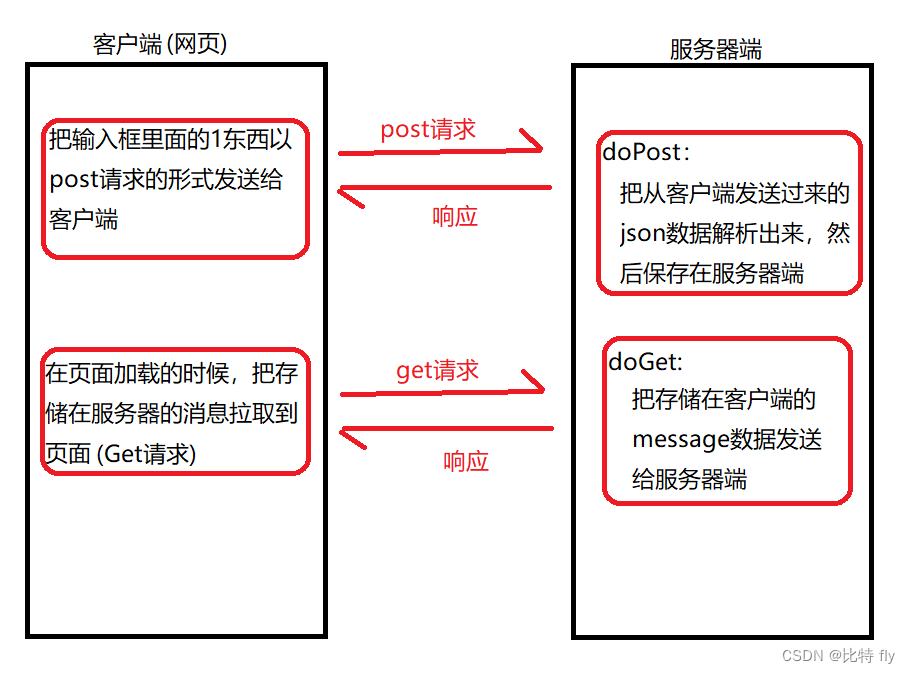
1. 基本思路

2. 前端模块
2.1 代码
<!DOCTYPE html> <html lang="en"> <head> <meta charset="UTF-8"> <meta http-equiv="X-UA-Compatible" content="IE=edge"> <meta name="viewport" content="width=device-width, initial-scale=1.0"> <title>表白墙</title> <style> * { padding: 0; margin: 0; box-sizing: border-box; } .container { width: 800px; margin: 10px auto; } .container h2 { text-align: center; margin: 30px 0px; } .row { height: 50px; display: flex; justify-content: center; margin-top: 5px; line-height: 50px; } .row span { height: 50px; width: 100px; line-height: 50px; } .row input { height: 50px; width: 300px; line-height: 50px; } .row button { width: 400px; height: 50px; color: white; background-color: orange; border: none; border-radius: 10px; } .row button:active { background-color: grey; } </style> </head> <body> <!-- 这是一个顶层容器, 放其他元素 --> <div class="container"> <h2>表白墙</h2> <div class="row"> <span>谁</span> <input type="text" id="from"> </div> <div class="row"> <span>对谁</span> <input type="text" id="to"> </div> <div class="row"> <span>说什么</span> <input type="text" id="message"> </div> <div class="row"> <button>提交</button> </div> </div> <!-- 引入jquery的CDN --> <script src="https://code.jquery.com/jquery-3.6.1.min.js"></script> <script> let container = document.querySelector('.container'); let fromInput = document.querySelector('#from'); let toInput = document.querySelector('#to'); let messageInput = document.querySelector('#message'); let button = document.querySelector('button'); button.onclick = function() { // 1. 把用户输入的内容获取到. let from = fromInput.value; let to = toInput.value; let message = messageInput.value; if (from == '' || to == '' || message == '') { return; } // 2. 构造一个 div, 把这个 div 插入到 .container 的末尾 let newDiv = document.createElement('div'); newDiv.className = 'row'; newDiv.innerHTML = from + " 对 " + to + " 说: " + message; // 3. 把 div 挂在 container 里面 container.appendChild(newDiv); // 4. 把之前的输入框内容进行清空 fromInput.value = ''; toInput.value = ''; messageInput.value = ''; //5.[新的步骤] 需要把刚才输入框里面的数据,构成post请求,交给后端服务器 let messageJson={ "from":from, "to":to, "message":message //冒号前面是字符串,后面是变量 }; $.ajax({ type:'post', //相对路径的写法 url:'message', //绝对路径的写法 // url:'/MessageWall/meaaage' contentType:'application/json,charset=utf8', data:JSON.stringify(messageJson), success: function(){ alert("提交成功"); }, error: function(){ alert("提交失败"); } }); } //这个函数在页面加载的时候调用,通过这个函数从服务器获取到当前的消息队列 //并且显示到页面上。 function load(){ $.ajax({ type:'get', url:'message', success:function(body){ //次数得到的body已经是一个js对象数组了 //ajax自动进行类型转换 //本来服务器返回的是JSON格式的字符串,ajax会自动的根据Content-Type 为 application/json //对响应的body进行解析,解析成为 js 对象 //遍历数组的元素,把内容构造到页面上 let container = document.querySelector('.container'); for(let message of body){ let newDiv = document.createElement('div'); newDiv.className = 'row'; newDiv.innerHTML=message.from +" 对 "+message.to+" 说:"+message.message; container.appendChild(newDiv); } } }); } //函数写在这里就表示页面加载的时候就进行执行 load(); </script> </body> </html>- 1
- 2
- 3
- 4
- 5
- 6
- 7
- 8
- 9
- 10
- 11
- 12
- 13
- 14
- 15
- 16
- 17
- 18
- 19
- 20
- 21
- 22
- 23
- 24
- 25
- 26
- 27
- 28
- 29
- 30
- 31
- 32
- 33
- 34
- 35
- 36
- 37
- 38
- 39
- 40
- 41
- 42
- 43
- 44
- 45
- 46
- 47
- 48
- 49
- 50
- 51
- 52
- 53
- 54
- 55
- 56
- 57
- 58
- 59
- 60
- 61
- 62
- 63
- 64
- 65
- 66
- 67
- 68
- 69
- 70
- 71
- 72
- 73
- 74
- 75
- 76
- 77
- 78
- 79
- 80
- 81
- 82
- 83
- 84
- 85
- 86
- 87
- 88
- 89
- 90
- 91
- 92
- 93
- 94
- 95
- 96
- 97
- 98
- 99
- 100
- 101
- 102
- 103
- 104
- 105
- 106
- 107
- 108
- 109
- 110
- 111
- 112
- 113
- 114
- 115
- 116
- 117
- 118
- 119
- 120
- 121
- 122
- 123
- 124
- 125
- 126
- 127
- 128
- 129
- 130
- 131
- 132
- 133
- 134
- 135
- 136
- 137
- 138
- 139
- 140
- 141
- 142
- 143
- 144
- 145
- 146
- 147
- 148
- 149
- 150
- 151
- 152
- 153
- 154
- 155
- 156
- 157
- 158
- 159
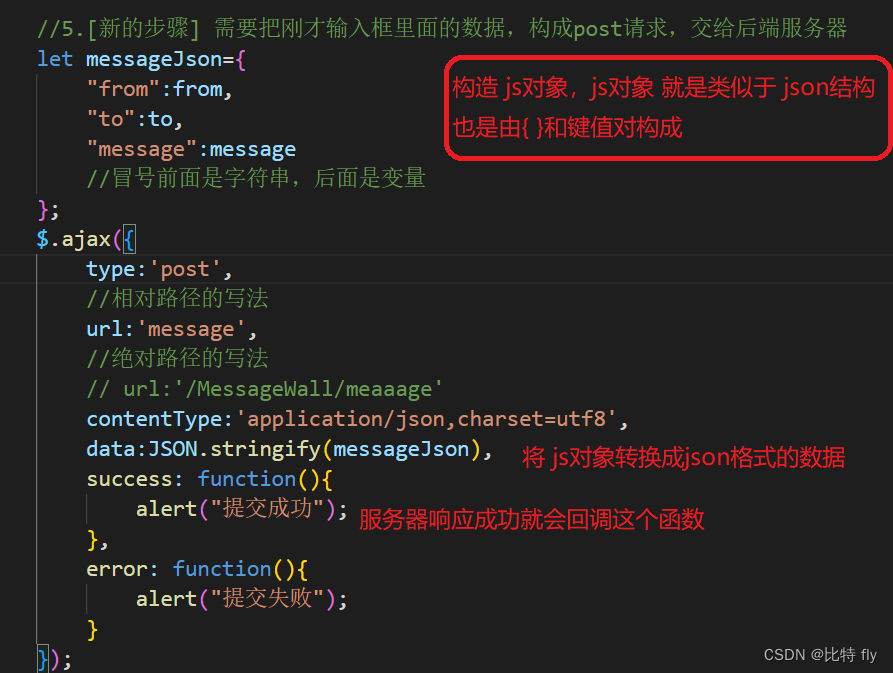
2.2 提交数据(post请求)

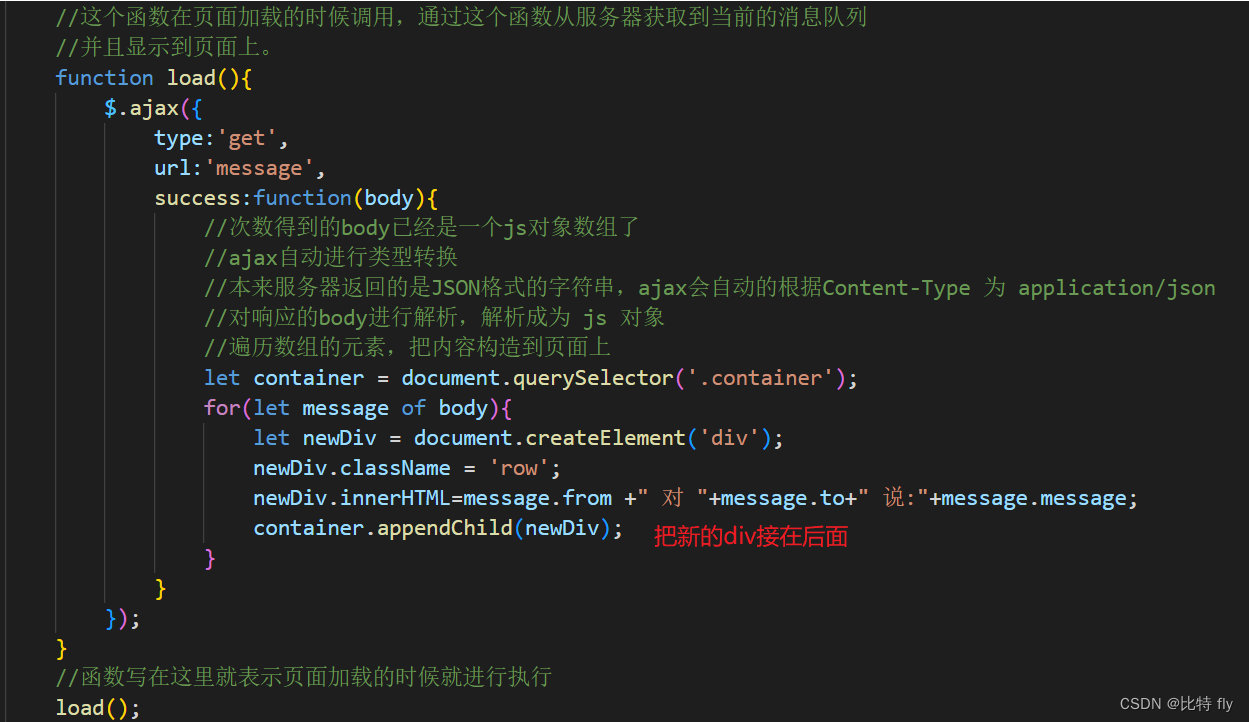
2.3 加载页面时,拉取服务器端的消息数据(get请求)

3. 后端模块
3.1 代码
后端处理模块:
import com.fasterxml.jackson.databind.ObjectMapper; import javax.servlet.ServletException; import javax.servlet.annotation.WebServlet; import javax.servlet.http.HttpServlet; import javax.servlet.http.HttpServletRequest; import javax.servlet.http.HttpServletResponse; import javax.swing.plaf.metal.MetalMenuBarUI; import java.io.IOException; import java.sql.Connection; import java.sql.PreparedStatement; import java.sql.ResultSet; import java.sql.SQLException; import java.util.ArrayList; import java.util.List; /** * Created with IntelliJ IDEA. * Description: * User: 3020104637 * Date: 2022-10-16 * Time: 9:25 */ // 对应前端传来的请求的body格式,要保证每个属性的名字和json里的key一样 //同时也得保证这几个属性是public或者提供public的getter方法 class Message{ public String from; public String to; public String message; @Override public String toString() { return "Message{" + "from='" + from + '\'' + ", to='" + to + '\'' + ", message='" + message + '\'' + '}'; } } @WebServlet("/message") public class MessageServlet extends HttpServlet { //objectMapper在多个方法中都会被使用,用来将Json的数据解析成Message类对象 private ObjectMapper objectMapper = new ObjectMapper(); //private ListmessageList = new ArrayList<>(); //实现客户端提交数据到服务器端 @Override protected void doPost(HttpServletRequest req, HttpServletResponse resp) throws ServletException, IOException { // 1.把body的json数据解析出来 Message message=objectMapper.readValue(req.getInputStream(),Message.class); // 2.把对象保存起来,先用最简单的做法,就是直接保存在内存中 //messageList.add(message); save(message); System.out.println(message); // 3.返回保存成功的响应 resp.setContentType("application/json;charset=utf8"); resp.getWriter().write("{\"ok\":1}"); } //实现客户端从服务器端拿到数据 @Override protected void doGet(HttpServletRequest req, HttpServletResponse resp) throws ServletException, IOException { //由于约定的请求没有参数,所以不需要进行解析操作 resp.setContentType("application/json;charset=utf8"); List<Message> messageList = load(); //把对象转成JSON形式的字符串 String respString = objectMapper.writeValueAsString(messageList); resp.getWriter().write(respString); } //把当前的消息存在数据库当中 private void save(Message message){ Connection connection=null; PreparedStatement statement=null; try { //1.和数据库建立连接 connection = DBUtil.getConnection(); //2.构造SQL语句 String sql = "insert into message values(?, ?, ?)"; statement = connection.prepareStatement(sql); statement.setString(1,message.from); statement.setString(2,message.to); statement.setString(3,message.message); //3.执行sql语句 int ret = statement.executeUpdate(); if(ret!=1){ System.out.println("插入失败!"); }else{ System.out.println("插入成功!"); } } catch (SQLException e) { e.printStackTrace(); }finally { //4.关闭连接 DBUtil.close(connection,statement,null); } } //从数据库查询到记录 private List<Message> load(){ Connection connection=null; PreparedStatement statement=null; ResultSet resultSet=null; List<Message> messageList = new ArrayList<>(); try { //1.和数据库建立连接 connection = DBUtil.getConnection(); //2.构造SQL语句 String sql = "select * from message"; statement = connection.prepareStatement(sql); //3.执行sql语句 resultSet = statement.executeQuery(); //4.遍历结果 while(resultSet.next()){ Message message = new Message(); message.from=resultSet.getString("from"); message.to=resultSet.getString("to"); message.message=resultSet.getString("message"); messageList.add(message); } } catch (SQLException e) { e.printStackTrace(); }finally { //5.释放资源 DBUtil.close(connection,statement,resultSet); } return messageList; } }- 1
- 2
- 3
- 4
- 5
- 6
- 7
- 8
- 9
- 10
- 11
- 12
- 13
- 14
- 15
- 16
- 17
- 18
- 19
- 20
- 21
- 22
- 23
- 24
- 25
- 26
- 27
- 28
- 29
- 30
- 31
- 32
- 33
- 34
- 35
- 36
- 37
- 38
- 39
- 40
- 41
- 42
- 43
- 44
- 45
- 46
- 47
- 48
- 49
- 50
- 51
- 52
- 53
- 54
- 55
- 56
- 57
- 58
- 59
- 60
- 61
- 62
- 63
- 64
- 65
- 66
- 67
- 68
- 69
- 70
- 71
- 72
- 73
- 74
- 75
- 76
- 77
- 78
- 79
- 80
- 81
- 82
- 83
- 84
- 85
- 86
- 87
- 88
- 89
- 90
- 91
- 92
- 93
- 94
- 95
- 96
- 97
- 98
- 99
- 100
- 101
- 102
- 103
- 104
- 105
- 106
- 107
- 108
- 109
- 110
- 111
- 112
- 113
- 114
- 115
- 116
- 117
- 118
- 119
- 120
- 121
- 122
- 123
- 124
- 125
- 126
- 127
- 128
- 129
- 130
- 131
- 132
数据库连接模块:
import com.mysql.cj.jdbc.MysqlDataSource; import javax.sql.DataSource; import java.sql.Connection; import java.sql.PreparedStatement; import java.sql.ResultSet; import java.sql.SQLException; /** * Created with IntelliJ IDEA. * Description: * User: 3020104637 * Date: 2022-10-16 * Time: 12:47 */ //通过这个类来完成数据库的连接 //建立连接需要使用Datasouce,并且一个程序有一个DataSouce实例即可,此处使用单例模式来实现 public class DBUtil { private static DataSource dataSource = null; private static DataSource getDataSource(){ if(dataSource==null){ dataSource = new MysqlDataSource(); ((MysqlDataSource)dataSource).setURL("jdbc:mysql://127.0.0.1:3306/MessageWall?characterEncoding=utf8&useSSL=false"); ((MysqlDataSource)dataSource).setUser("root"); ((MysqlDataSource)dataSource).setPassword("06095213");//必须喻数据库的密码一样 } return dataSource; } public static Connection getConnection() throws SQLException { return getDataSource().getConnection(); } public static void close(Connection connection, PreparedStatement statement, ResultSet resultSet) { if(resultSet!=null){ try { resultSet.close(); } catch (SQLException e) { e.printStackTrace(); } } if(statement!=null){ try { statement.close(); } catch (SQLException e) { e.printStackTrace(); } } if(connection!=null){ try { connection.close(); } catch (SQLException e) { e.printStackTrace(); } } } }- 1
- 2
- 3
- 4
- 5
- 6
- 7
- 8
- 9
- 10
- 11
- 12
- 13
- 14
- 15
- 16
- 17
- 18
- 19
- 20
- 21
- 22
- 23
- 24
- 25
- 26
- 27
- 28
- 29
- 30
- 31
- 32
- 33
- 34
- 35
- 36
- 37
- 38
- 39
- 40
- 41
- 42
- 43
- 44
- 45
- 46
- 47
- 48
- 49
- 50
- 51
- 52
- 53
- 54
- 55
- 56
3.2 将json转成自定义的类对象
用ObjectMapper

3.3 doPost模块
处理的整体逻辑
- 解析客户端过来的json数据,解析为Message类型
- 将解析出来的Message数据存储起来——save(message)
- 向客户端发出保存成功的响应

save方案
这里用数据库作为存储方案
处理流程:- 与数据库建立连接
- 构造sql语句——用客户端提交的内容
- 执行sql语句
- 关闭连接
private void save(Message message){ Connection connection=null; PreparedStatement statement=null; try { //1.和数据库建立连接 connection = DBUtil.getConnection(); //2.构造SQL语句 String sql = "insert into message values(?, ?, ?)"; statement = connection.prepareStatement(sql); statement.setString(1,message.from); statement.setString(2,message.to); statement.setString(3,message.message); //3.执行sql语句 int ret = statement.executeUpdate(); if(ret!=1){ System.out.println("插入失败!"); }else{ System.out.println("插入成功!"); } } catch (SQLException e) { e.printStackTrace(); }finally { //4.关闭连接 DBUtil.close(connection,statement,null); } }- 1
- 2
- 3
- 4
- 5
- 6
- 7
- 8
- 9
- 10
- 11
- 12
- 13
- 14
- 15
- 16
- 17
- 18
- 19
- 20
- 21
- 22
- 23
- 24
- 25
- 26
3.4 doGet模块
处理的整体逻辑
- 将存储在服务器数据库中的数据取出来构造成一个List对象
- 把List对象转成一个json字符串
- 将json字符串返回给客户端

加载数据库数据——load()
//从数据库查询到记录 private List<Message> load(){ Connection connection=null; PreparedStatement statement=null; ResultSet resultSet=null; List<Message> messageList = new ArrayList<>(); try { //1.和数据库建立连接 connection = DBUtil.getConnection(); //2.构造SQL语句 String sql = "select * from message"; statement = connection.prepareStatement(sql); //3.执行sql语句 resultSet = statement.executeQuery(); //4.遍历结果 while(resultSet.next()){ Message message = new Message(); message.from=resultSet.getString("from"); message.to=resultSet.getString("to"); message.message=resultSet.getString("message"); messageList.add(message); } } catch (SQLException e) { e.printStackTrace(); }finally { //5.释放资源 DBUtil.close(connection,statement,resultSet); } return messageList; }- 1
- 2
- 3
- 4
- 5
- 6
- 7
- 8
- 9
- 10
- 11
- 12
- 13
- 14
- 15
- 16
- 17
- 18
- 19
- 20
- 21
- 22
- 23
- 24
- 25
- 26
- 27
- 28
- 29
- 30
- 31
- 32
3. 数据库连接
代码
import com.mysql.cj.jdbc.MysqlDataSource; import javax.sql.DataSource; import java.sql.Connection; import java.sql.PreparedStatement; import java.sql.ResultSet; import java.sql.SQLException; /** * Created with IntelliJ IDEA. * Description: * User: 3020104637 * Date: 2022-10-16 * Time: 12:47 */ //通过这个类来完成数据库的连接 //建立连接需要使用Datasouce,并且一个程序有一个DataSouce实例即可,此处使用单例模式来实现 public class DBUtil { private static DataSource dataSource = null; private static DataSource getDataSource(){ if(dataSource==null){ dataSource = new MysqlDataSource(); ((MysqlDataSource)dataSource).setURL("jdbc:mysql://127.0.0.1:3306/MessageWall?characterEncoding=utf8&useSSL=false"); ((MysqlDataSource)dataSource).setUser("root"); ((MysqlDataSource)dataSource).setPassword("06095213");//必须喻数据库的密码一样 } return dataSource; } public static Connection getConnection() throws SQLException { return getDataSource().getConnection(); } public static void close(Connection connection, PreparedStatement statement, ResultSet resultSet) { if(resultSet!=null){ try { resultSet.close(); } catch (SQLException e) { e.printStackTrace(); } } if(statement!=null){ try { statement.close(); } catch (SQLException e) { e.printStackTrace(); } } if(connection!=null){ try { connection.close(); } catch (SQLException e) { e.printStackTrace(); } } } }- 1
- 2
- 3
- 4
- 5
- 6
- 7
- 8
- 9
- 10
- 11
- 12
- 13
- 14
- 15
- 16
- 17
- 18
- 19
- 20
- 21
- 22
- 23
- 24
- 25
- 26
- 27
- 28
- 29
- 30
- 31
- 32
- 33
- 34
- 35
- 36
- 37
- 38
- 39
- 40
- 41
- 42
- 43
- 44
- 45
- 46
- 47
- 48
- 49
- 50
- 51
- 52
- 53
- 54
- 55
- 56
- 57
- 58
注意

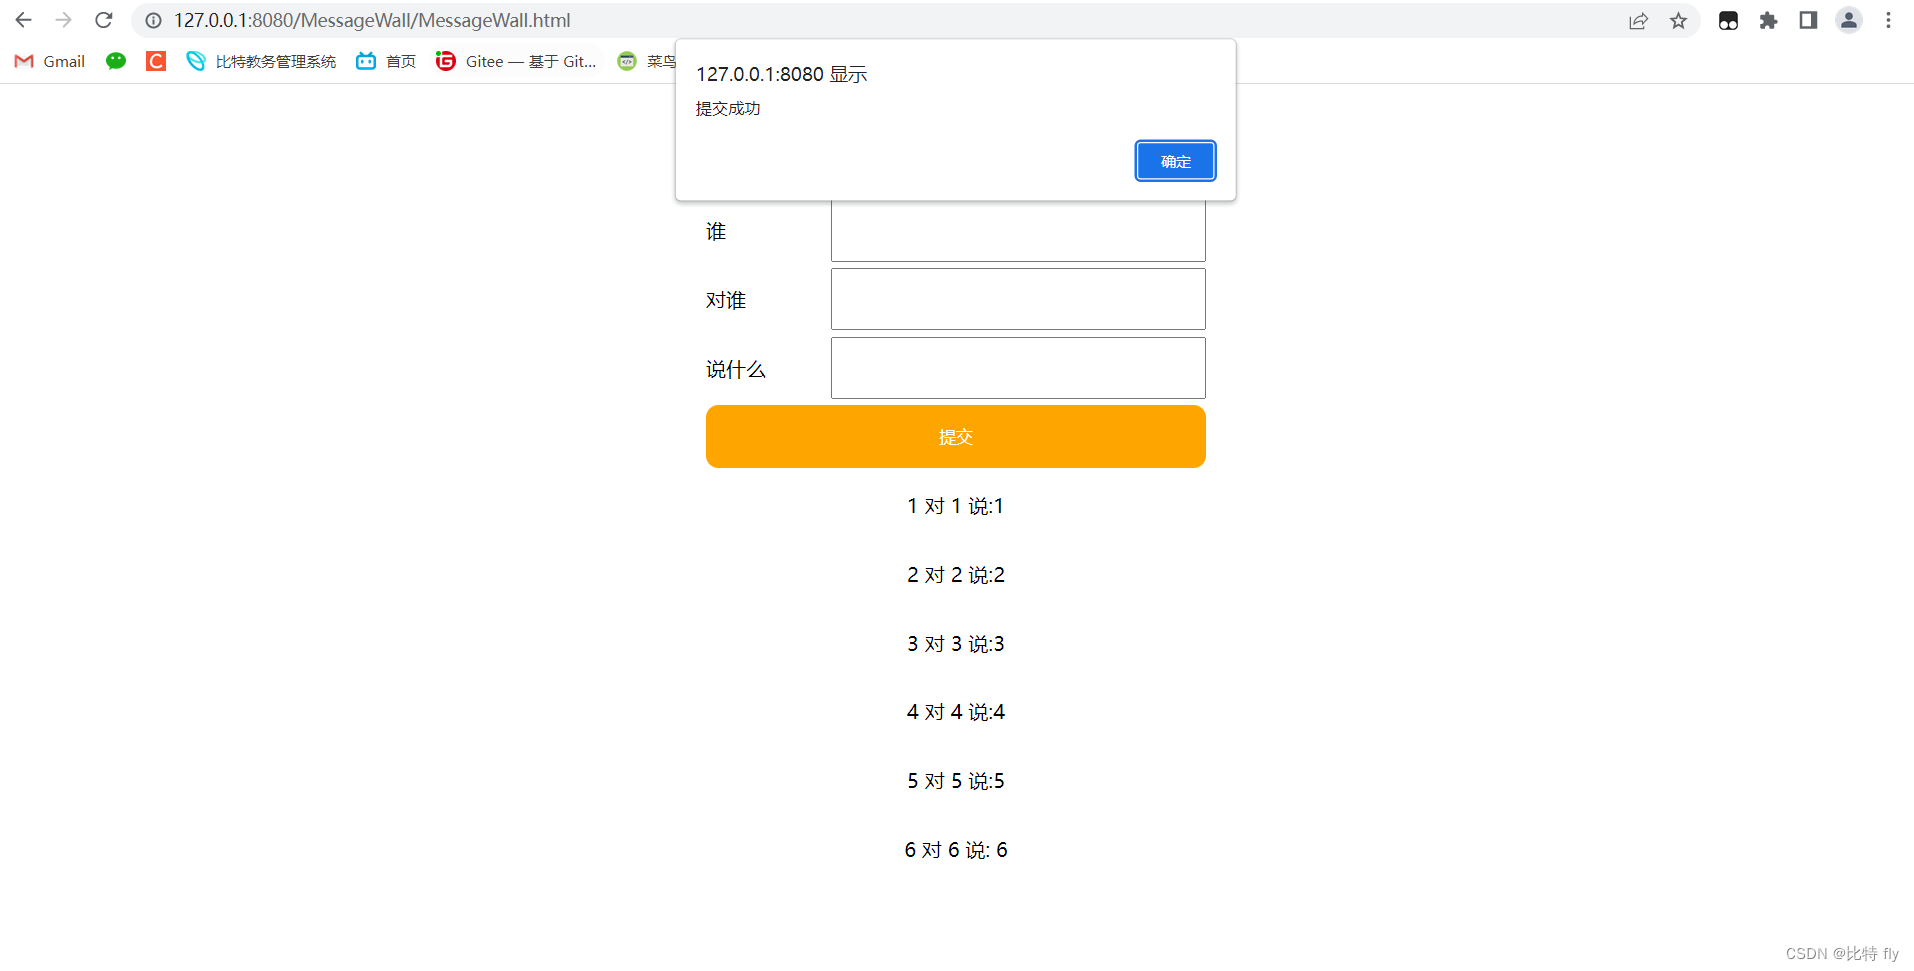
4. 结果展示

-
相关阅读:
leetcode 148. 排序链表
Elasticsearch:将关系数据库中的数据提取到 Elasticsearch 集群中
K8S云计算系列-(1)
python.py文件如何生成.exe
如果面试官让你设计美团外卖的分库分表架构,就该这么说!
Docker基础系列之DockerFile
WZOI-222最小公倍数
STM32 | 零基础 STM32 第一天
什么是RC低通滤波电路
Spring MVC基于注解的使用:JSON数据处理
- 原文地址:https://blog.csdn.net/qq_52276036/article/details/127388224
