-
【启动技术】启动菜单
MS-DOS 启动菜单
独立发行的 MS-DOS
从 MS-DOS 2 到 MS-DOS 6 ,启动文件都是
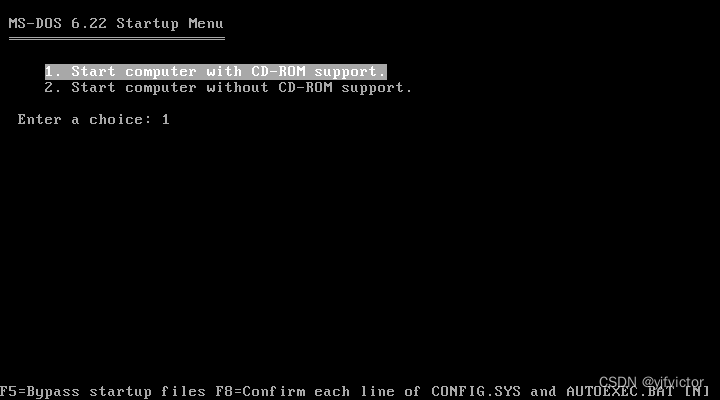
io.sys。开机启动加载io.sys之后,再加载 DOS 内核msdos.sys。加载 DOS 内核完成之后,加载启动菜单。启动菜单的配置文件是config.sys,但是默认情况下,config.sys的配置是不显示启动菜单。如果需要显示菜单,需要设置config.sys文件。这是一个纯文本文件, INI 格式。只要增加[menu]节,即可显示启动菜单。例如把config.sys文件配置如下:[menu] menuitem=CD, Start computer with CD-ROM support. menuitem=NOCD, Start computer without CD-ROM support. [COMMON] DEVICE=C:\DOS\SETVER.EXE DEVICE=C:\DOS\HIMEM.SYS DOS=HIGH FILES=30 STACKS=9,256 LASTDRIVE=Z [CD] DEVICEHIGH=C:\DOS\OAKCDROM.SYS /D:mscd001 [NOCD]- 1
- 2
- 3
- 4
- 5
- 6
- 7
- 8
- 9
- 10
- 11
- 12
- 13
- 14
- 15
- 16
则启动菜单如下图所示:
Windows 9x 内置的 MS-DOS
Windows 95、Windows 98 和 Windows Me 仍然使用 MS-DOS 的启动技术,只不过把 MS-DOS 内置在 Windows 安装程序里面,不再独立发行。
这里插一段题外话:依赖 DOS 的 Windows 一般叫做「经典Windows」,以区别于 Windows NT (不依赖DOS)。经典 Windows 的早期版本(1.x, 2.x, 3.x)依赖 DOS 但没有内置DOS ,所以需要单独购买 MS-DOS 或者 PC-DOS 安装盘,装好 DOS 操作系统之后,才能 DOS 之上安装 Windows 。然而,从 Windows 95 开始,Windows 安装程序内置 MS-DOS ,所以不再需要单独购买 DOS 安装盘单独安装 DOS 操作系统。另外提一下,经典 Windows 的最高版本是 Windows Me 。此后宣布废弃经典 Windows 项目,专心开发 Windows NT 。
Windows 95 RTM 的启动依赖内置的 MS-DOS 7.00 ,而 Windows 95 OSR 2 与 Windows 98 的启动依赖 内置的 MS-DOS 7.10 。至于 Windows Me 的启动,则是依赖内置的残缺版 MS-DOS 8.00 。
MS-DOS 7 的启动文件仍为
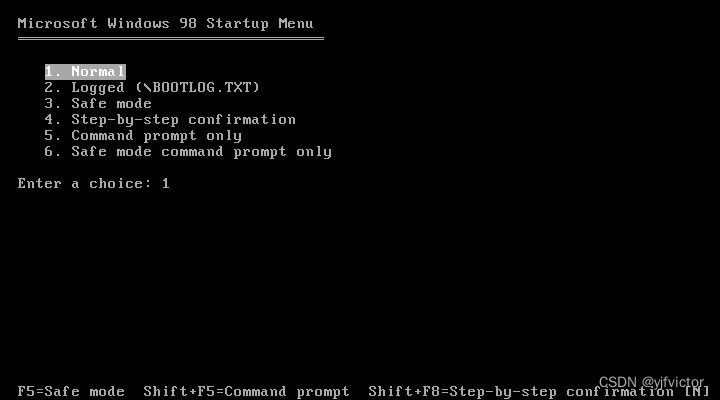
io.sys,但是区别是 DOS 内核也放在io.sys里面,而不再放在msdos.sys里面。因为msdos.sys改成了 Windows 环境变量配置文件,纯文本 INI 格式。启动菜单配置文件依然是config.sys,格式仍为纯文本的 INI 格式,用法保持不变。为之前不同的是,如果config.sys为空,则在默认情况下, MS-DOS 7.00 启动菜单和 MS-DOS 7.10 启动菜单分别显示如下: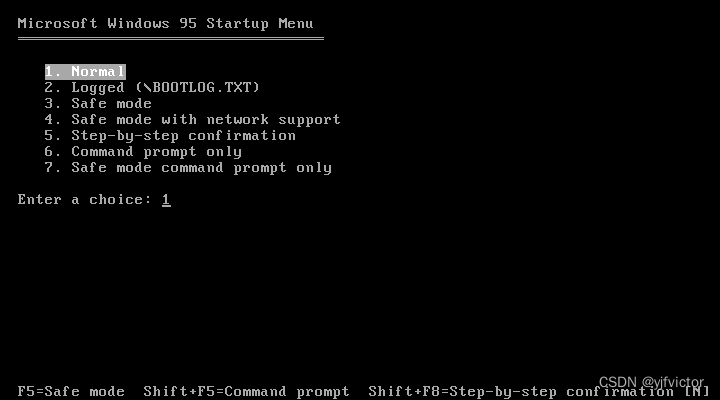
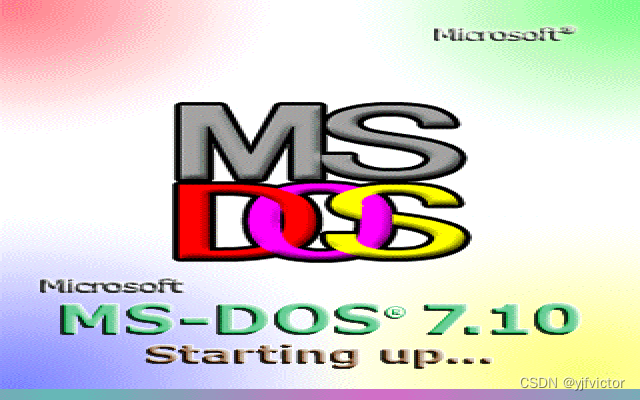
题外话,网上还流传着一个 中国DOS联盟 魔改版的 MS-DOS 7.10 。这个不是微软发行的。微软从来没发行过单独的 MS-DOS 7.10。这个版本是 中国DOS联盟 从 Windows 98 里面剥离出来的,而且还对
io.sys文件进行了字符串替换,把启动菜单中的 Windows 98 字样替换成了 MS-DOS 7.1 。而且,中国DOS联盟 还对io.sys文件打了一个 OSR2FIX 的补丁包,使其可以启动 Windows 3.x 。中国DOS联盟 魔改版 MS-DOS 7.10 启动画面与启动菜单分别如下:
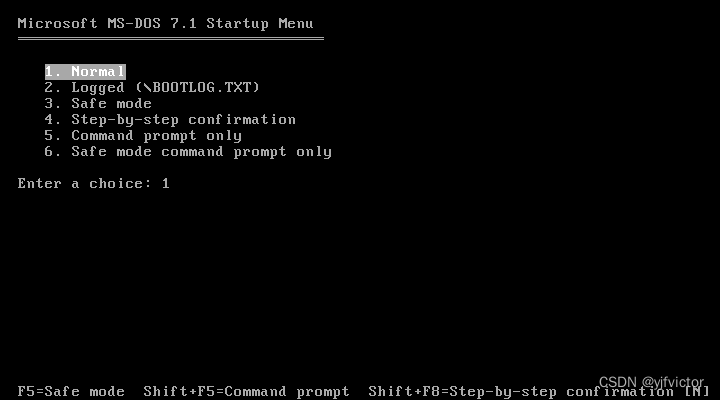
MS-DOS 8.00 同样是启动文件和残缺的 DOS 内核都是
io.sys,而msdos.sys也是 Windows 环境变量配置文件,纯文本 INI 文件。启动菜单配置文件也依然是config.sys。这个配置文件为空时,默认的启动菜单如下: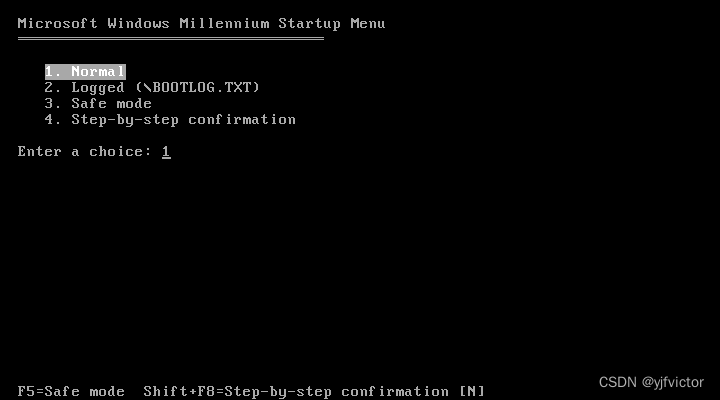
对比一下, MS-DOS 7 的启动菜单中,默认有一个 Command prompt only ,用于停在 DOS 不启动 Windows,而残缺版的 MS-DOS 8.00 的启动菜单中没有这个东西了,也就是强制启动Windows ,不许停留在 DOS 。
至于允许停留在 DOS 的 MS-DOS 8.00 ,就是 Windows Me 启动盘。在 Windows Me 安装程序中可以制作:
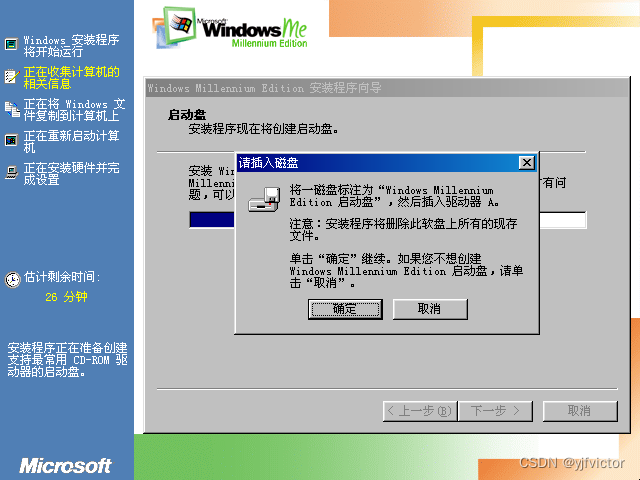
这个版本的 MS-DOS 8.00 启动菜单如下:
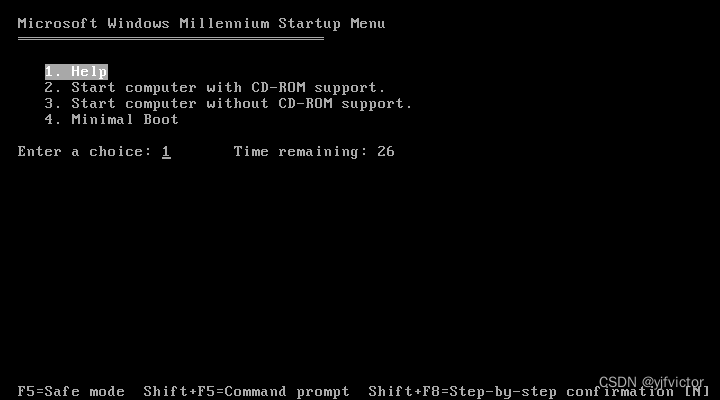
打开启动盘中的
config.sys文件,可以看到里面的配置信息如下:[menu] menuitem=HELP, Help menuitem=CD, Start computer with CD-ROM support. menuitem=NOCD, Start computer without CD-ROM support. menuitem=QUICK, Minimal Boot menudefault=HELP,30 menucolor=7,0 [HELP] device=oakcdrom.sys /D:mscd001 device=btdosm.sys device=flashpt.sys device=btcdrom.sys /D:mscd001 device=aspi2dos.sys device=aspi8dos.sys device=aspi4dos.sys device=aspi8u2.sys device=aspicd.sys /D:mscd001 devicehigh=ramdrive.sys /E 2048 [CD] device=oakcdrom.sys /D:mscd001 device=btdosm.sys device=flashpt.sys device=btcdrom.sys /D:mscd001 device=aspi2dos.sys device=aspi8dos.sys device=aspi4dos.sys device=aspi8u2.sys device=aspicd.sys /D:mscd001 devicehigh=ramdrive.sys /E 2048 [NOCD] devicehigh=ramdrive.sys /E 2048 [QUICK] [COMMON] files=10 buffers=10 dos=high,umb stacks=9,256 lastdrive=z- 1
- 2
- 3
- 4
- 5
- 6
- 7
- 8
- 9
- 10
- 11
- 12
- 13
- 14
- 15
- 16
- 17
- 18
- 19
- 20
- 21
- 22
- 23
- 24
- 25
- 26
- 27
- 28
- 29
- 30
- 31
- 32
- 33
- 34
- 35
- 36
- 37
- 38
- 39
- 40
- 41
- 42
- 43
题外话,网上也流传着 俄罗斯MultiBoot协会 魔改版的 MS-DOS 8.00 。启动菜单如下:
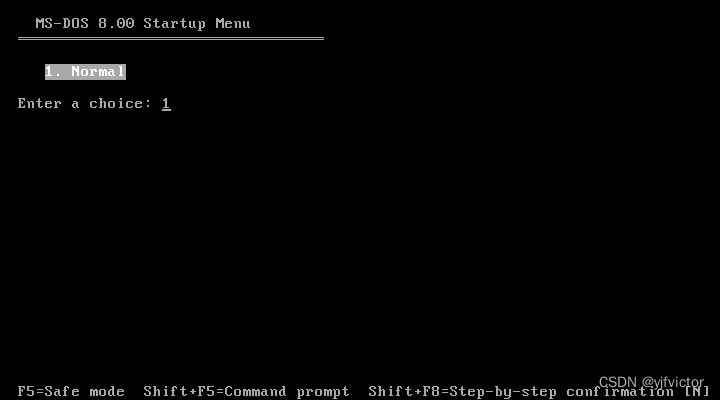
此外,还有 Adventures in Nostalgia 魔改版的 MS-DOS 8.00 。魔改版挺多的,这里不再多说。
Windows NT 启动菜单
微软发明了一套不依赖 DOS 的内核,叫做「新技术」(New Technology),简称 NT 。这就是 Windows NT 名字的由来。区别于「经典Windows」(依赖 DOS 的 Windows)。
NT 加载器
从 Windows NT 3 到 Windows NT 5 的启动文件,是根目录下的
ntldr文件。ntldr读做 NT Loader ,即「NT 加载器」。启动菜单的配置文件是
C:\boot.ini。 这是纯文本文件,INI 格式。例如 Windows NT 4.0 的
boot.ini的默认配置是:[boot loader] timeout=30 default=multi(0)disk(0)rdisk(0)partition(1)\WINNT [operating systems] multi(0)disk(0)rdisk(0)partition(1)\WINNT="Windows NT Server Version 4.00" multi(0)disk(0)rdisk(0)partition(1)\WINNT="Windows NT Server Version 4.00 [VGA mode]" /basevideo /sos- 1
- 2
- 3
- 4
- 5
- 6
显示出来的启动菜单是这样子的:
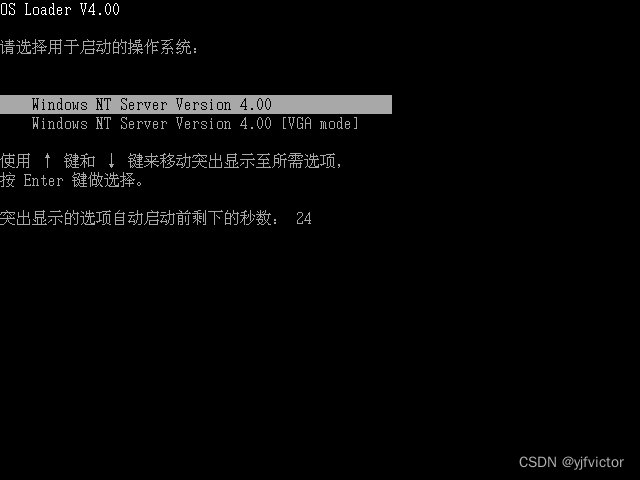
再例如 Windows NT 5.0(商品名 Windows 2000)的
boot.ini的默认配置是:[boot loader] timeout=30 default=multi(0)disk(0)rdisk(0)partition(1)\WINNT [operating systems] multi(0)disk(0)rdisk(0)partition(1)\WINNT="Microsoft Windows 2000 Professional" /fastdetect C:\CMDCONS\BOOTSECT.DAT="Microsoft Windows 2000 故障恢复控制台" /cmdcons- 1
- 2
- 3
- 4
- 5
- 6
显示出来的启动菜单是这样的:
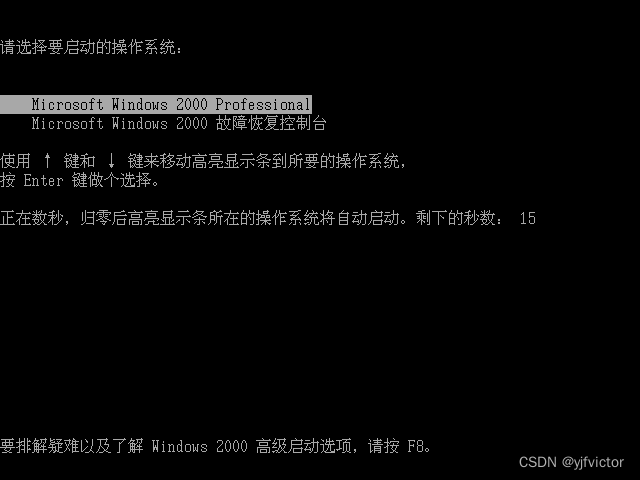
再例如 Windows NT 5.1 (商品名 Windows XP)的
boot.ini的默认配置是:[boot loader] timeout=30 default=multi(0)disk(0)rdisk(0)partition(1)\WINDOWS [operating systems] multi(0)disk(0)rdisk(0)partition(1)\WINDOWS="Microsoft Windows XP Professional" /noexecute=optin /fastdetect C:\CMDCONS\BOOTSECT.DAT="Microsoft Windows Recovery Console" /cmdcons- 1
- 2
- 3
- 4
- 5
- 6
显示出来的启动菜单是这样的:
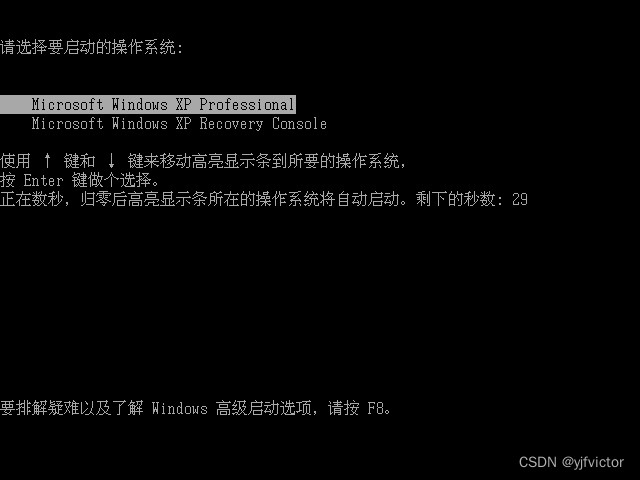
启动管理器
Windows NT 6 把启动文件改成了
bootmgr文件。bootmgr读做 Boot Manager ,即「启动管理器」。可以使用bootsect命令来切换ntldr与bootmgr的启动方式,详见 Bootsect Command-Line Options。启动菜单的配置文件是
C:\Boot\BCD。BCD 表示 Boot Configuration Data,即「启动配置数据」。值得注意的是,BCD 是二进制文件,无法直接编辑。微软提供了bcdedit.exe来编辑这个文件,详见 bcdedit。例如 Windows NT 6.0 (商品名 Windows Vista)的 BCD 的默认配置是:
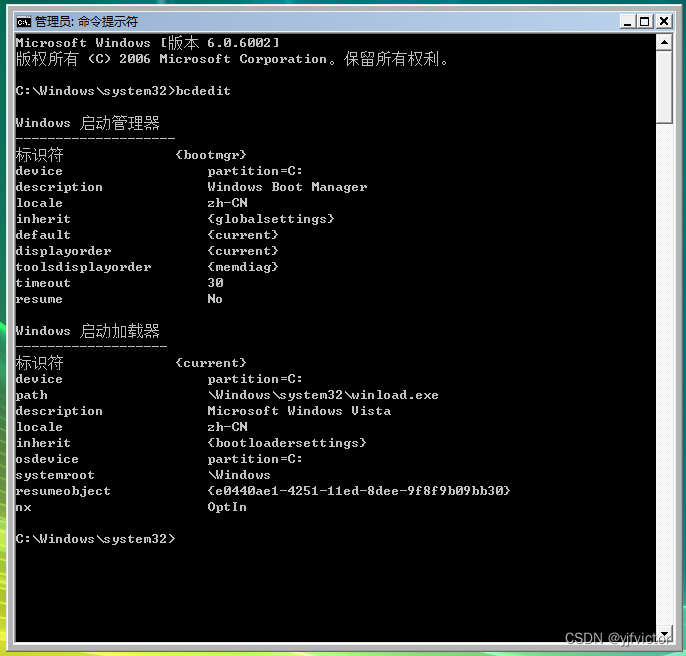
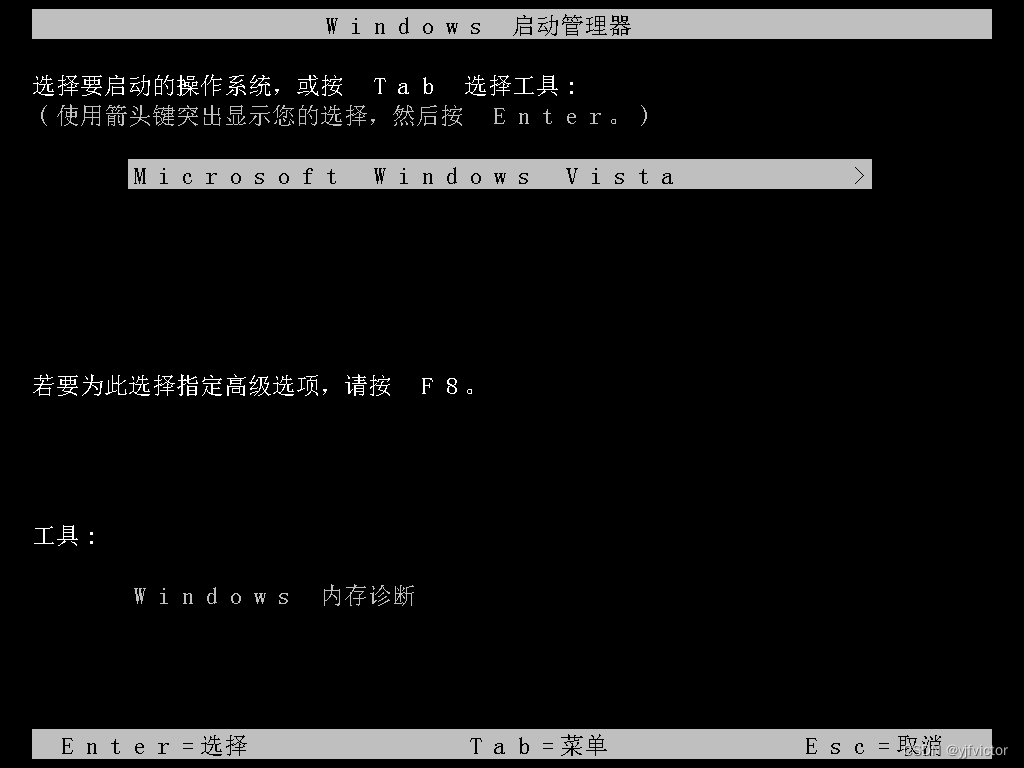
Windows NT 6.0 (商品名 Windows Vista)的启动菜单(启动管理器)界面如下:
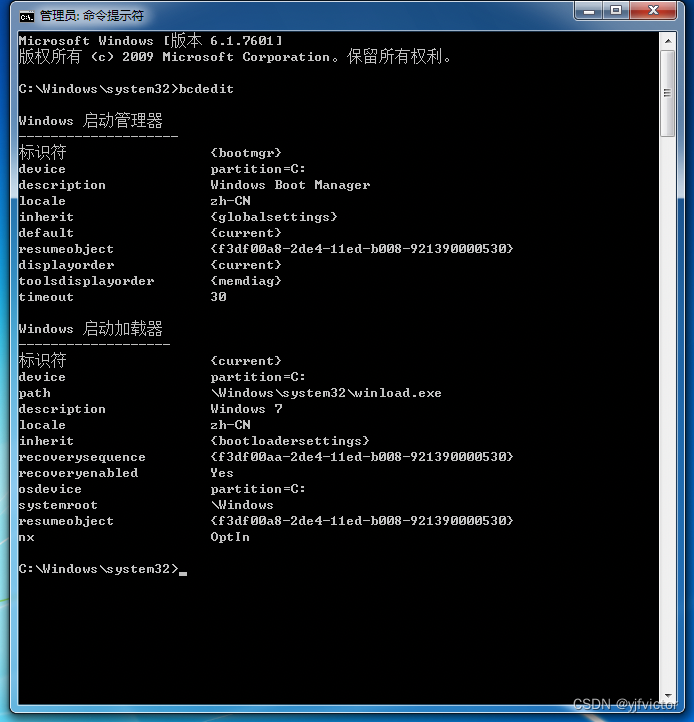
例如 Windows NT 6.1 (商品名 Windows 7)的 BCD 的默认配置是:
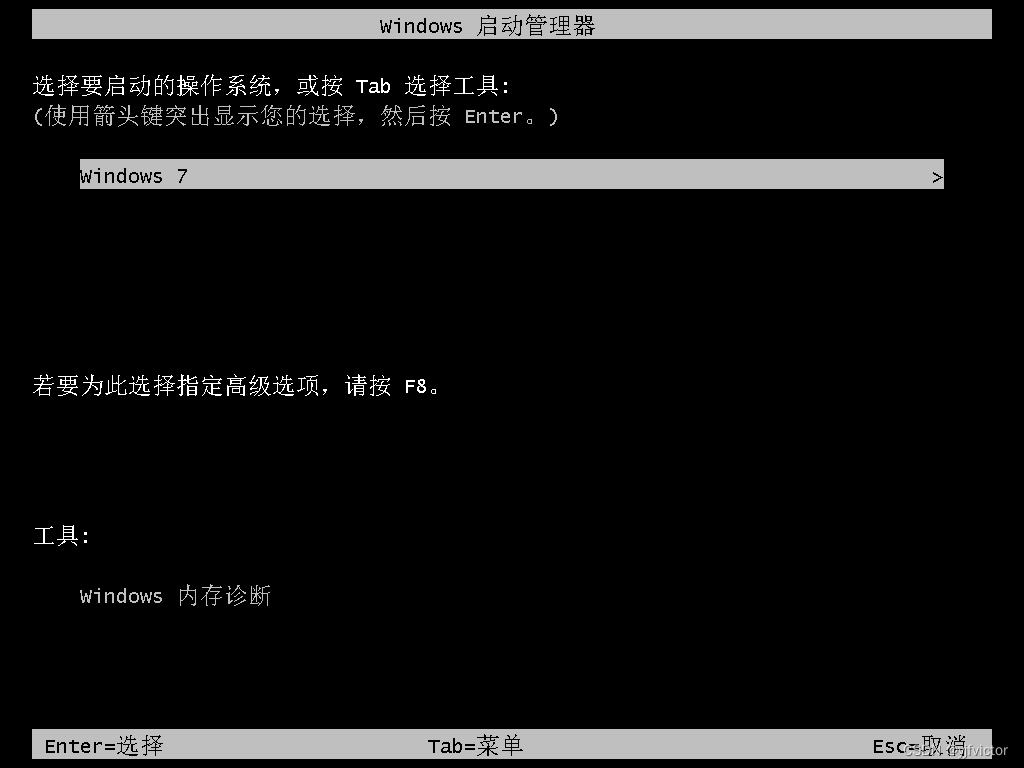
Windows NT 6.1 (商品名 Windows 7)的启动菜单(启动管理器)界面如下:
Metro 高级启动
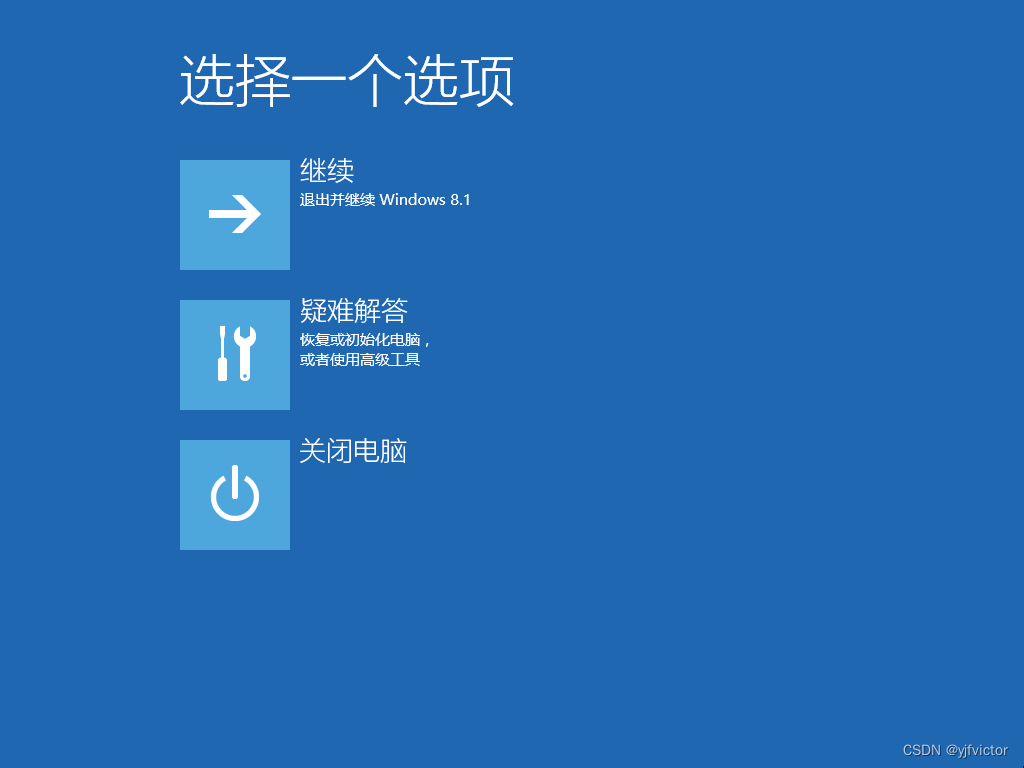
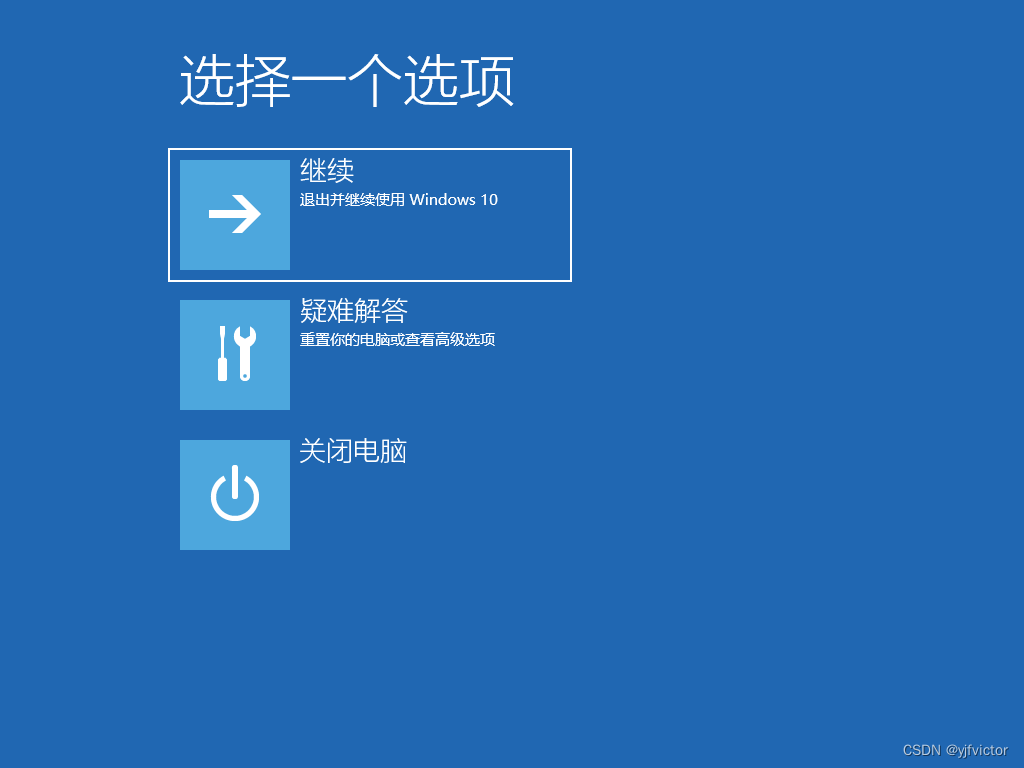
从 Windows NT 6.2 (商品名 Windows 8)开始,又增加了一种 metro 风格的彩色启动菜单,可在控制面板中使用「高级启动」来进入。如果还需要 NT6 启动管理器,可以使用管理员权限打开命令提示符,输入命令
bcdedit /set "{current}" bootmenupolicy legacy。如果还想再改回去,可以输入命令bcdedit /set "{current}" bootmenupolicy standard,开启metro风格彩色启动菜单。详见 BCDEdit /set - Windows drivers。Windows NT 6.2(商品名Windows 8)的启动菜单如下所示:

Windows NT 6.3(商品名Windows 8.1)的启动菜单如下所示:
Windows NT 10.0(商品名Windows 10)的启动菜单如下所示:
Linux 启动菜单
Linux启动菜单有很多种,常见的有 LILO 和 GRUB 。
GRUB 启动菜单分为 GRUB Legacy 和 GRUB 2。
LILO 启动菜单
LILO 的意思是 Linux Loader,是很早很早以前的 Linux 启动菜单。这东西我也没见过,这里就不谈了。
GRUB Legacy
GRUB Legacy ,又名 GRUB 1,启动菜单的配置文件是
/boot/grub/menu.lst。例如这样子的
menu.lst文件:# grub.conf generated by anaconda # # Note that you do not have to rerun grub after making changes to this file # NOTICE: You have a /boot partition. This means that # all kernel and initrd paths are relative to /boot/, eg. # root (hd0,0) # kernel /vmlinuz-version ro root=/dev/mapper/VolGroup-lv_root # initrd /initrd-[generic-]version.img #boot=/dev/sda default=0 timeout=10 splashimage=(hd0,0)/grub/splash.xpm.gz hiddenmenu title Fedora (2.6.35.6-45.fc14.i686) root (hd0,0) kernel /vmlinuz-2.6.35.6-45.fc14.i686 ro root=/dev/mapper/VolGroup-lv_root rd_LVM_LV=VolGroup/lv_root rd_LVM_LV=VolGroup/lv_swap rd_NO_LUKS rd_NO_MD rd_NO_DM LANG=en_US.UTF-8 SYSFONT=latarcyrheb-sun16 KEYTABLE=us rhgb quiet initrd /initramfs-2.6.35.6-45.fc14.i686.img- 1
- 2
- 3
- 4
- 5
- 6
- 7
- 8
- 9
- 10
- 11
- 12
- 13
- 14
- 15
- 16
- 17
显示的是这样的启动菜单:

GRUB Legacy 启动菜单还有几个衍生产品,比如 GRUB4DOS 和 WINGRUB 。这两个衍生产品的启动菜单配置文件是
C:\menu.lst。GRUB4DOS启动菜单配置文件
menu.lst的默认值是:# This is a sample menu.lst file. You should make some changes to it. # The old install method of booting via the stage-files has been removed. # Please install GRLDR boot strap code to MBR with the bootlace.com # utility under DOS/Win9x or Linux. color blue/green yellow/red white/magenta white/magenta timeout 30 default /default title find and load NTLDR of Windows NT/2K/XP fallback 1 find --set-root --ignore-floppies --ignore-cd /ntldr map () (hd0) map (hd0) () map --rehook find --set-root --ignore-floppies --ignore-cd /ntldr chainloader /ntldr savedefault --wait=2 title find and load BOOTMGR of Windows VISTA fallback 2 find --set-root --ignore-floppies --ignore-cd /bootmgr map () (hd0) map (hd0) () map --rehook find --set-root --ignore-floppies --ignore-cd /bootmgr chainloader /bootmgr savedefault --wait=2 title find and load CMLDR, the Recovery Console of Windows NT/2K/XP fallback 3 find --set-root --ignore-floppies --ignore-cd /cmldr map () (hd0) map (hd0) () map --rehook find --set-root --ignore-floppies --ignore-cd /cmldr chainloader /cmldr ##################################################################### # write string "cmdcons" to memory 0000:7C03 in 2 steps: ##################################################################### # step 1. Write 4 chars "cmdc" at 0000:7C03 write 0x7C03 0x63646D63 # step 2. Write 3 chars "ons" and an ending null at 0000:7C07 write 0x7C07 0x00736E6F savedefault --wait=2 title find and load IO.SYS of Windows 9x/Me fallback 4 find --set-root /io.sys chainloader /io.sys savedefault --wait=2 title find and boot 0PE.ISO fallback 5 find --set-root /0PE/0PE.ISO map /0PE/0PE.ISO (0xff) || map --mem /0PE/0PE.ISO (0xff) map --hook chainloader (0xff) savedefault --wait=2 title find and boot MicroPE.ISO fallback 6 find --set-root /boot/MicroPE.ISO map /boot/MicroPE.ISO (0xff) || map --mem /boot/MicroPE.ISO (0xff) map --hook chainloader (0xff) savedefault --wait=2 title Parted Magic ISO fallback 7 find --set-root /pmagic.iso map /pmagic.iso (0xff) || map --mem /pmagic.iso (0xff) map --hook chainloader (0xff) savedefault --wait=2 title Ultimate Boot CD ISO fallback 8 find --set-root /ubcd.iso map /ubcd.iso (0xff) || map --mem /ubcd.iso (0xff) map --hook chainloader (0xff) savedefault --wait=2 title commandline commandline title floppy (fd0) chainloader (fd0)+1 rootnoverify (fd0) title back to dos quit title reboot reboot title halt halt title MAXDOS.IMG find --set-root --ignore-floppies /boot/MAXDOS.IMG map --mem /boot/MAXDOS.IMG (fd0) map --hook chainloader (fd0)+1 rootnoverify (fd0)- 1
- 2
- 3
- 4
- 5
- 6
- 7
- 8
- 9
- 10
- 11
- 12
- 13
- 14
- 15
- 16
- 17
- 18
- 19
- 20
- 21
- 22
- 23
- 24
- 25
- 26
- 27
- 28
- 29
- 30
- 31
- 32
- 33
- 34
- 35
- 36
- 37
- 38
- 39
- 40
- 41
- 42
- 43
- 44
- 45
- 46
- 47
- 48
- 49
- 50
- 51
- 52
- 53
- 54
- 55
- 56
- 57
- 58
- 59
- 60
- 61
- 62
- 63
- 64
- 65
- 66
- 67
- 68
- 69
- 70
- 71
- 72
- 73
- 74
- 75
- 76
- 77
- 78
- 79
- 80
- 81
- 82
- 83
- 84
- 85
- 86
- 87
- 88
- 89
- 90
- 91
- 92
- 93
- 94
- 95
- 96
- 97
- 98
- 99
- 100
- 101
- 102
- 103
- 104
- 105
- 106
显示出来的效果是:

GRUB Legacy 启动菜单还有魔改版的,你们肯定见过:
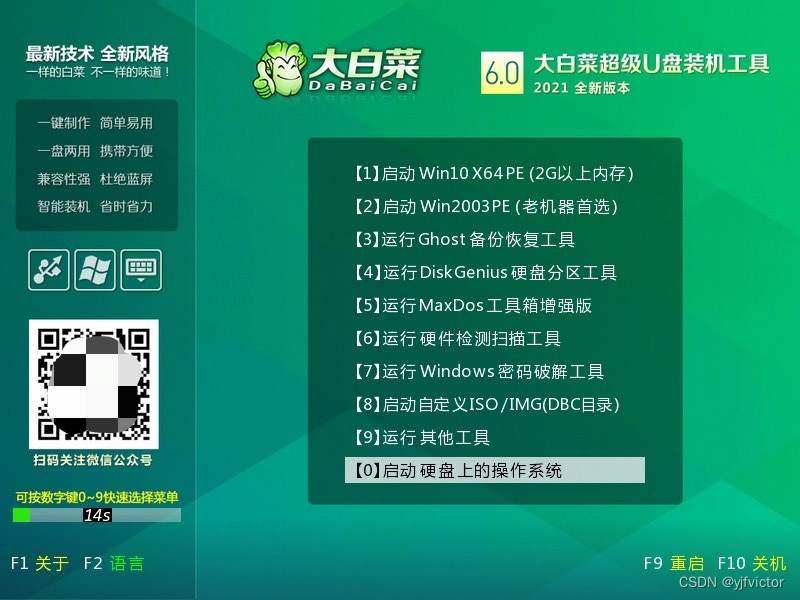
打开大白菜的启动分区,在
IDBC/GRUB目录下,可以看到MENU.LST文件,里面的代码是:timeout 15 default 9 graphicsmode -1 600:800 command --set-path=/IDBC/GRUB/ font /IDBC/GRUB/MENU.HEX find --set-root /IDBC/GRUB/MESSAGE && gfxmenu /IDBC/GRUB/MESSAGE calc *0x307FFC-0x110000 > nul && configfile (md)4+8 ! configfile (md)0x880+0x200 title 【1】 启动 Win10 X64 PE (2G以上内存) SISO RUN /IDBC/DBC10PE title 【2】 启动 Win2003 PE (老机器首选) find --set-root /WXPE/SETUPLDR.BIN || find --set-root /IDBC/03PE.ISO chainloader /WXPE/SETUPLDR.BIN || map /IDBC/03PE.ISO (0xff) && map --e820cycles=3 && map --hook && chainloader (0xff) title 【3】 运行 Ghost 备份恢复工具 configfile /IDBC/GRUB/GHOST.LST title 【4】 运行 DiskGenius 硬盘分区工具 SISO RUN --mem /IDBC/IMGS/MAXDOS.IMG Diskgen title 【5】 运行 MaxDos 工具箱增强版 SISO RUN --mem /IDBC/IMGS/MAXDOS.IMG title 【6】 运行 硬件检测扫描工具 configfile /IDBC/GRUB/HDD.LST title 【7】 运行 Windows 密码破解工具 configfile /IDBC/GRUB/PWD.LST title 【8】 启动 自定义ISO/IMG(DBC目录) SISO RUN --automenu /DBC/ title 【9】 运行 其他工具 configfile /IDBC/GRUB/TOOL.LST title 【0】 启动 硬盘上的操作系统 find --set-root --ignore-floppies --ignore-cd /ntldr || find --set-root --ignore-floppies --ignore-cd /bootmgr map () (hd0) map (hd0) () map --rehook find --set-root --ignore-floppies --ignore-cd /ntldr || find --set-root --ignore-floppies --ignore-cd /bootmgr chainloader /ntldr || chainloader /bootmgr- 1
- 2
- 3
- 4
- 5
- 6
- 7
- 8
- 9
- 10
- 11
- 12
- 13
- 14
- 15
- 16
- 17
- 18
- 19
- 20
- 21
- 22
- 23
- 24
- 25
- 26
- 27
- 28
- 29
- 30
- 31
- 32
- 33
- 34
- 35
- 36
- 37
- 38
- 39
- 40
- 41
- 42
- 43
GRUB 2
GRUB 2 启动菜单的配置文件是
/boot/grub/grub.cfg或者/boot/grub2/grub.cfg。这个配置文件一般不要自己写,而是先写/etc/default/grub文件,然后用grub2-mkconfig命令来生成/boot/grub2/grub.cfg。 在 Debian 系列的 Linux 上,也可以用sudo update-grub命令,因为此命令封装了grub2-mkconfig命令。例如这样子的
/etc/default/grub文件:# If you change this file, run 'update-grub' afterwards to update # /boot/grub/grub.cfg. # For full documentation of the options in this file, see: # info -f grub -n 'Simple configuration' GRUB_DEFAULT=0 GRUB_TIMEOUT_STYLE=menu GRUB_TIMEOUT=10 GRUB_DISTRIBUTOR=`lsb_release -i -s 2> /dev/null || echo Debian` GRUB_CMDLINE_LINUX_DEFAULT="quiet splash" GRUB_CMDLINE_LINUX="" # Uncomment to enable BadRAM filtering, modify to suit your needs # This works with Linux (no patch required) and with any kernel that obtains # the memory map information from GRUB (GNU Mach, kernel of FreeBSD ...) #GRUB_BADRAM="0x01234567,0xfefefefe,0x89abcdef,0xefefefef" # Uncomment to disable graphical terminal (grub-pc only) #GRUB_TERMINAL=console # The resolution used on graphical terminal # note that you can use only modes which your graphic card supports via VBE # you can see them in real GRUB with the command `vbeinfo' #GRUB_GFXMODE=640x480 # Uncomment if you don't want GRUB to pass "root=UUID=xxx" parameter to Linux #GRUB_DISABLE_LINUX_UUID=true # Uncomment to disable generation of recovery mode menu entries #GRUB_DISABLE_RECOVERY="true" # Uncomment to get a beep at grub start #GRUB_INIT_TUNE="480 440 1"- 1
- 2
- 3
- 4
- 5
- 6
- 7
- 8
- 9
- 10
- 11
- 12
- 13
- 14
- 15
- 16
- 17
- 18
- 19
- 20
- 21
- 22
- 23
- 24
- 25
- 26
- 27
- 28
- 29
- 30
- 31
- 32
- 33
运行完
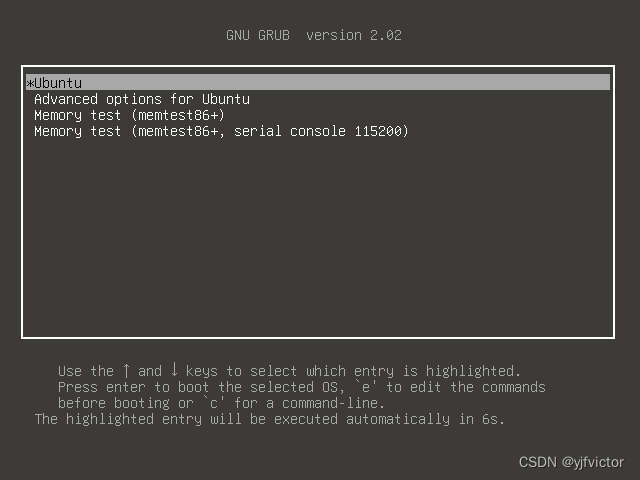
sudo update-grub命令之后,就会成一个几百长的
/boot/grub/grub.cfg文件。由于文件太长,就不列在这里了。这样子的启动菜单,显示效果为:
-
相关阅读:
优雅的使用token
人类的深度学习与机器的深度学习不同
Selenium原理深度解析
Kafka - 3.x 副本不完全指北
【自然语言处理】【实体匹配】CollaborER:使用多特征协作的自监督实体匹配框架
【一步一步了解Java系列】:认识异常类
【Rust基础③】方法method、泛型与特征
个人微信api
读取PDF中指定数据写入EXCEL文件
(有什么区别)Python中return self和return None或者return或者不写
- 原文地址:https://blog.csdn.net/yjf_victor/article/details/127129723
