{{ info.nickname }}
-
搭建 socket 客户端环境并开发简易版聊天
搭建 socket 客户端环境
初始⽬录结构说明
├── build 项目构建配置
│   ├── updateAdapter.js 更改adapter的配置
│   ├── webpack.base.conf.js webpack公共配置
│   ├── webpack.dev.conf.js webpack测试打包配置
│   ├── webpack.local.conf.js webpack本地打包配置
│   └── webpack.prod.conf.js webpack生产打包配置
├── cache-loader 项目构建缓存
├── config 项目构建配置内容
├── dist 项目构建生成的包
├── node_modules 安装依赖包存储的地方
├── src
│   ├── api 接口定义的地方
│   ├── assets 静态资源以及样式文件存放点
│   ├── components 公共组件
│   ├── router 路由配置
│   ├── store vuex(状态管理)
│   ├── types ts类型定义存放点
│   ├── utils 公共能力
│   ├── view 视图
│   ├── App.vue 根组件
│   └── main.ts 应用配置
├── static 静态资源存储目录,该目录中的资源不做构建处理
├── .babelrc babel配置文件
├── .editorconfig 编码风格配置文件
├── .eslintignore eslint忽略文件
├── .eslintrc.js eslint配置文件
├── .gitignore git忽略文件
├── .postcssrc.js Vue移动端rem适配 —— Postcss的配置文件
├── .prettierrc.js 代码风格格式化配置文件
├── index.html html模板文件
├── package.json
├── README.md
└── yarn.lock
初始化项目
安装脚手架
这里小编使用自己开发的一款脚手架@varied/cli,不硬性要求,可使用其他脚手架
npm install @varied/cli -g创建项目
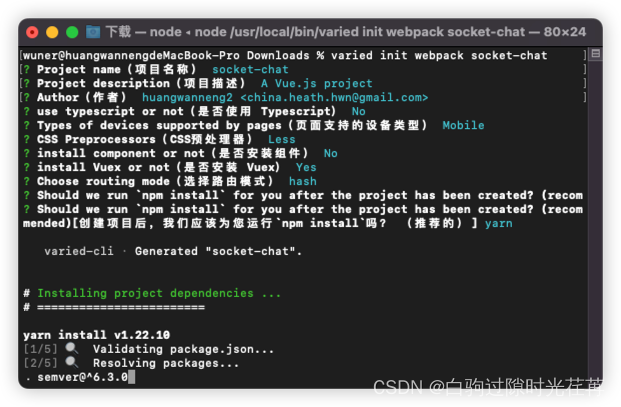
varied init webpack socket-chat
安装依赖
这里我们安装 vant 组件库和 socket 客户端
yarn add vant@2.12.50 socket.io-client@4.5.2vant 配置
这里为了图省事,小编使用全局引入,可自选选择引入方案
- main.js
import Vant from 'vant';
import 'vant/lib/index.css';
Vue.use(Vant);
js 配置
- 在项目根目录下新建
jsconfig.json - 使 webstorm 编译器识别
@
{
  "compilerOptions": {
    "baseUrl": ".",
    "paths": {
      "@/*": ["src/*"],
      "components/*": ["src/components/*"]
    }
  }
}
运行测试
yarn start
# 或者
npm run start
如图所示,即运行成功
socket 服务端聊天开发
- index.js
const express = require('express');
const app = express();
const http = require('http');
const server = http.createServer(app);
const { Server } = require('socket.io');
const io = new Server(server);
let rooms = {};

// 监听连接
io.on('connection', (socket) => {
  console.log('a user connected');

  // 监听创建聊天室
  socket.on('createRoom', (data) => {
    // 将聊天室id存放到rooms对象中
    Object.assign(rooms, data);
    console.log(data);
  });

  // 监听发送
  socket.on('send', (data) => {
    const { to, from, message } = data;
    // 将取到的数据,通过receive发送到对应的聊天室
    socket.to(rooms[to]).emit('receive', { from, message });
  });
});

server.listen(3000, () => {
  console.log('listening on *:3000');
});
项目地址
搭建 socket 客户端页面开发
目录结构
├── assets
│   └── avatar.png # 自行下载头像并存储到该位置
├── store
│   └── modules
│   │   └── user.js
│   └── index.js
├── utils
│   └── socket.js
├── view
│   ├── chat
│   │   ├── components
│   │   │   ├── receive
│   │   │   ├── └── index.vue
│   │   │   ├── send
│   │   │   └── └── index.vue
│   │   └── index.vue
│   ├── message
│   │   ├── components
│   │   │   ├── cell
│   │   │   └── └── index.vue
│   │   └── index.vue
│   ├── friends
│   │   └── index.vue
│   ├── mine
│   │   └── index.vue
vuex 状态管理
store/modules/user.js- 用户模块
/** * @author Wuner * @date 2020/12/9 18:00 * @description 用户模块 */ import Session from '@/utils/session'; import { login } from '@/api/user'; const storeState = Session.get('storeState'); const state = (storeState && storeState.user) || { // 用户信息 userinfo: { username: '', nickname: '', }, }; const getters = {}; const mutations = { /** * 设置用户信息 * @param state * @param data */ setUserinfo(state, data) { state.userinfo = data; }, }; const actions = {}; export default { namespaced: true, state, getters, mutations, actions };- 初始化 vuex
store/index.js
/**
 * @author Wuner
 * @date 2020/12/9 17:58
 * @description store 配置文件
 */
import Vuex from 'vuex';
import Vue from 'vue';
import Session from '@/utils/session';
import user from './modules/user';

Vue.use(Vuex);

const myPlugin = (store) => {
  store.subscribe((mutation, state) => {
    // 缓存状态
    Session.set('storeState', state);
  });
};

const storeState = Session.get('storeState');
const state = {
  data: (storeState && storeState.data) || {},
};

const getters = {
  /**
   * data数据
   * @param state
   * @returns {*}
   */
  data(state) {
    return state.data;
  },
};

const mutations = {
  /**
   * 设置data数据
   * @param state
   * @param data
   */
  setData(state, data) {
    state.data = data;
  },
};

const actions = {};

const store = new Vuex.Store({
  // 非生产环境添加严格模式
  strict: process.env.NODE_ENV !== 'production',
  state,
  getters,
  mutations,
  actions,
  // 模块
  modules: {
    user,
  },
  // 插件
  plugins: [myPlugin],
});

export default store;
socket 开发
utils/socket.js
/** * @returns {String} */ import io from 'socket.io-client'; function socketUrl() { if (process.env.NODE_ENV === 'local') { // 测试 return `http://localhost:3000/`; } else { // 生产 return 'http://localhost:3000/'; } } export const createSocket = (username) => { // console.log("建立websocket连接") // 建立websocket连接, const url = socketUrl(); const socket = (window.socket = io(url, { transports: ['websocket'], })); console.log(window.socket); // 监听客户端连接,回调函数会传递本次连接的socket socket.on('connect', () => { console.log('#connect,', socket.id); const id = socket.id.replace(url, ''); console.log('#connect,', id); let obj = {}; obj[username] = id; // 创建聊天室 socket.emit('createRoom', obj); }); };main.js- 当去首页时,获取 username,并设置到 vuex 里
- 刷新页面的时候,会丢失 socket 对象,所以在刷新页面时,我们需重新创建连接
router.beforeEach((to, from, next) => {
  if (to.name === 'index') {
    const { username } = to.query;
    store.commit('user/setUserinfo', { username, nickname: username });
  }
  if (store.state.user.userinfo.username && !window.socket) {
    createSocket(store.state.user.userinfo.username);
    next();
  } else {
    next();
  }
});
首页开发
view/index.vue- 我们使用嵌套路由开发首页
消息 联系人 我的 子路由
聊天页面
- 接收组件
view/chat/components/receive/index.vue

{{ info.from }}
- 发送组件
view/chat/components/send/index.vue
{{ info.from }}

- 聊天页面
view/chat/index.vue
消息页面
- 消息单元组件
view/message/components/cell/index.vue
- 消息页面
view/message/index.vue
联系人页面
view/friends/index.vue联系人我的页面
view/mine/index.vue我的路由配置
router/index.js
import Vue from 'vue';
import Router from 'vue-router';

Vue.use(Router); // 启用router插件

// 以下是路由配置
let router = new Router({
  mode: 'hash',
  routes: [
    {
      path: '/',
      name: 'index',
      component: () => import(/*webpackChunkName: "index"*/ '@/view/index.vue'),
      redirect: '/message',
      children: [
        {
          path: '/message',
          name: 'message',
          component: () =>
            import(/*webpackChunkName: "index"*/ '@/view/message/index.vue'),
          meta: {
            title: '消息',
          },
        },
        {
          path: '/friends',
          name: 'friends',
          component: () =>
            import(/*webpackChunkName: "index"*/ '@/view/friends/index.vue'),
          meta: {
            title: '联系人',
          },
        },
        {
          path: '/mine',
          name: 'mine',
          component: () =>
            import(/*webpackChunkName: "index"*/ '@/view/mine/index.vue'),
          meta: {
            title: '我的',
          },
        },
      ],
    },
    {
      path: '/chat/:username',
      name: 'chat',
      component: () =>
        import(/*webpackChunkName: "index"*/ '@/view/chat/index.vue'),
      meta: {
        title: '聊天',
      },
    },
  ],
});

export default router;
测试
yarn start
# 或者
npm run start
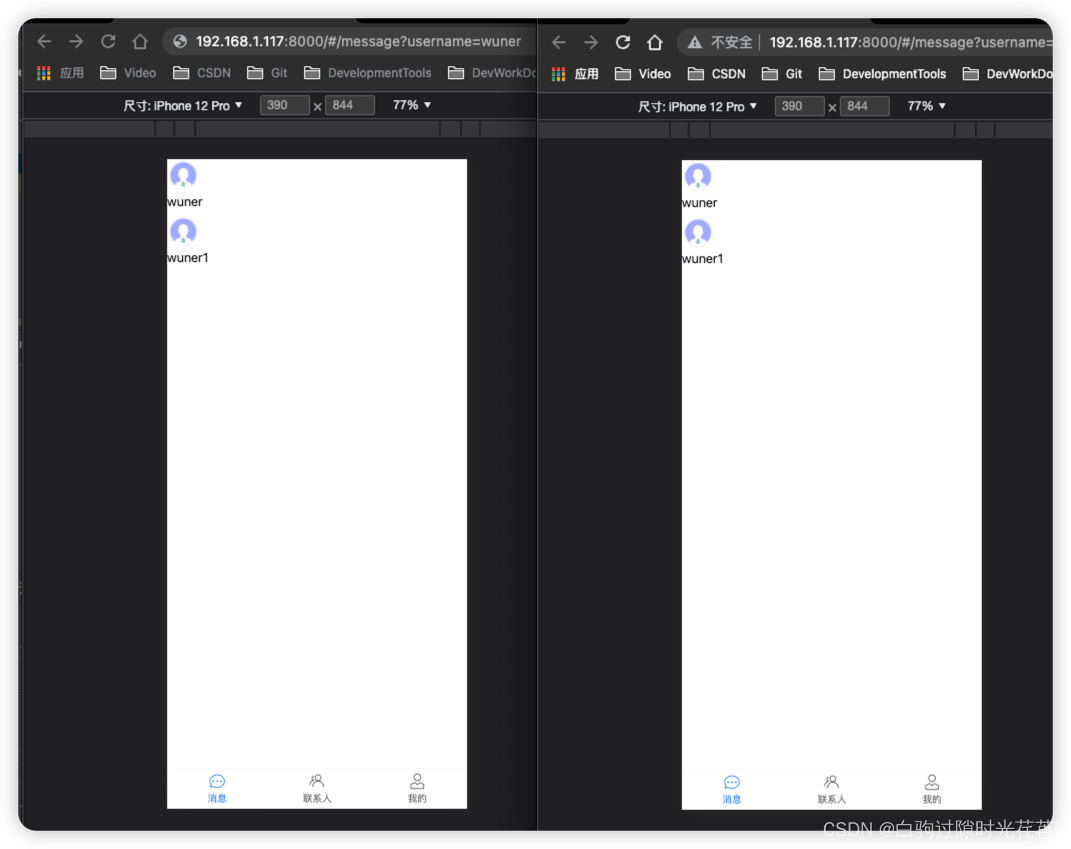
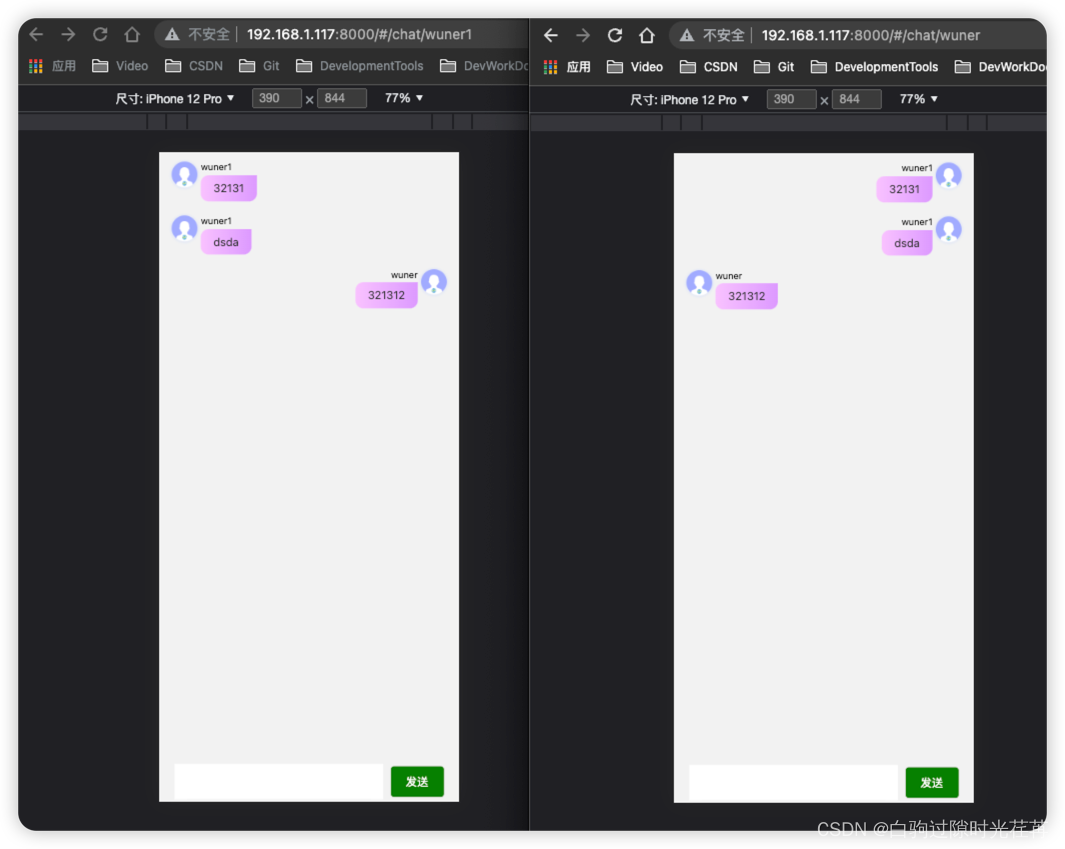
这时浏览器会自带打开页面,在浏览器连接中,添加?username=wuner,并复制浏览器连接,将 wuner 改为 wuner1,并使用新建标签打开

- wuner 进入 wuner1
- wuner1 进入 wuner

项目地址
-
相关阅读:
ESP8266-Arduino编程实例-SHT20温湿度传感器驱动
[附源码]java毕业设计石林县石漠化信息查询分析系统
使用Java 17中的record替代Lombok的部分功能
MyBatis #{} 和 ${} 的区别
【Linux系统编程】第九弹---权限管理操作(下)
121. 买卖股票的最佳时机
简单工厂、工厂方法和抽象工厂模式(创建型设计模式)的 C++ 代码示例模板
初探亚马逊 AI 编程助手 CodeWhisperer
salesforce零基础学习(一百二十七)Custom Metadata Type 篇二
对已经关闭的 channel 进行读写关闭操作会发生什么?
- 原文地址:https://blog.csdn.net/qq_32090185/article/details/127110453