-
谷粒商城笔记+踩坑(4)——商品服务-品牌管理
导航:
Java笔记汇总:
目录
7.3.2、开通阿里云OSS对象存储服务,创建新的Bucket
7.3.3、子账户创建和授权,获取Endpoint、AccessKey ID、AccessKey Secret
7.3.7、实现服务端签名后直传文件,新建OssController
7.6.6、使用自定义校验,showStatus只能是0或1
7、商品服务-品牌管理
7.1、添加“品牌管理”到人人后台管理系统
7.1.1、在人人后台管理系统中新增“品牌管理”菜单
菜单管理->新增菜单

7.1.2、人人生成的前端vue文件复制到前端工程
前端代码路径
\product\main\resources\src\views\modules\product
7.1.3、修改权限
没有新增删除按钮: 修改权限,Ctrl+Shift+F查找
isAuth后,在src/utils/index.js修改
isAuth,注释并全部返回为true

7.1.4、测试增删改查基础功能
运行项目, 可以发现增删改查都是成功的.
注意:现在没有添加表单校验,新增时表单有非法输入会失败,例如状态设为汉字。
http://localhost:8001/#/product-brand

7.2、新增时显示状态开关(仅前端)
1、在列表中添加自定义列:中间加
标签。可以通过Scoped slot可以获取到 row, column, $index 和 store(table 内部的状态管理)的数据2、修改开关状态,发送修改请求
3、数据库中showStatus是01,开关默认值是true/false。 所以在开关中设置
:active-value="1" 、:inactive-value="0"属性,与数据库同步代码+注释:
- <el-table-column
- prop="showStatus"
- header-align="center"
- align="center"
- label="显示状态"
- >
- <template slot-scope="scope">
- <el-switch
- v-model="scope.row.showStatus"
- active-color="#13ce66"
- inactive-color="#ff4949"
- :active-value="1"
- :inactive-value="0"
- @change="updateBrandStatus(scope.row)"
- >
- el-switch>
- template>
- el-table-column>
- <el-form-item label="显示状态" prop="showStatus">
- <el-switch
- v-model="dataForm.showStatus"
- active-color="#13ce66"
- inactive-color="#ff4949"
- :active-value="1"
- :inactive-value="0"
- >
- el-switch>
- el-form-item>
- //brand.vue中新增方法,用来修改状态
- updateBrandStatus(data) {
- let { brandId, showStatus } = data;
- this.$http({
- url: this.$http.adornUrl("/product/brand/update"),
- method: "post",
- data: this.$http.adornData({ brandId, showStatus }, false),
- }).then(({ data }) => {
- this.$message({
- message: "状态修改成功",
- type: "success",
- });
- });
- },
7.3、文件上传功能,阿里云云存储
7.3.1、分布式系统上传文件
单体应用上传:上传文件到服务器,想获取文件时再向服务器发请求获取文件。
分布式系统上传: 因为有多台服务器,为防止负载均衡导致获取文件时没找到对应的服务器,所以使用专门的存读文件服务器,或者云存储。
和传统的单体应用不同,这里我们选择将数据上传到分布式文件服务器上。
这里我们选择将图片放置到阿里云上,使用对象存储。
帮助文档:
- https://github.com/alibaba/aliyun-spring-boot/blob/master/aliyun-spring-boot-samples/aliyun-oss-spring-boot-sample/README-zh.md
- https://help.aliyun.com/document_detail/32009.html?spm=a2c4g.11186623.6.768.549d59aaWuZMGJ
上传策略:服务端签名后直传

7.3.2、开通阿里云OSS对象存储服务,创建新的Bucket
尽管开通即可,oss是按量计费,开发阶段不会超过一块钱。
注册、登录、实名认证、开通oss对象存储:
点击立即开通

点击“管理控制台” :

oss基本概念:基本概念-Object-对象-存储-对象存储 OSS-阿里云
存储空间(Bucket)
存储空间是用户用于存储对象(Object)的容器,所有的对象都必须隶属于某个存储空间。存储空间具有各种配置属性,包括地域、访问权限、存储类型等。用户可以根据实际需求,创建不同类型的存储空间来存储不同的数据。
建议一个项目创建一个存储空间。
对象(Object)
对象是OSS存储数据的基本单元,也被称为OSS的文件。和传统的文件系统不同,对象没有文件目录层级结构的关系。对象由元信息(Object Meta),用户数据(Data)和文件名(Key)组成,并且由存储空间内部唯一的Key来标识。对象元信息是一组键值对,表示了对象的一些属性,比如最后修改时间、大小等信息,同时用户也可以在元信息中存储一些自定义的信息。
创建bucket:

手动上传任意文件测试:


点击文件详情、 复制url就能直接下载文件:

7.3.3、子账户创建和授权,获取
Endpoint、AccessKey ID、AccessKey Secret创建子账户


点击创建用户

新建成功后得到
AccessKey ID、AccessKey Secret对子账户分配权限,管理OSS对象存储服务

给oss完全权限:

Endpoint。 (gulimall-xmh -> 概览 -> Endpoint(地域节点))

7.3.4、测试普通上传方式(不建议)

经过服务器不建议
product模块导入依赖
- <dependency>
- <groupId>com.aliyun.ossgroupId>
- <artifactId>aliyun-sdk-ossartifactId>
- <version>3.15.0version>
- dependency>
上传文件流,将下面代码中String都
改成自己的信息:- @Test
- public void testOss(){
- String endpoint = "https://oss-cn-hangzhou.aliyuncs.com";
- // 阿里云账号AccessKey拥有所有API的访问权限,风险很高。强烈建议您创建并使用RAM用户进行API访问或日常运维,请登录RAM控制台创建RAM用户。
- String accessKeyId = "yourAccessKeyId";
- String accessKeySecret = "yourAccessKeySecret";
- // 填写Bucket存储空间名称,例如gulimall-hello。
- String bucketName = "examplebucket";
- // 填写存储对象Object完整路径,完整路径中不能包含Bucket名称,例如exampledir/exampleobject.txt。
- String objectName = "exampledir/exampleobject.txt";
- // 填写本地文件的完整路径,例如D:\\localpath\\examplefile.txt。
- // 如果未指定本地路径,则默认从示例程序所属项目对应本地路径中上传文件流。
- String filePath= "D:\\localpath\\examplefile.txt";
- // 创建OSSClient实例。
- OSS ossClient = new OSSClientBuilder().build(endpoint, accessKeyId, accessKeySecret);
- try {
- InputStream inputStream = new FileInputStream(filePath);
- // 创建PutObject请求。
- ossClient.putObject(bucketName, objectName, inputStream);
- } catch (OSSException oe) {
- System.out.println("Caught an OSSException, which means your request made it to OSS, "
- + "but was rejected with an error response for some reason.");
- System.out.println("Error Message:" + oe.getErrorMessage());
- System.out.println("Error Code:" + oe.getErrorCode());
- System.out.println("Request ID:" + oe.getRequestId());
- System.out.println("Host ID:" + oe.getHostId());
- } catch (ClientException ce) {
- System.out.println("Caught an ClientException, which means the client encountered "
- + "a serious internal problem while trying to communicate with OSS, "
- + "such as not being able to access the network.");
- System.out.println("Error Message:" + ce.getMessage());
- } finally {
- if (ossClient != null) {
- ossClient.shutdown();
- }
- }
- }
运行,上传成功:

复制文件url在浏览器也是可以打开的。
7.3.5、建立第三方服务模块,实现服务端签名后直传
删除前面测试时引入的依赖和测试类,以后导入starter依赖。

官方演示示例 :
- 新建springboot模块,
gulimall-third-party


- 第三方模块引入common、oss依赖和alibaba管理依赖
- <properties>
- <java.version>11java.version>
- <spring-cloud.version>2021.0.4spring-cloud.version>
- properties>
- <dependencies>
- <dependency>
- <groupId>org.springframework.bootgroupId>
- <artifactId>spring-boot-starter-webartifactId>
- dependency>
- <dependency>
- <groupId>org.springframework.cloudgroupId>
- <artifactId>spring-cloud-starter-openfeignartifactId>
- dependency>
- <dependency>
- <groupId>org.springframework.bootgroupId>
- <artifactId>spring-boot-starter-testartifactId>
- <scope>testscope>
- dependency>
- <dependency>
- <groupId>com.vince.gulimallgroupId>
- <artifactId>gulimall-commonartifactId>
- <version>0.0.1-SNAPSHOTversion>
- dependency>
- <dependency>
- <groupId>com.alibaba.cloudgroupId>
- <artifactId>spring-cloud-starter-alicloud-ossartifactId>
- <version>2.2.0.RELEASEversion>
- dependency>
- dependencies>
- <dependencyManagement>
- <dependencies>
- <dependency>
- <groupId>org.springframework.cloudgroupId>
- <artifactId>spring-cloud-dependenciesartifactId>
- <version>${spring-cloud.version}version>
- <type>pomtype>
- <scope>importscope>
- dependency>
- <dependency>
- <groupId>com.alibaba.cloudgroupId>
- <artifactId>spring-cloud-alibaba-dependenciesartifactId>
- <version>2021.0.1.0version>
- <type>pomtype>
- <scope>importscope>
- dependency>
- dependencies>
- dependencyManagement>
- nacos新建命名空间
third-party

- 命名空间中新建配置文件
oss.yml

- spring:
- cloud:
- alicloud:
- oss:
- endpoint: xxx
- bucket: xxx
- access-key: xxx
- secret-key: xxx
- 项目新建
bootstrap.yml
- spring:
- application:
- name: gulimall-third-party
- cloud:
- nacos:
- config:
- server-addr: 127.0.0.1:8848
- file-extension: yaml
- namespace: de0e12ff-8fc4-45a0-bdee-5b5618f4054f
- extension-configs:
- - data-id: oss.yml
- group: DEFAULT_GROUP
- refresh: true
坑点:报错没有配置endpoint:
在
SpringBoot 2.4.x的版本之后,对于bootstrap.properties/bootstrap.yaml配置文件(我们合起来成为Bootstrap配置文件)的支持,需要导入如下的依赖这里在common中导入:
- <dependency>
- <groupId>org.springframework.cloudgroupId>
- <artifactId>spring-cloud-starter-bootstrapartifactId>
- <version>3.1.4version>
- dependency>
- 项目新建
application.yml
- spring:
- cloud:
- nacos:
- discovery:
- server-addr: 127.0.0.1:8848
- application:
- name: gulimall-third-party
- server:
- port: 30000
- 主启动类注解@EnableDiscoveryClient开启nacos注册
- @SpringBootApplication
- @EnableDiscoveryClient
- public class GulimallThirdPartyApplication {
- public static void main(String[] args) {
- SpringApplication.run(GulimallThirdPartyApplication.class, args);
- }
- }
7.3.6、测试上传文件功能
在第三方模块的pom里排除mybatisplus依赖:
- <dependency>
- <groupId>com.vince.gulimallgroupId>
- <artifactId>gulimall-commonartifactId>
- <version>0.0.1-SNAPSHOTversion>
- <exclusions>
- <exclusion>
- <groupId>com.baomidougroupId>
- <artifactId>mybatis-plus-boot-starterartifactId>
- exclusion>
- exclusions>
- dependency>
编写测试类:
注意修改bucket
- @SpringBootTest
- class GulimallThirdPartyApplicationTest {
- @Autowired
- OSSClient ossClient;
- @Test
- public void testUpload() throws FileNotFoundException {
- //上传文件流。
- InputStream inputStream = new FileInputStream("E:\\SystemDefault\\桌面\\1.jpg");
- ossClient.putObject("改成自己bucketName例如gulimall-xmh", "hahaha1.jpg", inputStream);
- // 关闭OSSClient。
- ossClient.shutdown();
- System.out.println("上传成功.");
- }
- }
7.3.7、实现服务端签名后直传文件,新建OssController
在第三方模块controller.OssController
代码来源:简单上传-上传-文件-OSS-对象存储 OSS-阿里云
这里主要是从yml里注入oss需要的关键属性,删去了跨域相关的代码,因为跨域我们之前在网关模块的配置类里已经统一配置了跨域规则。
- @RestController
- public class OssController {
- @Autowired
- OSS ossClient; //注意不是OssClient
- //从nacos配置的yml里注入阿里云云存储的关键属性
- @Value("${spring.cloud.alicloud.oss.endpoint}")
- String endpoint;
- @Value("${spring.cloud.alicloud.oss.bucket}")
- String bucket;
- @Value("${spring.cloud.alicloud.access-key}")
- String accessId;
- @Value("${spring.cloud.alicloud.secret-key}")
- String accessKey;
- @RequestMapping("/oss/policy")
- public R policy(){
- String host = "https://" + bucket + "." + endpoint; // host的格式为 bucketname.endpoint
- // 用户上传文件时指定的前缀
- String dir = new SimpleDateFormat("yyyy-MM-dd").format(new Date());
- Map
- try {
- long expireTime = 30;
- long expireEndTime = System.currentTimeMillis() + expireTime * 1000;
- Date expiration = new Date(expireEndTime);
- PolicyConditions policyConds = new PolicyConditions();
- policyConds.addConditionItem(PolicyConditions.COND_CONTENT_LENGTH_RANGE, 0, 1048576000);
- policyConds.addConditionItem(MatchMode.StartWith, PolicyConditions.COND_KEY, dir);
- String postPolicy = ossClient.generatePostPolicy(expiration, policyConds);
- byte[] binaryData = postPolicy.getBytes("utf-8");
- String encodedPolicy = BinaryUtil.toBase64String(binaryData);
- String postSignature = ossClient.calculatePostSignature(postPolicy);
- respMap= new LinkedHashMap
- respMap.put("accessid", accessId);
- respMap.put("policy", encodedPolicy);
- respMap.put("signature", postSignature);
- respMap.put("dir", dir);
- respMap.put("host", host);
- respMap.put("expire", String.valueOf(expireEndTime / 1000));
- } catch (Exception e) {
- // Assert.fail(e.getMessage());
- System.out.println(e.getMessage());
- } finally {
- ossClient.shutdown();
- }
- return R.ok().put("data",respMap);
- }
- }
文件真正访问地址:https://bucket名.endpoint名/文件名
例如:

启动访问获取签名:

7.3.8、配置网关路由
- # oss等第三方模块路由
- - id: third_party_route
- uri: lb://gulimall-third-party
- predicates:
- - Path=/api/thirdparty/**
- filters:
- # http://localhost:88/api/thirdparty/oss/policy--->http://localhost:30000/oss/policy
- - RewritePath=/api/thirdparty/(?
.*),/$\{segment}
注意:位置要放到/api的上面

7.3.9、启动网关、测试获取oss签名请求
访问http://localhost:88/api/thirdparty/oss/policy测试

7.3.10、前端联调,实现文件上传功能
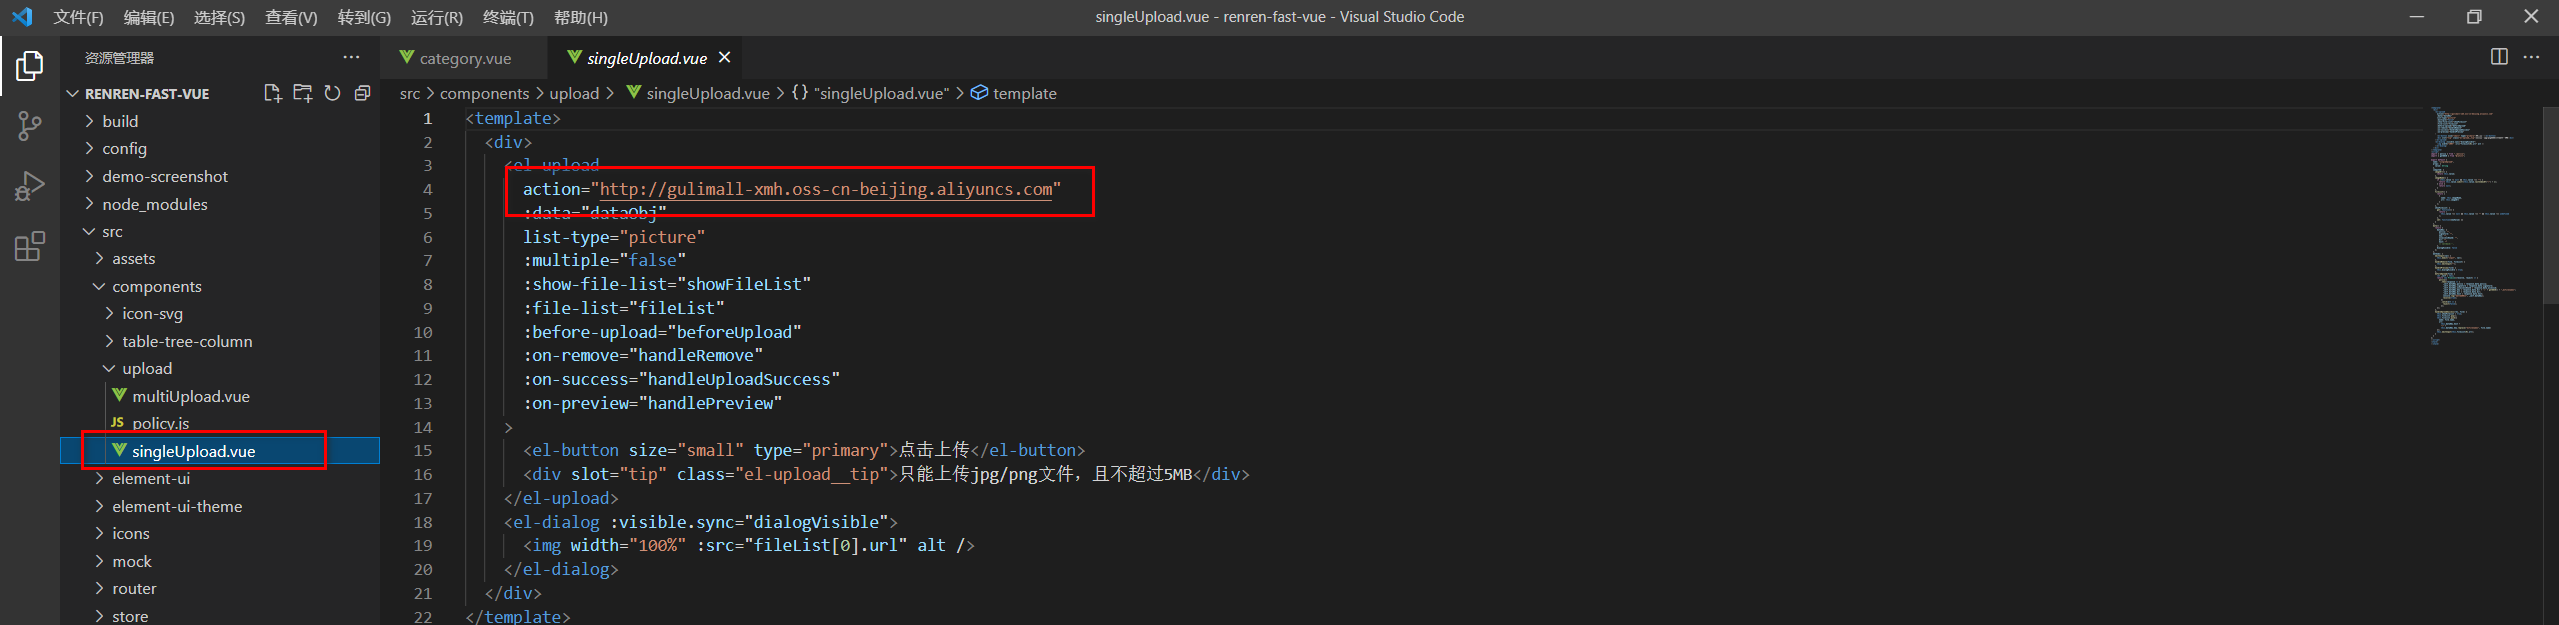
- 将资料里的upload文件夹cv在/renren-fast-vue/src/components中
- 修改multiUpload
.vue和singeUplad.vue组件中el-upload中的action属性,替换成自己的Bucket域名
修改\src\views\modules\productbrand-add-or-update.vue,把单个文件上传组件应用到brand-add-or-update.vue
- //在