-
Springcloud的学习笔记(二)
目录
8 消费者订单模块
创建子工程
cloud-consumer-order80- 导入依赖
<project xmlns="http://maven.apache.org/POM/4.0.0" xmlns:xsi="http://www.w3.org/2001/XMLSchema-instance" xsi:schemaLocation="http://maven.apache.org/POM/4.0.0 http://maven.apache.org/xsd/maven-4.0.0.xsd"> <parent> <artifactId>clould2020artifactId> <groupId>com.wjiangquan.springcloudgroupId> <version>1.0-SNAPSHOTversion> parent> <modelVersion>4.0.0modelVersion> <artifactId>clould-consumer-order80artifactId> <dependencies> <dependency> <groupId>org.springframework.bootgroupId> <artifactId>spring-boot-starter-webartifactId> dependency> <dependency> <groupId>org.springframework.bootgroupId> <artifactId>spring-boot-starter-actuatorartifactId> dependency> <dependency> <groupId>org.springframework.bootgroupId> <artifactId>spring-boot-devtoolsartifactId> <scope>runtimescope> <optional>trueoptional> dependency> <dependency> <groupId>org.projectlombokgroupId> <artifactId>lombokartifactId> <optional>trueoptional> dependency> <dependency> <groupId>org.springframework.bootgroupId> <artifactId>spring-boot-starter-testartifactId> <scope>testscope> dependency> dependencies> project>- 1
- 2
- 3
- 4
- 5
- 6
- 7
- 8
- 9
- 10
- 11
- 12
- 13
- 14
- 15
- 16
- 17
- 18
- 19
- 20
- 21
- 22
- 23
- 24
- 25
- 26
- 27
- 28
- 29
- 30
- 31
- 32
- 33
- 34
- 35
- 36
- 37
- 38
- 39
- 40
- 41
- 42
- 增加yml文件
server: port: 81- 1
- 2
- 启动类
package com.wjiangquan.springcloud; import org.springframework.boot.SpringApplication; import org.springframework.boot.autoconfigure.SpringBootApplication; /** * @author weijiangquan * @date 2022/9/17 -16:37 * @Description */ @SpringBootApplication public class OrderMain81 { public static void main(String[] args) { SpringApplication.run(OrderMain81.class); } }- 1
- 2
- 3
- 4
- 5
- 6
- 7
- 8
- 9
- 10
- 11
- 12
- 13
- 14
- 15
- 16
- 17
- 18
- 实体类
直接复制刚才上面的那个模块的

- 配置类
package com.wjiangquan.springcloud.config; import org.springframework.context.annotation.Bean; import org.springframework.context.annotation.Configuration; import org.springframework.web.client.RestTemplate; /** * @author weijiangquan * @date 2022/9/17 -20:13 * @Description */ @Configuration public class ApplicationContestConfig { @Bean public RestTemplate getRestTemplate(){ return new RestTemplate(); } } //application.xml上面就相当于这个,相当于在容器中有一个这样的对象,相当于将方法的返回值返回容器中 - 1
- 2
- 3
- 4
- 5
- 6
- 7
- 8
- 9
- 10
- 11
- 12
- 13
- 14
- 15
- 16
- 17
- 18
- 19
- 20
- controller层
package com.wjiangquan.springcloud.controller; import com.wjiangquan.springcloud.entities.CommonResult; import com.wjiangquan.springcloud.entities.Payment; import lombok.extern.slf4j.Slf4j; import org.springframework.web.bind.annotation.GetMapping; import org.springframework.web.bind.annotation.PathVariable; import org.springframework.web.bind.annotation.RestController; import org.springframework.web.client.RestTemplate; import javax.annotation.Resource; /** * @author weijiangquan * @date 2022/9/17 -20:08 * @Description */ @RestController @Slf4j public class OrderController { public static final String PAYMENT_URL = "http://localhost:8001"; @Resource private RestTemplate restTemplate; @GetMapping("/consumer/payment/create") public CommonResult<Payment> create(Payment payment){ return restTemplate.postForObject(PAYMENT_URL+"/payment/create",payment,CommonResult.class); } @GetMapping("/consumer/payment/get/{id}") public CommonResult<Payment> getPayment(@PathVariable("id") Long id){ return restTemplate.getForObject(PAYMENT_URL+"/payment/get/"+id,CommonResult.class); } }- 1
- 2
- 3
- 4
- 5
- 6
- 7
- 8
- 9
- 10
- 11
- 12
- 13
- 14
- 15
- 16
- 17
- 18
- 19
- 20
- 21
- 22
- 23
- 24
- 25
- 26
- 27
- 28
- 29
- 30
- 31
- 32
- 33
- 34
- 35
- 36
- 37
- 测试类
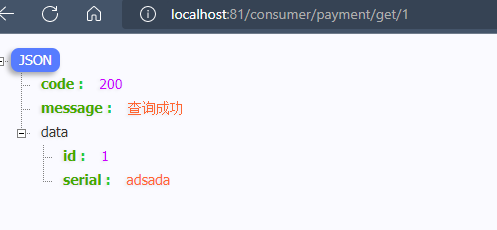
获取数据
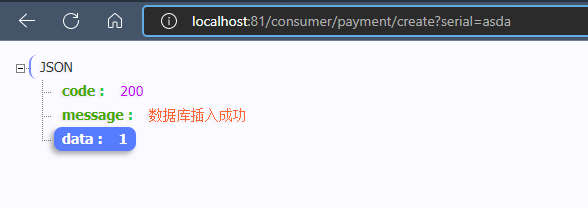
添加数据,
这个只是表面上添加成功,可以观看数据库,刚才添加的数据为空
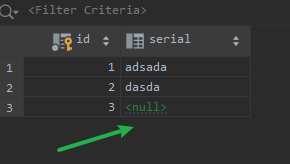
出现上面的原因是因为没有在8001这个服务中添加如下

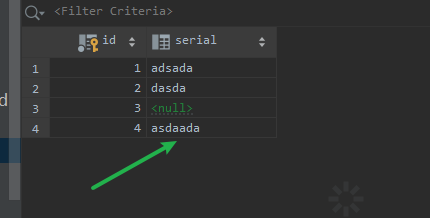
当加入之后,再次插入的时候,可以发现添加成功

9 重构
将重复的代码统一起来,框起来的代码是重复的
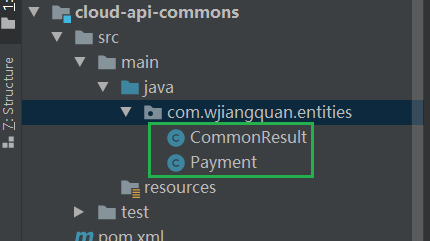
建立公共的模块
cloud-api-commons- 改pom文件
<project xmlns="http://maven.apache.org/POM/4.0.0" xmlns:xsi="http://www.w3.org/2001/XMLSchema-instance" xsi:schemaLocation="http://maven.apache.org/POM/4.0.0 http://maven.apache.org/xsd/maven-4.0.0.xsd"> <parent> <artifactId>clould2020artifactId> <groupId>com.wjiangquan.springcloudgroupId> <version>1.0-SNAPSHOTversion> parent> <modelVersion>4.0.0modelVersion> <artifactId>cloud-api-commonsartifactId> <dependencies> <dependency> <groupId>org.springframework.bootgroupId> <artifactId>spring-boot-devtoolsartifactId> <scope>runtimescope> <optional>trueoptional> dependency> <dependency> <groupId>org.projectlombokgroupId> <artifactId>lombokartifactId> <optional>trueoptional> dependency> <dependency> <groupId>cn.hutoolgroupId> <artifactId>hutool-allartifactId> <version>5.1.0version> dependency> dependencies> project>- 1
- 2
- 3
- 4
- 5
- 6
- 7
- 8
- 9
- 10
- 11
- 12
- 13
- 14
- 15
- 16
- 17
- 18
- 19
- 20
- 21
- 22
- 23
- 24
- 25
- 26
- 27
- 28
- 29
- 30
- 31
- 32
- 33
- 34
- 将公共的复制过来

- 使用maven的命令
clean install

- 在81和8001这两个服务中导入刚才生成的依赖
<dependency> <groupId>com.wjiangquan.springcloudgroupId> <artifactId>cloud-api-commonsartifactId> <version>${project.version}version> dependency> <dependency>- 1
- 2
- 3
- 4
- 5
- 6
10 Eureka服务注册与发现
目前在前面的内容中还没有涉及到有关
springcloud的知识10.1 Eureka基础知识
什么是服务治理:
Spring Cloud封装了Netflix 公司开发的Eureka模块来实现服务治理
在传统的RPC远程调用框架中,管理每个服务与服务之间依赖关系比较复杂,管理比较复杂,所以需要使用服务治理,管理服务于服务之间依赖关系,
可以实现服务调用、负载均衡、容错等,实现服务发现与注册。- 什么是服务注册与发现
Eureka采用了CS的设计架构,Eureka Sever作为服务注册功能的服务器,它是服务注册中心。而系统中的其他微服务,使用Eureka的客户端连接到 Eureka Server并维持心跳连接。这样系统的维护人员就可以通过Eureka Server来监控系统中各个微服务是否正常运行。
在服务注册与发现中,有一个注册中心。当服务器启动的时候,会把当前自己服务器的信息比如
服务地址通讯地址等以别名方式注册到注册中心上。另一方(消费者服务提供者),以该别名的方式去注册中心上获取到实际的服务通讯地址,然后再实现本地RPC调用RPC远程调用框架核心设计思想:在于注册中心,因为使用注册中心管理每个服务与服务之间的一个依赖关系(服务治理概念)。在任何RPC远程框架中,都会有一个注册中心存放服务地址相关信息(接口地址)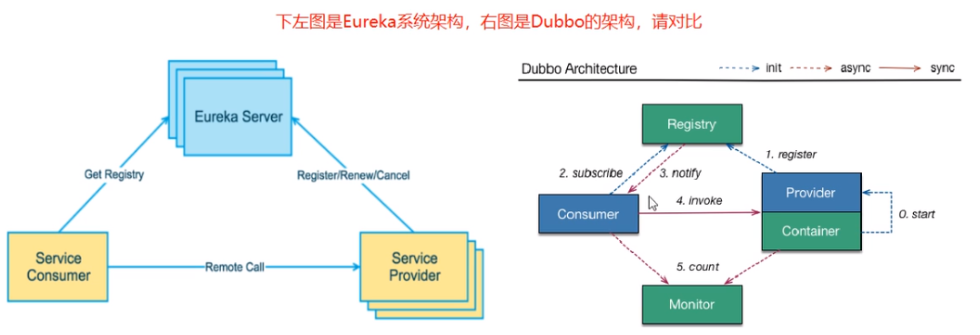
Eureka包含两个组件:Eureka Server和Eureka Client
Eureka Server提供服务注册服务
各个微服务节点通过配置启动后,会在EurekaServer中进行注册,这样EurekaServer中的服务注册表中将会存储所有可用服务节点的信息,服务节点的信息可以在界面中直观看到。
EurekaClient通过注册中心进行访问
它是一个Java客户端,用于简化Eureka Server的交互,客户端同时也具备一个内置的、使用轮询(round-robin)负载算法的负载均衡器。在应用启动后,将会向Eureka Server发送心跳(默认周期为30秒)。如果Eureka Server在多个心跳周期内没有接收到某个节点的心跳,EurekaServer将会从服务注册表中把这个服务节点移除(默认90秒)
10.2 EurekaServer服务端安装
IDEA生成eurekaServer端服务注册中心,类似物业公司
1.创建名为cloud-eureka-server7001的Maven工程
2.修改pom.xml
注意
<dependencies> <dependency> <groupid>org.springframework.cloudgroupId> <artifactId>spring-cloud-starter-eurekaartifactId> dependency> <dependency> <groupId>org.springframework.cloudgroupId> <artifactId>spring-cloud-starter-netflix-eureka-serverartifactId> dependency> dependencies>- 1
- 2
- 3
- 4
- 5
- 6
- 7
- 8
- 9
- 10
- 11
- 12
- 13
- 14
- 15
pom文件的内容是
3.改yml
server: port: 7001 eureka: instance: hostname: locathost #eureka服务端的实例名称 client: #false表示不向注册中心注册自己。 register-with-eureka: false #false表示自己端就是注册中心,我的职责就是维护服务实例,并不需要去检索服务 fetch-registry: false service-url: #设置与Eureka server交互的地址查询服务和注册服务都需要依赖这个地址。 defaultZone: http://${eureka.instance.hostname}:${server.port}/eureka/- 1
- 2
- 3
- 4
- 5
- 6
- 7
- 8
- 9
- 10
- 11
- 12
- 13
- 14
4.主启动
package com.wjiangquan.springcloud; import org.springframework.boot.SpringApplication; import org.springframework.boot.autoconfigure.SpringBootApplication; import org.springframework.cloud.netflix.eureka.server.EnableEurekaServer; @SpringBootApplication @EnableEurekaServer public class EurekaMain7001 { public static void main(String[] args) { SpringApplication.run(EurekaMain7001.class,args); } }- 1
- 2
- 3
- 4
- 5
- 6
- 7
- 8
- 9
- 10
- 11
- 12
- 13
5.测试
浏览器中输入
localhost:7001如下表示启动成功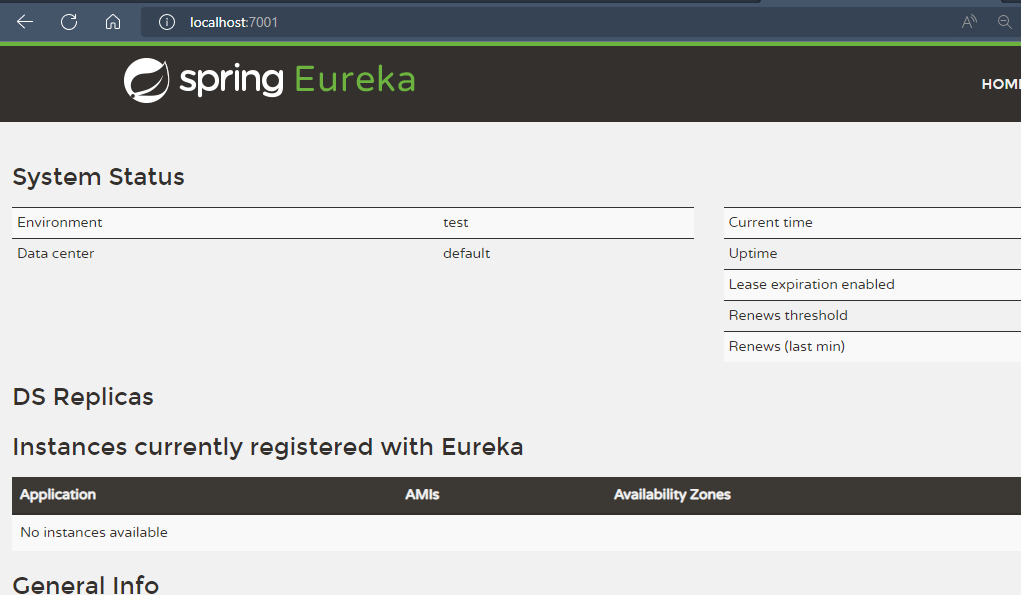
10.3 支付微服务8001入驻进EurekaServer
EurekaClient端cloud-provider-payment8001将注册进EurekaServer成为服务提供者provider,类似学校对外提供授课服务。
1.修改cloud-provider-payment8001
2.改POM
添加spring-cloud-starter-netflix-eureka-client依赖
<dependency> <groupId>org.springframework.cloud</groupId> <artifactId>spring-cloud-starter-netflix-eureka-client</artifactId> </dependency>- 1
- 2
- 3
- 4
3.写YMl
eureka: client: #表示是否将自己注册进Eurekaserver默认为true。 register-with-eureka: true #是否从EurekaServer抓取已有的注册信息,默认为true。单节点无所谓,集群必须设置为true才能配合ribbon使用负载均衡 fetchRegistry: true service-url: defaultZone: http://localhost:7001/eureka- 1
- 2
- 3
- 4
- 5
- 6
- 7
- 8
4.改启动类

- 测试
重新启动
8001之后,发现入住成功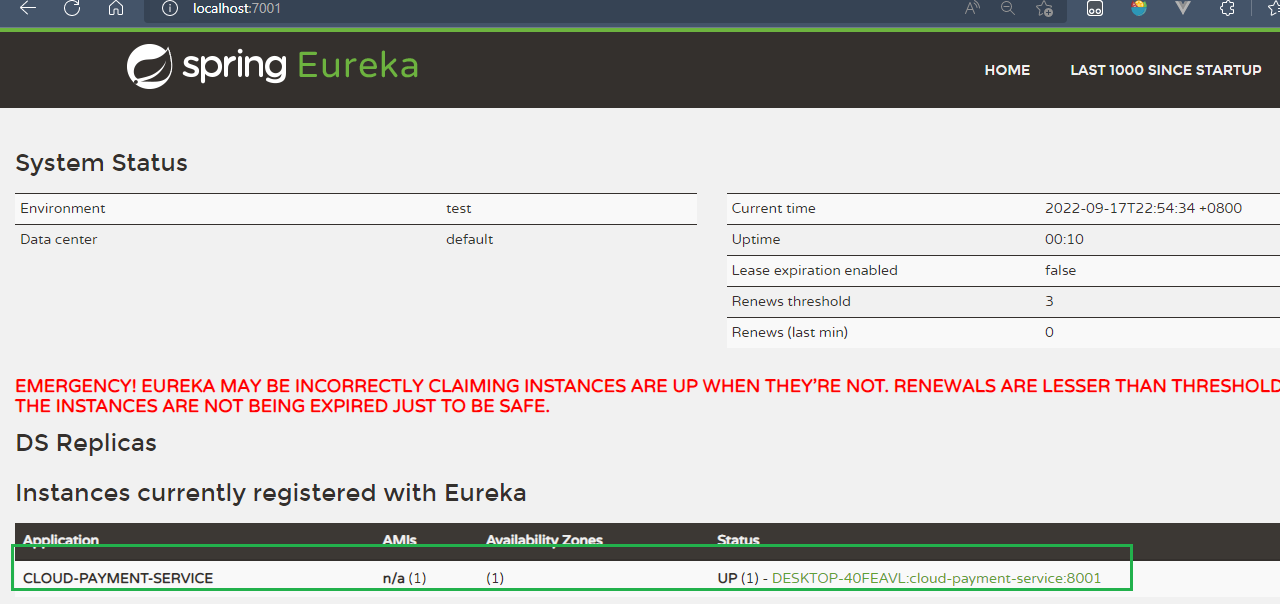
10.4 订单微服务81入驻进EurekaServer
EurekaClient端cloud-consumer-order81将注册进EurekaServer成为服务消费者consumer,类似来上课消费的同学
1.cloud-consumer-order80
2.POM
<dependency> <groupId>org.springframework.cloudgroupId> <artifactId>spring-cloud-starter-netflix-eureka-clientartifactId> dependency>- 1
- 2
- 3
- 4
3.YML
server: port: 81 spring: application: name: cloud-order-service eureka: client: #表示是否将自己注册进Eurekaserver默认为true。 register-with-eureka: true #是否从EurekaServer抓取已有的注册信息,默认为true。单节点无所谓,集群必须设置为true才能配合ribbon使用负载均衡 fetchRegistry: true service-url: defaultZone: http://localhost:7001/eureka- 1
- 2
- 3
- 4
- 5
- 6
- 7
- 8
- 9
- 10
- 11
- 12
- 13
- 14
- 15
- 16
4.主启动
import org.springframework.boot.SpringApplication; import org.springframework.boot.autoconfigure.SpringBootApplication; import org.springframework.cloud.netflix.eureka.EnableEurekaClient; @SpringBootApplication @EnableEurekaClient//<--- 添加该标签 public class OrderMain81 { public static void main( String[] args ){ SpringApplication.run(OrderMain81.class, args); } }- 1
- 2
- 3
- 4
- 5
- 6
- 7
- 8
- 9
- 10
- 11
- 12
5.测试
启动cloud-provider-payment8001、cloud-eureka-server7001和cloud-consumer-order80这三工程。
浏览器输入 http://localhost:7001 , 在主页的Instances currently registered with Eureka将会看到cloud-provider-payment8001、cloud-consumer-order80两个工程名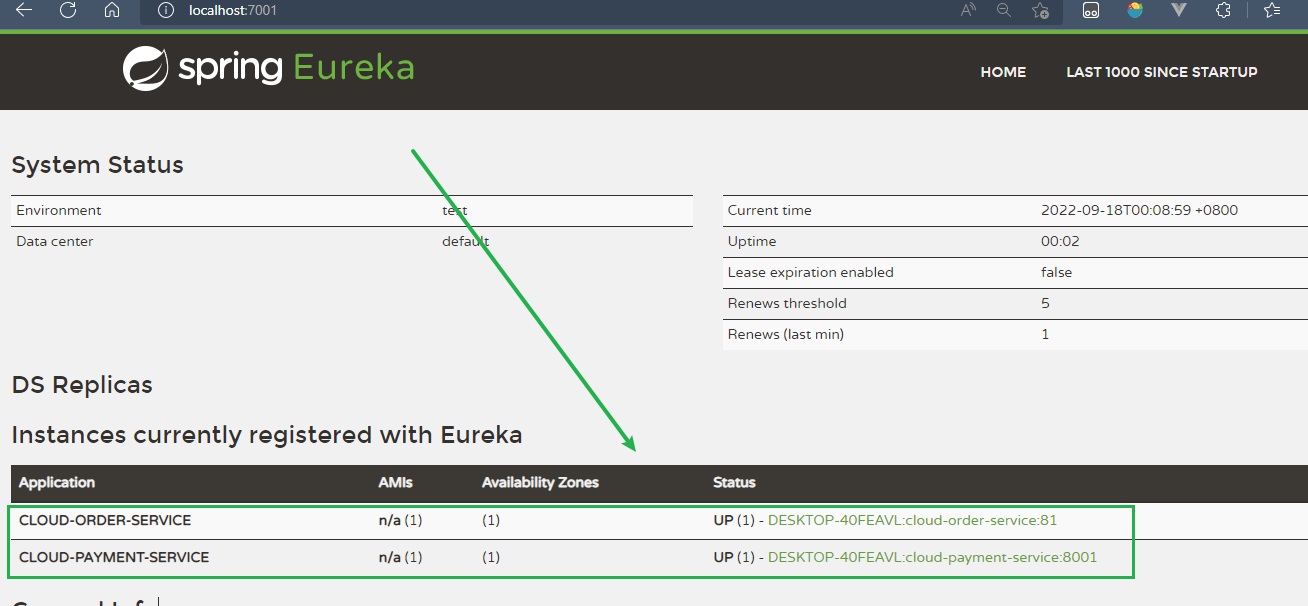
10.5 Eureka集群原理说明
1.Eureka集群原理说明

服务注册:将服务信息注册进注册中心
服务发现:从注册中心上获取服务信息
实质:存key服务命取value闭用地址
-
先启动eureka注主册中心
-
启动服务提供者payment支付服务
-
支付服务启动后会把自身信息(比服务地址L以别名方式注朋进eureka
-
消费者order服务在需要调用接口时,使用服务别名去注册中心获取实际的RPC远程调用地址
-
消去者导调用地址后,底屋实际是利用HttpClient技术实现远程调用
-
消费者实癸导服务地址后会缓存在本地jvm内存中,默认每间隔30秒更新—次服务调用地址
问题:微服务RPC远程服务调用最核心的是什么
高可用,试想你的注册中心只有一个only one,万一它出故障了,会导致整个为服务环境不可用。解决办法:搭建Eureka注册中心集群,实现负载均衡+故障容错。
互相注册,相互守望。
10.6 Eureka集群环境构建
创建cloud-eureka-server7002工程,同创建cloud-eureka-server7002方式,只有细微的差别

-
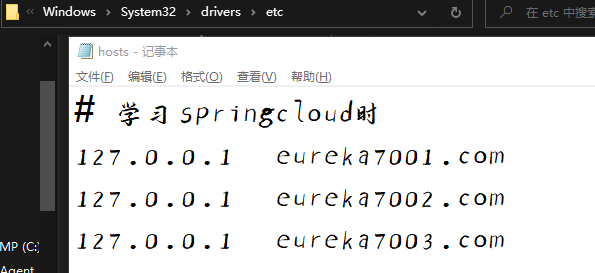
找到C:\Windows\System32\drivers\etc路径下的hosts文件,修改映射配置添加进hosts文件
- 修改cloud-eureka-server7001配置文件
server: port: 7001 eureka: instance: hostname: eureka7001.com #eureka服务端的实例名称 client: register-with-eureka: false #false表示不向注册中心注册自己。 fetch-registry: false #false表示自己端就是注册中心,我的职责就是维护服务实例,并不需要去检索服务 service-url: #集群指向其它eureka defaultZone: http://eureka7002.com:7002/eureka/ #单机就是7001自己 #defaultZone: http://eureka7001.com:7001/eureka/- 1
- 2
- 3
- 4
- 5
- 6
- 7
- 8
- 9
- 10
- 11
- 12
- 13
- 14
- 15
- 修改cloud-eureka-server7002配置文件
server: port: 7002 eureka: instance: hostname: eureka7002.com #eureka服务端的实例名称 client: register-with-eureka: false #false表示不向注册中心注册自己。 fetch-registry: false #false表示自己端就是注册中心,我的职责就是维护服务实例,并不需要去检索服务 service-url: #集群指向其它eureka defaultZone: http://eureka7001.com:7001/eureka/ #单机就是7002自己 #defaultZone: http://eureka7002.com:7002/eureka/- 1
- 2
- 3
- 4
- 5
- 6
- 7
- 8
- 9
- 10
- 11
- 12
- 13
- 14
- 15
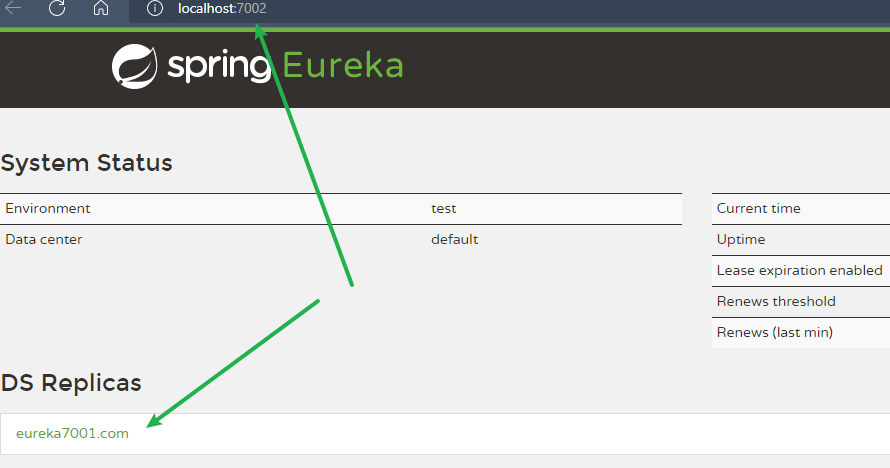
启动之后7001指向7002,7002指向7001表明成功
10.7 订单支付两微服务注册进Eureka集群
将支付服务8001微服务,订单服务80微服务发布到上面2台Eureka集群配置中
将它们的配置文件的eureka.client.service-url.defaultZone进行修改
eureka: client: #表示是否将自己注册进Eurekaserver默认为true。 register-with-eureka: true #是否从EurekaServer抓取已有的注册信息,默认为true。单节点无所谓,集群必须设置为true才能配合ribbon使用负载均衡 fetchRegistry: true service-url: defaultZone: http://eureka7001.com:7001/eureka, http://eureka7002.com:7002/eureka- 1
- 2
- 3
- 4
- 5
- 6
- 7
- 8
- 测试01
- 先要启动EurekaServer,7001/7002服务
- 再要启动服务提供者provider,8001
- 再要启动消费者,80
- 浏览器输入 - http://localhost/consumer/payment/get/1
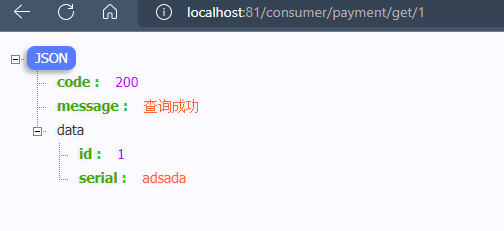
同时可以看到两个注册中心已经相互注册
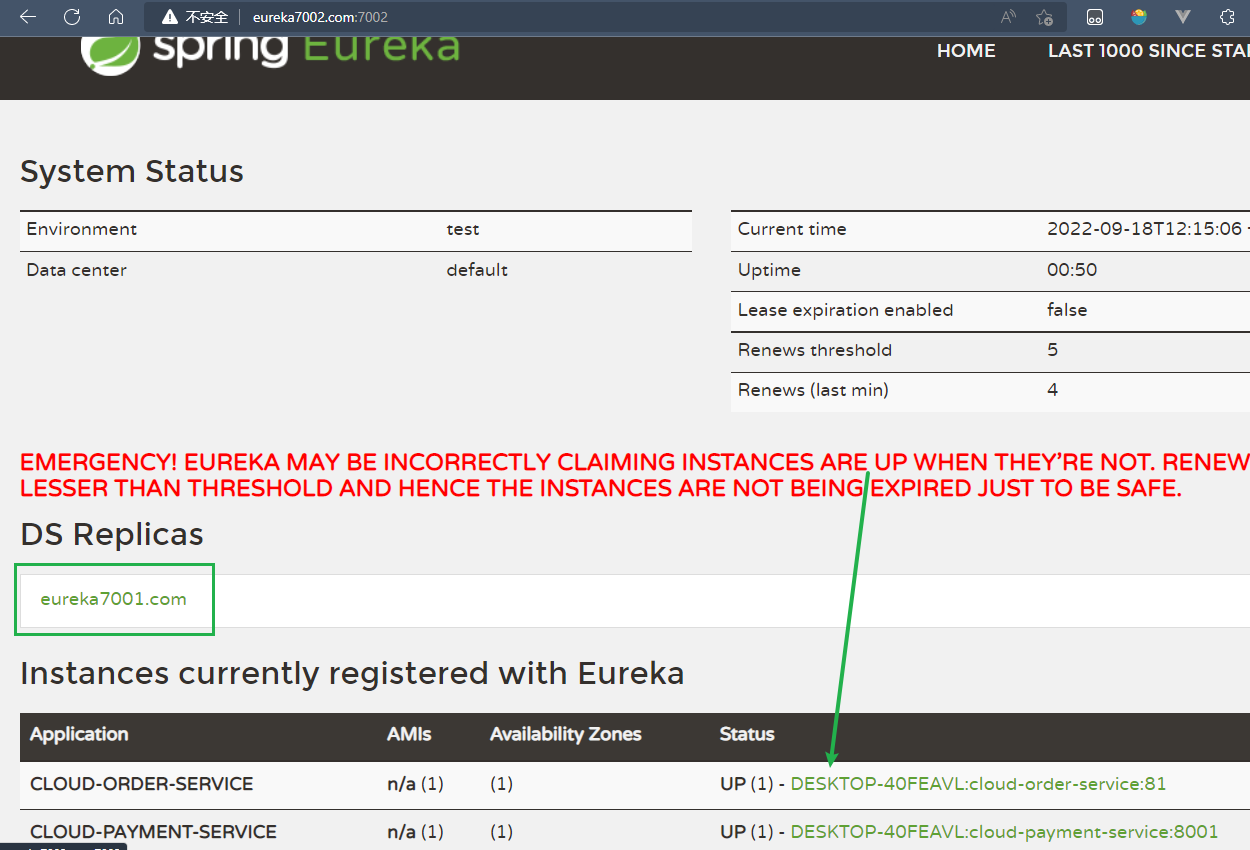
11 支付微服务集群配置
支付服务提供者8001集群环境构建
可以参考cloud-provicer-payment8001
1.新建cloud-provider-payment8002
2.改POM
3.写YML - 端口8002
4.主启动
5.业务类
6.修改8001/8002的Controller,添加serverPort
在8001和8002中都需要修改这个,从而知道是从哪一个端口获得的数据
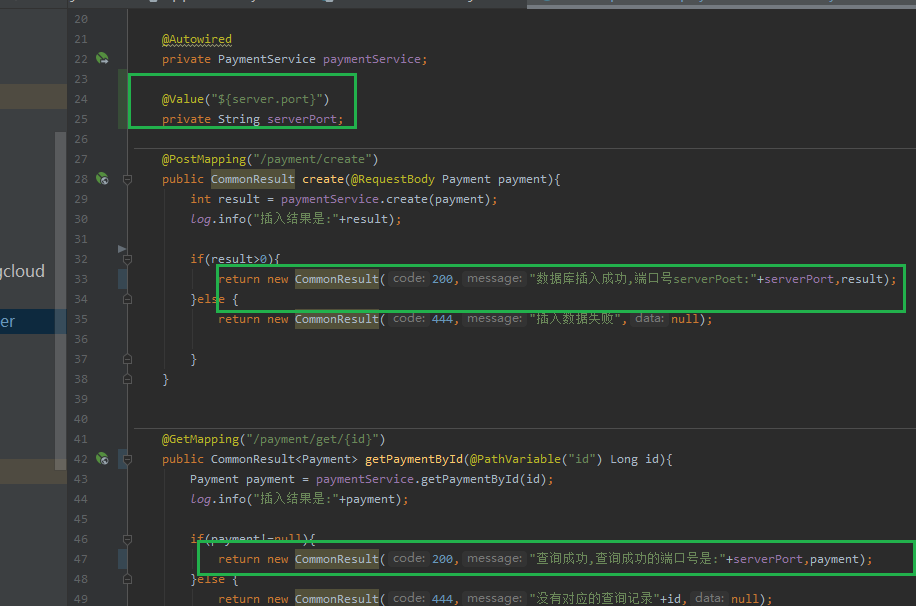
下面为测试截图,从测试截图可以看出结果
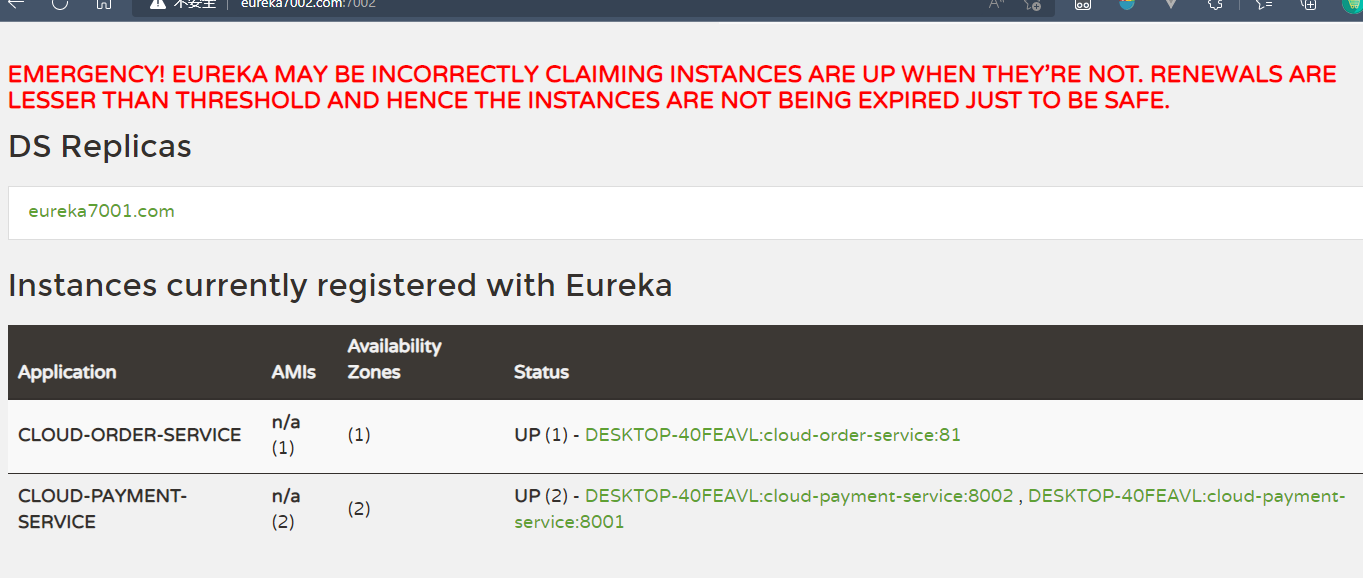
启动之后通过
81端口进行查询的时候,无论如何查询,最终的结果都是8001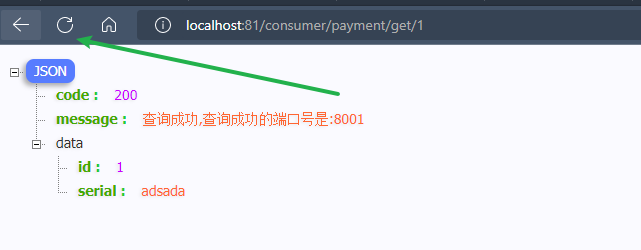
通过查看代码,是由于81的请求地址写死了
在81的controller中写了这样一行代码,它只会像81端口发送请求
public static final String PAYMENT_URL = "http://localhost:8001";- 1
将写死的地址换成了微服务的名称
public static final String PAYMENT_URL = "http://CLOUD-PAYMENT-SERVICE";- 1
11.1 目前的情况
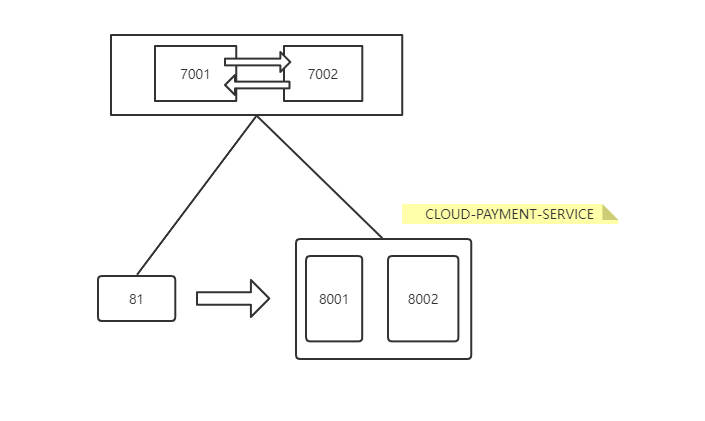
11.2 开启负载均衡
只有开启了负载均衡才会有效,不然没用
在81端口的配置文件中添加注解
@LoadBalanced,开启负载均衡,这样就赋予了负载均衡的能力@Configuration public class ApplicationContestConfig { @Bean @LoadBalanced public RestTemplate getRestTemplate(){ return new RestTemplate(); } }- 1
- 2
- 3
- 4
- 5
- 6
- 7
- 8
重启之后,再次测试,可以看到查询的服务端口发生变,将会交替出现(按照轮询算法进行交替出现)
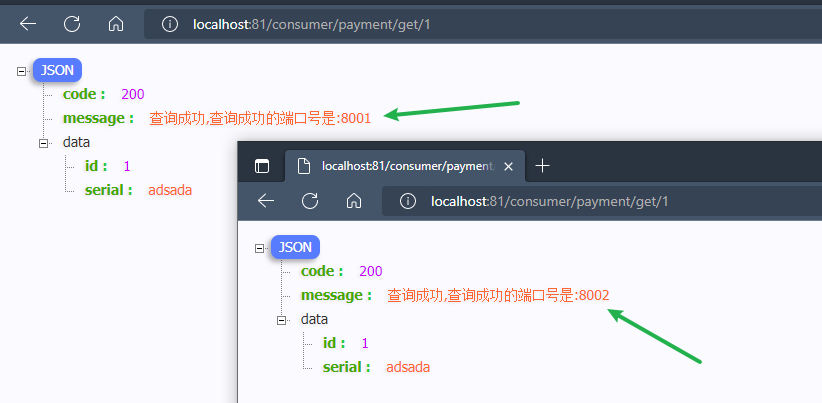
目前已经具备了负载均衡的能力了
12 actuator微服务信息完善
12.1 主机名称:服务名称修改
在8001和8002加上这个
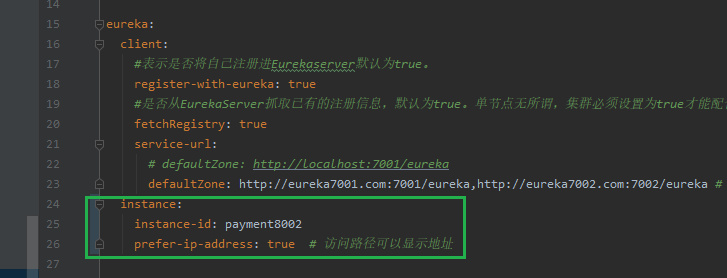
重启之后就会发现,经过右边箭头的时候,可以在左下角可以看到ip地址的显示
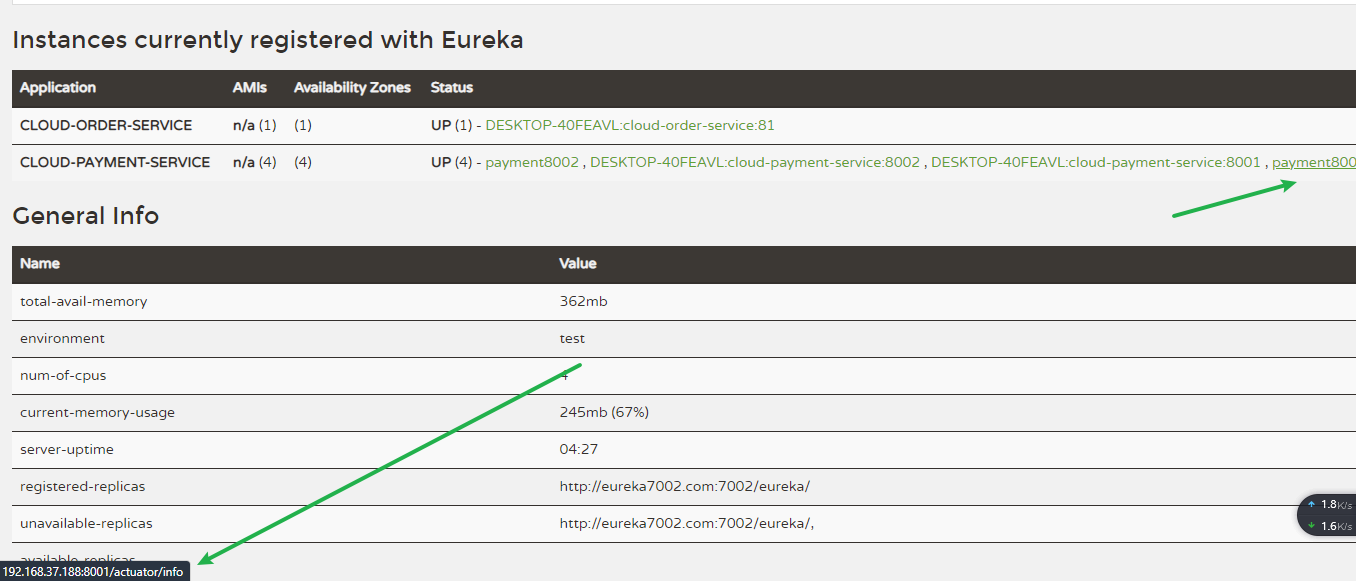
12.2 访问信息有ip信息提示
并且要保证在pom文件中添加了下面,由于一开始就添加了,所以现在不需要再添加了
<dependency> <groupId>org.springframework.bootgroupId> <artifactId>spring-boot-starter-webartifactId> dependency> <dependency> <groupId>org.springframework.bootgroupId> <artifactId>spring-boot-starter-actuatorartifactId> dependency>- 1
- 2
- 3
- 4
- 5
- 6
- 7
- 8
13 服务发现Discovery
对于注册进eureka里面的微服务,可以通过服务发现来获得该服务的信息
修改cloud-provider-payment8001的Controller
增加的代码如下
... @Resource private DiscoveryClient discoveryClient; ... @GetMapping(value = "/payment/discovery") public Object discovery(){ List<String> services = discoveryClient.getServices(); //得到服务清单列表 for (String element:services){ log.info("****element:"+element); } // 获取一个微服务下面的所有的实例 List<ServiceInstance> instances = discoveryClient.getInstances("CLOUD-PAYMENT-SERVICE"); for (ServiceInstance instance:instances){ log.info(instance.getServiceId()+"\t"+instance.getHost()+"\t"+instance.getUri()); } return this.discoveryClient; }- 1
- 2
- 3
- 4
- 5
- 6
- 7
- 8
- 9
- 10
- 11
- 12
- 13
- 14
- 15
- 16
- 17
- 18
- 19
- 20
- 21
- 22
主启动类加入新的注解
... @EnableDiscoveryClient //新加的 public class PaymentMain8001 { public static void main(String[] args) { SpringApplication.run(PaymentMain8001.class,args); } }- 1
- 2
- 3
- 4
- 5
- 6
- 7
- 8
在浏览器中输入之后
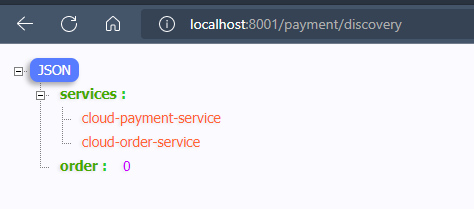
控制台的打印信息,可以得到微服务的各种信息

14 Eureka自我保护理论知识
概述
保护模式主要用于一组客户端和Eureka Server之间存在网络分区场景下的保护。
一旦进入保护模式,Eureka Server将会尝试保护其服务注册表中的信息,不再删除服务注册表中的数据,也就是不会注销任何微服务。
如果在Eureka Server的首页看到以下这段提示,则说明Eureka进入了保护模式:
EMERGENCY! EUREKA MAY BE INCORRECTLY CLAIMING INSTANCES ARE UP WHEN THEY’RE NOT. RENEWALS ARE LESSER THANTHRESHOLD AND HENCE THE INSTANCES ARE NOT BEING EXPIRED JUSTTO BE SAFE- 1
导致原因
一句话:某时刻某一个微服务不可用了,Eureka不会立刻清理,依旧会对该微服务的信息进行保存。
属于CAP里面的AP分支。
为什么会产生Eureka自我保护机制?
为了EurekaClient可以正常运行,防止与EurekaServer网络不通情况下,EurekaServer不会立刻将EurekaClient服务剔除
什么是自我保护模式?
默认情况下,如果EurekaServer在一定时间内没有接收到某个微服务实例的心跳,EurekaServer将会注销该实例(默认90秒)。但是当网络分区故障发生(延时、卡顿、拥挤)时,微服务与EurekaServer之间无法正常通信,以上行为可能变得非常危险了——因为微服务本身其实是健康的,此时本不应该注销这个微服务。Eureka通过“自我保护模式”来解决这个问题——当EurekaServer节点在短时间内丢失过多客户端时(可能发生了网络分区故障),那么这个节点就会进入自我保护模式。

自我保护机制∶默认情况下EurekaClient定时向EurekaServer端发送心跳包
如果Eureka在server端在一定时间内(默认90秒)没有收到EurekaClient发送心跳包,便会直接从服务注册列表中剔除该服务,但是在短时间( 90秒中)内丢失了大量的服务实例心跳,这时候Eurekaserver会开启自我保护机制,不会剔除该服务(该现象可能出现在如果网络不通但是EurekaClient为出现宕机,此时如果换做别的注册中心如果一定时间内没有收到心跳会将剔除该服务,这样就出现了严重失误,因为客户端还能正常发送心跳,只是网络延迟问题,而保护机制是为了解决此问题而产生的)。
注意:在自我保护模式中,Eureka Server会保护服务注册表中的信息,不再注销任何服务实例。
它的设计哲学就是宁可保留错误的服务注册信息,也不盲目注销任何可能健康的服务实例。一句话讲解:好死不如赖活着。
综上,自我保护模式是一种应对网络异常的安全保护措施。它的架构哲学是宁可同时保留所有微服务(健康的微服务和不健康的微服务都会保留)也不盲目注销任何健康的微服务。使用自我保护模式,可以让Eureka集群更加的健壮、稳定。
15 怎么禁止自我保护
在eurekaServer端7001处设置关闭自我保护机制
出厂默认,自我保护机制是开启的
使用
eureka.server.enable-self-preservation = false可以禁用自我保护模式eureka: ... server: #关闭自我保护机制,保证不可用服务被及时踢除 enable-self-preservation: false eviction-interval-timer-in-ms: 2000- 1
- 2
- 3
- 4
- 5
- 6
- 7
关闭效果:
spring-eureka主页会显示出一句:THE SELF PRESERVATION MODE IS TURNED OFF. THIS MAY NOT PROTECT INSTANCE EXPIRY IN CASE OF NETWORK/OTHER PROBLEMS.- 1
- 生产者客户端eureakeClient端8001
默认:
eureka.instance.lease-renewal-interval-in-seconds=30 eureka.instance.lease-expiration-duration-in-seconds=90- 1
- 2
eureka: ... instance: instance-id: payment8001 prefer-ip-address: true #心跳检测与续约时间 #开发时没置小些,保证服务关闭后注册中心能即使剔除服务 #Eureka客户端向服务端发送心跳的时间间隔,单位为秒(默认是30秒) lease-renewal-interval-in-seconds: 1 #Eureka服务端在收到最后一次心跳后等待时间上限,单位为秒(默认是90秒),超时将剔除服务 lease-expiration-duration-in-seconds: 2- 1
- 2
- 3
- 4
- 5
- 6
- 7
- 8
- 9
- 10
- 11
- 测试
- 7001和8001都配置完成
- 先启动7001再启动8001
结果:先关闭8001,马上被删除了
15.1 Eureka停更说明
https://github.com/Netflix/eureka/wiki
Eureka 2.0 (Discontinued) The existing open source work on eureka 2.0 is discontinued. The code base and artifacts that were released as part of the existing repository of work on the 2.x branch is considered use at your own risk. Eureka 1.x is a core part of Netflix’s service discovery system and is still an active project.- 1
- 2
- 3
- 4
- 5
- 6
因此,现在使用Zookeeper代替掉Eureka功能
nds=90
```yml eureka: ... instance: instance-id: payment8001 prefer-ip-address: true #心跳检测与续约时间 #开发时没置小些,保证服务关闭后注册中心能即使剔除服务 #Eureka客户端向服务端发送心跳的时间间隔,单位为秒(默认是30秒) lease-renewal-interval-in-seconds: 1 #Eureka服务端在收到最后一次心跳后等待时间上限,单位为秒(默认是90秒),超时将剔除服务 lease-expiration-duration-in-seconds: 2- 1
- 2
- 3
- 4
- 5
- 6
- 7
- 8
- 9
- 10
- 11
- 12
- 测试
- 7001和8001都配置完成
- 先启动7001再启动8001
结果:先关闭8001,马上被删除了
-
相关阅读:
整个表单设置disable禁用,单独某个功能设置不禁用
vue里使用elementui的级联选择器el-cascader进行懒加载的怎么实现数据回显?
【Jmeter+Influxdb+Grafana性能监控平台安装与部署】
【编程不良人】SpringSecurity实战学习笔记04---RememberMe
Java23种设计模式-创建型模式之单例模式
网络安全-ACL应用
【软件设计模式之适配器模式】
从刘维尔方程到Velocity-Verlet算法
Java面试问题记录
棒球特色校园教学方案·棒球1号位
- 原文地址:https://blog.csdn.net/weixin_47994845/article/details/126943546
