-
c语言系统编程十三:Linux线程间的同步与互斥
Linux线程间的同步与互斥
一 同步与互斥概述
多任务操作系统中会遇到两个问题: 1. 多个任务需要访问/使用同一资源。 2. 多个任务之间有依赖关系,某个任务任务的运行依赖于另一个任务。 同步和互斥就是用于解决这两个问题的。 互斥:同一时间,只能一个任务(进程或线程)执行,谁先运行不确定。 同步:同一时间,只能一个任务(进程或线程)执行,有顺序的执行。 同步是特殊的互斥。- 1
- 2
- 3
- 4
- 5
- 6
- 7
二 互斥锁(用于线程间的互斥)
2.1 互斥锁概述
用于线程的互斥。 互斥锁是一种简单的加锁的方式来控制对共享资源的访问,互斥锁只有两种状态:加锁(lock)和解锁(unlock)- 1
- 2
2.2 互斥锁的操作流程
1. 在访问共享资源临界区域前,对互斥锁进行加锁; 2. 在访问完成后释放互斥锁上的锁(解锁); 3. 对互斥锁进行加锁后,任何其他试图再次对互斥锁加锁的线程都会被阻塞,直到锁被释放。- 1
- 2
- 3
2.3 互斥锁操作函数
2.3.1 初始化互斥锁函数 pthread_mutex_init
#includeint pthread_mutex_init(pthread_mutex_t *mutex,const pthread_mutex_attr_t *attr); - 1
- 2
功能:初始化一个互斥锁。 参数: mutex:互斥锁地址。类似pthread_mutex_t attr: 设置互斥锁的属性,通常可采用默认属性,即可将attr设为NULL。可以使用宏PTHREAD_MUTEX_INITIALIZER静态初始化互斥锁,比如:pthread_mutex_t mutex = PTHREAD_MUTEX_INITIALIZER;这种方法等价于使用NULL指定的attr参数调用pthread_mutex_init()来完成动态初始化,不同之处在于PTHREAD_MUTEX_INITIALIZER宏不进行错误检查。 返回值: 成功:0,成功申请的锁默认是打开的。 失败:非0错误码- 1
- 2
- 3
- 4
- 5
- 6
- 7
- 8
2.3.2 销毁互斥锁函数 pthread_mutex_destroy
#includeint pthread_mutex_destroy(pthread_mutex_t *mutex); - 1
- 2
功能:销毁指定的一个互斥锁。互斥锁使用完毕后必须要是否资源 参数: mutex:互斥锁地址 返回值: 成功:0 失败:非0错误码- 1
- 2
- 3
- 4
- 5
- 6
2.3.3 申请上锁函数 pthread_mutex_lock
#includeint pthread_mutex_lock(pthread_mutex_t *mutex); - 1
- 2
功能:对互斥锁上锁,如果互斥锁已经上锁,则调用者阻塞,直到互斥锁解锁后再上锁。 参数: mutex:互斥锁地址 返回值: 成功:0 失败:非0错误码- 1
- 2
- 3
- 4
- 5
- 6
2.3.4 试着申请上锁函数 pthread_mutex_trylock
#includeint pthread_mutex_trylock(pthread_mutex_t *mutex); - 1
- 2
功能:对互斥锁上锁,如果互斥锁未上锁,则上锁,返回0; 如果互斥锁已经上锁,则函数直接返回失败,即EBUSY- 1
- 2
- 3
2.3.5 解锁函数 pthread_mutex_unlock
#includeint pthread_mutex_unlock(pthread_mutex_t *mutex); - 1
- 2
功能:对指定的互斥锁解锁 参数: mutex:互斥锁地址 返回值: 成功:0 失败:非0错误码- 1
- 2
- 3
- 4
- 5
- 6
2.4 互斥锁实例
2.4.1 没有互斥锁,多任务运行混乱
#include#include #include void *deal_fun01(void *arg) { char *str = (char *)arg; int i = 0; while(str[i] != '\0') { printf("%c", str[i++]); fflush(stdout); sleep(1); } return NULL; } void *deal_fun02(void *arg) { char *str = (char *)arg; int i = 0; while(str[i] != '\0') { printf("%c", str[i++]); fflush(stdout); sleep(1); } return NULL; } int main(int argc, char * kwargs[]) { pthread_t tid1, tid2; pthread_create(&tid1, NULL, deal_fun01, "hello"); pthread_create(&tid2, NULL, deal_fun02, "12345"); pthread_join(tid1, NULL); pthread_join(tid2, NULL); return 0; } - 1
- 2
- 3
- 4
- 5
- 6
- 7
- 8
- 9
- 10
- 11
- 12
- 13
- 14
- 15
- 16
- 17
- 18
- 19
- 20
- 21
- 22
- 23
- 24
- 25
- 26
- 27
- 28
- 29
- 30
- 31
- 32
- 33
- 34
- 35
- 36
- 37

2.4.2 加了互斥锁,多任务有序,一个运行完另一个再运行
#include#include #include //定义一把锁 pthread_mutex_t mutex; void *deal_fun01(void *arg) { char *str = (char *)arg; int i = 0; //上锁 pthread_mutex_lock(&mutex); while(str[i] != '\0') { printf("%c", str[i++]); fflush(stdout); sleep(1); } //解锁 pthread_mutex_unlock(&mutex); return NULL; } void *deal_fun02(void *arg) { char *str = (char *)arg; int i = 0; //上锁 pthread_mutex_lock(&mutex); while(str[i] != '\0') { printf("%c", str[i++]); fflush(stdout); sleep(1); } //解锁 pthread_mutex_unlock(&mutex); return NULL; } int main(int argc, char * kwargs[]) { //初始化这把锁 pthread_mutex_init(&mutex, NULL); pthread_t tid1, tid2; pthread_create(&tid1, NULL, deal_fun01, "hello"); pthread_create(&tid2, NULL, deal_fun02, "12345"); pthread_join(tid1, NULL); pthread_join(tid2, NULL); //销毁锁 pthread_mutex_destroy(&mutex); return 0; } - 1
- 2
- 3
- 4
- 5
- 6
- 7
- 8
- 9
- 10
- 11
- 12
- 13
- 14
- 15
- 16
- 17
- 18
- 19
- 20
- 21
- 22
- 23
- 24
- 25
- 26
- 27
- 28
- 29
- 30
- 31
- 32
- 33
- 34
- 35
- 36
- 37
- 38
- 39
- 40
- 41
- 42
- 43
- 44
- 45
- 46
- 47
- 48
- 49
- 50
- 51
- 52
- 53
- 54

三 死锁
3.1 死锁的形成
互斥条件中一个线程已经保持了至少一个资源,但是资源没释放前又要请求另外一个资源,而这个资源正在被另一个线程占用,导致自己占用的资源没有释放,必然存在一个循环链- 1
3.2 出现死锁的情况
3.2.1 情况一:上完锁,未解锁

解决办法:确保上锁和解锁一一对应
3.2.2 情况二:多把锁的上锁顺序问题,导致死锁
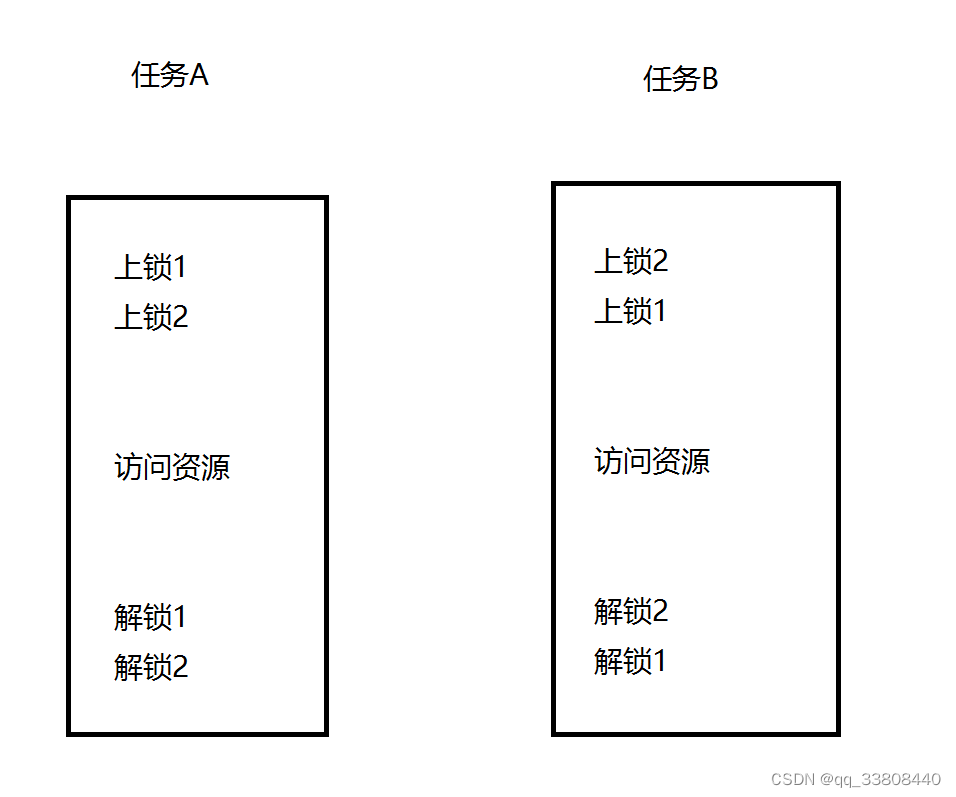
解决办法:规定好上锁和解锁的顺序3.2.3 情况三:任务中的阻塞导致无法解锁形成死锁
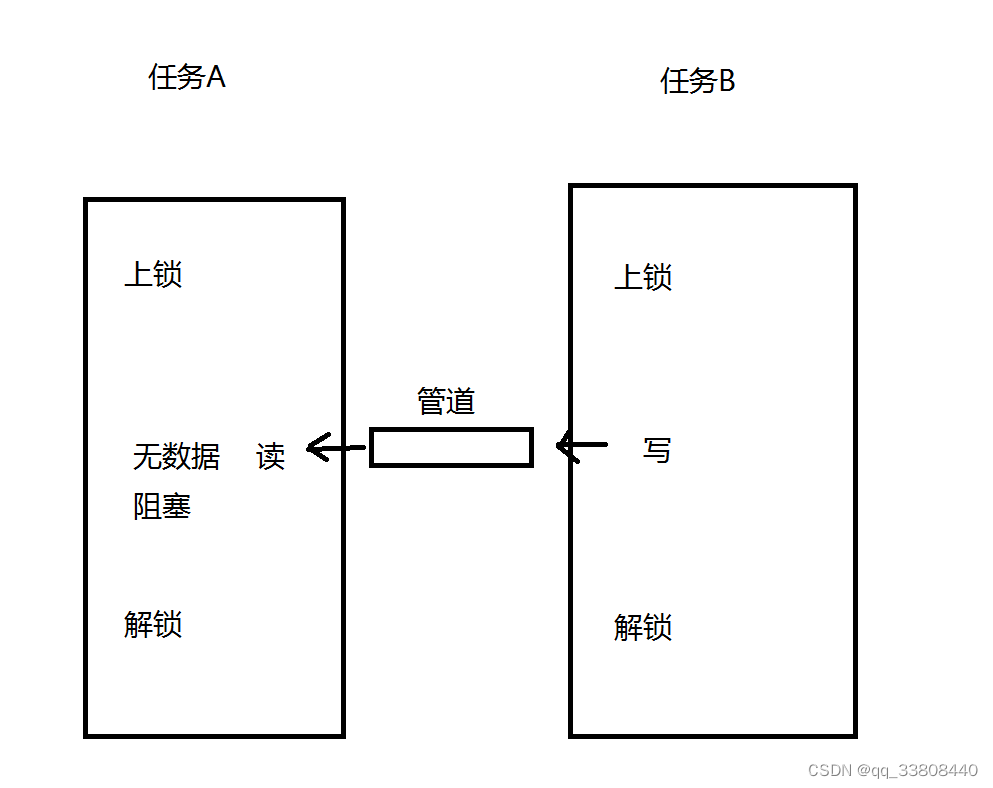
解决办法:修改任务为非阻塞四 读写锁(用于线程间的互斥)
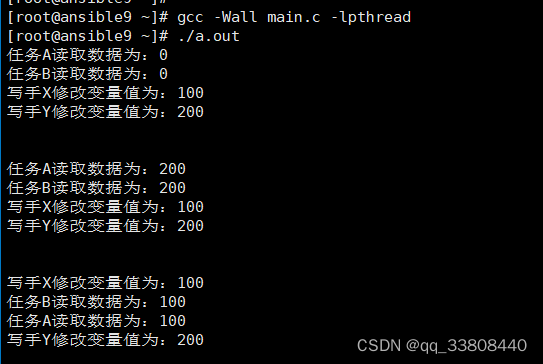
读写锁是为了满足允许多个读,但只允许一个写入的需求,线程提供了读写锁来实现; 读写锁分为读锁和写锁;- 1
- 2
4.1 读写锁的特点
1. 如果有其他线程读数据,则允许其他线程执行读操作,但不允许写操作 2. 如果有其他线程写数据,则其他线程都不允许读和写操作- 1
- 2
4.2 读写锁相关函数
4.2.1 初始化读写锁函数 pthread_rwlock_init
#includeint pthread_rwlock_init(pthread_rwlock_t *rwlock, const pthread_rwlock_attr_t *attr); - 1
- 2
功能:用来初始化rwlock锁指向的读写锁 参数: rwlock:指向要初始化的读写锁指针 attr:读写锁的属性指针。如果attr为NULL则会使用默认的属性初始化读写锁,否则使用指定的attr初始化读写锁。可以使用宏PTHREAD_RWLOCK_INITIALIZER静态初始化读写锁,比如:pthread_rwlock_t my_rwlock = PTHREAD_RWLOCK_INITIALIZER;这种方法等价于使用NULL指定的attr参数调用pthread_rwlock_init()来完成动态初始化,不同之处在于PTHREAD_RWLOCK_INITIALIZER宏不进行错误检查。 返回值: 成功:0, 读写锁的状态将成为已初始化和已解锁 失败:非0错误码- 1
- 2
- 3
- 4
- 5
- 6
- 7
- 8
4.2.2 释放读写锁函数 pthread_rwlock_destroy
#includeint pthread_rwlock_destroy(pthread_rwlock_t *rwlock); - 1
- 2
功能:用于销毁一个读写锁,并释放所有相关的资源 参数: rwlock:读写锁指针 返回值: 成功:0 失败:非0错误码- 1
- 2
- 3
- 4
- 5
- 6
- 7
4.2.3 申请读锁函数 pthread_rwlock_rdlock
#includeint pthread_rwlock_rdlock(pthread_rwlock_t *rwlock); - 1
- 2
功能:以阻塞方式在读写锁上获取读锁(读锁定)。 如果没有写者持有该锁,并且没有写者阻塞在该锁上,则调用线程会获取读锁。 如果调用线程未获取读锁,则他将阻塞直到她获取了该锁,一个线程可以在一个读写锁上多次执行读锁定。 线程可以成功调用pthread_rwlock_rdlock()函数n次,但是之后该线程必须调用pthread_rwlock_unlock()函数n次才能解除锁定。 参数: rwlock:读写锁指针 返回值: 成功:0 失败:非0错误码- 1
- 2
- 3
- 4
- 5
- 6
- 7
- 8
- 9
- 10
- 11
4.2.4 尝试申请读锁函数 pthread_rwlock_tryrdlock
#includeint pthread_rwlock_tryrdlock(pthread_rwlock_t *rwlock); 用于尝试以非阻塞方式来在读写锁上获取读锁。 如果有任何写者持有该锁或有写者阻塞在该读写锁上,则立刻失败返回。 - 1
- 2
- 3
- 4
4.2.5 申请写锁函数 pthread_rwlock_wrlock
#includeint pthread_rwlock_wrlock(pthread_rwlock_t *rwlock); - 1
- 2
功能:以阻塞方式在读写锁上获取写锁(写锁定)。 如果没有写者持有该锁,并且没有读者写者阻塞在该锁上,则调用线程会获取写锁。 如果调用线程未获取写锁,则他将阻塞直到她获取了该锁。 参数: rwlock:读写锁指针 返回值: 成功:0 失败:非0错误码- 1
- 2
- 3
- 4
- 5
- 6
- 7
- 8
- 9
- 10
4.2.6 尝试申请写锁函数 pthread_rwlock_trywrlock
#includeint pthread_rwlock_trywrlock(pthread_rwlock_t *rwlock); 用于尝试以非阻塞方式来在读写锁上获取写锁; 如果有任何读者或写者持有该锁,则立刻失败返回 - 1
- 2
- 3
- 4
4.2.7 释放读写锁函数 pthread_rwlock_unlock
#includeint pthread_rwlock_unlock(pthread_rwlock_t *rwlock); - 1
- 2
功能:无论是读写还是写锁,都可以通过此函数解锁 参数: rwlock:读写锁指针 返回值: 成功:0 失败:非0错误码- 1
- 2
- 3
- 4
- 5
- 6
- 7
- 8
4.3 读写锁的代码实例
#include#include #include #include #include //创建一个读写锁 pthread_rwlock_t rwlock; void *read_data1(void *arg) { int *p = (int *)arg; while(1) { //申请读锁 pthread_rwlock_rdlock(&rwlock); printf("任务A读取数据为:%d\n",*p); //释放读写锁 pthread_rwlock_unlock(&rwlock); sleep(1); } } void *read_data2(void *arg) { int *p = (int *)arg; while(1) { //申请读锁 pthread_rwlock_rdlock(&rwlock); printf("任务B读取数据为:%d\n",*p); //释放读写锁 pthread_rwlock_unlock(&rwlock); sleep(1); } } void *write_data1(void *arg) { int *p = (int *)arg; while(1) { //申请写锁 pthread_rwlock_wrlock(&rwlock); *p = 100; printf("写手X修改变量值为:%d\n",*p); //释放读写锁 pthread_rwlock_unlock(&rwlock); sleep(1); } } void *write_data2(void *arg) { int *p = (int *)arg; while(1) { //申请写锁 pthread_rwlock_wrlock(&rwlock); *p = 200; printf("写手Y修改变量值为:%d\n",*p); //释放读写锁 pthread_rwlock_unlock(&rwlock); sleep(1); } } int main(int argn, char *args[]) { //初始化读写锁 int res = pthread_rwlock_init(&rwlock, NULL); if(res) exit(1); int a = 0; //创建2个读线程和2个写线程 pthread_t read1,read2,write1,write2; pthread_create(&read1, NULL, read_data1, &a); pthread_create(&read2, NULL, read_data2, &a); pthread_create(&write1, NULL, write_data1, &a); pthread_create(&write2, NULL, write_data2, &a); pthread_join(read1, NULL); pthread_join(read2, NULL); pthread_join(write1, NULL); pthread_join(write2, NULL); //释放读写锁 pthread_rwlock_destroy(&rwlock); return 0; } - 1
- 2
- 3
- 4
- 5
- 6
- 7
- 8
- 9
- 10
- 11
- 12
- 13
- 14
- 15
- 16
- 17
- 18
- 19
- 20
- 21
- 22
- 23
- 24
- 25
- 26
- 27
- 28
- 29
- 30
- 31
- 32
- 33
- 34
- 35
- 36
- 37
- 38
- 39
- 40
- 41
- 42
- 43
- 44
- 45
- 46
- 47
- 48
- 49
- 50
- 51
- 52
- 53
- 54
- 55
- 56
- 57
- 58
- 59
- 60
- 61
- 62
- 63
- 64
- 65
- 66
- 67
- 68
- 69
- 70
- 71
- 72
- 73
- 74
- 75
- 76
- 77
- 78
- 79
- 80
- 81
- 82
- 83
- 84
- 85
- 86
- 87
- 88
五 条件变量(用于线程间的互斥)
5.1 条件变量概述
与互斥锁不同,条件变量是用于等待而不是用来上锁的,条件变量本身不是锁。条件变量用来自己阻塞一个线程,直到某特殊情况发生为止。通常条件变量和互斥锁同时使用。条件变量的两个动作:条件不满,阻塞线程,当条件满足,通知阻塞的线程开始工作,条件变量的类型:pthread_cond_t。- 1
-
死锁

-
用条件变量解决死锁
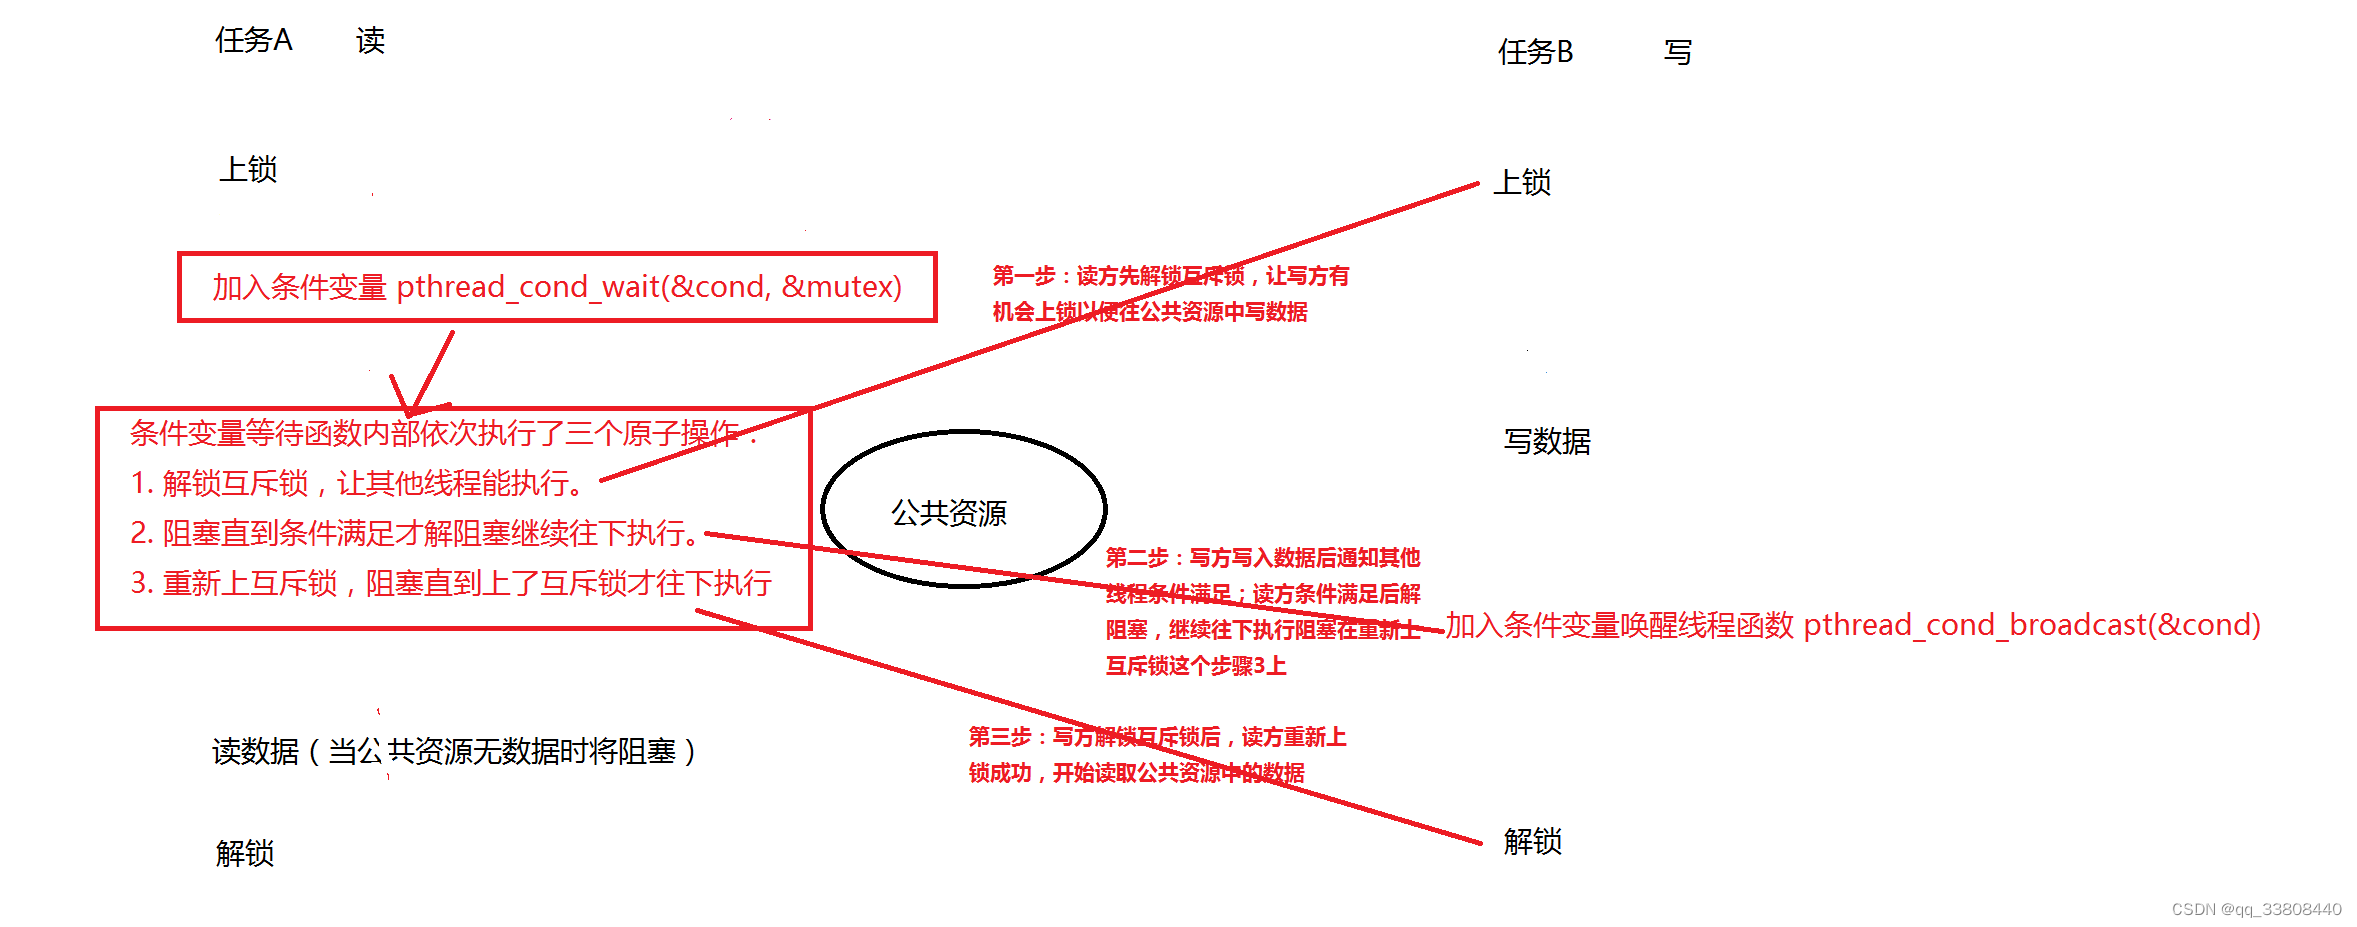
5.2 条件变量操作相关函数
5.2.1条件变量初始化函数 pthread_cond_init
需要的头文件和函数原型: #includeint pthread_cond_init(pthread_cond_t *cond, const pthread_condattr_t *attr); 功能:初始化一个条件变量 参数: cond:指向要初始化的条件变量指针。 attr:条件变量属性,通常为默认值,传NULL即可。 也可以使用静态初始化的方法,初始化条件变量:pthread_cond_t cond = PTHREAD_COND_INITIALIZER; 返回值: 成功:0 失败:非0错误号 - 1
- 2
- 3
- 4
- 5
- 6
- 7
- 8
- 9
- 10
- 11
- 12
- 13
- 14
5.2.2 条件变量释放函数 pthread_cond_destroy
需要的头文件和函数原型: #includeint pthread_cond_destroy(pthread_cond_t *cond); 功能:销毁一个条件变量 参数: cond:指向要销毁的条件变量 返回值: 成功:0 失败:非0错误号 - 1
- 2
- 3
- 4
- 5
- 6
- 7
- 8
- 9
- 10
- 11
- 12
5.2.3 等待条件函数 pthread_cond_wait
需要的头文件和函数原型: #includeint pthread_cond_wait(pthread_cond_t *cond, pthread_mutex_t *mutex); 功能:阻塞等待一个条件变量 a) 阻塞等待一个条件变量cond(参数1)满足 b) 先解锁相当于pthread_mutex_unlock(&mutex);再等待条件满足;再重新上锁(3步为原子操作) 参数: cond:指向要初始化的条件变量指针 mutex:互斥锁 返回值: 成功:0 失败:非0错误码 - 1
- 2
- 3
- 4
- 5
- 6
- 7
- 8
- 9
- 10
- 11
- 12
- 13
- 14
- 15
- 16
5.2.4 限时等待条件函数 pthread_cond_timewait
需要的头文件和函数原型: #includeint pthread_cond_timewait(pthread_cond_t *cond, pthread_mutex_t *mutex, const struct *abstime); 功能:限时等待一个条件变量 参数: cond:指向要初始化的条件变量指针 mutex:互斥锁 abstime:绝对时间 返回值: 成功:0 失败:非0错误码 - 1
- 2
- 3
- 4
- 5
- 6
- 7
- 8
- 9
- 10
- 11
- 12
- 13
- 14
- 15
5.2.5 唤醒等待在条件变量上的线程函数 pthread_cond_signal
需要的头文件和函数原型: #includeint pthread_cond_signal(pthread_cond_t *cond); 功能:唤醒至少一个阻塞在条件变量上的线程 参数: cond:指向要初始化的条件变量 返回值: 成功:0 失败:非0错误号 - 1
- 2
- 3
- 4
- 5
- 6
- 7
- 8
- 9
- 10
- 11
- 12
- 13
5.2.6 唤醒全部等待在条件变量上的线程函数 pthread_cond_broadcast
需要的头文件和函数原型: #includeint pthread_cond_broadcast(pthread_cond_t *cond); 功能:唤醒全部阻塞在条件变量上的线程,给阻塞在条件变量上的所有线程发送信号 参数: cond:指向要初始化的条件变量指针 返回值: 成功:0 失败:非0错误号 - 1
- 2
- 3
- 4
- 5
- 6
- 7
- 8
- 9
- 10
- 11
- 12
- 13
5.3 用条件变量实现生产者消费者模型
5.3.1 模型分析
- 互斥:同一时刻只能生产者或消费者中一个人进入仓库;
- 条件变量:如果仓库的产品数量为0,消费者不允许进入仓库购买;
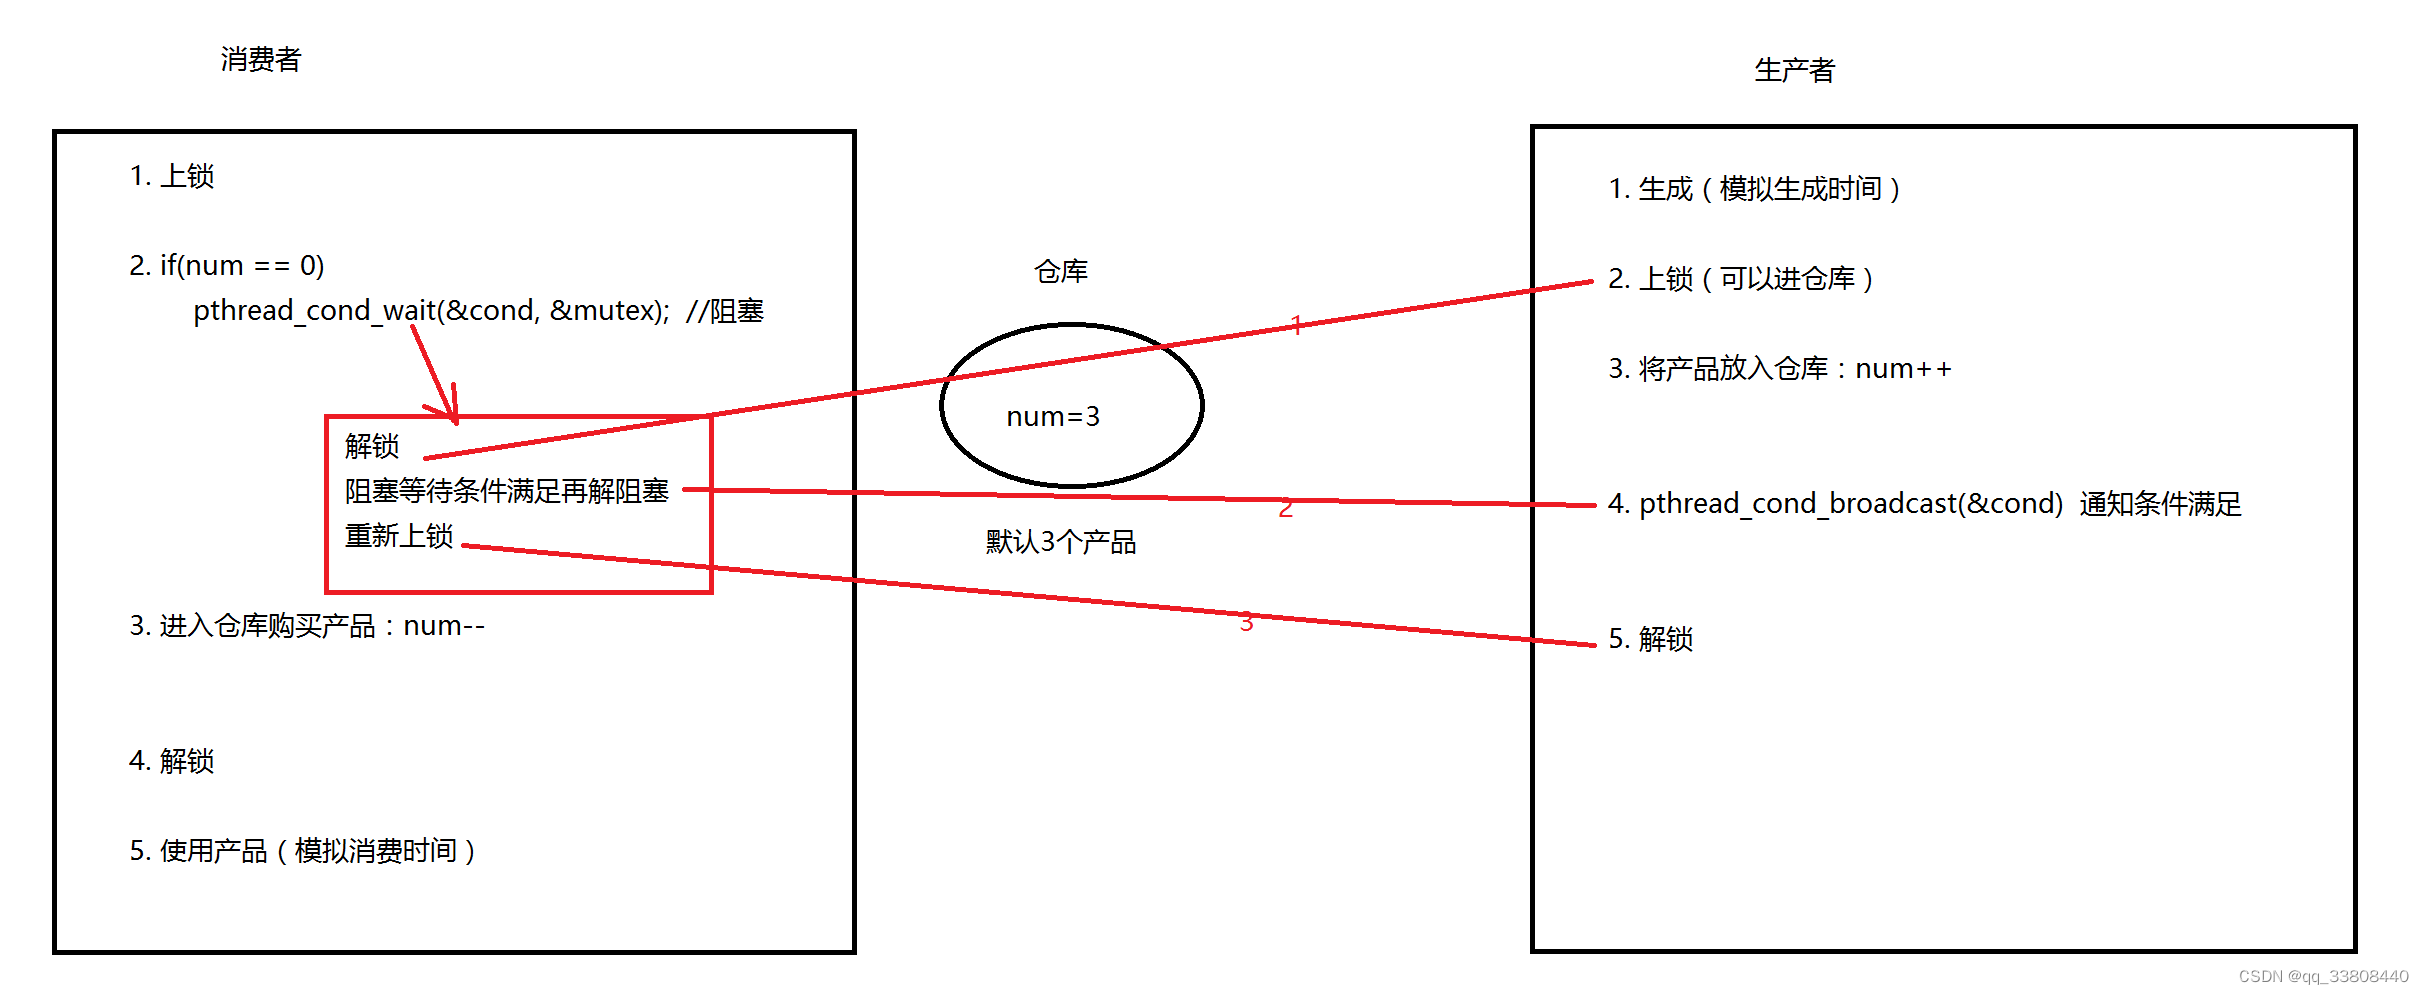
5.3.2 模型代码实现
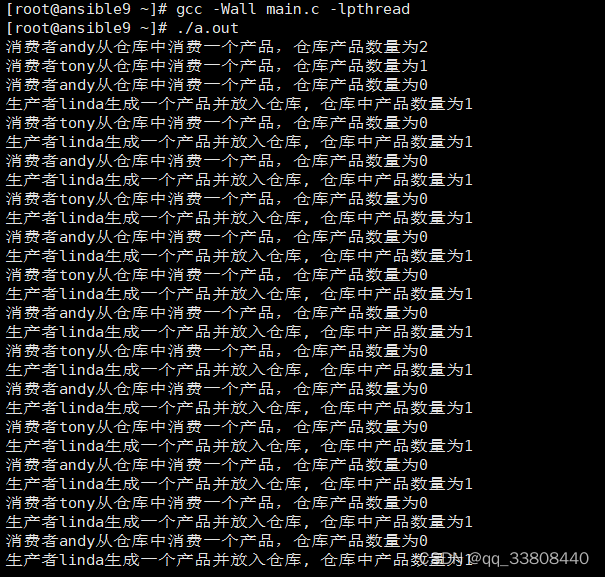
#include#include #include #include #include //创建一个互斥锁 pthread_mutex_t mutex; //创建一个条件变量 pthread_cond_t cond; //创建仓库资源 int num = 3; void *consumer(void * arg) { while(1) { //上锁 pthread_mutex_lock(&mutex); //如果仓库中没产品,则触发条件等待 if(num == 0) pthread_cond_wait(&cond, &mutex); //消费一个产品 num--; printf("消费者%s从仓库中消费一个产品,仓库产品数量为%d\n", (char *)arg, num); //解锁 pthread_mutex_unlock(&mutex); //消费产品时间 sleep(1); } } void *producer(void *arg) { while(1) { //生成产品时间 sleep(2); //上锁 pthread_mutex_lock(&mutex); //将产品放入仓库 num++; printf("生产者%s生成一个产品并放入仓库, 仓库中产品数量为%d\n", (char *)arg, num); //调整消费者,条件已经满足 pthread_cond_signal(&cond); //解锁 pthread_mutex_unlock(&mutex); } } int main(void) { //初始化互斥锁 pthread_mutex_init(&mutex, NULL); //初始化条件变量 pthread_cond_init(&cond, NULL); //创建2个消费者 pthread_t c1,c2; pthread_create(&c1, NULL, consumer,"andy"); pthread_create(&c2, NULL, consumer,"tony"); //创建1个生产者 pthread_t p1; pthread_create(&p1, NULL, producer,"linda"); pthread_join(c1,NULL); pthread_join(c2,NULL); pthread_join(p1,NULL); //销毁互斥锁 pthread_mutex_destroy(&mutex); //销毁条件变量 pthread_cond_destroy(&cond); return 0; } - 1
- 2
- 3
- 4
- 5
- 6
- 7
- 8
- 9
- 10
- 11
- 12
- 13
- 14
- 15
- 16
- 17
- 18
- 19
- 20
- 21
- 22
- 23
- 24
- 25
- 26
- 27
- 28
- 29
- 30
- 31
- 32
- 33
- 34
- 35
- 36
- 37
- 38
- 39
- 40
- 41
- 42
- 43
- 44
- 45
- 46
- 47
- 48
- 49
- 50
- 51
- 52
- 53
- 54
- 55
- 56
- 57
- 58
- 59
- 60
- 61
- 62
- 63
- 64
- 65
- 66
- 67
- 68
- 69
- 70
- 71
- 72
- 73
- 74
- 75
- 76
- 77
- 78
六 信号量(用于线程间的互斥,线程间的同步,进程间的互斥,进程间的同步)
6.1 信号量的概述
信号量广泛用于进程或线程间的同步和互斥,信号量本质上是一个非负的整数计数器,他被用来控制对公共资源的访问。编程时可根据操作信号量值的结果判断是否对公共资源具有访问权限,当信号量值大于0时,可以访问,否则将阻塞。PV原语是对信号量的操作,一次P操作使信号量减1,一次V操作使信号量加1。信号量主要用于进程或线程间的同步和互斥这两种典型情况。信号量数据类型为:sem_t。- 1
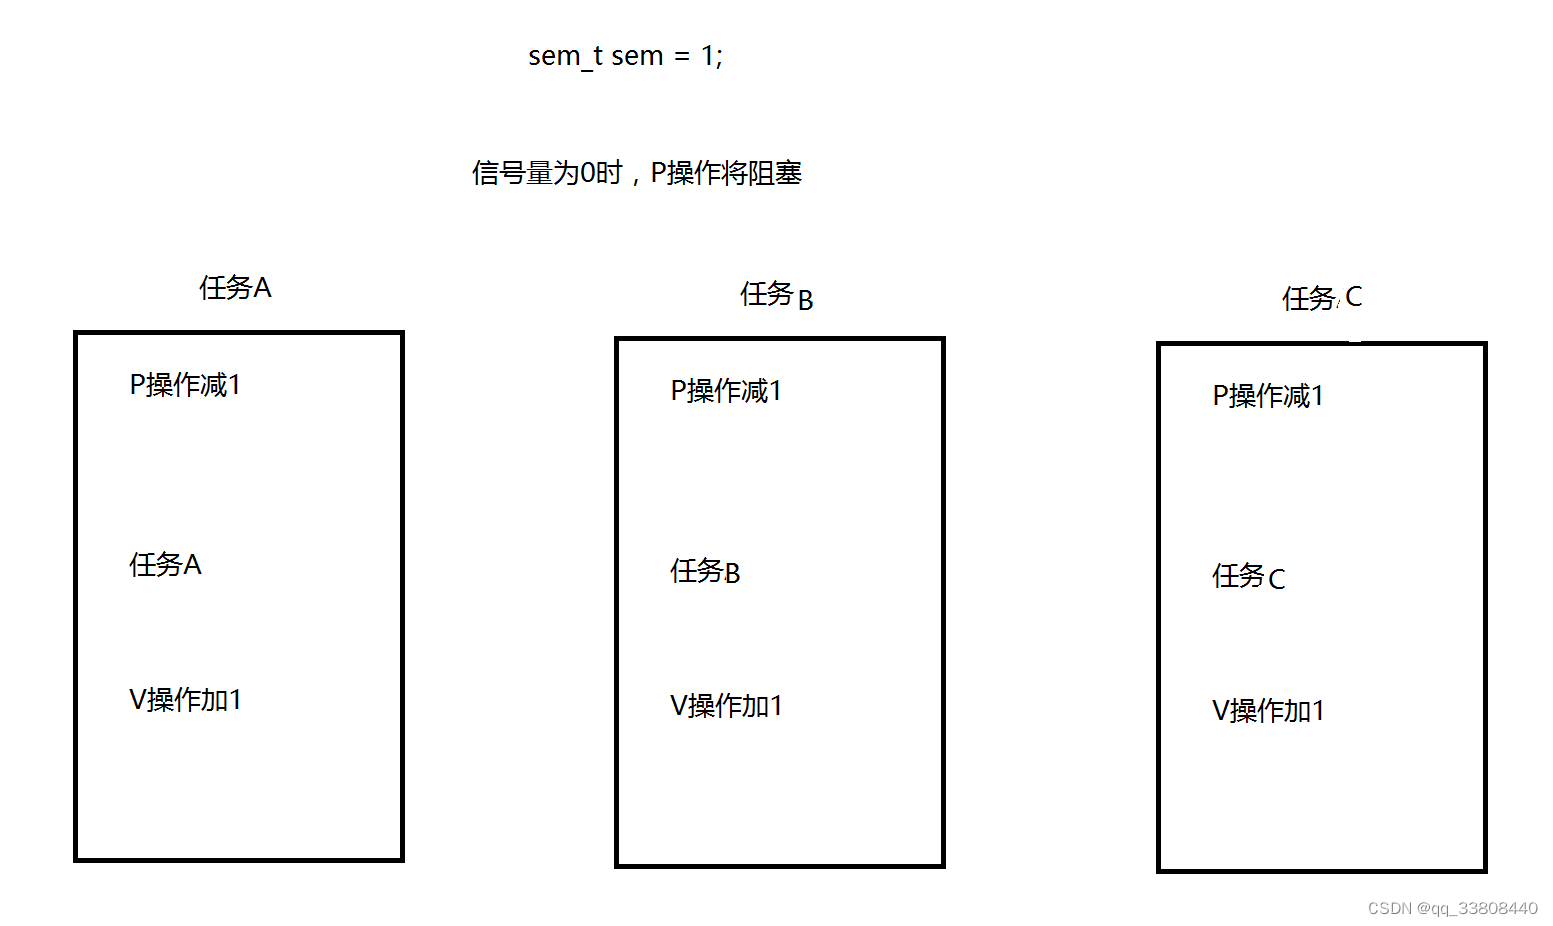
6.2 信号量用于互斥
无论有几个任务,只有一个信号量。最初时信号量为1。哪个任务P操作成功,哪个任务执行任务,其他任务由于信号量减为0了阻塞在P操作。等执行P操作的那个任务执行完任务再执行V操作把信号量加为1,其他任务就可以抢P操作了。- 1
6.3 信号量用于同步
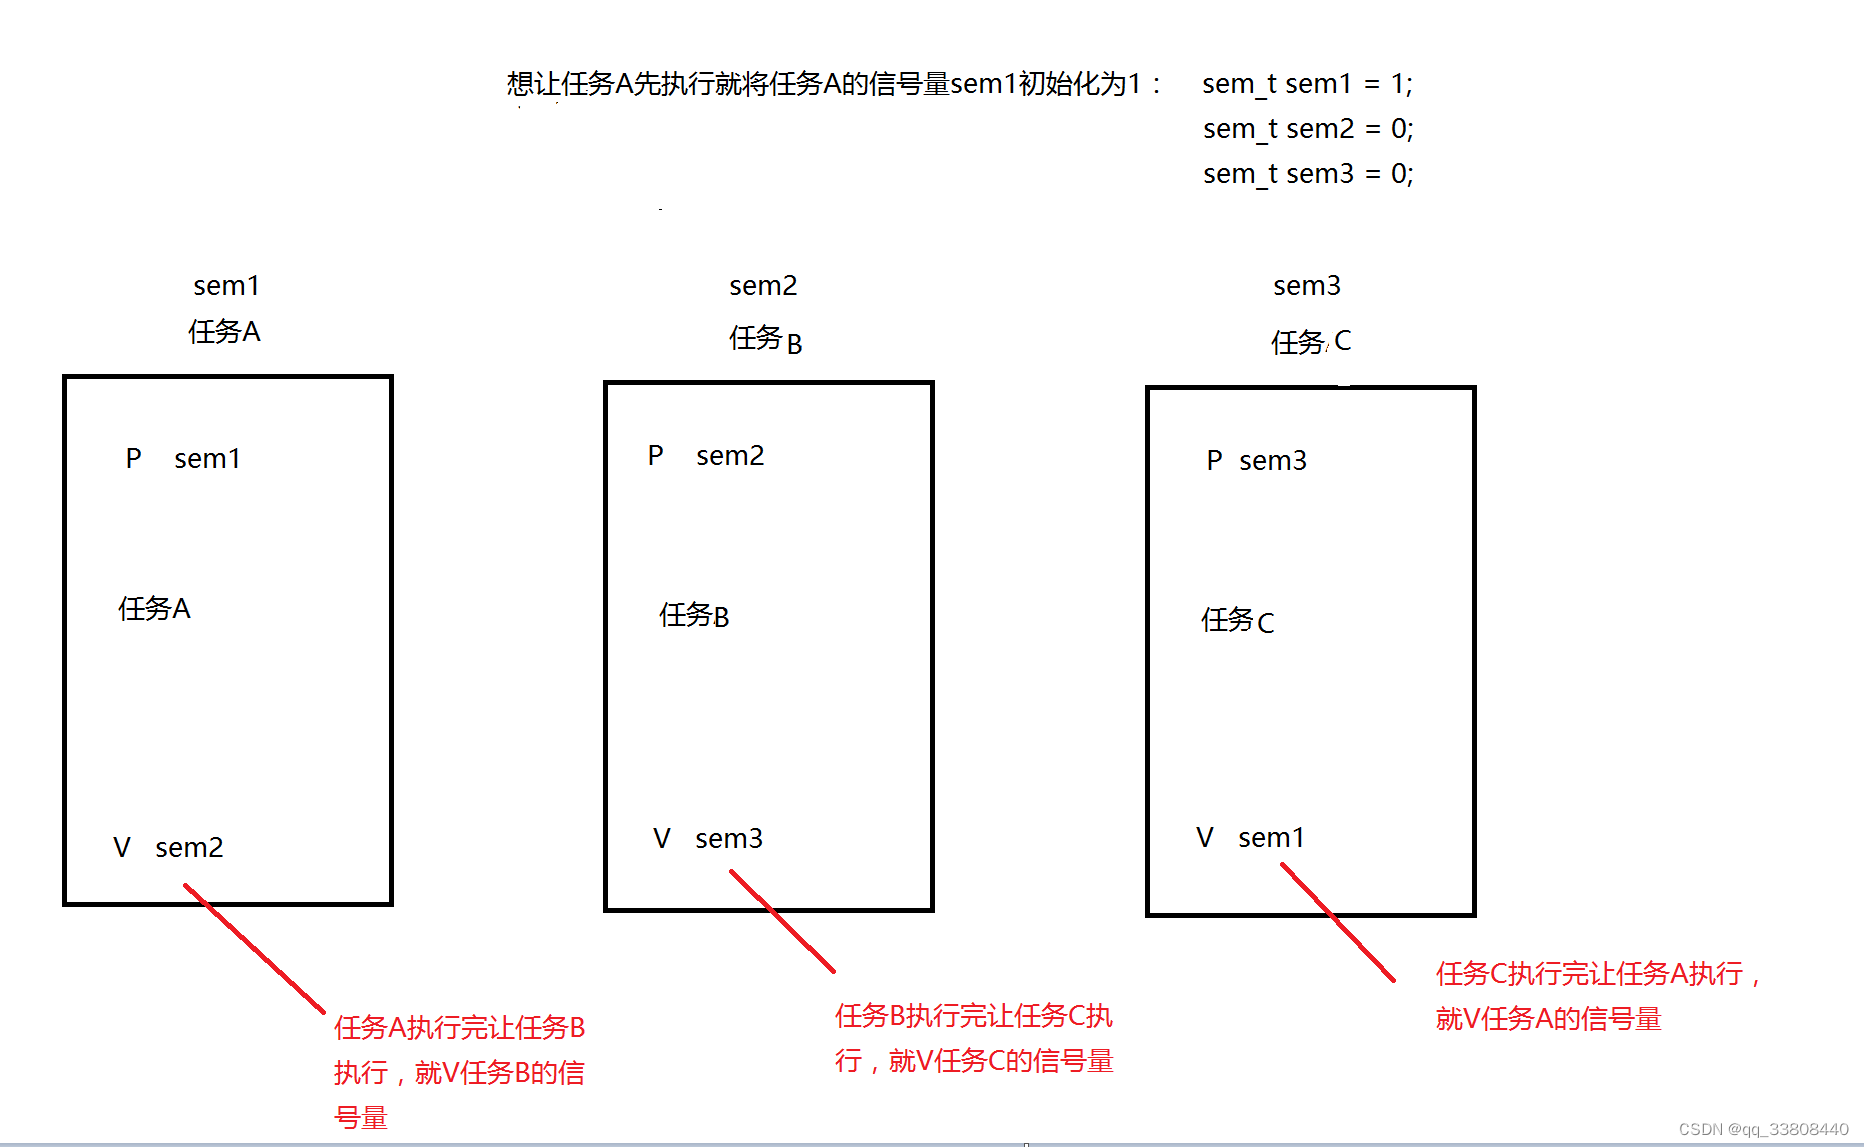
有多少个任务就需要多少个信号量。最先执行的任务对应的信号量为1,其他信号量全部为0。 每个任务先执行自己信号量的P操作,再执行自己的任务,任务执行完毕后再执行下一个任务的信号量的V操作。- 1
- 2
6.4 信号量相关的API函数
6.4.1 初始化信号量函数 sem_init
1. 使用的头文件和函数原型: #includeint sem_init(sem_t *sem, int pshared, unsigned int value); 2. 功能: 创建一个信号量并初始化他的值。一个无名信号量在被使用前必须先初始化。 3. 参数: sem: 信号量的地址 pshared:等于0,信号量在线程间共享(常用);不等于0,信号量在进程间共享。 4. 返回值: 成功:0 失败:-1 - 1
- 2
- 3
- 4
- 5
- 6
- 7
- 8
- 9
- 10
- 11
- 12
- 13
- 14
6.4.2 P操作(信号量减1)函数 sem_wait
1. 使用的头文件和函数原型: #includeint sem_wait(sem_t *sem); 2. 功能: 将信号量减1。如果信号量的值为0则阻塞;大于0则减1。 3. 参数: sem: 信号量的地址 4. 返回值: 成功:0 失败:-1 - 1
- 2
- 3
- 4
- 5
- 6
- 7
- 8
- 9
- 10
- 11
- 12
- 13
6.4.3 尝试P操作(尝试信号量减1)函数 sem_trywait
1. 使用的头文件和函数原型: #includeint sem_trywait(sem_t *sem); 2. 功能: 尝试将信号量减1。如果信号量的值为0不阻塞,立刻返回;大于0则减1。 3. 参数: sem: 信号量的地址 4. 返回值: 成功:0 失败:-1 - 1
- 2
- 3
- 4
- 5
- 6
- 7
- 8
- 9
- 10
- 11
- 12
- 13
6.4.4 V操作(信号量加1)函数 sem_post
1. 使用的头文件和函数原型: #includeint sem_post(sem_t *sem); 2. 功能: 将信号量加1。 3. 参数: sem: 信号量的地址 4. 返回值: 成功:0 失败:-1 - 1
- 2
- 3
- 4
- 5
- 6
- 7
- 8
- 9
- 10
- 11
- 12
- 13
6.4.5 销毁信号量函数 sem_destroy
1. 使用的头文件和函数原型: #includeint sem_destroy(sem_t *sem); 2. 功能: 销毁信号量。 3. 参数: sem: 信号量的地址 4. 返回值: 成功:0 失败:-1 - 1
- 2
- 3
- 4
- 5
- 6
- 7
- 8
- 9
- 10
- 11
- 12
- 13
6.5 信号量用于线程间互斥代码实例
#include#include #include #include #include #include //信号量用于线程间的互斥时,只用一个信号量 sem_t sem; //任务A void *task_a(void *arg) { char *str = (char *)arg; while(1) { sleep(0.1); int n = 0; //信号量sem的P操作 sem_wait(&sem); while(*(str+n) != '\0') { printf("%c", *(str+n)); fflush(stdout); n++; sleep(1); } //信号量sem的V操作 sem_post(&sem); } return NULL; } //任务B void *task_b(void *arg) { char *str = (char *)arg; while(1) { sleep(0.1); int n = 0; //信号量sem的P操作 sem_wait(&sem); while(*(str+n) != '\0') { printf("%c", *(str+n)); fflush(stdout); n++; sleep(1); } //信号量sem的V操作 sem_post(&sem); } return NULL; } //任务C void *task_c(void *arg) { char *str = (char *)arg; while(1) { sleep(0.1); int n = 0; //信号量sem的P操作 sem_wait(&sem); while(*(str+n) != '\0') { printf("%c", *(str+n)); fflush(stdout); n++; sleep(1); } //信号量sem的V操作 sem_post(&sem); } return NULL; } int main(void) { //初始化信号量sem。第一个0是指用于线程,第二个1是指将信号量初始化为1 sem_init(&sem, 0,1); //创建三个任务线程 pthread_t ta,tb,tc; pthread_create(&ta,NULL,task_a,"12345678"); pthread_create(&tb,NULL,task_b,"abcdefgh"); pthread_create(&tc,NULL,task_c,"ABCDEFGH"); pthread_join(ta,NULL); pthread_join(tb,NULL); pthread_join(tc,NULL); //销毁信号量 sem_destroy(&sem); return 0; } - 1
- 2
- 3
- 4
- 5
- 6
- 7
- 8
- 9
- 10
- 11
- 12
- 13
- 14
- 15
- 16
- 17
- 18
- 19
- 20
- 21
- 22
- 23
- 24
- 25
- 26
- 27
- 28
- 29
- 30
- 31
- 32
- 33
- 34
- 35
- 36
- 37
- 38
- 39
- 40
- 41
- 42
- 43
- 44
- 45
- 46
- 47
- 48
- 49
- 50
- 51
- 52
- 53
- 54
- 55
- 56
- 57
- 58
- 59
- 60
- 61
- 62
- 63
- 64
- 65
- 66
- 67
- 68
- 69
- 70
- 71
- 72
- 73
- 74
- 75
- 76
- 77
- 78
- 79
- 80
- 81
- 82
- 83
- 84
- 85
- 86
- 87
- 88
- 89
- 90
- 91
- 92
- 93
- 94
- 95
- 96

6.6 信号量用于线程间同步代码实例
#include#include #include #include #include #include //信号量用于线程间的同步时,几个任务就用几个信号量 sem_t sem_a, sem_b, sem_c; //任务A void *task_a(void *arg) { char *str = (char *)arg; while(1) { int n = 0; //对自己的信号量sem_a做P操作 sem_wait(&sem_a); while(*(str+n) != '\0') { printf("%c", *(str+n)); fflush(stdout); n++; sleep(1); } //想让哪个任务跟着执行就将哪个任务的信号量sem_b执行V操作 sem_post(&sem_b); } return NULL; } //任务B void *task_b(void *arg) { char *str = (char *)arg; while(1) { int n = 0; //对自己的信号量sem_b做P操作 sem_wait(&sem_b); while(*(str+n) != '\0') { printf("%c", *(str+n)); fflush(stdout); n++; sleep(1); } //想让哪个任务跟着执行就将哪个任务的信号量sem_c执行V操作 sem_post(&sem_c); } return NULL; } //任务C void *task_c(void *arg) { char *str = (char *)arg; while(1) { int n = 0; //对自己的信号量sem_c做P操作 sem_wait(&sem_c); while(*(str+n) != '\0') { printf("%c", *(str+n)); fflush(stdout); n++; sleep(1); } //想让哪个任务跟着执行就将哪个任务的信号量sem_a执行V操作 sem_post(&sem_a); } return NULL; } int main(void) { //初始化信号量sem。想让哪个任务最先执行就将哪个任务的信号量初始化为1,其他任务的信号量都初始化为0 sem_init(&sem_a, 0,1); sem_init(&sem_b, 0,0); sem_init(&sem_c, 0,0); //创建三个任务线程 pthread_t ta,tb,tc; pthread_create(&ta,NULL,task_a,"i am task A"); pthread_create(&tb,NULL,task_b,"i am task B"); pthread_create(&tc,NULL,task_c,"i am task C"); pthread_join(ta,NULL); pthread_join(tb,NULL); pthread_join(tc,NULL); //销毁信号量 sem_destroy(&sem_a); sem_destroy(&sem_b); sem_destroy(&sem_c); return 0; } - 1
- 2
- 3
- 4
- 5
- 6
- 7
- 8
- 9
- 10
- 11
- 12
- 13
- 14
- 15
- 16
- 17
- 18
- 19
- 20
- 21
- 22
- 23
- 24
- 25
- 26
- 27
- 28
- 29
- 30
- 31
- 32
- 33
- 34
- 35
- 36
- 37
- 38
- 39
- 40
- 41
- 42
- 43
- 44
- 45
- 46
- 47
- 48
- 49
- 50
- 51
- 52
- 53
- 54
- 55
- 56
- 57
- 58
- 59
- 60
- 61
- 62
- 63
- 64
- 65
- 66
- 67
- 68
- 69
- 70
- 71
- 72
- 73
- 74
- 75
- 76
- 77
- 78
- 79
- 80
- 81
- 82
- 83
- 84
- 85
- 86
- 87
- 88
- 89
- 90
- 91
- 92
- 93
- 94
- 95
- 96
- 97

-
相关阅读:
Javascript 中的堆、栈、引用和值指南
FreeRTOS学习笔记-事件组
信息科技如何做好风险管理
Springboot 引入第三方jar包,并打包运行
我们会把 OTA 页的权重设置得更高。
UDS入门至精通系列Service 3D
数据结构·栈与队列介绍与实现
MacOS 上安装和管理 Node.js
高并发项目-分布式Session解决方案
可视化工具Visdom的使用
- 原文地址:https://blog.csdn.net/qq_33808440/article/details/126730013
