-
基于MSCNN算法的python编程实现的人群密度检测系统
目录
饭堂人群密度检测 4
一、选题背景 4
二、方案论证(设计理念) 4
1、硬件摄像 4
1.1 方案 1 5
1.2 方案 2 5
1.3 方案优劣选择 5
2、网页终端 5
2.1设计原理 5
2.2方案选择 5
2.3实现的功能 6
2.4系统的安全性 6
2.5数据的完整性 6
2.6应用的运行环境 7
2.7性能 7
3、核心算法 7
3.1设计要求 7
3.2手动提取特征回归人数 7
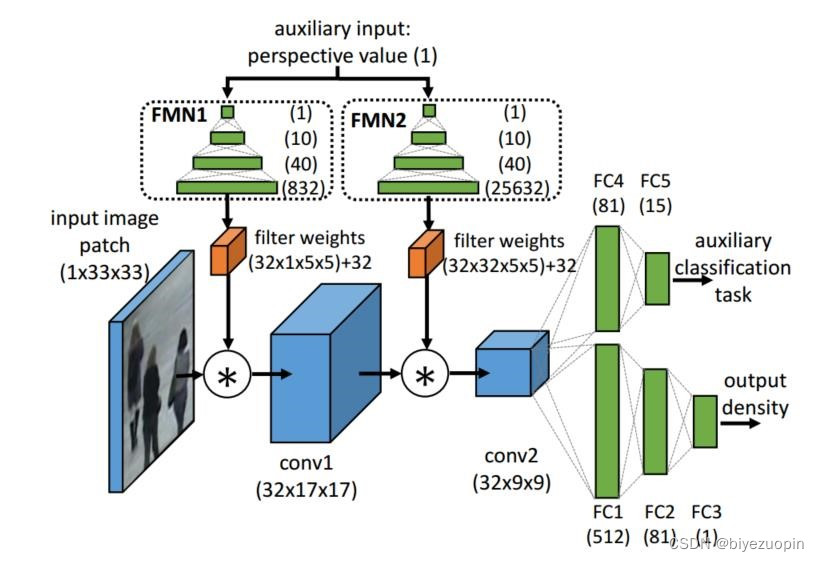
3.3深度卷积神经网络 8
三、过程论述 10
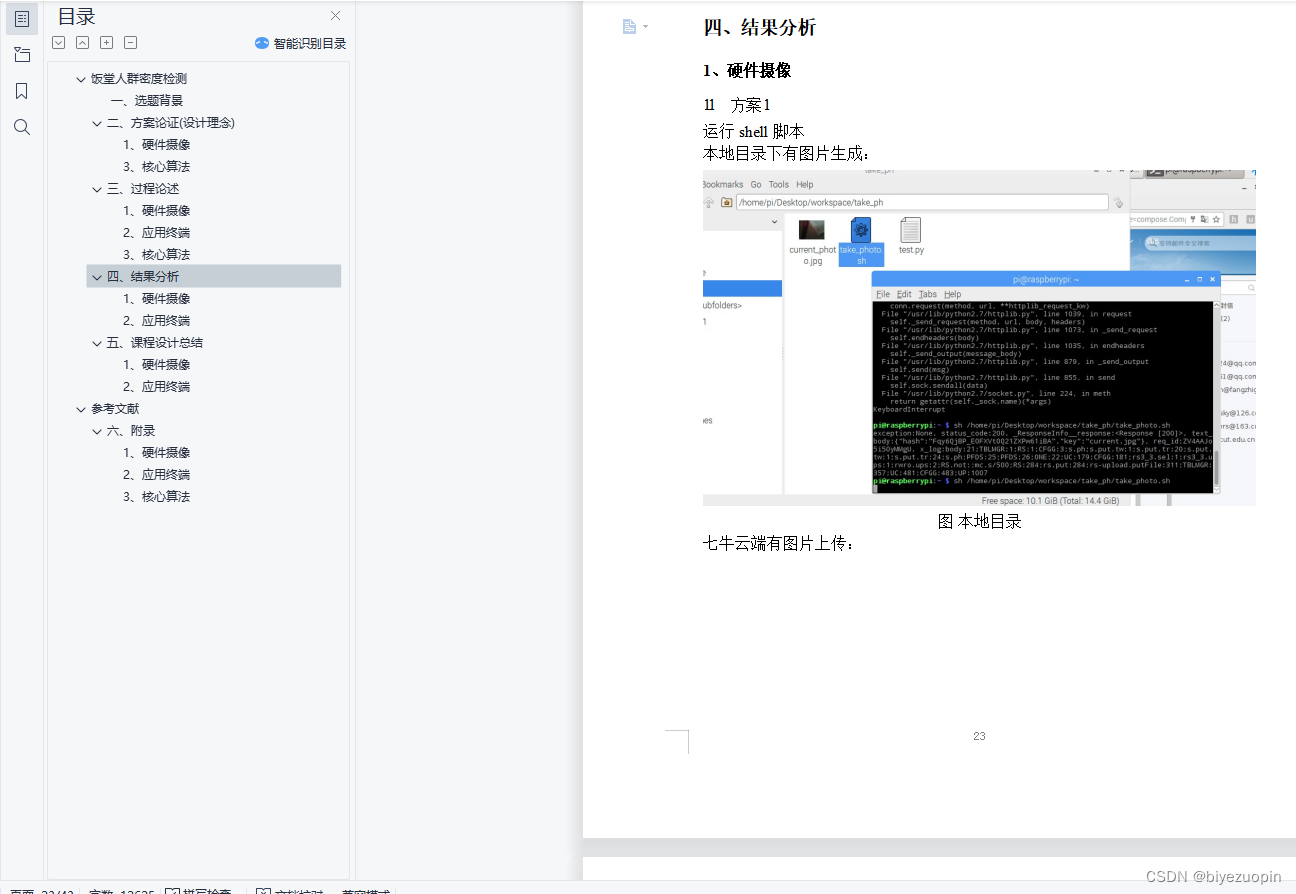
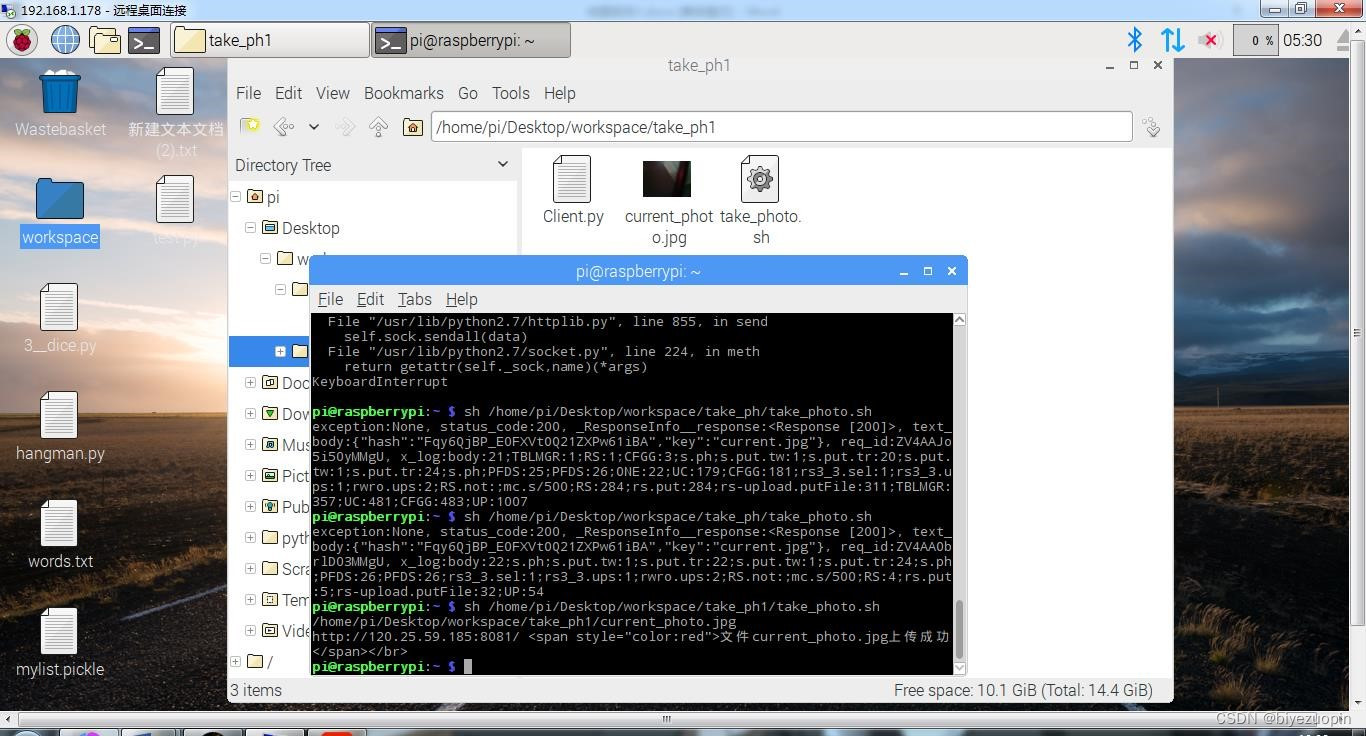
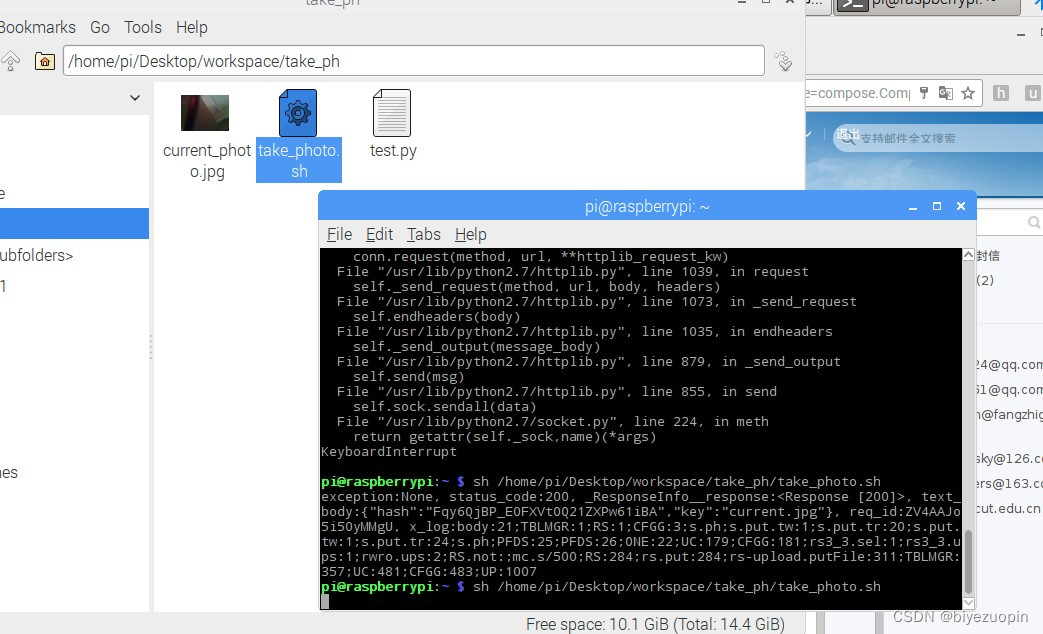
1、硬件摄像 11
1.1 方案 1 11
1.2 方案 2 12
2、应用终端 12
2.1项目架构 12
2.2组件结构 14
2.3页面切换与路由跳转 16
3、核心算法 18
3.1手动提取特征 18
3.2MSCNN 19
四、结果分析 24
1、硬件摄像 24
1.1 方案 1 24
1.2 方案 2 25
2、应用终端 26
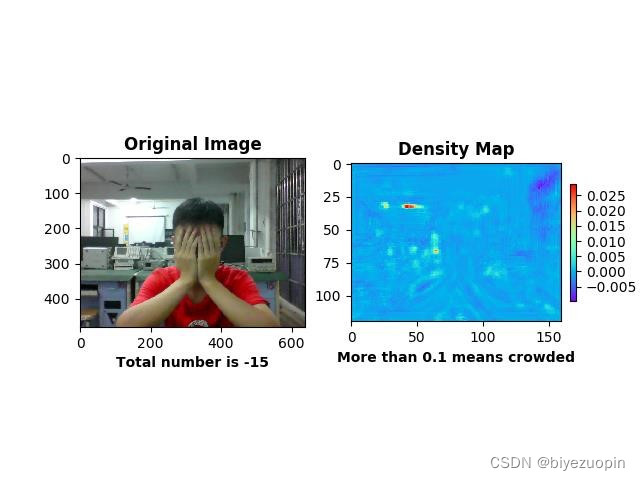
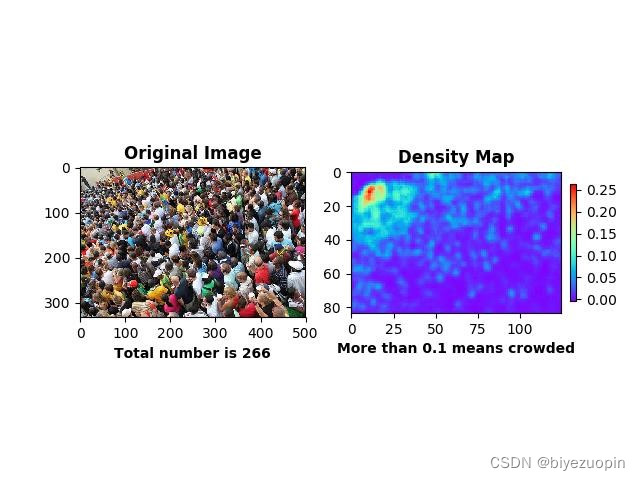
3、核心算法 29
手动提取特征 29
MSCNN 30
五、课程设计总结 32
1、硬件摄像 33
2、应用终端 33
3、核心算法 34
手动提取特征 34
MSCNN 34
参考文献 36
六、附录 37
1、硬件摄像 37
1.1 方案 1 37
1.2 方案 2 37
2、应用终端 38
3、核心算法 38
手动提取特征应用代码 38
MSCNN 应用代码 39
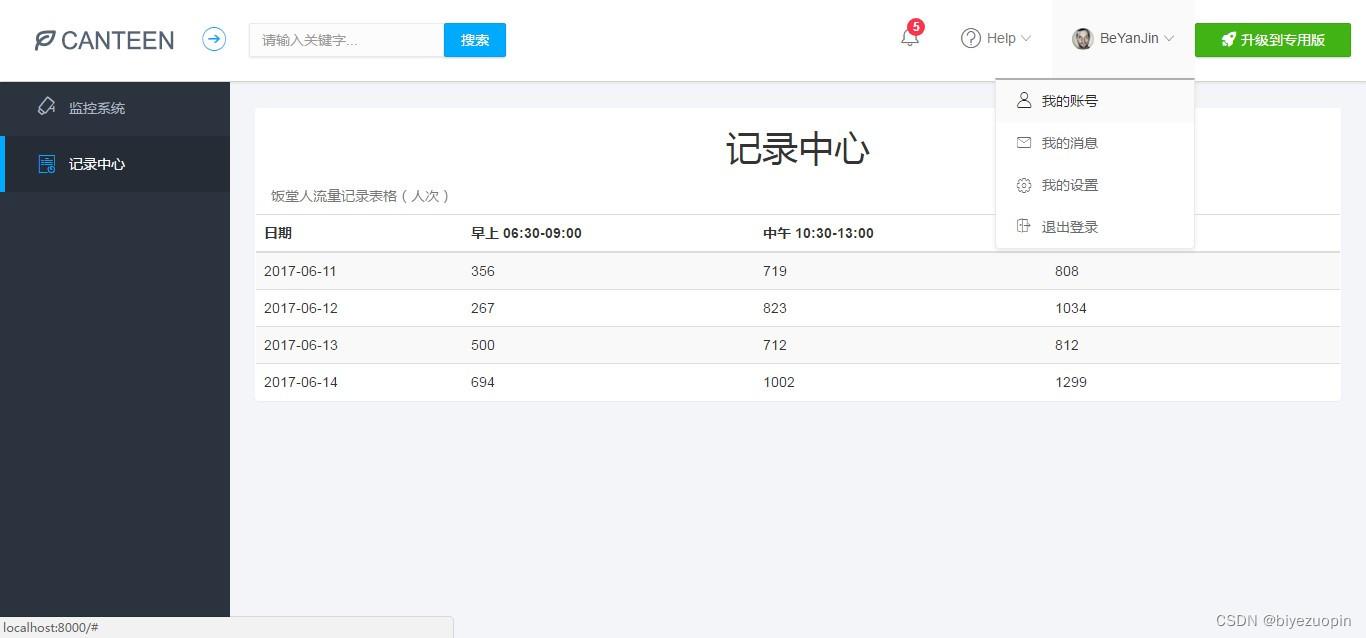
2.3实现的功能
在应用功能的设计上,该 web 应用功能模块主要有两个:
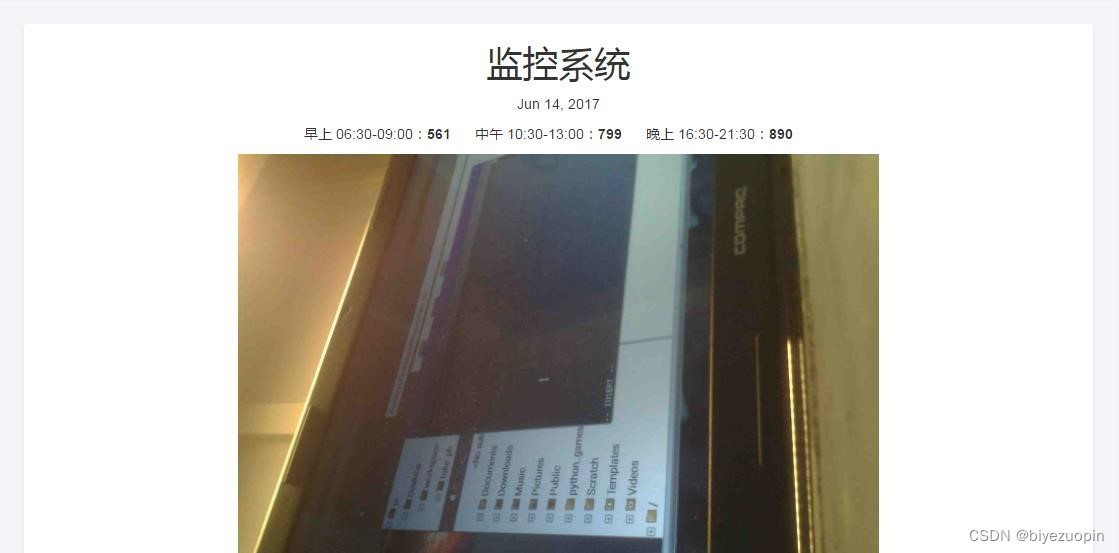
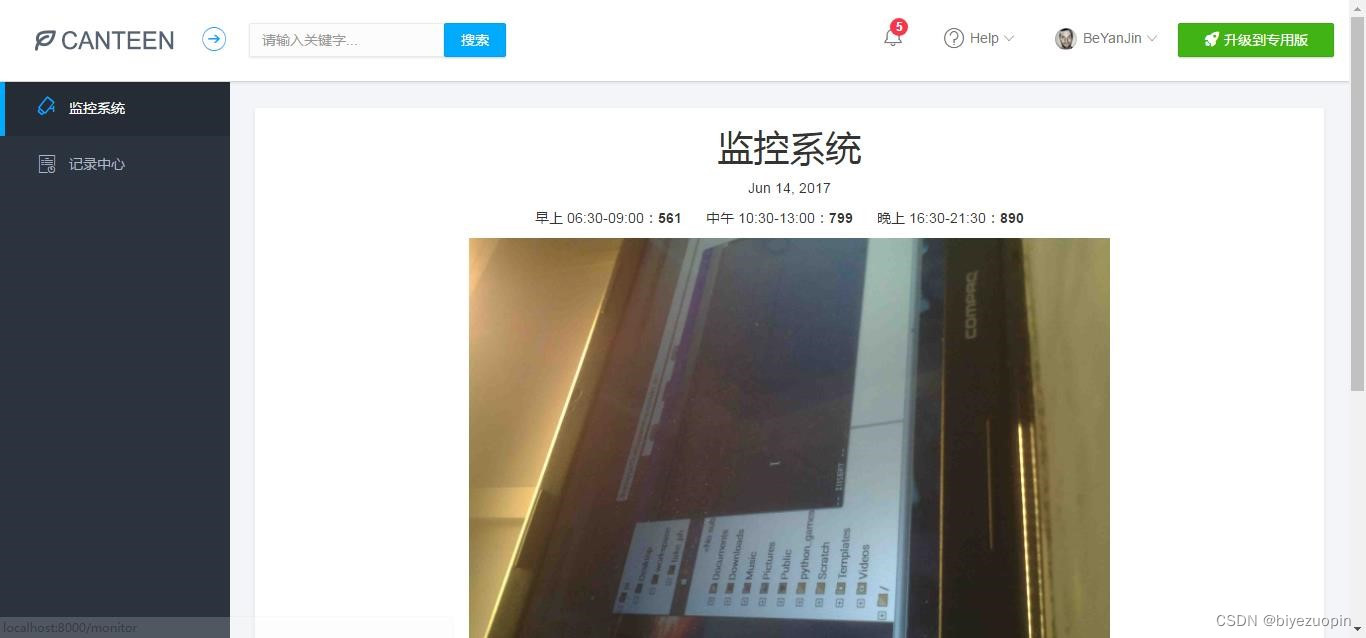
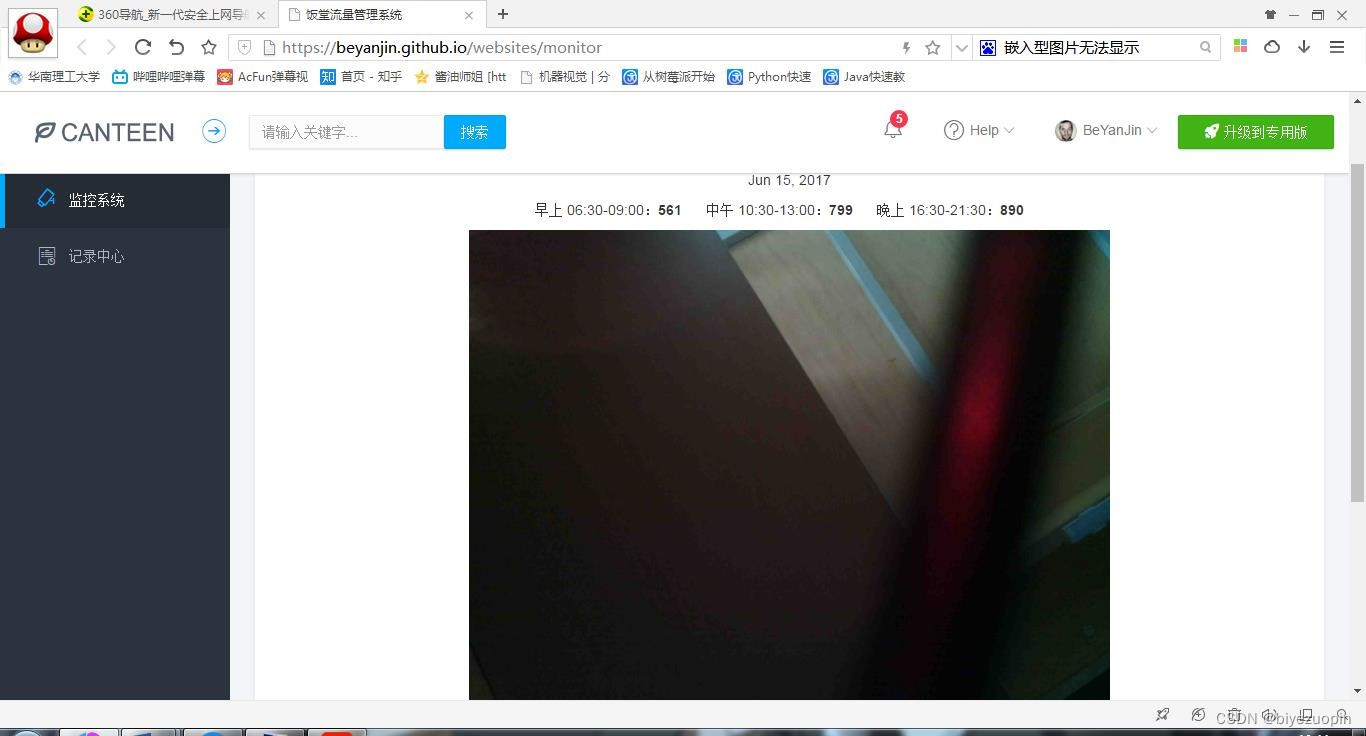
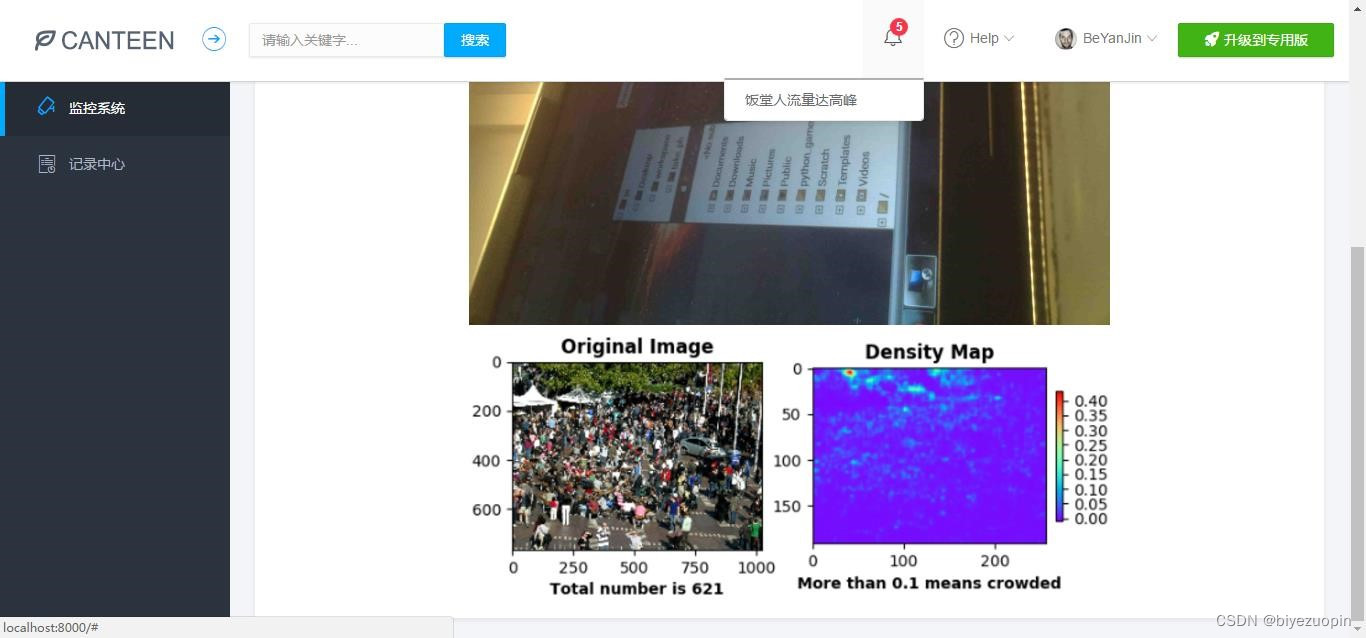
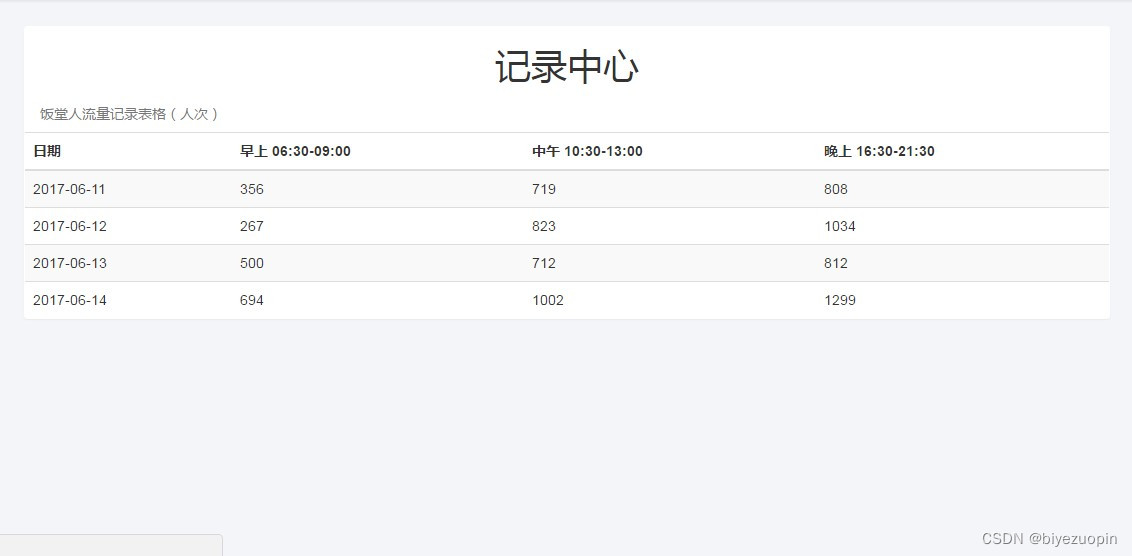
① 监控系统和记录中心。监控系统中有当前日期、该日期下饭堂早午晚的人流量统计数据、监控图片等等,这些日期、数据和图片都会根据监控摄像头拍到的图像进行实时更新。
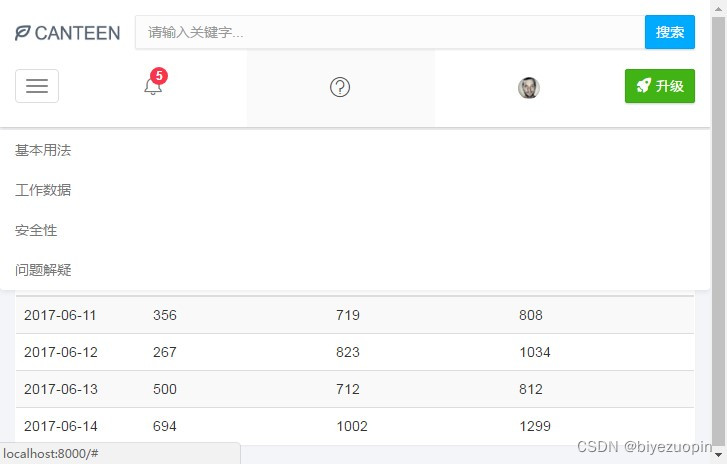
②记录中心有一个表格,记录了当前和以往日期的饭堂早午晚的人流量统计数据,所以我们可以从中查询到一些历史记录。2.4系统的安全性
该 web 应用程序含有一个登录系统,要使用该系统首先需要登录,直接通过一些特殊路由来访问该系统的一些模块都是会被拦截禁止的。2.5数据的完整性
该 web 应用程序记录的数据很全面,包含了一天中饭堂从开放到关闭的所有时间段(早上 06:30-09:00、中午 10:30-13:00、晚上 16:30-21:30)。而且,该程序还有一个记录中心记录了当前和以往日期的饭堂早午晚的人流量统计数据,我们可以从中查询到一些历史记录。2.6应用的运行环境
在开发调试中,我采用的运行环境是叫做 webpack-dev-server 的一个调试服务器,参数可以自己按需求配置。而打包应用时,我自己配置了两个环境,分为
dev(开发环境,该环境下主要为了调试和效率,故排除掉生产环境下要做的步骤)和 prod(生产环境,该环境意味着项目已经完成并准备上传到真实的服务器上,需要对代码进行压缩、混淆、删除注释等等)。两个环境下生产的文件都可以先通过调试服务器来打开预先观察其效果、正确性,确认系统无可用、正确后, 再上传到服务器上,这样就使得整个开发流程即灵活高效,又稳定正确。2.7性能
由于该 web 应用程序用到的框架和库也不少,而且 bootstrap 在移动端的性能比较一般,这就使得程序的性能优化异常重要。所以在项目的架构上,对
webpack 打包项目上进行了不少的优化。例如:用 CommonChunksPlugin 提取各个被打包模块代码的公共部分。用 DllPlugin 把解决浏览器兼容性的一些文件(如:
core.js、polyfills、zone.js、ts-helpers 等等),angular 4、jquery、bootstrap 等一系列框架或库文件打包到一个 dll 文件中,与业务代码分开打包编译,实现 webpack 的音速编译,提高调试服务器的运行速度,减少程序的 http 请求次数。总的来说, 优化后程序的性能有了很大的提升,效果非常好。3、核心算法
3.1设计要求
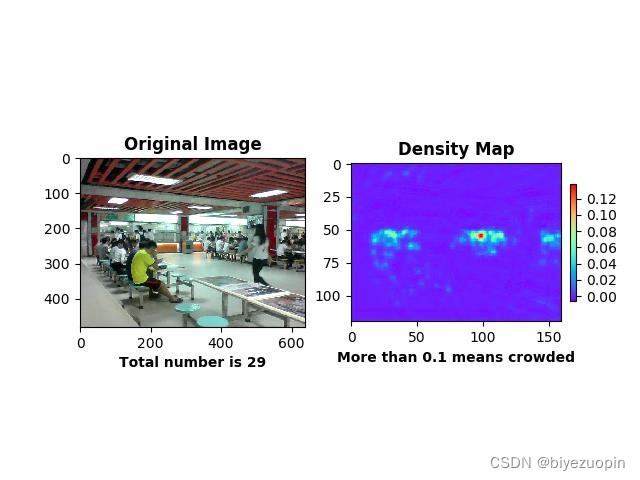
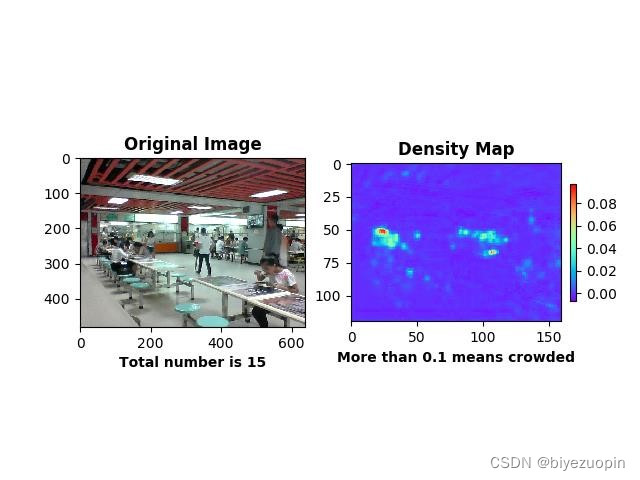
核心算法应当解决人群密度检测两方面的问题:人数统计和密度图绘制,在此之上,算法追求克服摄像头偏差、人群拥挤等环境情况影响,更准确地形象地将人群信息返回给用户。3.2手动提取特征回归人数
解决人群计数问题的传统的做法是手动设计并提取各种特征(Hand-crafted
Features),然后再基于这些特征训练一个线性或非线性函数来回归人头数。此类算法大多三个步骤: 1)前景分割;2)特征提取;3)人数回归。接下来将对这三个步骤分别做介绍。
1)前景分割
前景(人群)分割的目的是将人群从图像中分割出来便于后面的特征提取,分割性能的好坏直接关系的最终的计数精度,因此这是限制传统算法性能的一个重要因素。常用的分割算法有:本文转载自http://www.biyezuopin.vip/onews.asp?id=15086光流法(Optical Flow)、混合动态纹理(Mixture of Dynamic Textures)、小波分析(Wavelets) 等。
2)特征提取
在完成前景分割之后,紧接着就是从分割得到的前景(人群)提取各种不同的低层特征(Low-level Features),常用的特征有:人群面积和周长(Area and Perimeter of Crowd Mask)、边的数量(Edge Count)、边的方向(Edge Orientation)、纹理特征(Texture Features)、闵可夫斯基维度(Minkowski Dimension)等。
3)人数回归
该步骤的目的是将上一步提取到的特征回归到图像中的人数,回归可以是简单的线性回归,也可以用复杂的非线性回归。常用的回归方法有:线性回归(Linear
Regression)、分段线性回归(Piece-wise Linear Regression)、脊回归(Ridge
Regression)、高斯过程回归(Gaussian Process Regression)等。
而对于单张图像而言没有运动信息,那么人群分割就显得非常困难,因此此 类算法一般直接从整张图像或者其子区域提取特征,然后再计算图像中人群数量。
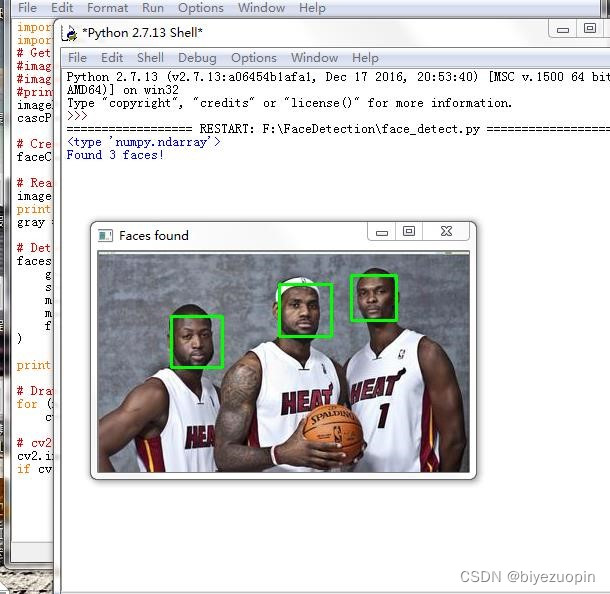
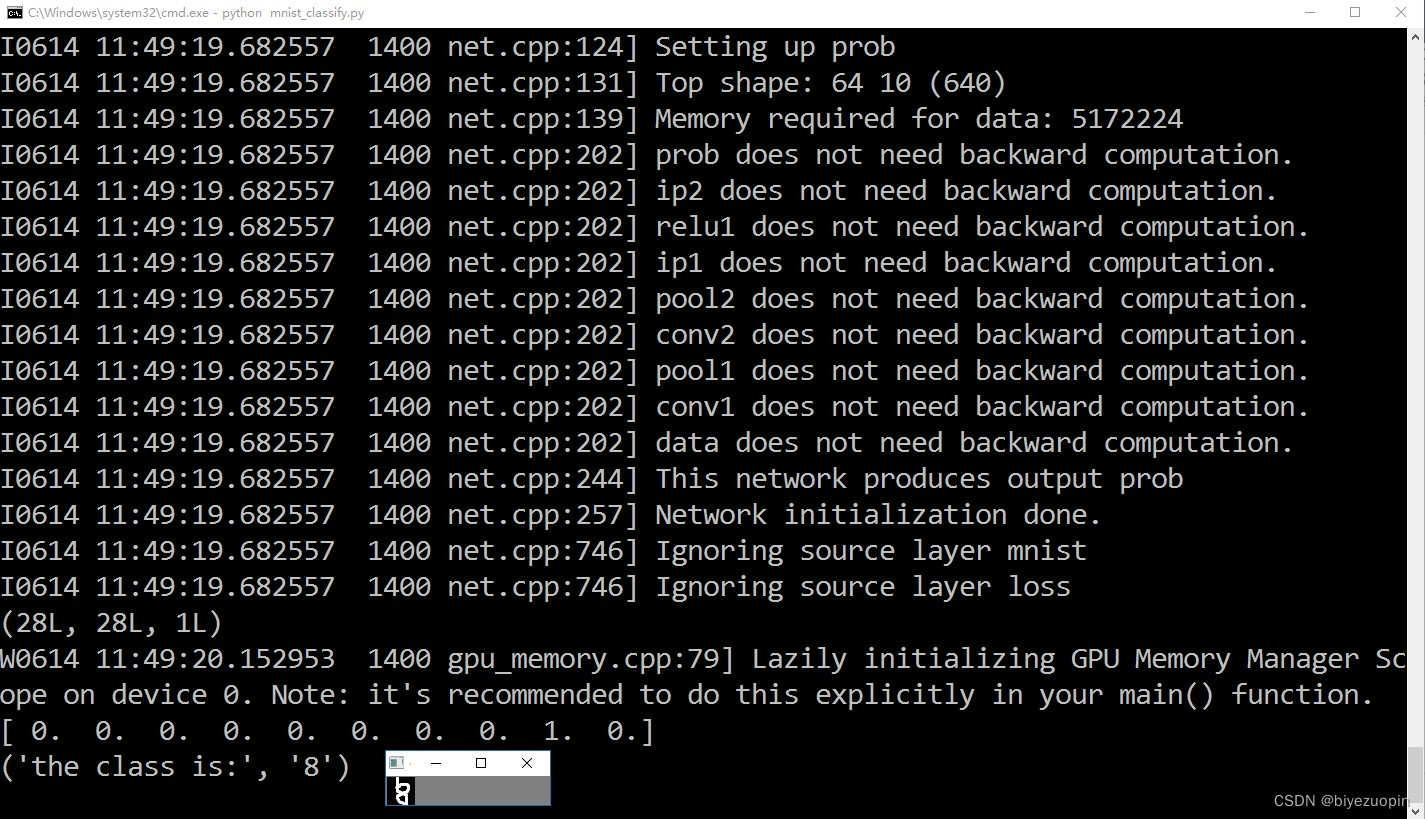
通过查询网上资料,最终确定为利用 python 以及 python-opencv 简单地实现算法,达到人脸检测、人头检测等基本目的。# -*- coding: utf-8 -*- import os import sys # 添加python到环境变量 # caffe_root = '../../python' # sys.path.insert(0, caffe_root) import caffe import numpy as np import cv2 import scipy.io from matplotlib import pyplot as plt caffe.set_mode_gpu() caffe.set_device(0) proto_use = 'network/MSCNN_deploy.prototxt' proto_file = 'network/MSCNN.prototxt' model_file = 'caffemodel/mscnn_partA_iter_380000.caffemodel' result_output = 'test_result_380000.txt' # 能够使用edit_proto的主要原因是全卷积网络 def edit_proto(img_height, img_width): with open(proto_file, 'r') as template_file: template_proto = template_file.read() # 写好测试模型文件,即复制MSCNN到MSCNN_deploy with open(proto_use, 'w') as out_file: out_file.write(template_proto.format(height=img_height, width=img_width)) def predict_count(image_path): frame = cv2.imread(image_path) if not frame.shape[2] == 1: frame = cv2.cvtColor(frame, cv2.COLOR_BGR2GRAY) img_height = frame.shape[0] img_width = frame.shape[1] frame = np.reshape(frame, (img_height, img_width, 1)) edit_proto(img_height, img_width) net_full_conv = caffe.Net(proto_use, model_file, caffe.TEST) transformers = caffe.io.Transformer({'data': net_full_conv.blobs['data'].data.shape}) transformers.set_transpose('data', (2,0,1)) # 转化为数组再传入网络 out = net_full_conv.forward_all(data=np.array([transformers.preprocess('data', frame)])) # 输出密度图,(图片数量,通道,高度,宽度) estdmap = out['estdmap'] # print(estdmap.shape) # 1*1*height*width->height*width,只要元素总量一致即可 estdmap = np.reshape(estdmap, (estdmap.shape[2], estdmap.shape[3])) count = int(np.ceil(np.sum(out['estdmap']))) return count def final_result(images_path, ground_truth_path): if not images_path.endswith('/'): images_path += '/' if not ground_truth_path.endswith('/'): ground_truth_path += '/' images_list = os.listdir(images_path) num_test = len(images_list) predict_list = np.zeros((num_test,1)) ground_truth_list = np.zeros((num_test, 1)) mae = 0 mse = 0 with open(result_output, 'w') as result_file: for i in range(num_test): image_name = images_list[i] gt_name = 'GT_'+image_name[:-4]+'.txt' image_path = images_path + image_name gt_path = ground_truth_path + gt_name count = predict_count(image_path) with open(gt_path, 'rb') as f: gt = int(f.readline()) predict_list[i] = count ground_truth_list[i] = gt result_file.write('predicting {0}, ground truth {1}\n'.format(count, gt)) # print 'processing image %d, predicting: %d, ground truth: %d' % (i+1, count, gt) mae = np.mean(np.abs(predict_list - ground_truth_list)) mse = np.sqrt(np.mean((predict_list - ground_truth_list)**2)) result_file.write('The total MAE is {0}.\nThe total MSE is {1}.\n'.format(mae, mse)) print 'The total MAE is ', mae print 'The total MSE is ', mse if __name__ == '__main__': images_path = 'D:/Caffe/caffe-windows-ms/data/ShanghaiTech/part_A/test_data/images' ground_truth_path = 'D:/Caffe/caffe-windows-ms/data/ShanghaiTech/part_A/test_data/GT_NUM' final_result(images_path, ground_truth_path)- 1
- 2
- 3
- 4
- 5
- 6
- 7
- 8
- 9
- 10
- 11
- 12
- 13
- 14
- 15
- 16
- 17
- 18
- 19
- 20
- 21
- 22
- 23
- 24
- 25
- 26
- 27
- 28
- 29
- 30
- 31
- 32
- 33
- 34
- 35
- 36
- 37
- 38
- 39
- 40
- 41
- 42
- 43
- 44
- 45
- 46
- 47
- 48
- 49
- 50
- 51
- 52
- 53
- 54
- 55
- 56
- 57
- 58
- 59
- 60
- 61
- 62
- 63
- 64
- 65
- 66
- 67
- 68
- 69
- 70
- 71
- 72
- 73
- 74
- 75
- 76
- 77
- 78
- 79
- 80
- 81
- 82
- 83
- 84
- 85
- 86
- 87
- 88
- 89


-
相关阅读:
L48.linux命令每日一练 -- 第七章 Linux用户管理及用户信息查询命令 -- last、lastb和lastlog
窗口延时、侧输出流数据处理
鞋子,靴子,拖鞋傻傻分不清楚 pytorch实现分类 入门小案例
inux安装软件命令yum,apt-get
C# 11新特性之原始字符串
【mindspore】【算子执行】执行Exception
【运算符+逻辑控制】
Java学习 --- this关键字
Java基础(三)
Kafka - 主题Topic与消费者消息Offset日志记录机制
- 原文地址:https://blog.csdn.net/sheziqiong/article/details/126886444
