-
vue基础 —— 单网页版的Vue学习 基础
文章目录
1、vue-cli
1.1、什么是vue-cli
vue-cli是 Vue.js 开发的标准工具。它简化了程序员基于 webpack 创建工程化的 Vue 项目的过程。1.2、vue-cli 安装
vue-cli是 npm 上的一个全局包。使用
npm install命令,即可方便的把它安装到自己的电脑上:npm install -g @vue/cli- 1
基于 vue-cli 快速生成工程化的 Vue 项目:
vue create 项目的名称- 1
示例:
vue create demo-first- 1


2.、vue 项目结构和运行
2.1、vue 项目目录结构

assets 目录:存放项目的静态资源文件,例如:css 、图片资源 components 目录: 程序员封装的、可复用的组件,都要放到components目录下 main.js : 是项目的入口文件,整个项目的运行,要先执行 main.js App.vue :是项目的根组件- 1
- 2
- 3
- 4
2.2、vue 项目的运行流程
在工程化的项目中,vue 要做的事情很单纯: 通过
main.js把App.vue渲染(内容替换)到index.html的 指定区域(id=“app”) 。其中:
App.vue用来编写待渲染的 模板结构 。index.html中需要预留一个 el区域 。main.js把 App.vue 渲染到 index.html 所指定区域(id=“app”)。
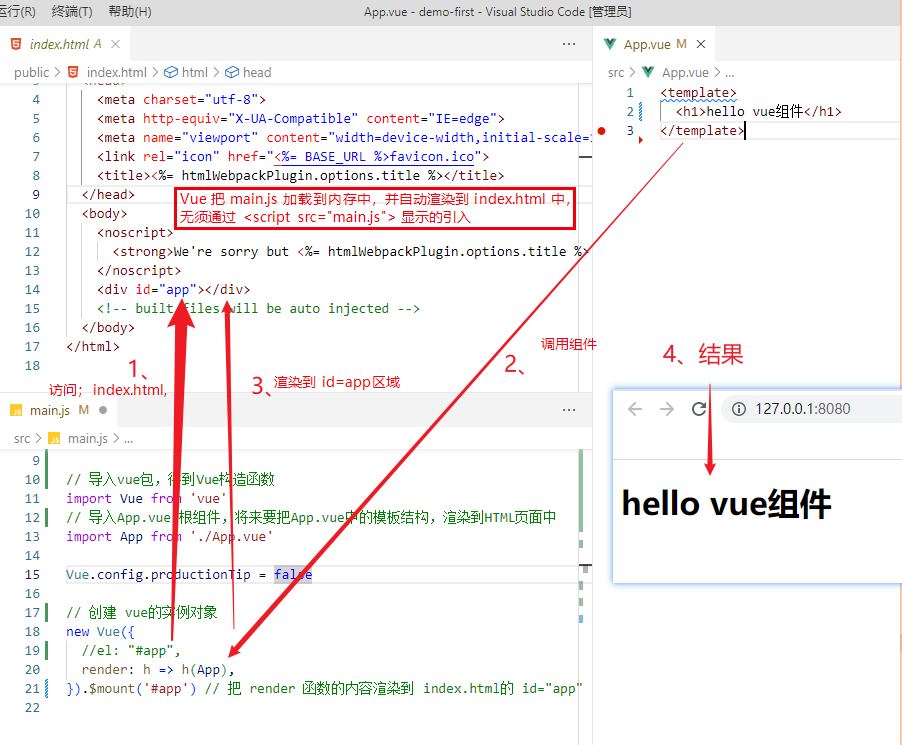
new Vue({ //el: "#app", render: h => h(App), }).$mount('#app') // 把 render 函数的内容渲染到 index.html的 id="app" 的区域中- 1
- 2
- 3
- 4
.$mount('#app')等价于el: "#app"vue 组件由三部分组成
每个.vue组件都由他其个部分构成,分别是
- template : 组件的模板结构
- script :组件的Javascript
- style :组件的样式
一般来部,最上面是 template、中间是script、最下面是style。

.vue注意事项template下只允许有一个根节点。script中,export default(), data 必须是函数。style默认只支持css ,若要写less,则增加lang="less"属性。
<template> <div> <div class="test-box"> <h3>hello vue组件 --- {{ username }}h3> <button @click="changeName">修改用户名button> div> <div> XXX div> div> template> <script> export default { data() { return { username: '张三', } }, methods: { changeName() { // 在组件中,this表示当前组件的实例对象 console.log(this) this.username = 'haha' } } } script> <style lang="less" > .test-box{ background-color: pink; h3 { color: red; } } style>- 1
- 2
- 3
- 4
- 5
- 6
- 7
- 8
- 9
- 10
- 11
- 12
- 13
- 14
- 15
- 16
- 17
- 18
- 19
- 20
- 21
- 22
- 23
- 24
- 25
- 26
- 27
- 28
- 29
- 30
- 31
- 32
- 33
- 34
- 35
- 36
- 37
- 38
- 39
- 40
2.3、运行命令
打开
package.json,内容如下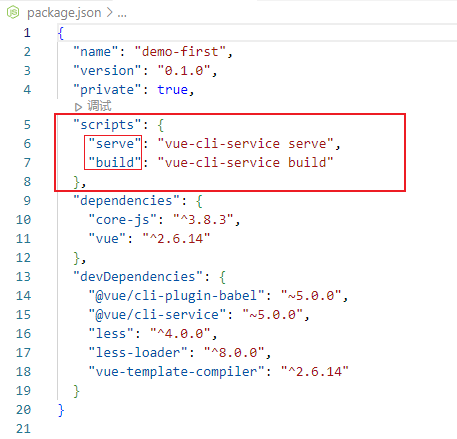
查看
scripts,运行命令 即是
npm run serve,打包命令 是
npm run build。3、Vue组件(components)
3.1、私有子组件
步骤1: 在
scripts标签内,通过 导入需要的组件:import Left from '@/components/Left.vue'- 1
步骤2:在 script 的 components 节点注册组件
<script> // 步骤1 import Left from '@/components/Left.vue' // 步骤2 export default{ components:{ Left } } script>- 1
- 2
- 3
- 4
- 5
- 6
- 7
- 8
- 9
- 10
- 11
- 12
步骤3:在 template 中,以标签的形式使用刚才注册的组件。
<template> <div> <Left>Left> div> template>- 1
- 2
- 3
- 4
- 5

Left.vue
<template> <div class="left"> <h3>Left vueh3> div> template> <style> .left{ background-color: rgba(20, 20, 241, 0.5); height: 200px; } style> <script> export default{ components:{ } } script>- 1
- 2
- 3
- 4
- 5
- 6
- 7
- 8
- 9
- 10
- 11
- 12
- 13
- 14
- 15
- 16
- 17
- 18
- 19
- 20
- 21
- 22
- 23
App.vue
<template> <div class="app-container"> <h1>App根组件h1> <hr/> <div class="box"> <Left>Left> div> <div class="bottom"> <h2>bottom h2> div> div> template> <script> // 步骤1:导入.vue组件 import Left from '@/components/Left.vue' // 在 components 节点注册组件 export default { components:{ Left, } } script> <style lang="less" > .app-container{ background-color: red; } .bottom{ background-color: aqua; height: 150px; } style>- 1
- 2
- 3
- 4
- 5
- 6
- 7
- 8
- 9
- 10
- 11
- 12
- 13
- 14
- 15
- 16
- 17
- 18
- 19
- 20
- 21
- 22
- 23
- 24
- 25
- 26
- 27
- 28
- 29
- 30
- 31
- 32
- 33
- 34
- 35
- 36
- 37
- 38
- 39
- 40
3.2、全局组件
在vue项目的
main.js入口文件中,通过Vue.component()方法 ,可以注册全局组件。-
步骤1: 导入需要全局注册的组件
示例:
import Count from '@/components/Count.vue' -
使用
Vue.components('MyCount',Count)注册。-
参数1:字符串格式,表示组件的 注册名称
-
参数2:需要被注册的那个组件
-
3.3、单行(一行)方法的简写
<template> <div> <p>count 的值是:{{ count }}p> <button @click="add" > +1 button> div> template> <script> export default { data() { return { count: 0, } }, methods: { add() { this.count+=1 } } } script>- 1
- 2
- 3
- 4
- 5
- 6
- 7
- 8
- 9
- 10
- 11
- 12
- 13
- 14
- 15
- 16
- 17
- 18
- 19
- 20
- 21
add()只有一行代码,所以add()可以省略,将这一行代码写到@click中,即@click="count += 1"。完整代码如下:<template> <div> <p>count 的值是:{{ count }}p> <button @click="count += 1" > +1 button> div> template>- 1
- 2
- 3
- 4
- 5
- 6
3.3.1、共用组件,在引用时,初始化不同的值
问题描述:
Count.vue是共用组件。其它组件( Left.vue、Right.vue)在引用Count.vue组件时,希望Count.vue中的 count 变量在初始化为不同的值。Count.vue的代码:<template> <div> <h5>Count 组件h5> <p>count 的值是:{{ count }}p> <button @click="count += 1">+1button> <button @click="show">打印 thisbutton> div> template> <script> export default { data() { return { // 把 props 中的 init 值,转存到 count 上 count: 0, } }, methods: { show() { console.log(this) } } } script>- 1
- 2
- 3
- 4
- 5
- 6
- 7
- 8
- 9
- 10
- 11
- 12
- 13
- 14
- 15
- 16
- 17
- 18
- 19
- 20
- 21
- 22
- 23
- 24
3.4、组件的 props(自定义属性)
props是组件的自定义属性,通过this.属性名进行属性值的运算处理。vue规定:组件中封装的自定义属性是只读的,不允许直接修改。
要修改
props中属性的值,可以把 props 的值转到 data中,因为data中的数据是可读可写的。<script> export default { props: ['init'], data() { return { count: this.init, } }, methods: { show() { console.log(this) } } } script>- 1
- 2
- 3
- 4
- 5
- 6
- 7
- 8
- 9
- 10
- 11
- 12
- 13
- 14
- 15
在
Left.vue中,:init="9",每个组件在引用时,通过这样的方式进行初始化 。<template> <div class="left-container"> <h3>Left 组件h3> <hr> <MyCount init="9">MyCount> div> template>- 1
- 2
- 3
- 4
- 5
- 6
- 7
3.4.1、
:propName="9"与propName="9"数字与字符串的传递上一步,通过下面的代码对
count初始化。<MyCount init="9">MyCount>- 1
点击
+1按钮后,发现是不是加1,而是往后面拼接1,如 91、911、9111 … 。主要原因是 通过 init="9 传值,被默认是字符串,字符串无法直接相加,只是拼接。
如果要将init 的值变为数,则如下:
<MyCount :init="9">MyCount>- 1
:propName="9"与propName="9"的区别如下::propName="9",相当于v-bind:propName="9",这个9是数字。propName="9",这个9是字符串。
总结:
如果props的属值,初始化传递时是字符串,则使用
propName="value"方式。如果props的属值,初始化传递时是数字,则
:propName="number"方式。
3.4.2、props 的默认值
数组格式:
props:['init1' , 'init2']- 1
对象格式:
props:{ init1:{ default: 0, required: true, type: Number, }, }- 1
- 2
- 3
- 4
- 5
- 6
- 7
如果 不通过 :init=“9” 传值时,有一个默认值。配置如下:
<script> export default { props: { init:{ default:0, } }, data() { return { count: this.init, } }, methods: { show() { console.log(this) } } } script>- 1
- 2
- 3
- 4
- 5
- 6
- 7
- 8
- 9
- 10
- 11
- 12
- 13
- 14
- 15
- 16
- 17
- 18
- 19
3.5、样式(CSS)冲突
在一个vue 定义的样式 会影响到 其它vue中。
3.6、Vue的生命周期
生命周期(Life Cycle)是指一个组件从
创建 -> 运行 -> 销毁的整个阶段,强调的是一个时间段。生命周期函数:是由 vue 框架提供的内置函数,会伴随着组件的生命周期,自动按次序执行。
注意:生命周期强调的是时间段, 生命周期 函数 强调的是时间点。

3.7、组件之间的数据共享
1)父向子传数据
<template> <div> <Son :msg="message" :info="info" >Son> div> template> <script> import Left Son "@/components/Son.vue"; export default { data() { return { message: "hello parent", info: { name: "zhangsan", age: 25 }, }; }, components: { Son, }, }; script>- 1
- 2
- 3
- 4
- 5
- 6
- 7
- 8
- 9
- 10
- 11
- 12
- 13
- 14
- 15
- 16
- 17
- 18
- 19
- 20
- 21
<template> <div> msg:{{ msg }} , info:{{ msg }} , div> template> <script> export default { props: ["msg", "info"], }; script>- 1
- 2
- 3
- 4
- 5
- 6
- 7
- 8
- 9
- 10
- 11
- 12
2)子向父传数据

3)兄弟组件之间的数据共享
在 vue2.x 中,兄弟组件之间数据共享的方案是 EventBus 。

EventBus 的使用步骤 :
① 创建
eventBus.js模块,并向外共享一个Vue 的实例对象。② 在数据 发送方,调用
bus.$emit('事件名称', 要发送的数据)方法触发自定义事件 。③ 在数据 接收方,调用
bus.$on('事件名称', 事件处理函数)方法注册一个自定义事件。3.8、ref 引用
ref 用来辅助开发者在不依赖于 jQuery 的情况下,获取 DOM 元素或组件的引用。
每个 vue 的组件实例上,都包含一个
$refs 对象,里面存储着对应的 DOM 元素或组件的引用。默认情况下, 组件的
$refs指向一个空对象。使用
ref引用 DOM 元素<template> <div class="app-container"> <h3 ref="myh13"> ref 学习h3> <button @click="showThis">showThisbutton> div> template> <script> export default { methods: { showThis() { console.log(this) this.$refs.myh13.style.color = 'red' } } }; script>- 1
- 2
- 3
- 4
- 5
- 6
- 7
- 8
- 9
- 10
- 11
- 12
- 13
- 14
- 15
- 16
- 17
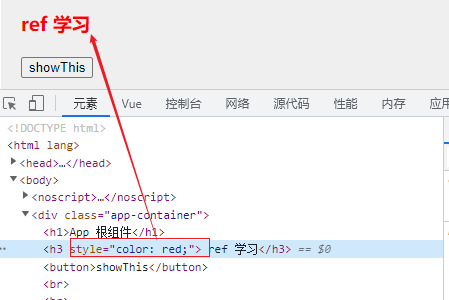
说明: 点击showThis 按钮, 通过
this.$refs.myh13定位到h3dom 对象,然后通过style.color = 'red'对其内容进行修改。效果图如下:
使用
ref引用组件App 是父组件,Left 是子组件, Left中有 count 数据,点击 addCount 按钮可以自增。父组件中有 Count重置为0 的按钮,点击后,可以将 Left中有 count 设置为0。
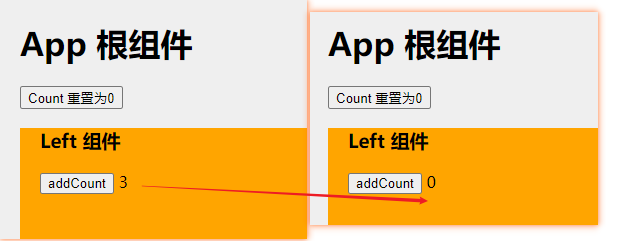
App.vue 组件:
<template> <div class="app-container"> <h1>App 根组件h1> <button @click="ReCount">Count 重置为0button> <Left ref="comLeft">Left> div> template> <script> import Left from '@/components/Left.vue'; export default { components: { Left, }, methods: { ReCount() { console.log(this) //方法1,定位到Left组件中 count 元素,重置为0 this.$refs.comLeft.count = 0 // 方法2,定位到Left组件中resetCount()方法,将count重置为0 //this.$refs.comLeft.resetCount() }, }, }; script>- 1
- 2
- 3
- 4
- 5
- 6
- 7
- 8
- 9
- 10
- 11
- 12
- 13
- 14
- 15
- 16
- 17
- 18
- 19
- 20
- 21
- 22
- 23
- 24
- 25
- 26
- 27
Left.vue 组件:
<template> <div class="left-container"> <h3>Left 组件h3> <button @click="addCount"> addCount button> {{ count }} div> template> <script> export default { props: ["msg", "info"], data() { return { count: 0, }; }, methods: { addCount() { this.count = this.count + 1 }, resetCount() { this.count = 0; }, }, }; script>- 1
- 2
- 3
- 4
- 5
- 6
- 7
- 8
- 9
- 10
- 11
- 12
- 13
- 14
- 15
- 16
- 17
- 18
- 19
- 20
- 21
- 22
- 23
- 24
- 25
说明:
方法1:
主要是通过 父组件中的
this.$refs.comLeft.count = 0,将Left组件中的count 重置为 0 。方法2:
主要是通过 父组件中的
this.$refs.comLeft.resetCount(),调用Left组件中resetCount() 方法,将count 重置为 0 。this.$nextTick(cb)方法3.9、动态组件
什么是动态组件
动态组件指的是 动态地切换组件 的显示与隐藏。
动态组件渲染
如何实现动态组件渲染 vue 提供了一个内置的
<template> <div class="app-container"> <div class="box"> <component :is="comName">component> div> div> template> <script> import Left from '@/components/Left.vue'; import Right from '@/components/Right.vue'; export default { data() { return { comName: 'Right', } }, components: { Left, Right, } } script> script>- 1
- 2
- 3
- 4
- 5
- 6
- 7
- 8
- 9
- 10
- 11
- 12
- 13
- 14
- 15
- 16
- 17
- 18
- 19
- 20
- 21
- 22
- 23
- 24
- 25
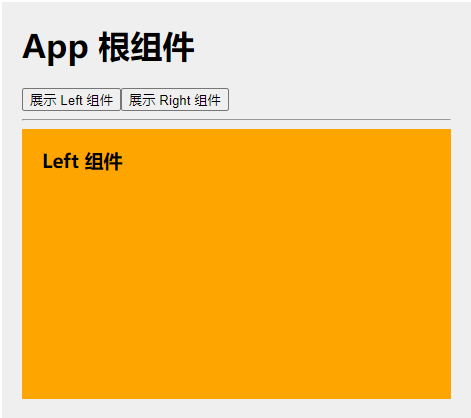
注意:
有一个的前提条件:
所有要切换的组件,要先
import导入和components注册,之后才能进行组件的各种切换。没有提现提前
import导入和components注册的,无法切换。keep-alive 保持组件的状态
默认情况下,组件切换时,隐藏的组件会被销毁,再次切换显示时,所有的数据会变成默认的初始值。
vue 内置了
示例:
App 组件中增加
<keep-alive> <component :is="comName">component> keep-alive>- 1
- 2
- 3
keep-alive 对应的生命周期函数
当组件被 缓存 时,会自动触发组件的
deactivated生命周期函数。当组件被
激活时,会自动触发组件的activated生命周期函数。Left 组件中,
<template> <div class="left-container"> <h3>Left 组件h3> {{ count }}<br>br> <button @click="count += 1"> +1button> div> template> <script> export default { data() { return { count: 0 } }, created() { console.log("组件被创建 created ") }, destroyed() { console.log("组件被 销毁 destroyed") }, activated() { console.log("Left 组件被 激活 activated") }, deactivated() { console.log("Left 组件被 缓存 cache") }, } script>- 1
- 2
- 3
- 4
- 5
- 6
- 7
- 8
- 9
- 10
- 11
- 12
- 13
- 14
- 15
- 16
- 17
- 18
- 19
- 20
- 21
- 22
- 23
- 24
- 25
- 26
- 27
- 28
- 29
效果图:

keep-alive 的 include 、exclude 属性
- include :只有 组件名称 匹配的组件会被缓存。多个组件名之间使用英文的逗号分隔
- exclude :除了指定的组件名称 的组件不会被缓存外,其它组件都会被缓存。多个组件用逗号分隔。
include和exclude只能二者一,不能同时使用。注意:
-
include 和 exclude 的值是组件的名称,组件名称可以通过name进行修改的。如
name:'MyLeft'。 -
is的值是import指定的名称。如:
import Left from '...'。Left和MyLeft都是同一件组件,但是在不同的地方,值是不同。
示例:
<template> <div class="app-container"> <keep-alive include="MyLeft"> <component :is="comName">component> keep-alive> div> template> <script> import Left from '@/components/Left.vue'; import Right from '@/components/Right.vue'; export default { data() { return { comName: 'Left', } }, components: { Left, Right, }, } script>- 1
- 2
- 3
- 4
- 5
- 6
- 7
- 8
- 9
- 10
- 11
- 12
- 13
- 14
- 15
- 16
- 17
- 18
- 19
- 20
- 21
- 22
关于 组件名称的自定义
<template> <div class="left-container"> <h3>Left 组件h3> div> template> <script> export default { name: 'MyLeft', // 指定组件的名称 data() { return { //.... } }, } script>- 1
- 2
- 3
- 4
- 5
- 6
- 7
- 8
- 9
- 10
- 11
- 12
- 13
- 14
- 15
- 16
4、插槽
4.1、什么是插槽
插槽(Slot)是 vue 为
组件的封装者提供的能力。允许开发者在封装组件时,把不确定的、希望由用户指定的部分定义为插槽。插槽认为是组件封装期间,为用户预留的内容的 占位符 。

4.2、默认插槽
4.2.1、默认插槽的格式
自定义数据的格式
<组件名称> 自定义数据- 1
- 2
- 3
定义插槽:
<slot>slot>- 1
4.2.2、示例:
示例说明:
Left.vue 组件中定义了插槽, 将App.vue 中 自定义的数据传入 Left.vue 的插槽中。
Aue.vue 自定义数据
<template> <div class="app-container"> <h1>App 根组件h1> <hr /> <div class="box"> <Left> <p>体验插件的基本使用p> Left> div> div> template> <script> import Left from '@/components/Left.vue'; export default { components: { Left, }, } script>- 1
- 2
- 3
- 4
- 5
- 6
- 7
- 8
- 9
- 10
- 11
- 12
- 13
- 14
- 15
- 16
- 17
- 18
- 19
- 20
Left.vue 插槽:
<template> <div class="left-container"> <h3>Left 组件h3> <hr /> <slot>slot> div> template>- 1
- 2
- 3
- 4
- 5
- 6
- 7

效果图如下:

说明:
如果
Left.vue中没有App.vue中的内容 上面是没有指定 name 名称的插槽( 其实也有默认名称叫做
default), 这种插槽叫做默认插槽。4.3、具名插槽
上面的例子中,只有一个插槽,无须指定插槽,就能使用。这是插槽的最简单的使用。
实际业务要复杂得多,有多个插槽 ,每个插槽有名字,在定义数据时,要指指定渲染到哪个插槽中。
如果在封装组件时需要预留多个插槽节点,则需要为每个 插槽指定具体的 name 名称。这种带有具体名称的插槽叫做
具名插槽。格式:
<slot name="插槽名称">slot>- 1
成熟组件中的插件案件:
网址: NavBar 导航栏

4.3.1、具名插槽的使用
Left.vue 组件中,定义3个插槽,代码如下:
<template> <div class="left-container"> <h3>Left 组件h3> <header> <slot name="header">slot> header> <main> <slot>slot> main> <footer> <slot name="footer">slot> footer> div> template>- 1
- 2
- 3
- 4
- 5
- 6
- 7
- 8
- 9
- 10
- 11
- 12
- 13
- 14
- 15
- 16
- 17
- 18
- 19
- 20
4.3.2、为具名插槽提供数据内容(具名插槽的数据模板)
具名插槽的数据模板的格式:
<template v-slot:插槽名称r> 数据内容 template>- 1
- 2
- 3
说明:
-
数据内容必须要 组件的内部定义。比如
数据模板 -
数据模板指定插槽名称时,用
v-slot:插槽名称。 -
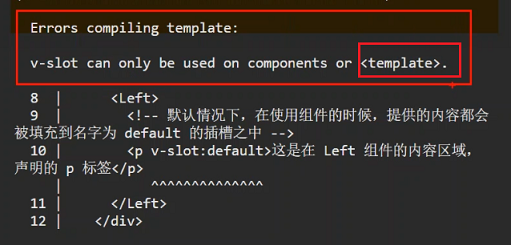
每个名插槽的数据模板必须使用
。是一个虚拟的标签,只起到包裹的作用,不会在渲染的页面中出现。- 不使用
包裹数据时,会抛出以下错误。
App.vue 中自定义数据,代码如下。
<template> <div class="app-container"> <h1>App 根组件h1> <hr /> <div class="box"> <Left> <template v-slot:header> <p>体验插件 -- header p> template> <template> <p>体验插件的基本使用p> template> <template v-slot:footer> <p>体验插件-- footer p> template> Left> div> div> template>- 1
- 2
- 3
- 4
- 5
- 6
- 7
- 8
- 9
- 10
- 11
- 12
- 13
- 14
- 15
- 16
- 17
- 18
- 19
- 20
- 21
- 22
- 23
- 24
运行效果如下:

4.3.3、具名插槽的数据模板的简写
跟
v-on和v-bind一样,v-slot也有缩写,把v-slot:替换为字符#。例如 ,
v-slot:header可以被重写为#header。上一步,App.vue 的代码重写如下。
<template> <div class="app-container"> <h1>App 根组件h1> <hr /> <div class="box"> <Left> <template #header> <p>体验插件 -- header p> template> <template #default> <p>体验插件的基本使用p> template> <template #footer> <p>体验插件-- footer p> template> Left> div> div> template>- 1
- 2
- 3
- 4
- 5
- 6
- 7
- 8
- 9
- 10
- 11
- 12
- 13
- 14
- 15
- 16
- 17
- 18
- 19
- 20
- 21
- 22
- 23
4.4、作用域
插槽在封装组件时,可以为
作用域插槽。作用域插槽对外提供数据。- 可绑定
props和data中的所有类型的数据。
4.4.1、
作用域插槽的定义格式如下:
<slot name="footer" key1="value1" key2="value2" >slot>- 1
在 Left.vue 中定义的
作用域插槽的 示例:<template> <div class="left-container"> <h3>Left 组件h3> <footer> <slot name="footer" msg="Hello msg" :hello="hello" :user="user">slot> footer> div> template> <script> export default { data() { return { hello: "hello world", user: { name: "zhangsan", age: 25 } } } } script>- 1
- 2
- 3
- 4
- 5
- 6
- 7
- 8
- 9
- 10
- 11
- 12
- 13
- 14
- 15
- 16
- 17
- 18
- 19
- 20
- 21
- 22
- 23
- 24
- 25
- 26
说明:
- msg 是直接定义数据。
- hello、user 是 引用 data中定义的数据。
4.4.2、使用
作用域插槽作用域插槽的数据 会传到插槽的数据模板的组件中, 相当于 数据的子传父。接收
作用域插槽数据的格式:<template v-slot:插槽名称="自定义变量" > 或者简写为: <template #插槽名称="自定义变量" >- 1
- 2
- 3
自定义变量 是一个对象,默认是
{}, 所有传过来的数据都封装成对象。App.vue 组件示例:
App.vue 组件 接收 Left.vue 作用域插件传来的数据。
<template> <div class="app-container"> <h1>App 根组件h1> <hr /> <div class="box"> <Left> <template #footer="data"> <p>体验插件-- footer p> {{ data }}<br><br> {{ data.msg }}<br> {{ data.hello }}<br> {{ data.user }}<br> template> Left> div> div> template>- 1
- 2
- 3
- 4
- 5
- 6
- 7
- 8
- 9
- 10
- 11
- 12
- 13
- 14
- 15
- 16
- 17
- 18
- 19
- 20
- 21
- 22
- 23
- 24
- 25
- 26

4.4.3、解构作用域插槽的数据对象
作用域插槽对外提供的数据对象,可以使用
{ }进行 解构赋值 ,简化数据的接收过程。App.vue 组件的代码优化:
<template> <div class="app-container"> <h1>App 根组件h1> <hr /> <div class="box"> <Left> <template #footer="{msg,hello,user }"> <p>体验插件-- footer p> {{ msg }}<br> {{ hello }}<br> {{ user }}<br> template> Left> div> div> template>- 1
- 2
- 3
- 4
- 5
- 6
- 7
- 8
- 9
- 10
- 11
- 12
- 13
- 14
- 15
- 16
- 17
- 18
- 19
- 20
- 21
- 22
运行效果图:

5、自定义指令(directive)
vue 官方提供了
v-text、v-for、v-model、v-if等常用的指令。除此之外 vue 还允许开发者 自定义指令。vue 中的自定义指令分为两类,分别是:
- 私有(自定义)指令
- 全局(自定义)指令
5.1、私有指令
5.1.1、私有指令的语法
私有指令的语法,分为两步:
- 定义指令
- 使用指令
1)定义指令:
在
directives节点下,声明 定义指令。<script> export default { directives: { color: { bind(el) { el.style.color = 'blue'; } } } } script>- 1
- 2
- 3
- 4
- 5
- 6
- 7
- 8
- 9
- 10
- 11
2)使用指令:
在
中 使用指令。<template> <div v-color> 页面内容div> template>- 1
- 2
- 3
5.1.2、入门使用1:最简单的使用
<template> <div class="app-container"> <h1 v-color>App 根组件h1> <hr /> div> template> <script> export default { // 1、定义指令,名称为color的指令 directives: { color: { bind(el) { el.style.color = 'blue'; } } } } script>- 1
- 2
- 3
- 4
- 5
- 6
- 7
- 8
- 9
- 10
- 11
- 12
- 13
- 14
- 15
- 16
- 17
- 18
- 19
- 20
- 21
- 22
5.1.3、入门使用2:
动态绑定参数-
动态参数可以在
data中指定,或者使用指令时指定(v-clor="'red'")。 -
在指令中,可以通过形参中的第二个参数
binding,来取动态变化的参数值。
1)data中定义变量值
directives中,定义指令;data中,定义动态参数;中,使用指令;
<template> <div class="app-container"> <h1 v-color="colorData"> 1111 h1> <h2 v-color="colorData"> 2222h2> <hr /> div> template> <script> export default { data() { return { //2、颜色参数 colorData: 'blue' } }, // 1、定义指令 directives: { color: { bind(el, binding) { el.style.color = binding.value } } } } script>- 1
- 2
- 3
- 4
- 5
- 6
- 7
- 8
- 9
- 10
- 11
- 12
- 13
- 14
- 15
- 16
- 17
- 18
- 19
- 20
- 21
- 22
- 23
- 24
- 25
- 26
- 27
- 28

2)使用
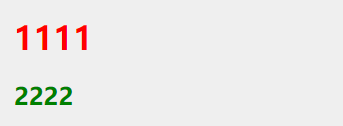
v-color时指定参数值颜色的参数全部定义在 data,基实并不是太好。可以在使用
v-color时指定值。directives中,定义指令;中,使用指令,并指定参数值。
注意:
v-color="'red'",red外层是双引号,里面是单引号,表示字符串,而不是 data 中的变量。<template> <div class="app-container"> <h1 v-color="'red'"> 1111 h1> <h2 v-color="'green'"> 2222h2> <hr /> div> template> <script> export default { // 1、定义指令 directives: { color: { bind(el, binding) { el.style.color = binding.value } } } } script>- 1
- 2
- 3
- 4
- 5
- 6
- 7
- 8
- 9
- 10
- 11
- 12
- 13
- 14
- 15
- 16
- 17
- 18
- 19
- 20
- 21
5.1.4、update 函数
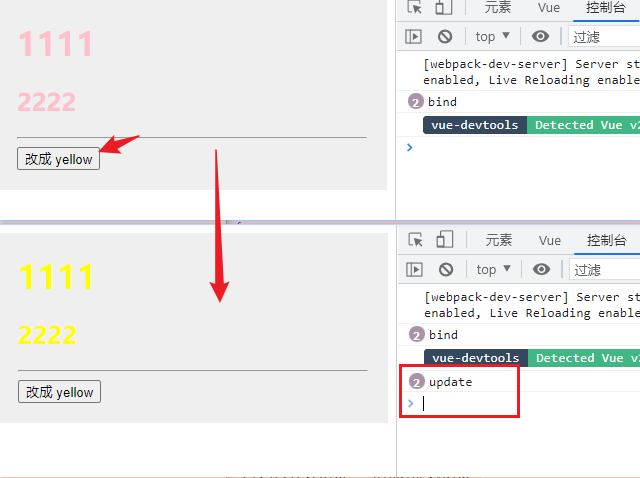
bind函数,只调用 1 次,当指令第一次绑定到元素时调用,当 DOM 更新时 bind 函数不会被触发。update函数会在每次 DOM 更新时被调用。示例1:
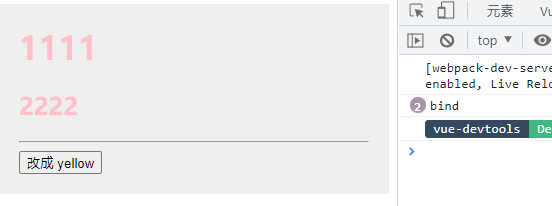
通过页面按钮,更改动态参数,不会被调用,颜色不会发生变化。
在日志中看出,在页面渲染时,
bind函数,只调用 1 次。再点击,没有反应。<template> <div class="app-container"> <!-- 1、使用指令 --> <h1 v-color="colorData"> 1111 </h1> <h2 v-color="colorData"> 2222</h2> <hr /> <button @click="colorData = 'yellow'">改成 yellow </button> </div> </template> <script> export default { data() { return { colorData: 'pink' } }, // 1、定义指令 directives: { color: { bind(el, binding) { console.log(binding) el.style.color = binding.value } } } } </script>- 1
- 2
- 3
- 4
- 5
- 6
- 7
- 8
- 9
- 10
- 11
- 12
- 13
- 14
- 15
- 16
- 17
- 18
- 19
- 20
- 21
- 22
- 23
- 24
- 25
- 26
- 27
- 28
示例2:
增加
update函数后,点击按钮,颜色发生变化。看日志,
bind函数没有日志,update函数被调用,使颜色发生变化。<template> <div class="app-container"> <h1 v-color="colorData"> 1111 h1> <h2 v-color="colorData"> 2222h2> <hr /> <button @click="colorData = 'yellow'">改成 yellow button> div> template> <script> export default { data() { return { colorData: 'pink' } }, // 1、定义指令 directives: { color: { bind(el, binding) { console.log('bind') el.style.color = binding.value }, update(el, binding) { console.log('update') el.style.color = binding.value } } } } script>- 1
- 2
- 3
- 4
- 5
- 6
- 7
- 8
- 9
- 10
- 11
- 12
- 13
- 14
- 15
- 16
- 17
- 18
- 19
- 20
- 21
- 22
- 23
- 24
- 25
- 26
- 27
- 28
- 29
- 30
- 31
- 32
5.1.5、指令函数的简写
由于,
bing和update函数中的逻辑完全相同,则简写成函数格式。// 1、定义指令 directives: { color(el, binding) { el.style.color = binding.value } }- 1
- 2
- 3
- 4
- 5
- 6
完整示例代码:
<template> <div class="app-container"> <h1 v-color="colorData"> 1111 h1> <h2 v-color="'blue'"> 2222h2> <hr /> <button @click="colorData = 'yellow'">改成 yellow button> div> template> <script> export default { data() { return { colorData: 'pink' } }, // 1、定义指令 directives: { color(el, binding) { el.style.color = binding.value } } } script>- 1
- 2
- 3
- 4
- 5
- 6
- 7
- 8
- 9
- 10
- 11
- 12
- 13
- 14
- 15
- 16
- 17
- 18
- 19
- 20
- 21
- 22
- 23
- 24
- 25
- 26
- 27
5.2、全局指令
全局指令必须定义在
main.js中,使手Vue.directive进行定义 。方式1:
Vue.directive('color', { bind(el, binding) { el.style.color = binding.value }, update(el, binding) { el.style.color = binding.value } });- 1
- 2
- 3
- 4
- 5
- 6
- 7
- 8
方式2(简写版,推荐使用):
Vue.directive('color', function (el, binding) { el.style.color = binding.value });- 1
- 2
- 3
-
相关阅读:
linux系统Jenkins工具添加自由项目和maven项目
SpringBoot SpringBoot 开发实用篇 4 数据层解决方案 4.13 ES 下载与安装
部署LVS-NAT群集实验
分布式文件系统HDFS-2
PAT 1066 AVL树模板
LIN通讯
金仓数据库KingbaseES Clusterware配置手册(集群搭建前置操作 )
LCR 174.寻找二叉搜索树中的目标节点
《儿童教育心理学》读书笔记
晶振不仅仅是可以振荡就够了
- 原文地址:https://blog.csdn.net/xiaojin21cen/article/details/126887555
