-
Centos安装Thrift步骤以及实例
1.分析安装失败的原因
首先要保证Thrift可以通过C++操作,必须要安装依赖,且一些依赖的版本不能过低。
2.开始安装
确定相关依赖软件的版本:autoconf-2.69,automake-1.14,bison-2.5.1,boost_1_70_0,libevent2 ,另外 thrift-0.13.0 编译依赖
C++11,gcc版本需支持。
gcc、g++、gdb安装过程略。
# 新建一个文件夹 mkdir Thrift # 安装 autoconf wget http://ftp.gnu.org/gnu/autoconf/autoconf-2.69.tar.gz tar -xvf autoconf-2.69.tar.gz cd autoconf-2.69 ./configure --prefix=/usr make sudo make install # 安装 automake wget http://ftp.gnu.org/gnu/automake/automake-1.14.tar.gz tar xvf automake-1.14.tar.gz cd automake-1.14 ./configure --prefix=/usr make sudo make install # 安装 bison wget http://ftp.gnu.org/gnu/bison/bison-2.5.1.tar.gz tar xvf bison-2.5.1.tar.gz cd bison-2.5.1 ./configure --prefix=/usr make sudo make install # 安装 boost #【新版本要求5.6以上版本】 # 系统自带的boost库版本过低,要确保卸载干净 wget http://sourceforge.net/projects/boost/files/boost/1.70.0/boost_1_70_0.tar.gz tar xvf boost_1_70_0.tar.gz cd boost_1_70_0 ./bootstrap.sh sudo ./b2 install # 安装libevent2 #【新版本要求libevent 2 版本】 # 卸载旧版 yum remove libevent # 下载libevent2 wget -c https://github.com/libevent/libevent/releases/download/release-2.0.22-stable/libevent-2.0.22-stable.tar.gz tar -zxvf libevent-2.0.22-stable.tar.gz cd libevent-2.0.22-stable ./configure make make install # 开始安装 Thrift # 官网下载压缩包 https://thrift.apache.org/download- 1
- 2
- 3
- 4
- 5
- 6
- 7
- 8
- 9
- 10
- 11
- 12
- 13
- 14
- 15
- 16
- 17
- 18
- 19
- 20
- 21
- 22
- 23
- 24
- 25
- 26
- 27
- 28
- 29
- 30
- 31
- 32
- 33
- 34
- 35
- 36
- 37
- 38
- 39
- 40
- 41
- 42
- 43
- 44
- 45
- 46
- 47
- 48
- 49
- 50
- 51

# 使用 rz 命令将压缩包上传至文件夹 rz tar -xvf thrift-0.16.0.tar.gz cd thrift-0.16.0 ./bootstrap.sh # 仅编译C++库文件,/usr/local/include/boost为boost库地址,具体依据安装位置而定 # 终端输入 find / -name boost 查看boost库地址 ./configure --with-cpp --with-boost=/usr/local/include/boost --without-python --without-csharp --without-java --without-erlang --without-perl --without-php --without-php_extension --without-ruby --without-haskell --without-go --without-lua make # 如果报错内容为: # 找不到libboost_unit_test_framework.a错误 # 安装 libboost-all-dev 依赖即可 # yum install libboost-all-dev make install- 1
- 2
- 3
- 4
- 5
- 6
- 7
- 8
- 9
- 10
- 11
- 12
- 13
- 14
- 15
- 16

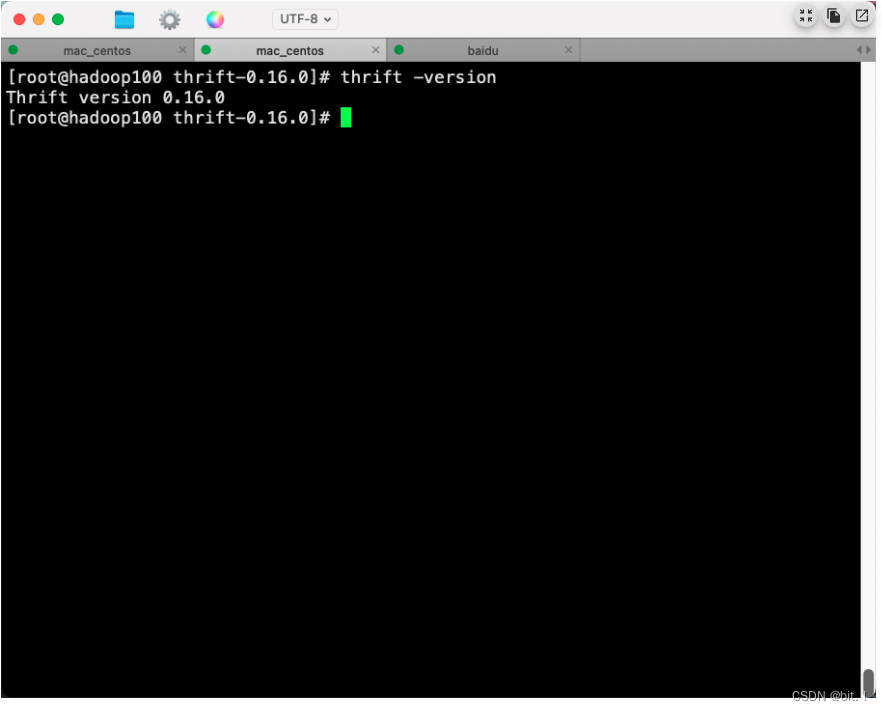
# 查看 Thrift 版本 # 终端输入 thrift -version- 1
- 2
- 3

3.实例
# 在任意目录下创建文件夹 thrift_test mkdir thrift_test # 创建一个后缀为 .thrift 的文件 touch Datainfo.thrift- 1
- 2
- 3
- 4
# Datainfo.thrift struct message { 1:i32 seqId, 2:string content } service serDemo { void put(1:message msg) }- 1
- 2
- 3
- 4
- 5
- 6
- 7
- 8
- 9
- 10
- 11
- 12
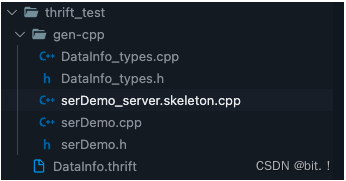
# 终端执行命令 thrift -gen cpp Datainfo.thrift # 在同级目录下会出现一个 gen-cpp 的文件夹,里面的内容如下:- 1
- 2
- 3

# 其中 serDemo_server.skeleton.cpp 就是系统生成的服务端,所以可以直接在此基础上编写服务端 # 在服务端的put函数里添加输出测试语句 printf("receive message: id: %d, content: %s\n", msg.seqId, msg.content.c_str());- 1
- 2
- 3
// serDemo_server.skeleton.cpp // This autogenerated skeleton file illustrates how to build a server. // You should copy it to another filename to avoid overwriting it. #include "serDemo.h" #include#include #include #include using namespace ::apache::thrift; using namespace ::apache::thrift::protocol; using namespace ::apache::thrift::transport; using namespace ::apache::thrift::server; class serDemoHandler : virtual public serDemoIf { public: serDemoHandler() { // Your initialization goes here } void put(const message& msg) { // Your implementation goes here printf("put\n"); printf("receive message: id: %d, content: %s\n", msg.seqId, msg.content.c_str()); } }; int main(int argc, char **argv) { int port = 9090; ::std::shared_ptr<serDemoHandler> handler(new serDemoHandler()); ::std::shared_ptr<TProcessor> processor(new serDemoProcessor(handler)); ::std::shared_ptr<TServerTransport> serverTransport(new TServerSocket(port)); ::std::shared_ptr<TTransportFactory> transportFactory(new TBufferedTransportFactory()); ::std::shared_ptr<TProtocolFactory> protocolFactory(new TBinaryProtocolFactory()); TSimpleServer server(processor, serverTransport, transportFactory, protocolFactory); server.serve(); return 0; } - 1
- 2
- 3
- 4
- 5
- 6
- 7
- 8
- 9
- 10
- 11
- 12
- 13
- 14
- 15
- 16
- 17
- 18
- 19
- 20
- 21
- 22
- 23
- 24
- 25
- 26
- 27
- 28
- 29
- 30
- 31
- 32
- 33
- 34
- 35
- 36
- 37
- 38
- 39
- 40
- 41
# 在gen-cpp目录下的终端输入 g++ *.cpp -o server -lthrift # 生成server可执行文件- 1
- 2
- 3
// 在同级目录下创建 client.cpp 文件 // ----------替换成自己的头文件---------- #include "serDemo.h" // -------------------------------------- #include#include #include using namespace apache::thrift; using namespace apache::thrift::protocol; using namespace apache::thrift::transport; using boost::shared_ptr; int main(int argc, char **argv) { std::shared_ptr<TSocket> socket(new TSocket("localhost", 9090)); std::shared_ptr<TTransport> transport(new TBufferedTransport(socket)); std::shared_ptr<TProtocol> protocol(new TBinaryProtocol(transport)); serDemoClient client(protocol); transport->open(); // ----------------------------我们的代码写在这里------------------------------ message msg; msg.seqId = 1; msg.content = "client message"; client.put(msg); //-------------------------------------------------------------------------- transport->close(); return 0; } - 1
- 2
- 3
- 4
- 5
- 6
- 7
- 8
- 9
- 10
- 11
- 12
- 13
- 14
- 15
- 16
- 17
- 18
- 19
- 20
- 21
- 22
- 23
- 24
- 25
- 26
- 27
- 28
- 29
- 30
- 31
- 32
- 33
- 34
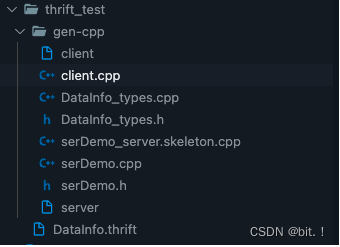
// 编译 client.cpp // 将serDemo_server.skeleton.cpp文件移动到其它位置,因为编译clietn.cpp不需要依赖,这样就可以这样编译 g++ *.cpp -o client -lthrift // 生成client可执行文件 // -------------------------------- // 不移动的编译命令为 g++ -o client *[^n].cpp -lthrift // 整个工程目录如下:- 1
- 2
- 3
- 4
- 5
- 6
- 7
- 8
- 9
- 10

// 在gen-cpp目录下开两个终端进行运行,先运行server,再运行client- 1
./server # 出现报错: # ./server: error while loading shared libraries: libthrift-0.16.0.so: cannot open shared object file: # No such file or directory # 原因:在编译时找不到libthrift-0.16.0.so这个动态库 # 通过命令 find / -name libthrift-0.16.0.so 查找文件路径 # 然后修改文件运行时动态库搜索路径 # 输出 /usr/local/lib/libthrift-0.16.0.so /usr/vscode/Thrift/thrift-0.16.0/lib/cpp/.libs/libthrift-0.16.0.so # 正常的动态库搜索顺序: # 1.编译目标代码时指定的动态库搜索路径; # 2.环境变量LD_LIBRARY_PATH指定的动态库搜索路径; # 3.配置文件/etc/ld.so.conf中指定的动态库搜索路径; # 4.默认的动态库搜索路径/lib /usr/lib。 # 修改环境变量指定的动态库搜索路径 export LD_LIBRARY_PATH=/usr/local/lib/ # 同理,客户端的终端也要执行 # 最终结果为:- 1
- 2
- 3
- 4
- 5
- 6
- 7
- 8
- 9
- 10
- 11
- 12
- 13
- 14
- 15
- 16
- 17
- 18
- 19
- 20
- 21
- 22
- 23
- 24
- 25
- 26
- 27
- 28
- 29

-
相关阅读:
idea导入maven项目依赖报错
PbootCMS SQL注入漏洞
阿里云官方 Redis 开发规范
模型微调(fine-tuning)
webpack拓展篇(六十八):bundle 和 bundless 的差异
uniapp的h5项目怎样分享指定信息到Facebook
什么是 WebRTC?
MyBatis-Plus 系列
Windows安装Go语言及VScode配置
C 二维数值指针访问
- 原文地址:https://blog.csdn.net/m0_51415606/article/details/126885780
