-
springboot-综合案例
springboot-综合案例
概览
通过上面内容的学习,我们完成一个综合案例:
采用 Springboot + mybatis + redis 实现对数据库的增删改查、分页、缓存操作。
具体需求如下:
1.MySQL数据库中有一张表 u_user
2.前端使用 thymeleaf 模板技术展示数据
3.后端使用 spring boot + mybatis + redis 实现对数据库数据的增删改查以及缓存操作
4.查询数据后将数据放入redis缓存中,减少对数据库的直接访问
主要目的是练习Springboot如何集成各类技术进行项目开发
1. SpringBoot-综合案例-环境搭建
1.1启动mysql
1.2启动redis
1.3 连接数据库
1.3.1 新建数据库
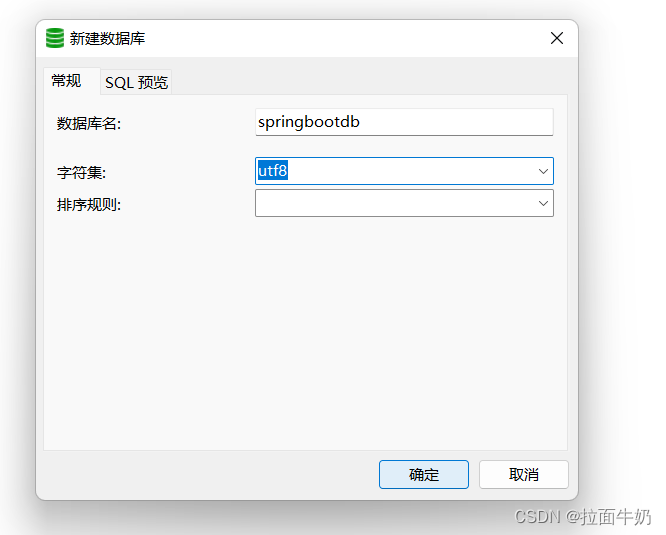
1.3.2新建表-并创建数据
/* Navicat Premium Data Transfer Source Server : 127.0.0.1mysql5.7.27 Source Server Type : MySQL Source Server Version : 50727 Source Host : localhost:3306 Source Schema : springbootdb Target Server Type : MySQL Target Server Version : 50727 File Encoding : 65001 Date: 31/08/2022 20:25:11 */ SET NAMES utf8mb4; SET FOREIGN_KEY_CHECKS = 0; -- ---------------------------- -- Table structure for t_user -- ---------------------------- DROP TABLE IF EXISTS `t_user`; CREATE TABLE `t_user` ( `id` int(11) NOT NULL AUTO_INCREMENT COMMENT 'id主键', `username` varchar(255) CHARACTER SET utf8 COLLATE utf8_general_ci NOT NULL COMMENT '账号\r\n', `password` varchar(255) CHARACTER SET utf8 COLLATE utf8_general_ci NOT NULL COMMENT '密码', `name` varchar(255) CHARACTER SET utf8 COLLATE utf8_general_ci NOT NULL COMMENT '姓名', `age` int(11) NOT NULL COMMENT '年龄', `sex` int(11) NOT NULL COMMENT '性别', `birthday` date NOT NULL COMMENT '时间', `xl` int(11) NOT NULL, PRIMARY KEY (`id`) USING BTREE, UNIQUE INDEX `username`(`username`) USING BTREE ) ENGINE = InnoDB AUTO_INCREMENT = 3 CHARACTER SET = utf8 COLLATE = utf8_general_ci ROW_FORMAT = DYNAMIC; -- ---------------------------- -- Records of t_user -- ---------------------------- INSERT INTO `t_user` VALUES (1, 'zs', '123456', '张三', 23, 1, '2022-06-13', 1); INSERT INTO `t_user` VALUES (2, 'ls', '123456', '李四', 24, 2, '2022-06-06', 2); SET FOREIGN_KEY_CHECKS = 1;- 1
- 2
- 3
- 4
- 5
- 6
- 7
- 8
- 9
- 10
- 11
- 12
- 13
- 14
- 15
- 16
- 17
- 18
- 19
- 20
- 21
- 22
- 23
- 24
- 25
- 26
- 27
- 28
- 29
- 30
- 31
- 32
- 33
- 34
- 35
- 36
- 37
- 38
- 39
- 40
- 41
- 42
- 43
- 44
1.4 创建工程
1.4.1 创建空的Project工程
1.4.2 创建Module模块
![[外链图片转存失败,源站可能有防盗链机制,建议将图片保存下来直接上传(img-IJxZc9CV-1663251148380)(img\创建工程结构.png)]](https://1000bd.com/contentImg/2023/11/09/045451374.png)
1.4.3 添加常用依赖
![[外链图片转存失败,源站可能有防盗链机制,建议将图片保存下来直接上传(img-x3WXRte7-1663251148384)(img\添加依赖.png)]](https://1000bd.com/contentImg/2023/11/09/045451497.png)
![ [外链图片转存失败,源站可能有防盗链机制,建议将图片保存下来直接上传(img-dvx9kkgo-1663251148384)(img\添加必要的依赖.png)]](https://1000bd.com/contentImg/2023/11/09/045451778.png)
勾选 -热部署插件-DevTools -web工程 -Thymeleaf -Mysql -Mybatis -Redis- 1
- 2
- 3
- 4
- 5
- 6
- 7
- 8
- 9
点击Finish 完成
1.4.4 修改环境信息
1.4.4.1 修改pom.xml文件
-
添加mysql的版本
<dependency> <groupId>mysqlgroupId> <artifactId>mysql-connector-javaartifactId> <scope>runtimescope> <version>5.1.46version> dependency>- 1
- 2
- 3
- 4
- 5
- 6
- 7
-
修改springboot版本-(将2.7.3的版本改成 2.3.12.RELEASE 低版本的)
<parent> <groupId>org.springframework.bootgroupId> <artifactId>spring-boot-starter-parentartifactId> <version>2.3.12.RELEASEversion> <relativePath/> parent>- 1
- 2
- 3
- 4
- 5
- 6
- 7
-
添加mybatis的插件
<build> <plugins> <plugin> <groupId>org.springframework.bootgroupId> <artifactId>spring-boot-maven-pluginartifactId> plugin> <plugin> <groupId>org.mybatis.generatorgroupId> <artifactId>mybatis-generator-maven-pluginartifactId> <version>1.3.6version> <configuration> <configurationFile>GeneratorMapper.xmlconfigurationFile> <verbose>trueverbose> <overwrite>trueoverwrite> configuration> plugin> plugins> <resources> <resource> <directory>src/main/javadirectory> <includes> <include>**/*.xmlinclude> includes> resource> resources> build>- 1
- 2
- 3
- 4
- 5
- 6
- 7
- 8
- 9
- 10
- 11
- 12
- 13
- 14
- 15
- 16
- 17
- 18
- 19
- 20
- 21
- 22
- 23
- 24
- 25
- 26
- 27
- 28
-
删除 spring-boot-maven-plugin
<build> <plugins> <plugin> <groupId>org.springframework.bootgroupId> <artifactId>spring-boot-maven-pluginartifactId> plugin> plugins> build>- 1
- 2
- 3
- 4
- 5
- 6
- 7
- 8
1.4.4.2修改配置文件
-
配置数据库连接
#配置数据库连接四要素 spring.datasource.driver-class-name=com.mysql.jdbc.Driver spring.datasource.url=jdbc:mysql://127.0.0.1:3306/springbootdb?useSSL=false&useUnicode=true&characterEncoding=utf-8&serverTimezone=Asia/Shanghai spring.datasource.username=root spring.datasource.password=root- 1
- 2
- 3
- 4
- 5
-
配置redis连接
#配置Redis的连接信息(单机版) ## redis所在的服务器IP spring.redis.host=127.0.0.1 ## 配置端口 spring.redis.port=6379 ##密码,我这里没有设置,所以不填 spring.redis.password= ## 设置最大连接数,0为无限 spring.redis.pool.max-active=8- 1
- 2
- 3
- 4
- 5
- 6
- 7
- 8
- 9
3.配置thymeleaf
#关闭缓冲,否则可能不能看到实时信息,开发阶段建议关闭,上线后建议开启 spring.thymeleaf.cache=false- 1
- 2
1.4.5 拷贝逆向工程 -GeneratorMapper.xml
DOCTYPE generatorConfiguration PUBLIC "-//mybatis.org//DTD MyBatis Generator Configuration 1.0//EN" "http://mybatis.org/dtd/mybatis-generator-config_1_0.dtd"> <generatorConfiguration> <classPathEntry location="D:\javaTools\maven_repository\mysql\mysql-connector-java\5.1.46\mysql-connector-java-5.1.46.jar"/> <context id="tables" targetRuntime="MyBatis3"> <commentGenerator> <property name="suppressAllComments" value="true" /> commentGenerator> <jdbcConnection driverClass="com.mysql.jdbc.Driver" connectionURL="jdbc:mysql://127.0.0.1:3306/springbootdb" userId="root" password="root"> jdbcConnection> <javaModelGenerator targetPackage="com.springboot.model" targetProject="src/main/java"> <property name="enableSubPackages" value="false" /> <property name="trimStrings" value="false" /> javaModelGenerator> <sqlMapGenerator targetPackage="com.springboot.mapper" targetProject="src/main/java"> <property name="enableSubPackages" value="false" /> sqlMapGenerator> <javaClientGenerator type="XMLMAPPER" targetPackage="com.springboot.mapper" targetProject="src/main/java"> <property name="enableSubPackages" value="false" /> javaClientGenerator> <table tableName="t_user" domainObjectName="User" enableCountByExample="false" enableUpdateByExample="false" enableDeleteByExample="false" enableSelectByExample="false" selectByExampleQueryId="false"/> context> generatorConfiguration>- 1
- 2
- 3
- 4
- 5
- 6
- 7
- 8
- 9
- 10
- 11
- 12
- 13
- 14
- 15
- 16
- 17
- 18
- 19
- 20
- 21
- 22
- 23
- 24
- 25
- 26
- 27
- 28
- 29
- 30
- 31
- 32
- 33
- 34
- 35
- 36
- 37
- 38
- 39
- 40
- 41
- 42
- 43
- 44
- 45
- 46
- 47
- 48
- 49
- 50
- 51
- 52
- 53
![[外链图片转存失败,源站可能有防盗链机制,建议将图片保存下来直接上传(img-5epZuZoR-1663251148385)(img\逆向文件位置.png)]](https://1000bd.com/contentImg/2023/11/09/045451452.png)
1.4.6 主启动类添加注解
@MapperScan(basePackages = "com.springboot.mapper")- 1
1.4.7 准备页面
将命名空间拷贝进去
xmlns:th="http://www.thymeleaf.org"- 1
完整代码
DOCTYPE html> <html lang="en" xmlns:th="http://www.thymeleaf.org"> <head> <meta charset="UTF-8"> <title>Titletitle> head> <body> <h1>index.htmlh1> body> html>- 1
- 2
- 3
- 4
- 5
- 6
- 7
- 8
- 9
- 10
1.5 准备类
1.5.1创建Controller
import org.springframework.stereotype.Controller; import org.springframework.ui.Model; import org.springframework.web.bind.annotation.RequestMapping; import javax.annotation.Resource; @Controller public class UserController { @Resource private UserService userService; @RequestMapping("/") public String index(){ return "index"; } }- 1
- 2
- 3
- 4
- 5
- 6
- 7
- 8
- 9
- 10
- 11
- 12
- 13
- 14
- 15
- 16
- 17
- 18
1.5.1创建Service
空的
1.5.1创建ServiceImpl
import com.springboot.service.UserService; @Service public class UserServiceImpl implements UserService { }- 1
- 2
- 3
- 4
- 5
- 6
1.6测试
localhost:8080- 1
![[外链图片转存失败,源站可能有防盗链机制,建议将图片保存下来直接上传(img-YSvCx0d3-1663251148385)(img\测试成功.png)]](https://1000bd.com/contentImg/2023/11/09/045451338.png)
2. SpringBoot-综合案例-显示数据列表
2.1 实现显示数据列表
2.1.1 编写controller
@RequestMapping("/") public String index(Model model) { List<User> list = userService.getUserList(); model.addAttribute("userList", list); return "index"; }- 1
- 2
- 3
- 4
- 5
- 6
2.1.2 编写service 和serviceimpl
/*获取Userlist列表*/ List<User> getUserList();- 1
- 2
- 3
/*注入userMapper*/ @Resource private UserMapper userMapper; /*获取Userlist列表*/ @Override public List<User> getUserList() { List<User>list= userMapper.selectAll(); return list; }- 1
- 2
- 3
- 4
- 5
- 6
- 7
- 8
- 9
2.1.3 编写mapper(dao层)
/*查询列表*/ List<User> selectAll();- 1
- 2
2.1.4 编写mapper.xml文件
<select id="selectAll" resultMap="BaseResultMap"> select <include refid="Base_Column_List" /> from t_user select>- 1
- 2
- 3
- 4
- 5
- 6
2.1.5 编写前端代码
<table> <tr> <td>序号td> <td>账号td> <td>姓名td> <td>年龄td> <td>性别td> <td>生日td> <td>学历td> <td>td> tr> <tr th:each="user:${userList}" th:object="${user}"> <td th:text="${userStat.count}">序号td> <td th:text="*{username}">账号td> <td th:text="*{name}">姓名td> <td th:text="*{age}">年龄td> <td th:text="*{sex==1?'男':'女'}">性别td> <td th:text="*{#dates.format(birthday,'yyyy-MM-dd')}">生日td> <td th:switch="*{xl}"> <span th:case="1">小学span> <span th:case="2">初中span> <span th:case="3">高中span> <span th:case="4">本科span> <span th:case="5">其他span> td> <td> <a th:href="@{|/toUpdate?id=*{id}|}">修改a> <a th:href="@{|/delete?id=*{id}|}">删除a> td> tr> table>- 1
- 2
- 3
- 4
- 5
- 6
- 7
- 8
- 9
- 10
- 11
- 12
- 13
- 14
- 15
- 16
- 17
- 18
- 19
- 20
- 21
- 22
- 23
- 24
- 25
- 26
- 27
- 28
- 29
- 30
- 31
- 32
- 33
- 34
- 35
2.2 结合redis实现缓存
2.2.1 为什么要使用缓存.
如果每次我们都要从数据库读,肯定会影响效率, 那我们是不是就会想到用缓存技术,那我们学到了什么缓存技术呢,是不是redis,.那我们就讲Redis使用进来
2.2.2 在serviceimpl增加缓存
-
注入redisTemplate对象
/*注入redisTemplate*/ @Resource private RedisTemplate redisTemplate;- 1
- 2
- 3
-
修改getUserList方法
/*获取Userlist列表*/ @Override public ListgetUserList() { List list= (List ) redisTemplate.opsForValue().get("userAll"); if(list==null||list.isEmpty()){ synchronized (this){ list= (List ) redisTemplate.opsForValue().get("userAll"); if(list==null||list.isEmpty()){ list= userMapper.selectAll(); redisTemplate.opsForValue().set("userAll",list); } } } return list; } - 1
- 2
- 3
- 4
- 5
- 6
- 7
- 8
- 9
- 10
- 11
- 12
- 13
- 14
- 15
-
在User 实现序列化接口
public class User implements Serializable{- 1
缓存成功:
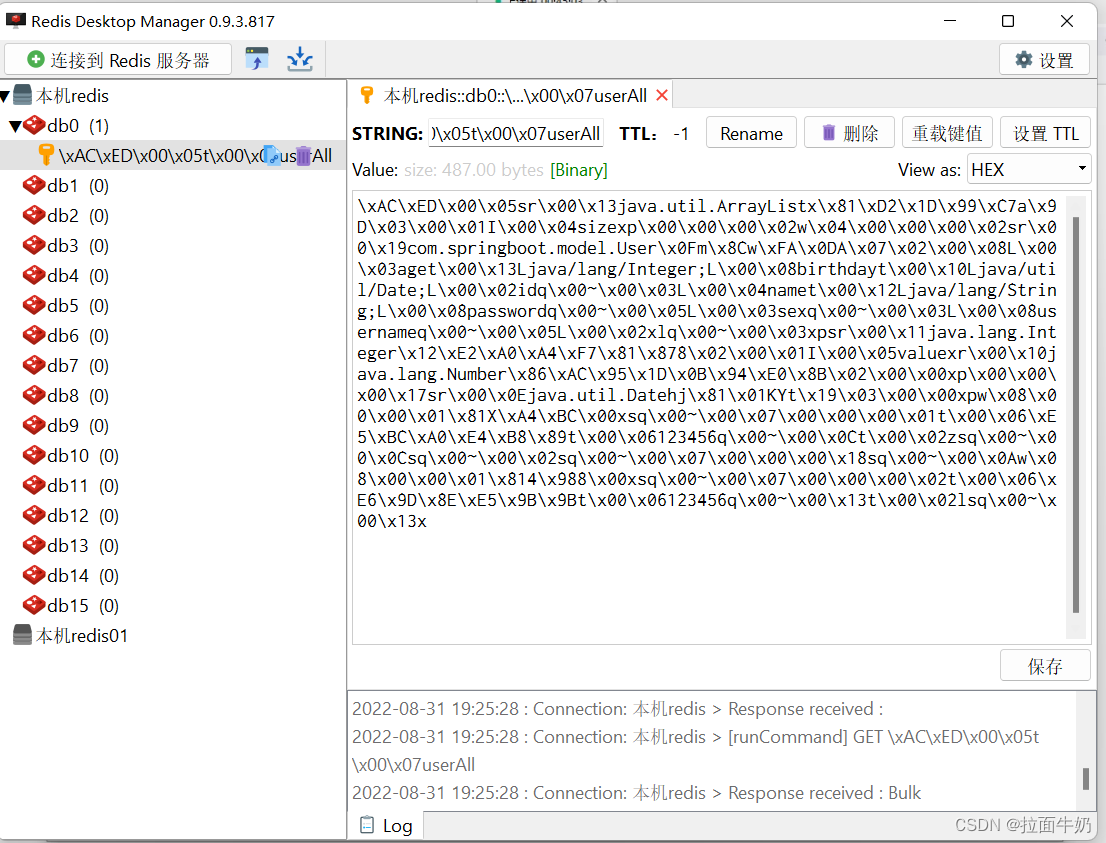
3. SpringBoot-综合案例-显示数据详情
3.1 实现显示数据详情
3.1.1 编写controller
/*根据id查询用户*/ @RequestMapping("/private/toUpdate") public String toUpdate(Integer id,Model model){ User user= userService.getUserById(id); model.addAttribute("user",user); return "update"; }- 1
- 2
- 3
- 4
- 5
- 6
- 7
3.1.2 编写Service
/*根据id查询用户*/ User getUserById(Integer id);- 1
- 2
3.1.3 编写Serviceimpl
/*根据id查询用户*/ @Override public User getUserById(Integer id) { return userMapper.selectByPrimaryKey(id); }- 1
- 2
- 3
- 4
- 5
3.1.4 修改index.html代码
/*增加两个/private */ <a th:href="@{|/private/toUpdate?id=*{id}|}">修改a> <a th:href="@{|/private/delete?id=*{id}|}">删除a>- 1
- 2
- 3
3.1.5 新建update.html
将命名空间(xmlns:th=“http://www.thymeleaf.org”)
Title - 1
- 2
- 3
- 4
- 5
- 6
- 7
- 8
- 9
- 10
3.1.4 body中编写前端代码
<h1>修改数据h1> <form th:action="@{|/private/update|}" method="post" th:object="${user}"> 账号:<input type="text" th:value="*{username}" ><br> 姓名:<input type="text" th:value="*{name}" ><br> 年龄:<input type="text" th:value="*{age}"><br> 性别: <input type="radio" value="1" >男 <input type="radio" value="2" >女 <br> 生日:<input type="text" th:value="*{#dates.format(birthday,'yyyy-MM-dd')}" ><br> 学历: <select > <option value="1" >小学option> <option value="2" >初中option> <option value="3" >高中option> <option value="4" >本科option> <option value="5" >其他option> select><br> <input type="submit" value="修改"> form>- 1
- 2
- 3
- 4
- 5
- 6
- 7
- 8
- 9
- 10
- 11
- 12
- 13
- 14
- 15
- 16
- 17
- 18
- 19
- 20
测试:http://localhost:8080/ 访问–>修改
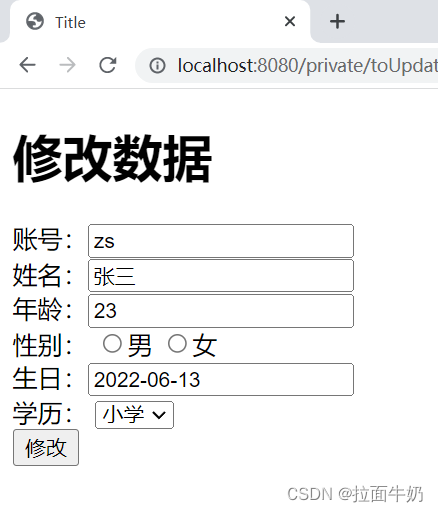
3.2 前端自动选中性别和学历
3.2.1 增加动态获取数据
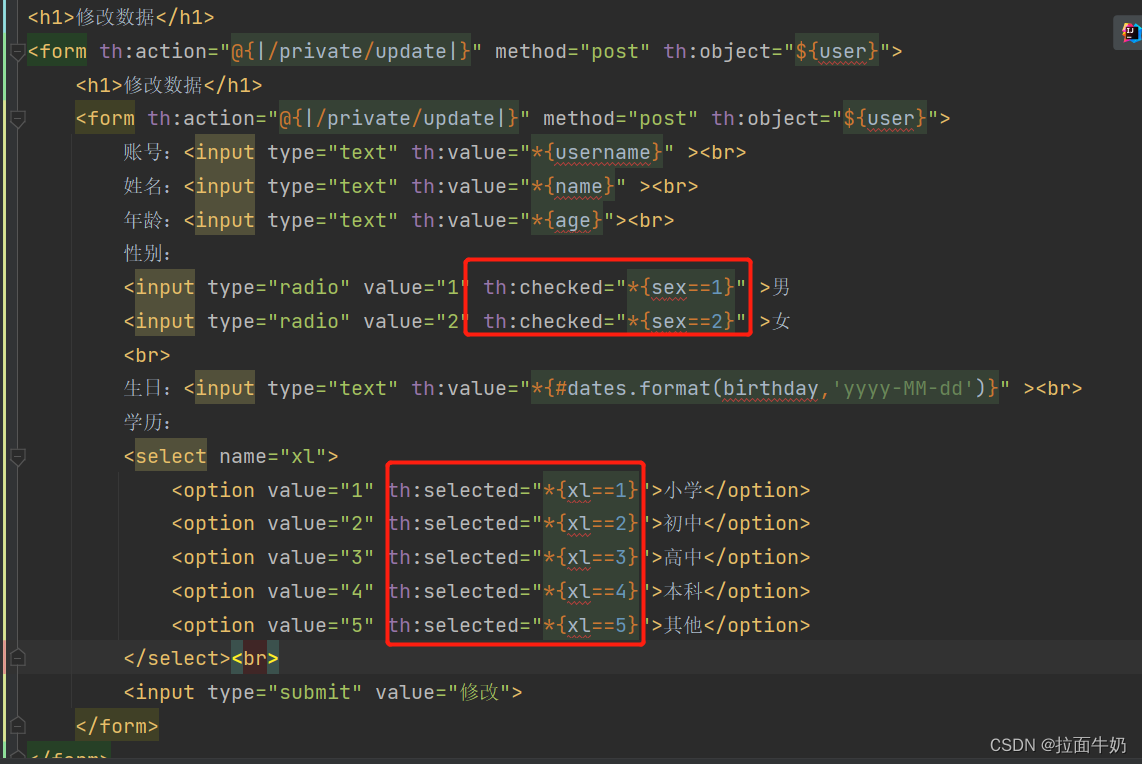
性别: <input type="radio" value="1" th:checked="*{sex==1}" >男 <input type="radio" value="2" th:checked="*{sex==2}" >女 <br> 学历: <select name="xl"> <option value="1" th:selected="*{xl==1}">小学option> <option value="2" th:selected="*{xl==2}">初中option> <option value="3" th:selected="*{xl==3}">高中option> <option value="4" th:selected="*{xl==4}">本科option> <option value="5" th:selected="*{xl==5}">其他option> select><br>- 1
- 2
- 3
- 4
- 5
- 6
- 7
- 8
- 9
- 10
- 11
- 12
- 13
- 14
再次测试:http://localhost:8080/ 访问–>修改
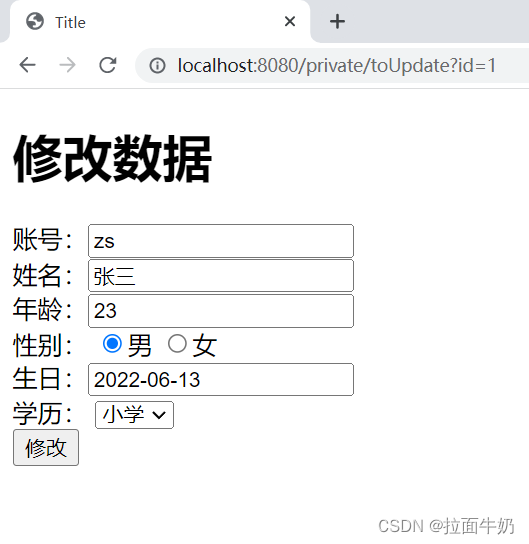
4. SpringBoot-综合案例-修改数据
4.1 实现修改数据
4.1.1 编写controller
//默认这里会出现异常,因为表单有日期格式的数据需要设置到User对象中。解决方案参考User类中的birthday属性的注解 /*修改方法*/ @RequestMapping("/private/update") public String update(User user){ userService.update(user); return "redirect:/"; }- 1
- 2
- 3
- 4
- 5
- 6
- 7
4.1.2修改User类
//将指定格式的字符串格式化成Date对象 @DateTimeFormat(pattern = "yyyy-MM-dd") private Date birthday;- 1
- 2
- 3
4.1. 3 编写service 和serviceimpl
/*修改用户信息*/ void update(User user);- 1
- 2
- 3
/*修改用户信息*/ @Override public void update(User user) { //由于参数User对象中的属性username和password没有值,因此需要调用updateByPrimaryKeySelective方法,进行选择列否改 //否则会将表中的username和password数据修改为null userMapper.updateByPrimaryKeySelective(user); //更新数据库的数据后,Redis中存在的数据和数据库不一致,Redis中的数据为脏数据解决方案如下 //1. 将Redis的数据删除,需要时再从数据库中读取存入Redis。可以及时更新Redis中的数据,但如果数据频繁修改效率不高且Redis缓冲利用率比较低 //2. 配置定时任务,定期更新例如1秒或10秒钟更新一次。不能及时更新Redis,但是可以在频繁修改的数据中使用,缓冲利用率比较高 redisTemplate.delete("userAll"); }- 1
- 2
- 3
- 4
- 5
- 6
- 7
- 8
- 9
- 10
- 11
4.1. 4 修改update页面
<form th:action="@{|/private/update|}" method="post" th:object="${user}"> 账号:<input type="text" th:value="*{username}" readonly><br> 姓名:<input type="text" th:value="*{name}" name="name"><br> 年龄:<input type="text" th:value="*{age}" name="age"><br> 性别: <input type="radio" value="1" th:checked="*{sex==1}" name="sex">男 <input type="radio" value="2" th:checked="*{sex==2}" name="sex">女 <br> 生日:<input type="text" th:value="*{#dates.format(birthday,'yyyy-MM-dd')}" name="birthday"><br> 学历: <select name="xl"> <option value="1" th:selected="*{xl==1}">小学option> <option value="2" th:selected="*{xl==2}">初中option> <option value="3" th:selected="*{xl==3}">高中option> <option value="4" th:selected="*{xl==4}">本科option> <option value="5" th:selected="*{xl==5}">其他option> select><br> <input type="hidden" th:value="*{id}" name="id"> <input type="submit" value="修改"> form>- 1
- 2
- 3
- 4
- 5
- 6
- 7
- 8
- 9
- 10
- 11
- 12
- 13
- 14
- 15
- 16
- 17
- 18
- 19
- 20
- 21
测试:http://localhost:8080/ 访问–>修改–修改成功
5. SpringBoot-综合案例-删除数据
5.1实现删除数据
5.1.1修改index.html的删除
<a th:href="@{|/private/delete?id=*{id}|}" onclick="return confirm('确认要删除数据码?')">删除a>- 1
- 2
- 3
- 4
- 5
5.1.2 编写controller
/*删除数据*/ //默认这里会出现异常,因为表单有日期格式的数据需要设置到User对象中。解决方案参考User类中的birthday属性的注解 @RequestMapping("/private/delete") public String delete(Integer id){ userService.deleteById(id); return "redirect:/"; }- 1
- 2
- 3
- 4
- 5
- 6
- 7
5.1.3 编写service 和serviceimpl
/*根据id删除数据*/ void deleteById(Integer id);- 1
- 2
/*根据id删除数据*/ @Override public void deleteById(Integer id) { userMapper.deleteByPrimaryKey(id); //更新数据库的数据后,Redis中存在的数据和数据库不一致,Redis中的数据为脏数据解决方案如下 //1. 将Redis的数据删除,需要时再从数据库中读取存入Redis。可以及时更新Redis中的数据,但如果数据频繁修改效率不高且Redis缓冲利用率比较低 //2. 配置定时任务,定期更新例如1秒或10秒钟更新一次。不能及时更新Redis,但是可以在频繁修改的数据中使用,缓冲利用率比较高 redisTemplate.delete("userAll"); }- 1
- 2
- 3
- 4
- 5
- 6
- 7
- 8
- 9
测试:http://localhost:8080/ 访问–>删除–删除成功
6. SpringBoot-综合案例-添加数据
6.1实现添加页面
6.1.1新增add.html添加页面
DOCTYPE html> <html lang="en" xmlns:th="http://www.thymeleaf.org"> <head> <meta charset="UTF-8"> <title>Titletitle> head> <body> <h1>添加数据h1> body> html>- 1
- 2
- 3
- 4
- 5
- 6
- 7
- 8
- 9
- 10
6.1.2 编写index.html页面
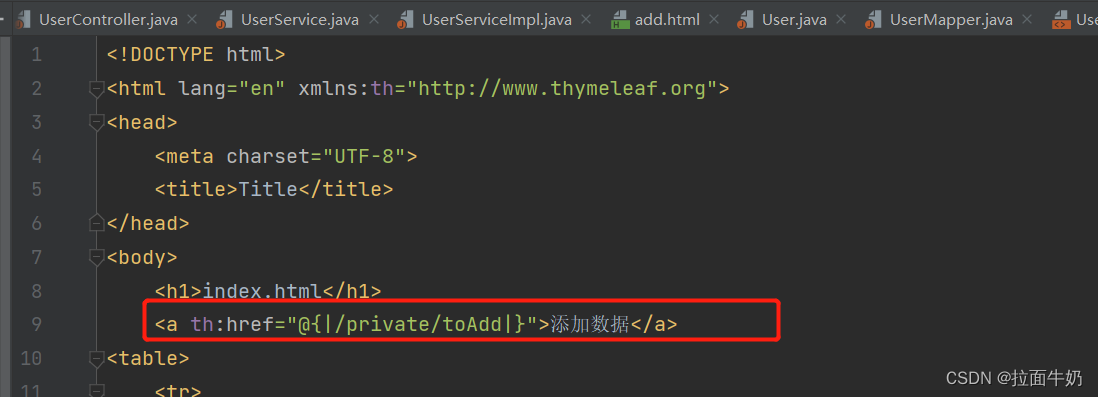
<a th:href="@{|/private/toAdd|}">添加数据a>- 1
6.1.3 编写controller
/*因为无法直接访问templates 下的add页面.所以从controller跳转*/ @RequestMapping("/private/toAdd") public String toAdd(){ return "add"; }- 1
- 2
- 3
- 4
- 5
6.1.4 测试:http://localhost:8080 点击添加数据按钮
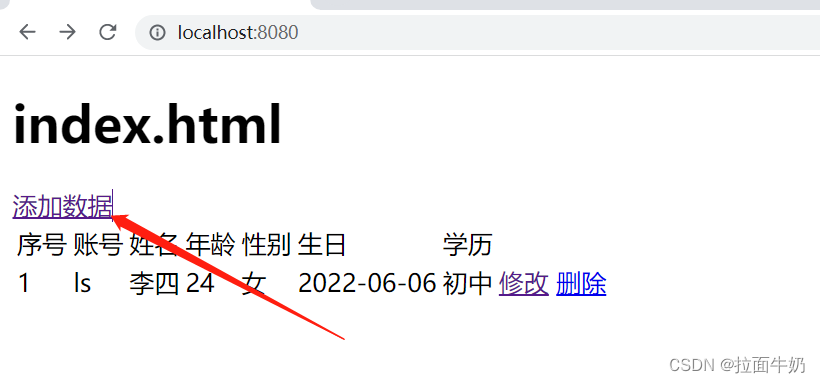
6.1.5正常跳转add页面成功
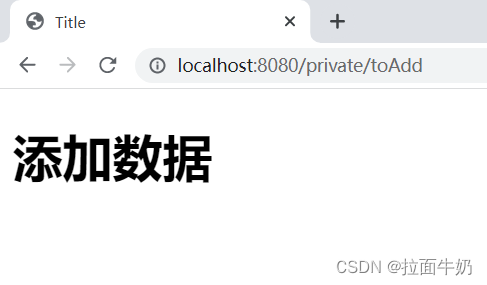
6.2实现添加数据
6.2.1 编写controller
/*新增用户*/ @RequestMapping("/private/add") public String add(User user,Model model){ //插入数据,返回0表示添加成功 ,返回1 表示账号重复 int result=userService.addUser(user); if(result==1){ model.addAttribute("msg","账号已经存在请更换!例如"+user.getUsername()+"123"); return "add"; } return "redirect:/"; }- 1
- 2
- 3
- 4
- 5
- 6
- 7
- 8
- 9
- 10
- 11
6.2.2 编写service和serviceImpl
/*新增用户*/ int addUser(User user);- 1
- 2
/*新增用户*/ @Override public int addUser(User user) { userMapper.insert(user); //更新数据库的数据后,Redis中存在的数据和数据库不一致,Redis中的数据为脏数据解决方案如下 //1. 将Redis的数据删除,需要时再从数据库中读取存入Redis。可以及时更新Redis中的数据,但如果数据频繁修改效率不高且Redis缓冲利用率比较低 //2. 配置定时任务,定期更新例如1秒或10秒钟更新一次。不能及时更新Redis,但是可以在频繁修改的数据中使用,缓冲利用率比较高 redisTemplate.delete("userAll"); return 0; }- 1
- 2
- 3
- 4
- 5
- 6
- 7
- 8
- 9
- 10
6.2.3 将update.html页面的form数据粘贴过来,进行修改
(因为update页面的数据和新增页面的基本数据一致.)
<h1>修改数据h1> <form th:action="@{|/private/update|}" method="post" th:object="${user}"> 账号:<input type="text" th:value="*{username}" readonly><br> 姓名:<input type="text" th:value="*{name}" name="name"><br> 年龄:<input type="text" th:value="*{age}" name="age"><br> 性别: <input type="radio" value="1" th:checked="*{sex==1}" name="sex">男 <input type="radio" value="2" th:checked="*{sex==2}" name="sex">女 <br> 生日:<input type="text" th:value="*{#dates.format(birthday,'yyyy-MM-dd')}" name="birthday"><br> 学历: <select name="xl"> <option value="1" th:selected="*{xl==1}">小学option> <option value="2" th:selected="*{xl==2}">初中option> <option value="3" th:selected="*{xl==3}">高中option> <option value="4" th:selected="*{xl==4}">本科option> <option value="5" th:selected="*{xl==5}">其他option> select><br> <input type="hidden" th:value="*{id}" name="id"> <input type="submit" value="修改"> form>- 1
- 2
- 3
- 4
- 5
- 6
- 7
- 8
- 9
- 10
- 11
- 12
- 13
- 14
- 15
- 16
- 17
- 18
- 19
- 20
- 21
- 22
6.2.3.1 将update.html页面的th删除,将上方的h1修改为添加数据
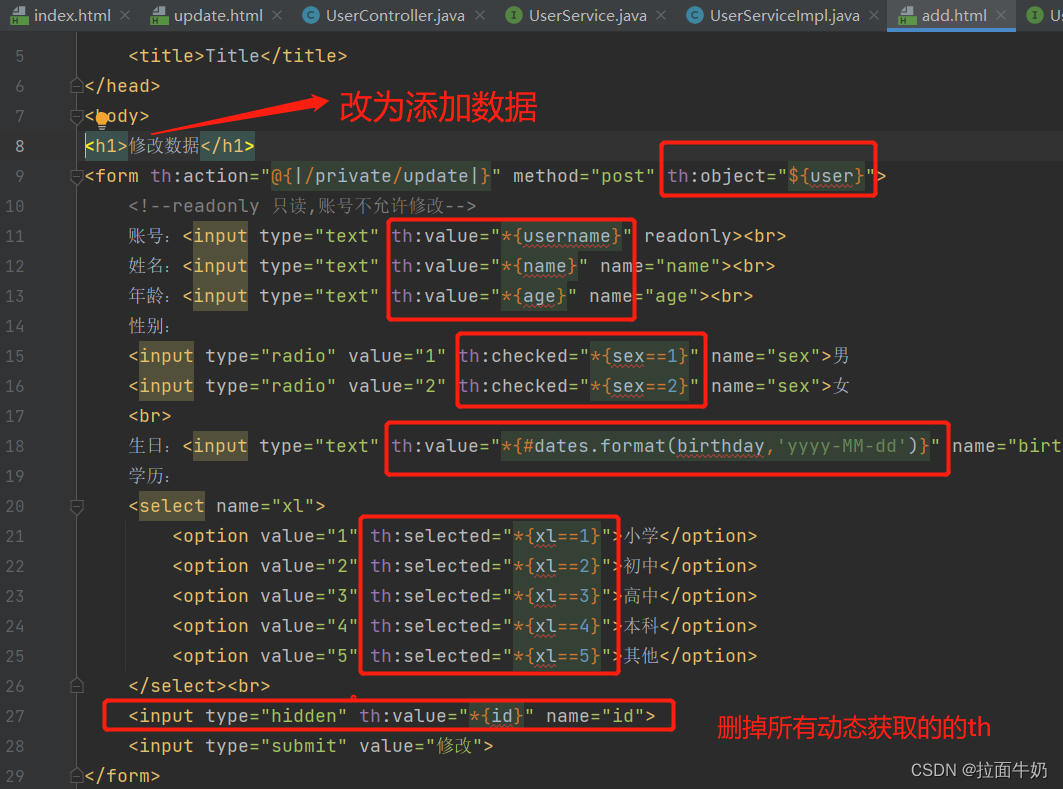
6.2.3.2新增两个输入框
账号:<input type="text" name="username"><br> 密码:<input type="text" name="password"><br>- 1
- 2
- 3
6.2.3.3请求路径为add
<form th:action="@{|/private/add|}" method="post" >- 1
6.2.3.4 input 标签修改为添加
<input type="submit" value="添加">- 1
6.2.3.5 修改成功后为:
<h1>添加数据h1> <form th:action="@{|/private/add|}" method="post" > 账号:<input type="text" name="username"><br> 密码:<input type="text" name="password"><br> 姓名:<input type="text" name="name"><br> 年龄:<input type="text" name="age"><br> 性别: <input type="radio" value="1" name="sex">男 <input type="radio" value="2" name="sex">女 <br> 生日:<input type="text" name="birthday"><br> 学历: <select name="xl"> <option value="1" >小学option> <option value="2" >初中option> <option value="3" >高中option> <option value="4" >本科option> <option value="5" >其他option> select><br> <input type="submit" value="添加"> form>- 1
- 2
- 3
- 4
- 5
- 6
- 7
- 8
- 9
- 10
- 11
- 12
- 13
- 14
- 15
- 16
- 17
- 18
- 19
- 20
- 21
- 22
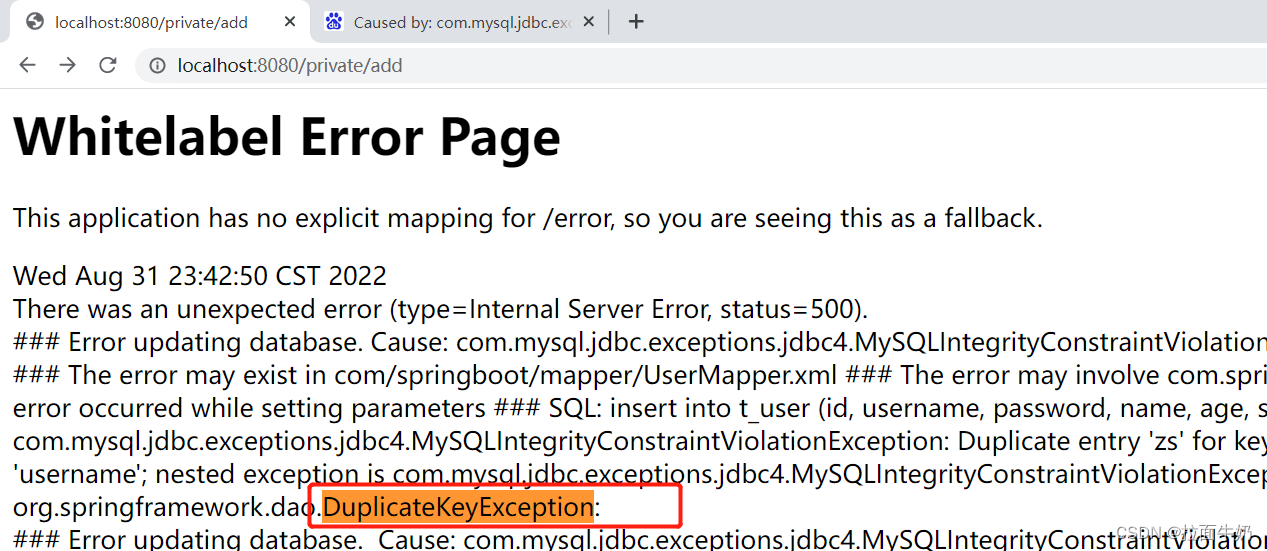
测试: http://localhost:8080/ 测试添加-当重复提交相同的username的时候,爆出异常

6.3解决 .DuplicateKeyException: 异常
org.springframework.dao.DuplicateKeyException:
6.3.1在serviceimpl实现类添加 try {} catch(){}
/*新增用户*/ @Override public int addUser(User user) { try { //插入数据,可能会抛出DuplicateKeyException异常,这个异常是Spring提供的,表示违反数据库的唯一约束,代表账号重复 userMapper.insert(user); //更新数据库的数据后,Redis中存在的数据和数据库不一致,Redis中的数据为脏数据解决方案如下 //1. 将Redis的数据删除,需要时再从数据库中读取存入Redis。可以及时更新Redis中的数据,但如果数据频繁修改效率不高且Redis缓冲利用率比较低 //2. 配置定时任务,定期更新例如1秒或10秒钟更新一次。不能及时更新Redis,但是可以在频繁修改的数据中使用,缓冲利用率比较高 redisTemplate.delete("userAll"); } catch (DuplicateKeyException e) { return 1; } return 0; }- 1
- 2
- 3
- 4
- 5
- 6
- 7
- 8
- 9
- 10
- 11
- 12
- 13
- 14
- 15
6.3.2在add.html添加span标签
<span style="color: red">[[${msg}]]span>- 1
- 2
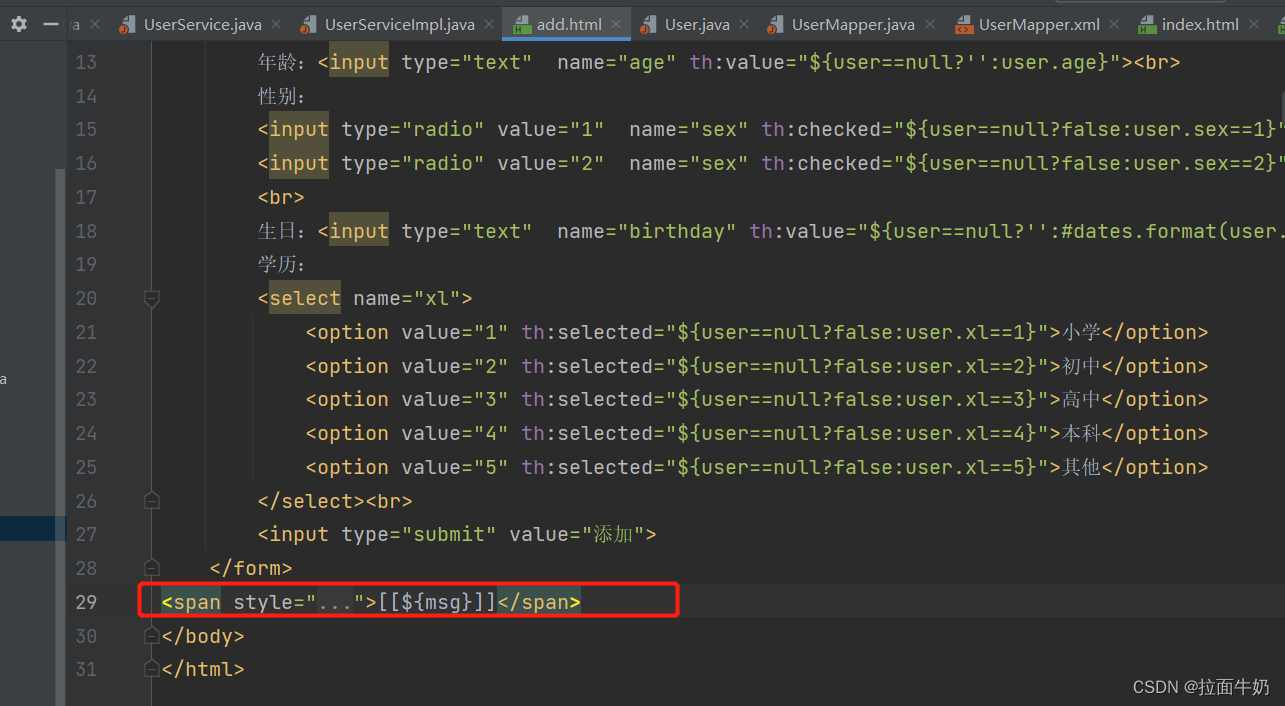
测试:http://localhost:8080/ 重复添加账号
成功回显重复账号提示信息
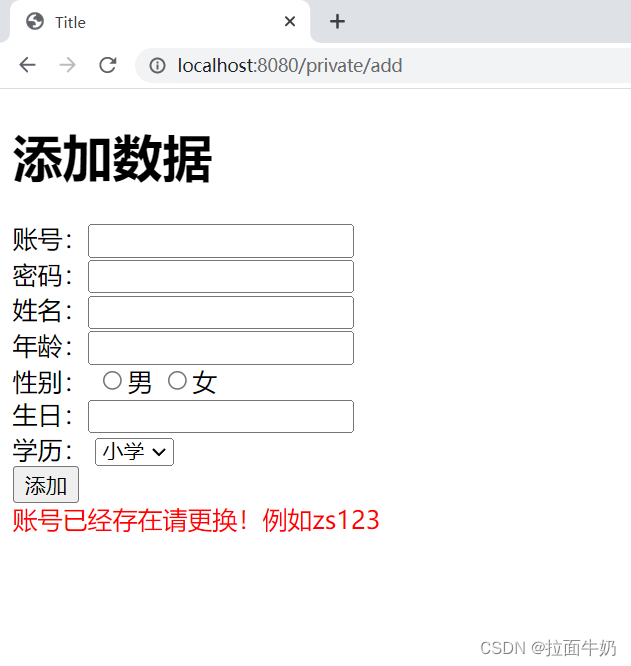
6.4 当用户添加不成功,保留用户之前输入的数据
6.4.1修改controller的add方法
model.addAttribute("user",user);- 1
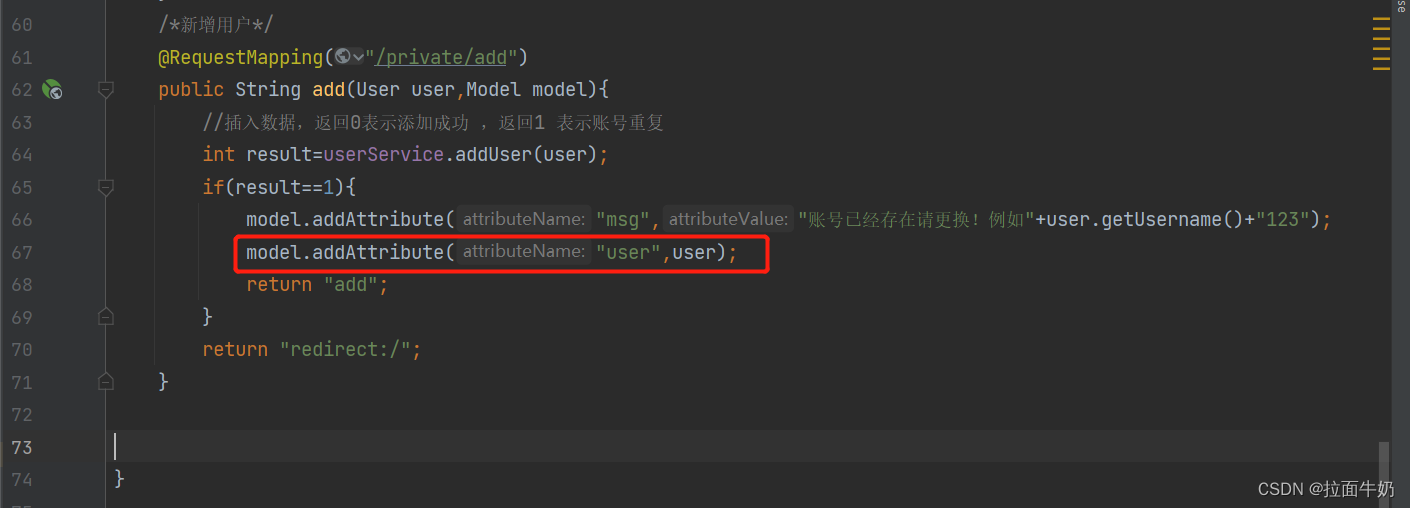
6.4.2 修改add.html页面
由于我们回到add页面有两个途径,分别是/pricate/toAdd 和 /pricate/add 两个控制器.由于toAdd页面没有数据会报错,所以我们要这样实现前端页面.我们要先判null
<form th:action="@{|/private/add|}" method="post" > 账号:<input type="text" name="username" th:value="${user==null?'':user.username}"><br> 密码:<input type="text" name="password"><br> 姓名:<input type="text" name="name" th:value="${user==null?'':user.name}"><br> 年龄:<input type="text" name="age" th:value="${user==null?'':user.age}"><br> 性别: <input type="radio" value="1" name="sex" th:checked="${user==null?false:user.sex==1}">男 <input type="radio" value="2" name="sex" th:checked="${user==null?false:user.sex==2}">女 <br> 生日:<input type="text" name="birthday" th:value="${user==null?'':#dates.format(user.birthday,'yyyy-MM-dd')}"><br> 学历: <select name="xl"> <option value="1" th:selected="${user==null?false:user.xl==1}">小学option> <option value="2" th:selected="${user==null?false:user.xl==2}">初中option> <option value="3" th:selected="${user==null?false:user.xl==3}">高中option> <option value="4" th:selected="${user==null?false:user.xl==4}">本科option> <option value="5" th:selected="${user==null?false:user.xl==5}">其他option> select><br> <input type="submit" value="添加"> form>- 1
- 2
- 3
- 4
- 5
- 6
- 7
- 8
- 9
- 10
- 11
- 12
- 13
- 14
- 15
- 16
- 17
- 18
- 19
- 20
- 21
测试: http://localhost:8080/ 提交重复的账号数据
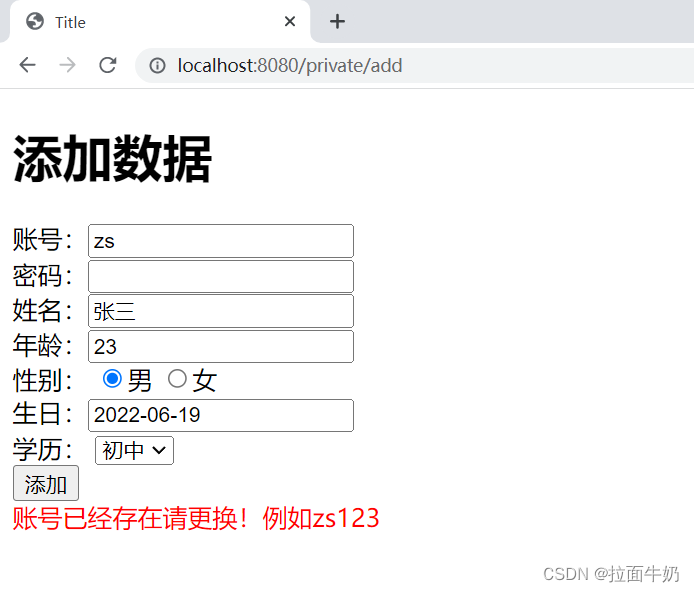
7. SpringBoot-综合案例-拦截器判断用户是否登录
7.1 创建 interceptors 包 -新建拦截器类 IsLoginInterceptor
package com.springboot.interceptors; import com.springboot.model.User; import org.springframework.stereotype.Component; import org.springframework.web.servlet.HandlerInterceptor; import javax.servlet.http.HttpServletRequest; import javax.servlet.http.HttpServletResponse; /*拦截器类*/ @Component public class IsLoginInterceptor implements HandlerInterceptor { @Override public boolean preHandle(HttpServletRequest request, HttpServletResponse response, Object handler) throws Exception { User user= (User) request.getSession().getAttribute("userSession"); if(user==null){ //没有登录,转向到noLogin控制器 request.getRequestDispatcher("/noLogin").forward(request,response); return false; } return true; } }- 1
- 2
- 3
- 4
- 5
- 6
- 7
- 8
- 9
- 10
- 11
- 12
- 13
- 14
- 15
- 16
- 17
- 18
- 19
- 20
- 21
- 22
- 23
7.2 编写controller 方法
/*用户未登录跳转*/ @RequestMapping("/noLogin") public String noLogin(Model model){ model.addAttribute("msg","请登录后在操作"); return "login"; }- 1
- 2
- 3
- 4
- 5
- 6
7. 3新建login.html页面
DOCTYPE html> <html lang="en" xmlns:th="http://www.thymeleaf.org"> <head> <meta charset="UTF-8"> <title>Titletitle> head> <body> <h1>用户登录h1> <span style="color: red">[[${msg}]]span> body> html>- 1
- 2
- 3
- 4
- 5
- 6
- 7
- 8
- 9
- 10
- 11
7.4 创建config 包 -新建拦截器类配置类 InterceptorConfig
package com.springboot.config; import com.springboot.interceptors.IsLoginInterceptor; import org.springframework.context.annotation.Configuration; import org.springframework.stereotype.Component; import org.springframework.web.servlet.config.annotation.InterceptorRegistry; import org.springframework.web.servlet.config.annotation.WebMvcConfigurer; import javax.annotation.Resource; /*拦截器配置类*/ @Configuration public class InterceptorConfig implements WebMvcConfigurer { //注入拦截器类对象 @Resource private IsLoginInterceptor isLoginInterceptor; @Override public void addInterceptors(InterceptorRegistry registry) { /*添加拦截器类*/ registry.addInterceptor(isLoginInterceptor) .addPathPatterns("/private/**");//指定拦截/private/下的所有方法 } }- 1
- 2
- 3
- 4
- 5
- 6
- 7
- 8
- 9
- 10
- 11
- 12
- 13
- 14
- 15
- 16
- 17
- 18
- 19
- 20
- 21
- 22
- 23
测试: http://localhost:8080/ 点击任意请求,都将跳转到登录页面
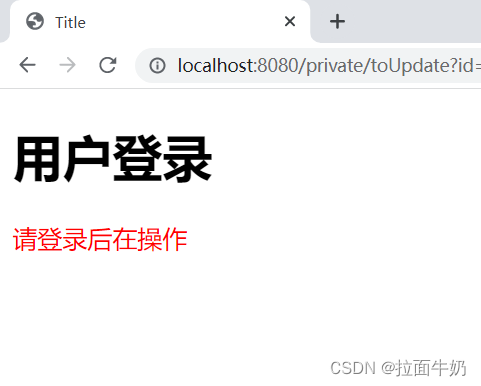
8. SpringBoot-综合案例-用户登录
8.1 修改login.html页面
增加命名空间和form 表单
<html lang="en" xmlns:th="http://www.thymeleaf.org"> <form th:action="@{|/login|}" method="post"> 账号:<input type="text" name="username"><br> 密码:<input type="text" name="password"><br> <input type="submit" value="登录"> form>- 1
- 2
- 3
- 4
- 5
- 6
- 7
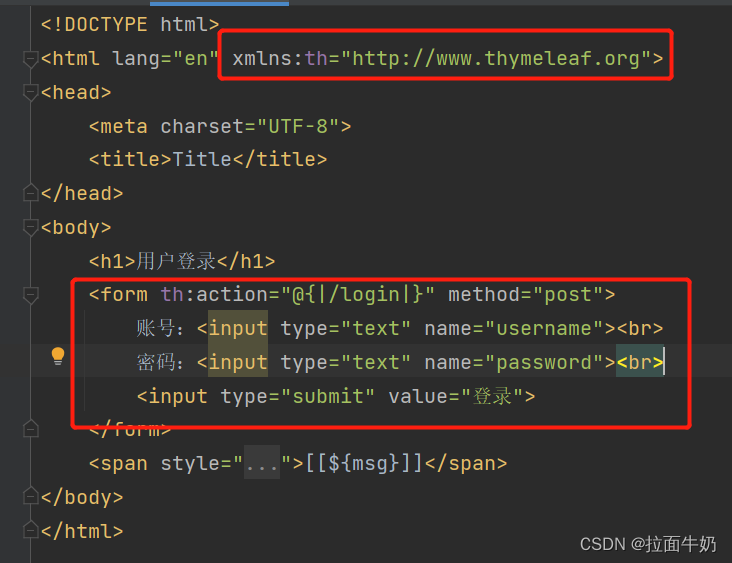
8.2 修改controller 添加login 方法
/*用户登录方法*/ @RequestMapping("/login") public String login(User user, Model model, HttpSession session){ int result= userService.login(user); if(result==1){ model.addAttribute("msg","账号错误"); return "login"; } if(result==2){ model.addAttribute("msg","密码错误"); return "login"; } session.setAttribute("userSession",user); return "redirect:/"; }- 1
- 2
- 3
- 4
- 5
- 6
- 7
- 8
- 9
- 10
- 11
- 12
- 13
- 14
- 15
8.3 修改service和serviceimpl
/*用户登录*/ int login(User user);- 1
- 2
/*用户登录*/ @Override public int login(User user) { //根据用户账号查询用户 User dbUser= userMapper.selectByUsername(user.getUsername()); if(dbUser==null){ return 1; } if(!dbUser.getPassword().equals(user.getPassword())){ return 2; } //将数据库中的user数据拷贝到当前方法的形参中 BeanUtils.copyProperties(dbUser,user); return 0; }- 1
- 2
- 3
- 4
- 5
- 6
- 7
- 8
- 9
- 10
- 11
- 12
- 13
- 14
- 15
8.4 修改mapper
//根据用户账号查询用户 User selectByUsername(String username);- 1
- 2
8.5 修改mapper.xml
<select id="selectByUsername" resultMap="BaseResultMap"> select <include refid="Base_Column_List" /> from t_user where username=#{username} select>- 1
- 2
- 3
- 4
- 5
- 6
- 7
-
相关阅读:
mysql超全语法大全
Linux-socket套接字
IP地址详解 IP地址的分类
图解 SQL,这也太形象了吧
Visual Studio 2022下载、安装与运行使用方法
【TcaplusDB知识库】TcaplusDB技术支持介绍
数学--逆运算知识点,附推逆函数的一例
openGauss数据库基本操作(超详细)
13. MIC配置
2022下半年前端面试题总结
- 原文地址:https://blog.csdn.net/qq_39505065/article/details/126880817
