-
谷粒商城-商品服务(平台属性)
基础概念
1 SPU与SKU
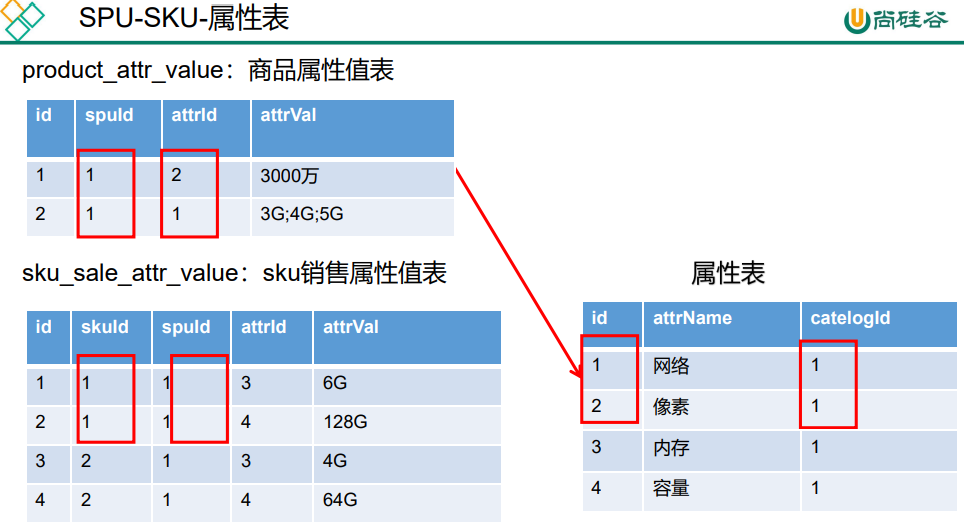
SPU = Standard Product Unit (标准化产品单元),是商品信息聚合的最小单位,是一组可复用、易检索的标准化信息的集合,该集合描述了一个产品的特性。通俗点讲,属性值、特性相同的商品就可以称为一个SPU。
SKU = Stock Keeping Unit(库存量单位),即库存进出计量的单位,可以是以件、盒、托盘等为单位。在服装、鞋类商品中使用最多最普遍。例如纺织品中一个SKU通常表示:规格、颜色、款式。

从上面的图中,我们可以看到,有三种选项供我们选择:
- 机型:iPhone 13 Pro 、iPhone 13 Pro Max
- 外观: 远峰蓝色、银色、金色、石墨色
- 存储容量:128GB、256GB、512GB、1TB
假设我们已经选好了这部手机:
- 机型:iPhone 13 Pro
- 外观:石墨色
- 存储容量:128GB
从我们想要买手机到确定要买的手机,可划分为四个步骤:
- 选择品牌:iPhone
- 选择机型:13 Pro
- 选择外观:石墨色
- 选择存储容量:128GB
当我们选择好了一台手机的品牌和型号:iPhone 13 Pro,那么我们就可以确定一个产品,即SPU。
当我们再基于这个选好的产品 (iPhone 13 Pro),再选择这个产品的外观 (石墨色) 和存储容量 (128GB),就是一个 SKU。
- SPU = 品牌 + 型号,即 iPhone 13 Pro
- SKU = SPU + 外观 + 存储容量,即 iPhone 13 Pro、石墨色、128GB
SKU 是从属于 SPU 的关系,即一个 SPU 可以有多个 SKU

对于 iPhone 13 Pro 这个产品 (SPU) 而言,根据笛卡尔乘积我们可知,一共拥有 14个 SKU【外观 {4} x 存储容量 {4}】
参考资源:https://www.biaodianfu.com/spu-sku.html#
2 表关联关系
【属性分组-规格参数-销售属性-三级分类】关联关系
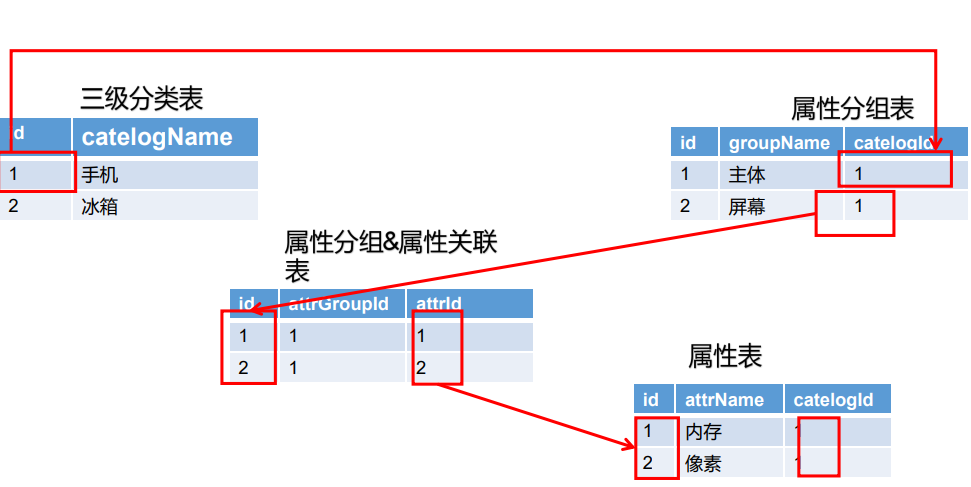
为什么只有三级分类中有属性分组?因为三级分类是具体的某类商品,这类商品有相同的属性。而一级和二级分类其实是个菜单,包含多种类型商品,这些不属于同类的商品,属性自然也不同。

这是京东的商品分类,三级分类中的每一项都是一个具体分类。
3 表理解
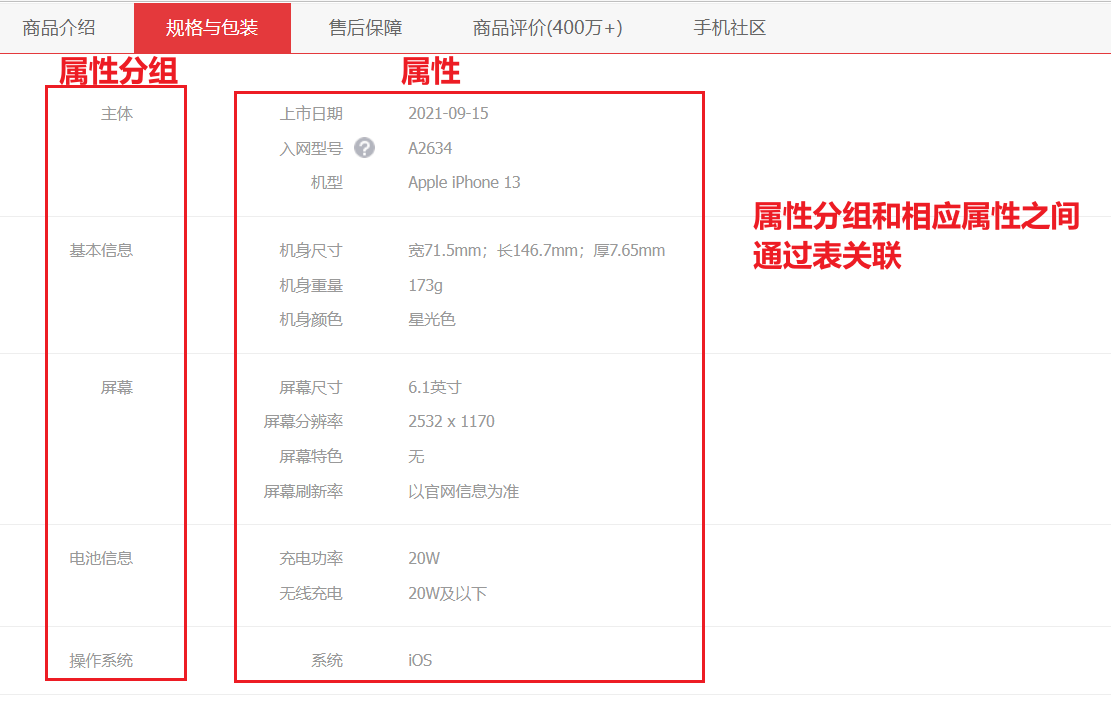
属性分组:某个分类下的每一个商品都有展示这些属性,主体、基本信息、主芯片、存储 …
属性:属性分组中的相应数据
平台属性—属性分组
1 前置操作

在
gulimall_admin数据库中运行该sql脚本,生成只会所需的菜单。2 修改页面
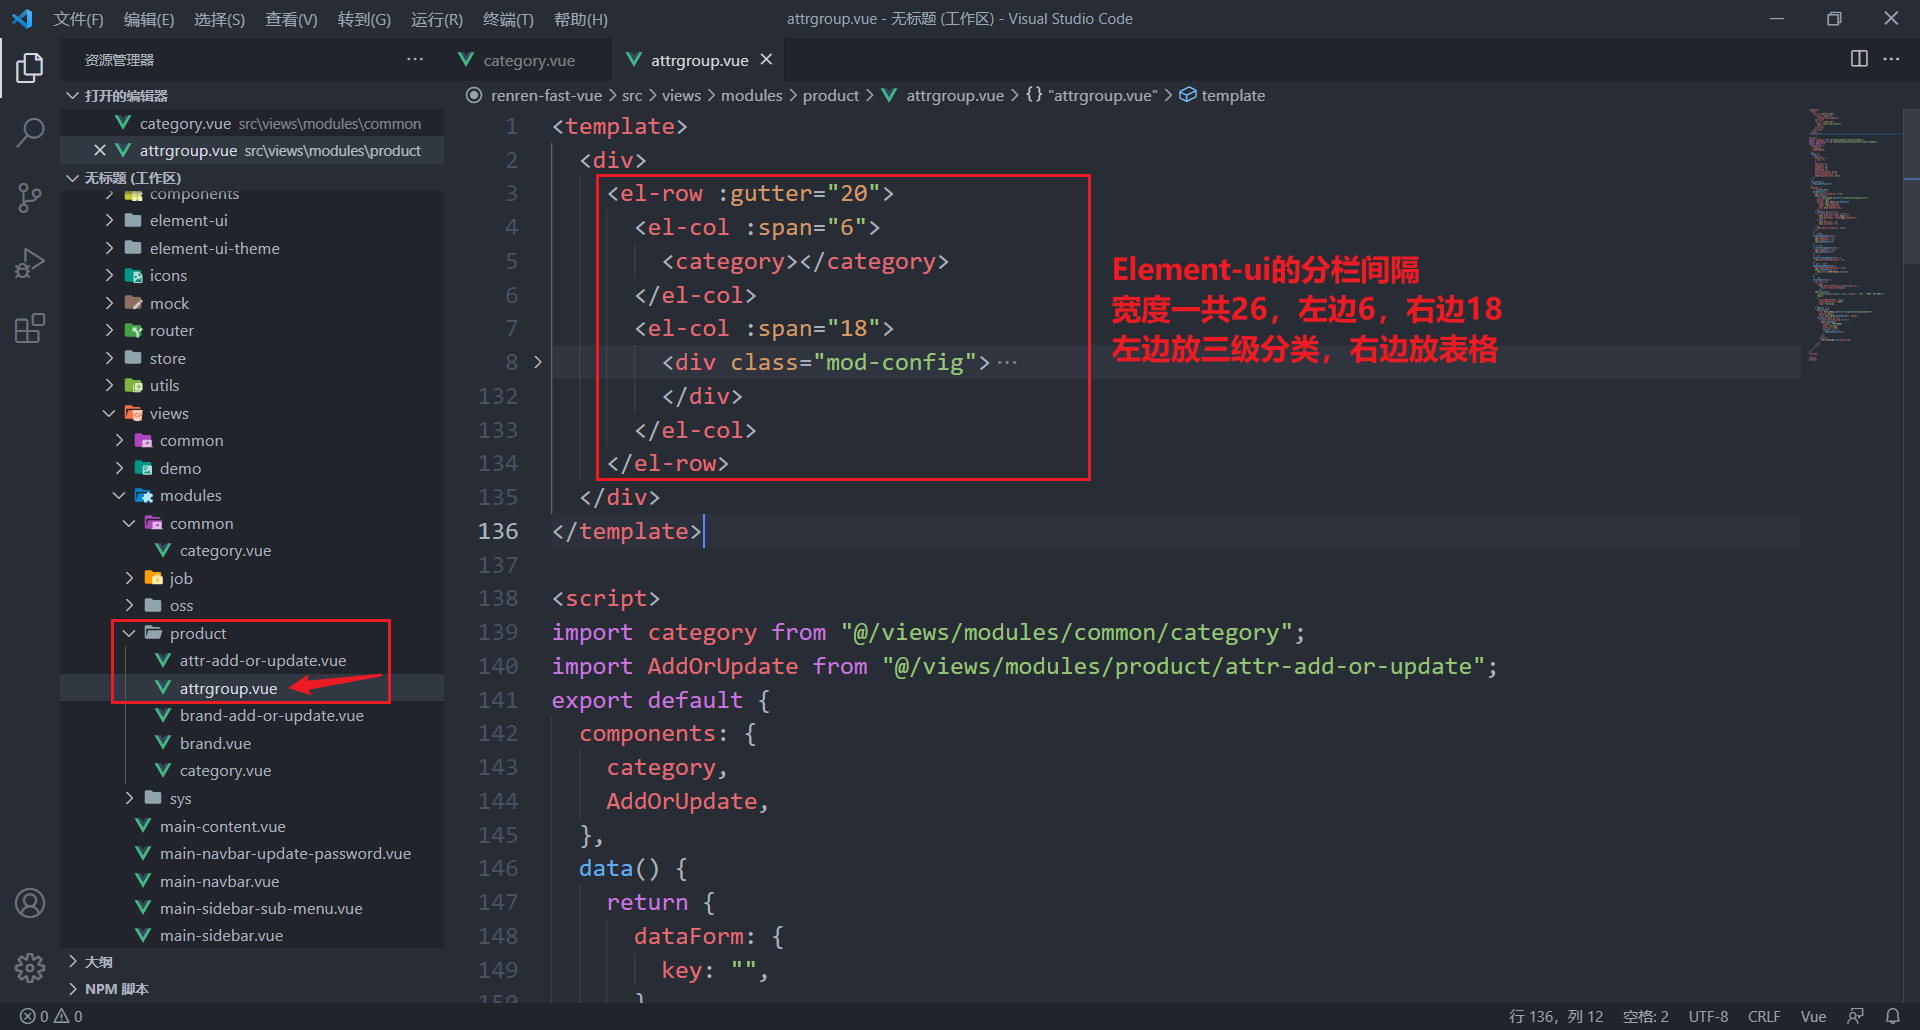
2.1 组件抽取
由于之后有多个页面都是 三级分类 + 表格 的布局,所以我们需要把这些重复的组件抽取出来复用。
- 创建
属性分组的vue组件
- 抽取公共组件——三级分类
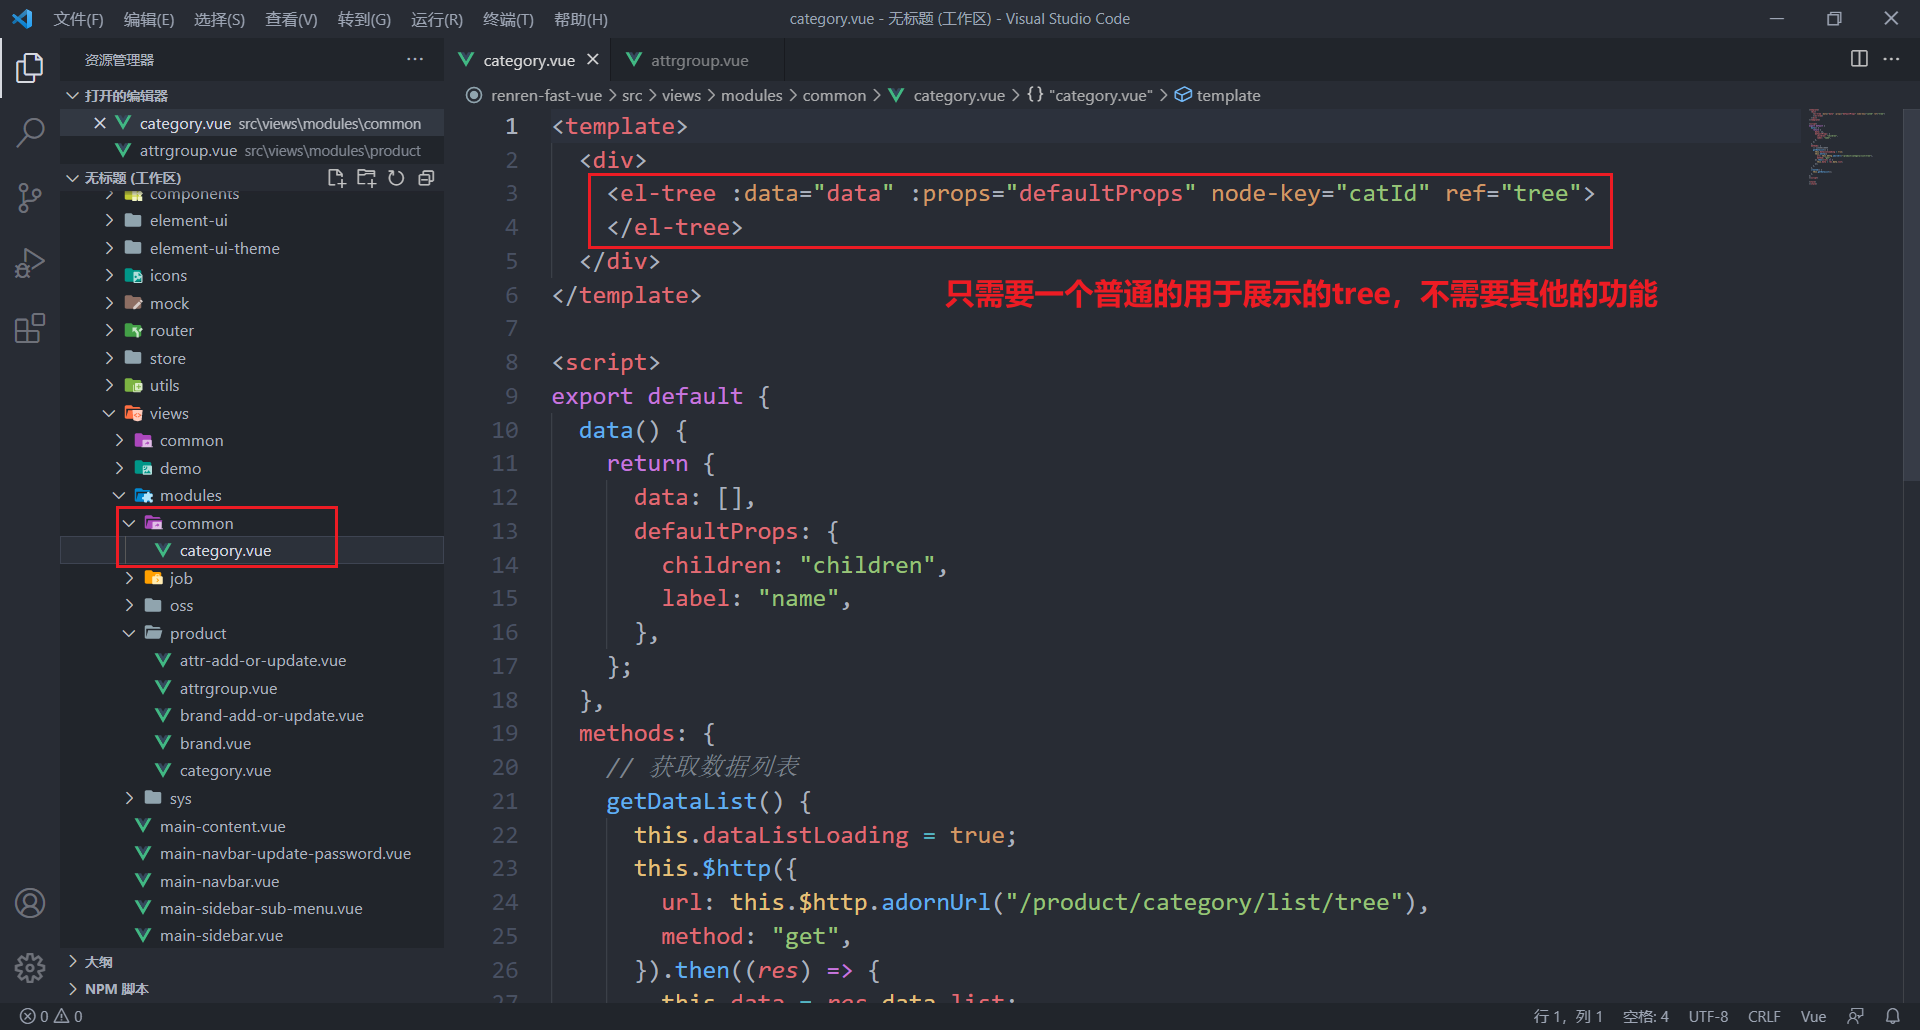
- 在属性分组中引入该公共组件
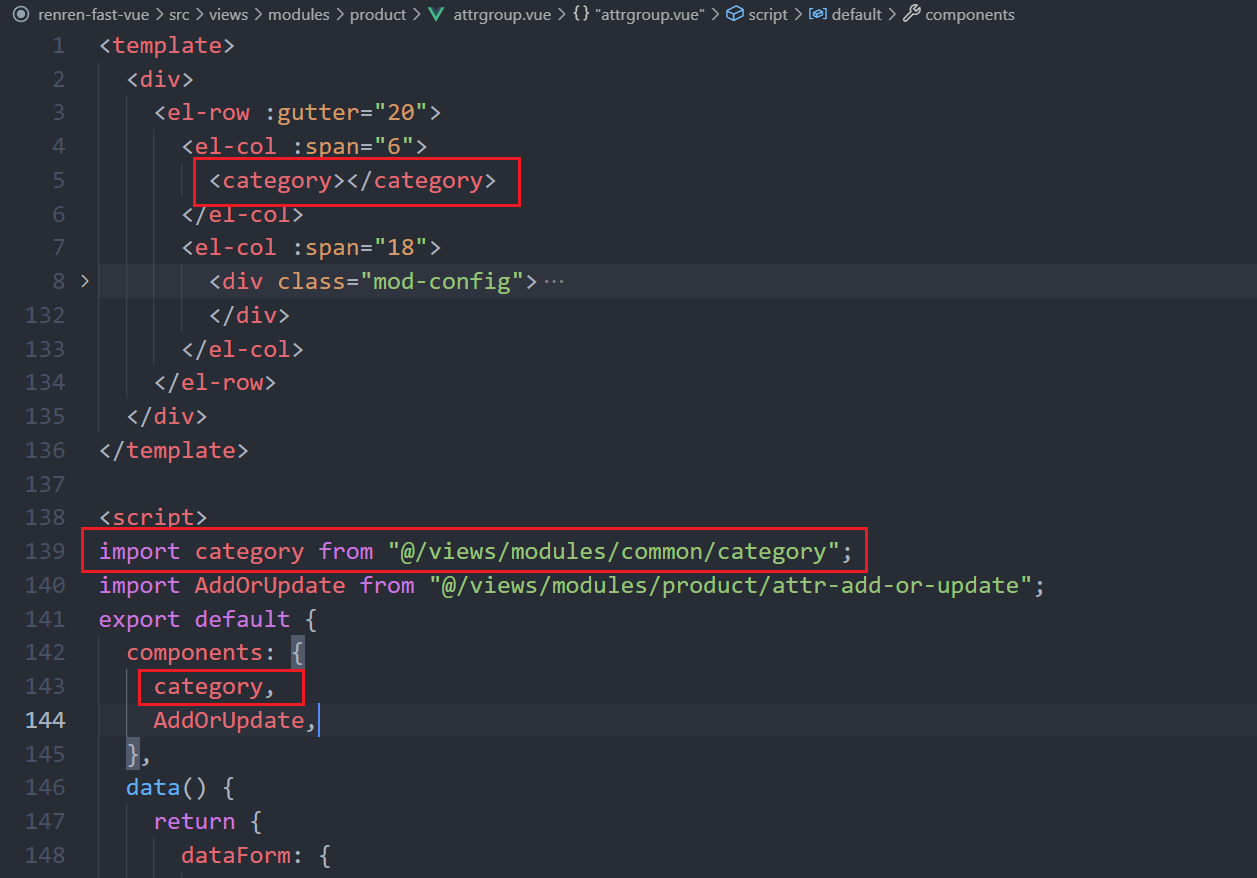
- 从之前的逆向工程中找到属性分组相关的组件并选择性复制到进前端中

- 最终效果

2.2 父子组件交互
现在需要在左边的树形结构中选中一个分类,并在右边实时显示该分类下的信息。但是左边的树形结构是我们的公共组件,是从外面引入进来的,这就有了一个问题:父子组件传递数据
步骤:
- 子组件给父组件传递事件,并携带上数据:
// 树里的点击方法 handleNodeClick(data) { console.log(data); // 向父组件传递事件 this.$emit("tree-node-click", data) },- 1
- 2
- 3
- 4
- 5
- 6
- 父组件感知子组件散发的事件:
<category @tree-node-click="treeNodeClick">category>- 1
treeNodeClick(data){ console.log("父组件感知到被点击:", data) },- 1
- 2
- 3
@后面跟上子组件向父组件传递的事件的名称,再后面跟的的父组件自己定义的一个方法,用于接收子组件传递过来的数据。
- 根据点击的分类,在右边渲染出相应数据:
首先需要修改后端接口,能够根据分类id查询相应数据
接口文档:https://easydoc.net/s/78237135/ZUqEdvA4/OXTgKobR
3 前后端联调
3.1 获取分类属性分组
这里做了一些小小的修改,使用对象来接收参数,而不直接使用map来传参。
为什么不适用map传参:谁要是再敢用Map传参,我过去就是一JIO
所以这里变成了一个POST方法。
/** * 根据分类id获取相应列表 */ @RequestMapping("/list/{catelogId}") public R listByCatelogId(@RequestBody AttrGroupQuery query, @PathVariable("catelogId") Long catelogId) { PageUtils page = attrGroupService.queryPage(query, catelogId); return R.ok().put("page", page); }- 1
- 2
- 3
- 4
- 5
- 6
- 7
- 8
@Override public PageUtils queryPage(AttrGroupQuery query, Long catelogId) { // 将对象转为map,因为this.page()方法内只能传map Map<String, Object> params = JSONObject.parseObject(JSON.toJSONString(query), new TypeReference<Map<String, Object>>() { }); System.out.println("query = " + query); IPage<AttrGroupEntity> page = null; QueryWrapper<AttrGroupEntity> wrapper = new QueryWrapper<>(); String key = query.getKey(); // 如果有传检索关键字 if (key != null &&!key.isEmpty()){ // 这个or是在括号内的,所以需要这种写法 wrapper.and((obj)->{ obj.eq("attr_group_id", key).or().like("attr_group_name", key); }); } // 没有提供分类id if (catelogId != 0) { // select * from pms_attr_group where catelog_id = catelogId and wrapper.eq("catelog_id", catelogId); } page = this.page(new Query<AttrGroupEntity>().getPage(params), wrapper); return new PageUtils(page); }- 1
- 2
- 3
- 4
- 5
- 6
- 7
- 8
- 9
- 10
- 11
- 12
- 13
- 14
- 15
- 16
- 17
- 18
- 19
- 20
- 21
- 22
- 23
- 24
- 25
3.2 前端获取属性分组并展示
// 获取数据列表 getDataList() { this.dataListLoading = true; let query = { page: this.pageIndex, limit: this.pageSize, key: this.dataForm.key, }; this.$http({ url: this.$http.adornUrl(`/product/attrgroup/list/${this.catId}`), method: "post", data: this.$http.adornData(query, false), }).then(({ data }) => { if (data && data.code === 0) { this.dataList = data.page.list; this.totalPage = data.page.totalCount; } else { this.dataList = []; this.totalPage = 0; } this.dataListLoading = false; }); },- 1
- 2
- 3
- 4
- 5
- 6
- 7
- 8
- 9
- 10
- 11
- 12
- 13
- 14
- 15
- 16
- 17
- 18
- 19
- 20
- 21
- 22
- 23

3.3 新增属性分组
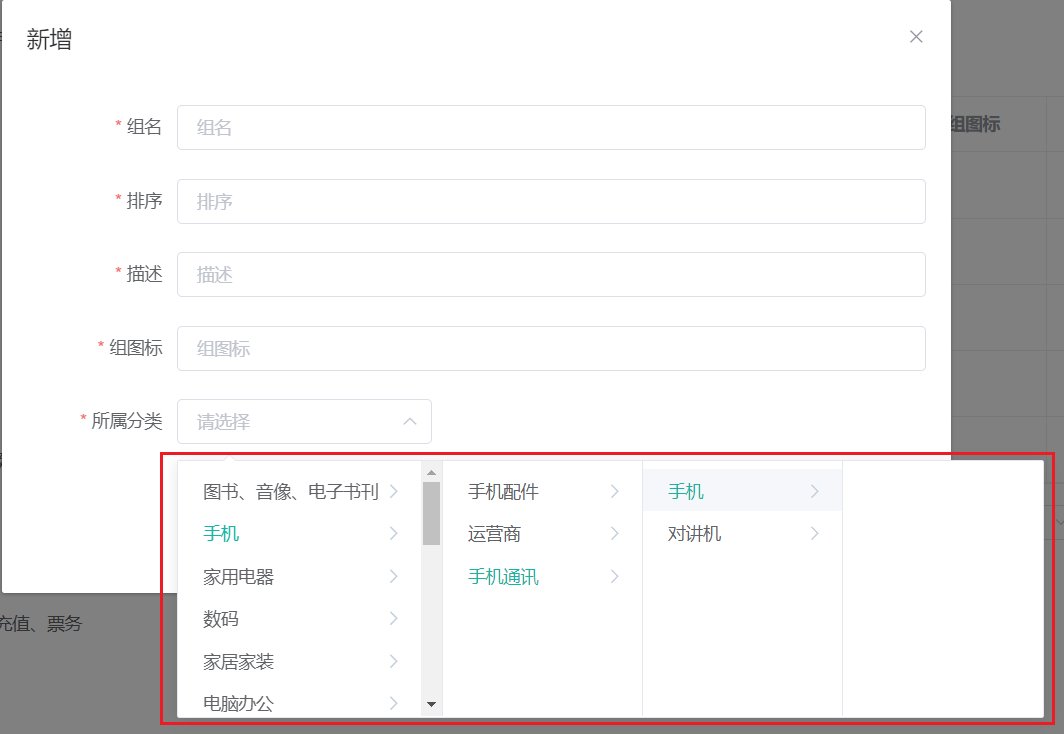
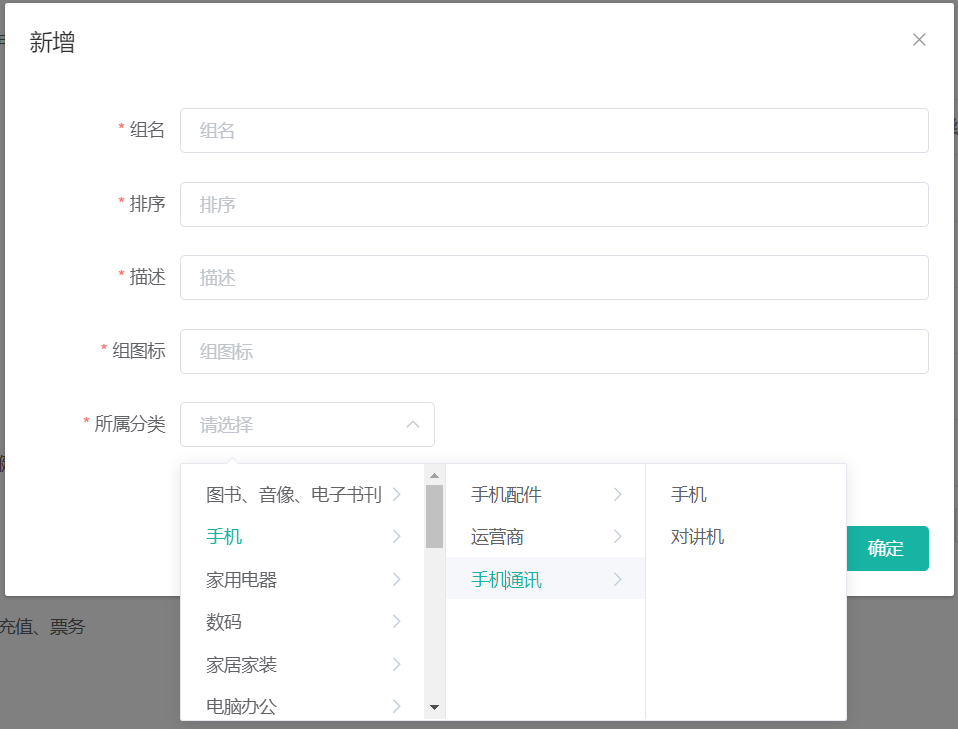
级联选择器
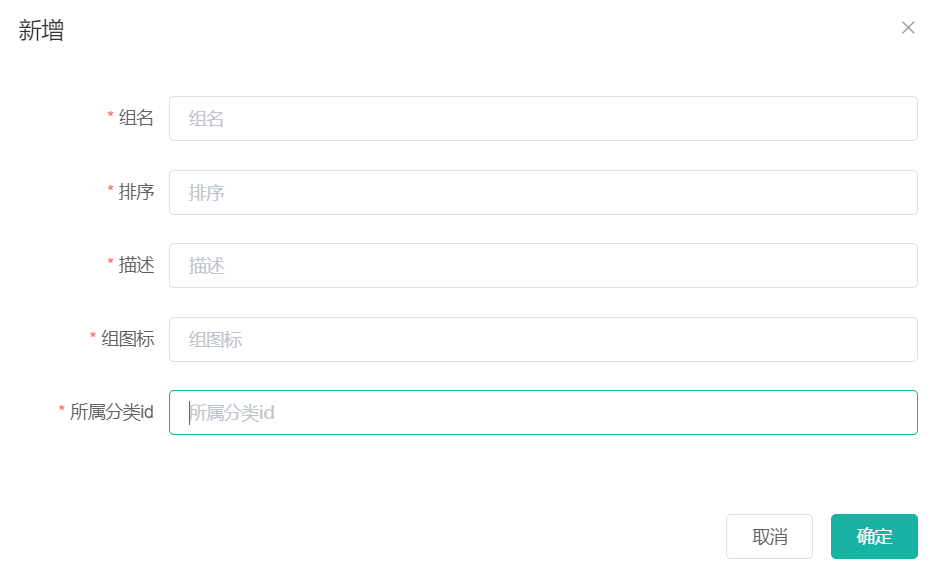
所属分类id应该是选择出来的而不是手动输入的。所以需要修改为级联选择器。
<el-cascader v-model="dataForm.catelogId" :options="categories" @change="handleChange" :props="props" > el-cascader>- 1
- 2
- 3
- 4
- 5
- 6
- 7
用props手动指定显示字段
data() { return { ..., categories: [], props: { label: "name", value: "catId" }, ... }; }, methods: { getCategories(){ this.$http({ url: this.$http.adornUrl("/product/category/list/tree"), method: "get", }).then((res) => { this.categories = res.data.list; }); }, }- 1
- 2
- 3
- 4
- 5
- 6
- 7
- 8
- 9
- 10
- 11
- 12
- 13
- 14
- 15
- 16
- 17
- 18
- 19
- 20
- 21
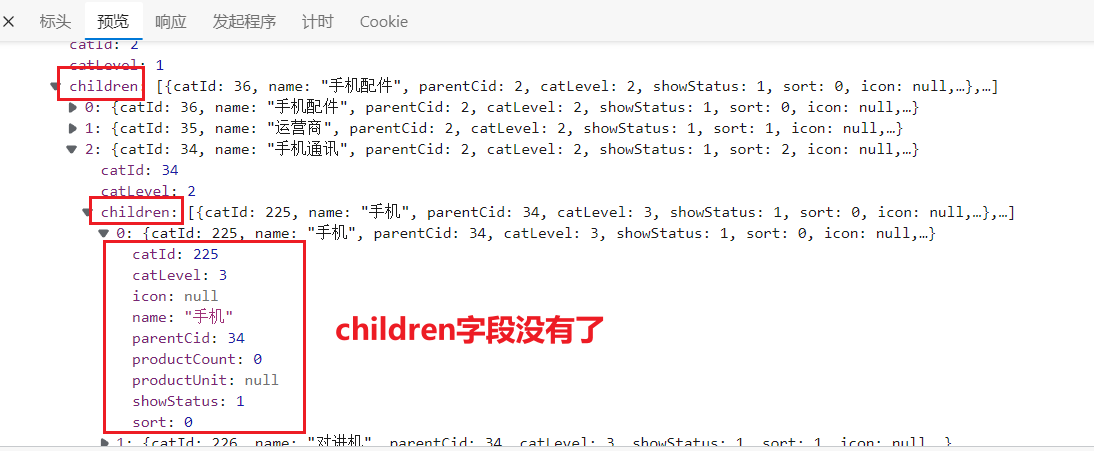
但是现在出现了一个问题,因为每一个分类下都有children属性,所以导致出现了这种情况,显示了四级:
如何解决?在后端解决
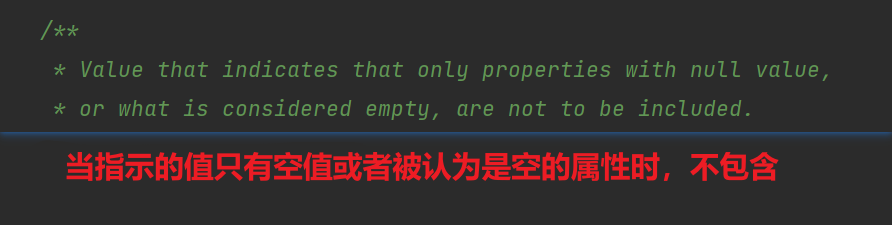
在返回的VO实体类上加注解:
/** * 子分类列表 * @JsonInclude: 返回数据中的包含规则,NON_EMPTY是不为空的情况下才会包含并返回 */ @JsonInclude(JsonInclude.Include.NON_EMPTY) private List<CategoryEntityVO> children;- 1
- 2
- 3
- 4
- 5
- 6
到Vue开发者工具中查看获取到的catelogId,居然是一个数组,保存了三级的分类id,可是我们只需要第三级的分类id:

所以要修改,先用一个数组(catelogPath)来接收这个值,最终新增或保存的时候只传第三级的分类id(catelogId):
dataForm: { attrGroupId: 0, attrGroupName: "", sort: "", descript: "", icon: "", catelogId: "", catelogPath: [], },- 1
- 2
- 3
- 4
- 5
- 6
- 7
- 8
- 9
// 表单提交 dataFormSubmit() { this.$refs["dataForm"].validate((valid) => { if (valid) { this.$http({ url: this.$http.adornUrl( `/product/attrgroup/${ !this.dataForm.attrGroupId ? "save" : "update" }` ), method: "post", data: this.$http.adornData({ attrGroupId: this.dataForm.attrGroupId || undefined, attrGroupName: this.dataForm.attrGroupName, sort: this.dataForm.sort, descript: this.dataForm.descript, icon: this.dataForm.icon, catelogId: this.dataForm.catelogPath[this.dataForm.catelogPath.length - 1], }), }).then(({ data }) => { if (data && data.code === 0) { this.$message({ message: "操作成功", type: "success", duration: 1500, }); } else { this.$message.error(data.msg); } this.visible = false; this.$emit("refreshDataList"); }); } }); },- 1
- 2
- 3
- 4
- 5
- 6
- 7
- 8
- 9
- 10
- 11
- 12
- 13
- 14
- 15
- 16
- 17
- 18
- 19
- 20
- 21
- 22
- 23
- 24
- 25
- 26
- 27
- 28
- 29
- 30
- 31
- 32
- 33
- 34
- 35
- 36
注:前端校验需要把categoryId改为catelogPath。
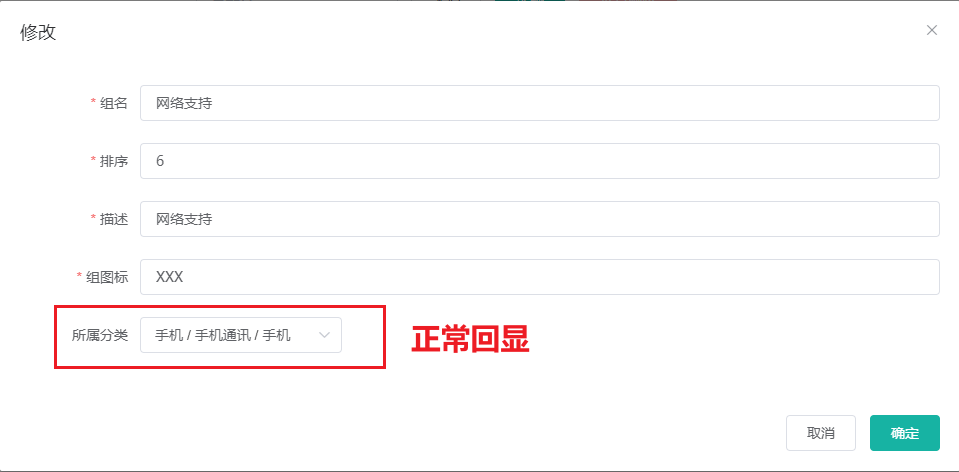
级联选择器内容回显
这时还有一个问题,刷新浏览器后,点击某个属性分组的修改按钮,所属分类的框中显示为空,为什么?因为我们绑定的是catelogPath,是一个数组,而后端返回的数据中并没有这一项,所以没东西显示。
解决方案:
- 为返回体创建VO实体类
@Data public class AttrGroupEntityVO { /** * 分组id */ private Long attrGroupId; /** * 组名 */ private String attrGroupName; /** * 排序 */ private Integer sort; /** * 描述 */ private String descript; /** * 组图标 */ private String icon; /** * 所属分类id */ private Long catelogId; /** * 分类的完整路径 (1级,2级,3级) */ private Long[] catelogPath; }- 1
- 2
- 3
- 4
- 5
- 6
- 7
- 8
- 9
- 10
- 11
- 12
- 13
- 14
- 15
- 16
- 17
- 18
- 19
- 20
- 21
- 22
- 23
- 24
- 25
- 26
- 27
- 28
- 29
- 30
- 31
- 32
- 创建寻找分类路径的方法
@Override public Long[] getCateLogPath(long catelogId) { List<Long> path = new ArrayList<>(); path = getParentPath(catelogId, path); int size = path.size(); return path.toArray(new Long[size]); } public List<Long> getParentPath(long catelogId, List<Long> path){ CategoryEntity category = this.getById(catelogId); if (category.getParentCid() != 0){ getParentPath(category.getParentCid(), path); } path.add(category.getCatId()); return path; }- 1
- 2
- 3
- 4
- 5
- 6
- 7
- 8
- 9
- 10
- 11
- 12
- 13
- 14
- 15
- 16
- 修改controller类的返回数据
/** * 信息 */ @RequestMapping("/info/{attrGroupId}") // @RequiresPermissions("product:attrgroup:info") public R info(@PathVariable("attrGroupId") Long attrGroupId) { // 获取属性分组信息 AttrGroupEntity attrGroup = attrGroupService.getById(attrGroupId); // 获取属性分组的父分类路径 Long[] cateLogPath = categoryService.getCateLogPath(attrGroup.getCatelogId()); // VO实体类 AttrGroupEntityVO attrGroupVO = new AttrGroupEntityVO(); // 组装VO实体类 BeanUtils.copyProperties(attrGroup, attrGroupVO); attrGroupVO.setCatelogPath(cateLogPath); return R.ok().put("attrGroup", attrGroupVO); }- 1
- 2
- 3
- 4
- 5
- 6
- 7
- 8
- 9
- 10
- 11
- 12
- 13
- 14
- 15
- 16
- 17
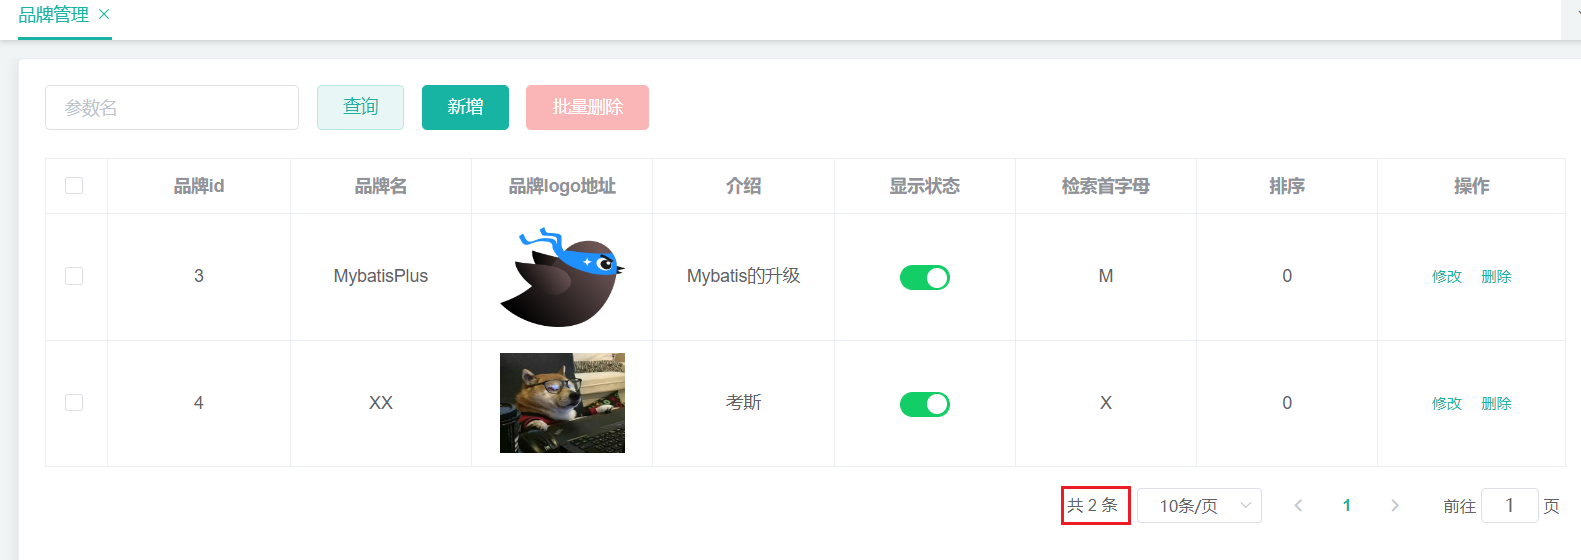
3.4 条件(带分页)查询品牌
引入MP的分页插件
@Configuration // 开启事务功能 @EnableTransactionManagement @MapperScan("com.example.gulimall.product.dao") public class MybatisPlusConfig { /** * 新的分页插件,一缓和二缓遵循mybatis的规则,需要设置 MybatisConfiguration#useDeprecatedExecutor = false 避免缓存出现问题(该属性会在旧插件移除后一同移除) */ @Bean public MybatisPlusInterceptor mybatisPlusInterceptor() { MybatisPlusInterceptor interceptor = new MybatisPlusInterceptor(); interceptor.addInnerInterceptor(new PaginationInnerInterceptor(DbType.MYSQL)); return interceptor; } }- 1
- 2
- 3
- 4
- 5
- 6
- 7
- 8
- 9
- 10
- 11
- 12
- 13
- 14
- 15
- 16
新建Query实体类
因为用map传参不好,所以我们把品牌管理这里的map也改掉。按照前端传过来的字段创建一个用于条件查询的实体类——BrandQuery
@Data public class BrandQuery { /** * token? */ private Long t; /** * 当前页码 */ private Long page; /** * 每页记录数 */ private Long limit; /** * 检索关键字 */ private String key; }- 1
- 2
- 3
- 4
- 5
- 6
- 7
- 8
- 9
- 10
- 11
- 12
- 13
- 14
- 15
- 16
- 17
- 18
- 19
条件、分页查询
@Override public PageUtils queryPage(BrandQuery query) { QueryWrapper<BrandEntity> wrapper = new QueryWrapper<>(); wrapper.and((obj)->{ obj.eq("brand_id", query.getKey()).or() .like("name", query.getKey()); }); // 这里不使用人人自带的分页方法,会与MP的分页冲突,用MP自己的。 Page<BrandEntity> page = brandDao.selectPage( new Page<>(query.getPage(), query.getLimit()), wrapper); return new PageUtils(page); }- 1
- 2
- 3
- 4
- 5
- 6
- 7
- 8
- 9
- 10
- 11
- 12
- 13
4 品牌分类关联与级联更新
将已有的前端代码直接放到项目中,
第一部分\代码\前端\modules\common,并稍加修改。之后就不记录前端的任何代码了,只做后端笔记。**品牌分类关联:**比如小米,它有手机,那就要关联手机分类;它又有电视,又要关联电视分类;等等。一个分类又可以属于多个品牌。所以是一种多对多的关系。多对多,使用关联表。
—— pms_category_brand_relation

但是现在又有个问题,
新增关联功能只会把品牌id和分类id传给后端来做一个新增的功能,但是现在的效果是原生的新增功能只会帮你存储品牌id和分类id,品牌名和分类名都没存进去。所以我们要修改新增功能的接口,在存储的时候还要把品牌名和分类名一并存进去。虽然说这品牌名和分类名的字段可以不设计到这个表中,或者可以用他们的id去表中查,但是每次都做这样的关联查询,会对数据库的性能有非常大的影响。在电商系统中,对于大表数据从不做联表查询,宁愿用分步一点一点查,尽量少用关联。所以我们在设计的时候添加了两个冗余的字段,在保存的时候一起保存进来,到时候就查询关联分类的时候就不需要再去其他表里去查了。
在新增的时候就查出两个名称。
categoryBrandRelationService.saveDetail(categoryBrandRelation); // ============================= @Override public void saveDetail(CategoryBrandRelationEntity categoryBrandRelation) { // 根据品牌id和分类id查询名称 BrandEntity brandEntity = brandDao.selectById(categoryBrandRelation.getBrandId()); CategoryEntity categoryEntity = categoryDao.selectById(categoryBrandRelation.getCatelogId()); categoryBrandRelation.setBrandName(brandEntity.getName()); categoryBrandRelation.setCatelogName(categoryEntity.getName()); this.save(categoryBrandRelation); }- 1
- 2
- 3
- 4
- 5
- 6
- 7
- 8
- 9
- 10
- 11
- 12
- 13

一个细节:
这个查询我们没有做联表,而是在中间表做了冗余存储名称。但是如果品牌名或者分类名该名称了,那我们还需要手动同步过来,保证数据的一致性。
4.1 修改品牌名称
多模块service和dao之间的调用问题:网上较多的回答是不同的模块之间还是service飞来飞去就好了,不要搞到模块A的service调用模块B的dao。
/** * 修改 */ @RequestMapping("/update") public R update(@Validated(value = {UpdateGroup.class}) @RequestBody BrandEntity brand) { brandService.updateDetail(brand); return R.ok(); }- 1
- 2
- 3
- 4
- 5
- 6
- 7
- 8
// 加上事务 @Transactional @Override public void updateDetail(BrandEntity brand) { // 首先更新自己 this.updateById(brand); // 同步更新其他关联表中的数据 // 如果改了品牌名 if (!brand.getName().isEmpty()){ categoryBrandRelationService.updateBrand(brand.getBrandId(), brand.getName()); } // TODO:更新其他关联 }- 1
- 2
- 3
- 4
- 5
- 6
- 7
- 8
- 9
- 10
- 11
- 12
- 13
@Override public void updateBrand(Long brandId, String name) { // 组装新的品牌id对应品牌名称 CategoryBrandRelationEntity relationEntity = new CategoryBrandRelationEntity(); relationEntity.setBrandId(brandId); relationEntity.setBrandName(name); // 设置wrapper QueryWrapper<CategoryBrandRelationEntity> wrapper = new QueryWrapper<>(); wrapper.eq("brand_id", brandId); this.update(relationEntity, wrapper); }- 1
- 2
- 3
- 4
- 5
- 6
- 7
- 8
- 9
- 10
- 11
4.2 修改分类名称
/** * 修改 */ @RequestMapping("/update") public R update(@RequestBody CategoryEntity category){ categoryService.updateDetail(category); return R.ok(); }- 1
- 2
- 3
- 4
- 5
- 6
- 7
- 8
- 9
// 加上事务 @Transactional @Override public void updateDetail(CategoryEntity category) { // 先改自己 this.updateById(category); // 同步更新 if (!category.getName().isEmpty()){ categoryBrandRelationService.updateCategory(category.getCatId(), category.getName()); } // TODO:其他同步更新 }- 1
- 2
- 3
- 4
- 5
- 6
- 7
- 8
- 9
- 10
- 11
- 12
@Override public void updateCategory(Long catId, String name) { // 组装新的分类id对应分类名称 CategoryBrandRelationEntity relationEntity = new CategoryBrandRelationEntity(); relationEntity.setCatelogId(catId); relationEntity.setCatelogName(name); // 设置wrapper QueryWrapper<CategoryBrandRelationEntity> wrapper = new QueryWrapper<>(); wrapper.eq("catelog_id", catId); this.update(relationEntity, wrapper); }- 1
- 2
- 3
- 4
- 5
- 6
- 7
- 8
- 9
- 10
- 11
Object划分(⭐⭐⭐⭐⭐)
PO(persistant object) 持久对象
PO就是对应数据库中某个表中的一条记录,多个记录可以用PO的集合。PO中应该不包含任何对数据库的操作。
PO就相当于和数据库相对应的实体类Do(Domain Object) 领域对象
就是从现实世界中抽象出来的有形或无形的业务实体。
TO(Transfer Object) 数据传输对象
不同的应用程序之间传输的对象。
微服务和微服务之间互相传输的对象DTO(Data Transfer Object) 数据传输对象
这个概,念来源于2EE的设计模式,原来的目的是为了B的分布式应用提供粗粒度的数据实体,以减少分布式调用的次数,从而提高分布式调用的性能和降低网络负载,但在这里,泛指用于展示层与服务层之间的数据传输对象。
VO(value object) 值对象
通常用于业务层之间的数据传递,和PO一样也是仅仅包含数据而已。但应是抽象出的业务对象,可以和表对应,也可以不,这根据业务的需要。用nw关键字创建,由GC回收的。
View Object 视图对象。用于接收请求,将请求的数据封装。待业务层处理完了呢,再响应出去。两个任务:
- 接收页面传递来的数据,封装对象
- 将业务处理完的对象,封装成页面要用的数据
BO(business object) 业务对象
从业务模型的角度看,见UML元件领域模型中的领域对象。封装业务逻辑的jva对象,通过调用DAO方法,结合PO,VO进行业务操作。business object:业务对象主要作用是把业务逻辑封装为一个对象。这个对象可以包括一个或多个其它的对象。比如一个简历右教宣经历、工作经历、社会关系等等。我们可以把教育经历对应一个P0,工作经历对应一个PO,社会关系对应一个PO。建立一个对应简历的BO对象处理简历,每个BO包含这些PO。这样处理业务逻辑时,我们就可以针对BO去处理。
POJO(plain ordinary java object) 简单无规则java对象
传统意义的java对象。就是说在一些Object,Relation Mapping工具中,能够做到维护数据库表记录的persisent object完全是一个符合Java Bean规范的纯Java对象,没有增加别的属性和方法。我的理解就是最基本的java Bean,只有属性字段及setter和eteg方法!。
POjO是DO/DTO/BO/VO的统称。
DAO(data access object) 数据访问对象
是一个sun的一个标准j2ee设计模式,这个模式中有个接口就是DAO,它负持久层的操作。为业务层提供接口。此对象用于访问数据库。通常和PO结合使用,DAO中包含了各种数据库的操作方法。通过它的方法,结合PO对数据库进行相关的操作。夹在业务逻辑与数据库资源中间。配合VO,提供数据库的CRUD操作。
平台属性—规格参数
属性分组中展示的是该分类下的所有属性
规格参数中展示的是该分类下的所有规格参数
// 属性的关联按钮可以看到该属性下的所有关联的规格参数
1 使用Vo实体类来新增
- 创建Vo实体类来接收前端传过来的参数
@Data public class AttrVo { /** * 属性id */ private Long attrId; /** * 属性名 */ private String attrName; /** * 是否需要检索[0-不需要,1-需要] */ private Integer searchType; /** * 属性图标 */ private String icon; /** * 可选值列表[用逗号分隔] */ private String valueSelect; /** * 属性类型[0-销售属性,1-基本属性,2-既是销售属性又是基本属性] */ private Integer attrType; /** * 启用状态[0 - 禁用,1 - 启用] */ private Long enable; /** * 所属分类 */ private Long catelogId; /** * 快速展示【是否展示在介绍上;0-否 1-是】,在sku中仍然可以调整 */ private Integer showDesc; /** * 属性分组id */ private Long attrGroupId; /** * token? */ private Long t; private Long valueType; }- 1
- 2
- 3
- 4
- 5
- 6
- 7
- 8
- 9
- 10
- 11
- 12
- 13
- 14
- 15
- 16
- 17
- 18
- 19
- 20
- 21
- 22
- 23
- 24
- 25
- 26
- 27
- 28
- 29
- 30
- 31
- 32
- 33
- 34
- 35
- 36
- 37
- 38
- 39
- 40
- 41
- 42
- 43
- 44
- 45
- 46
- 47
- 48
- 49
- 50
- 新增功能
@Override public void saveAttr(AttrVo attr) { AttrEntity attrEntity = new AttrEntity(); BeanUtils.copyProperties(attrVo, attrEntity); // 1、保存基本信息 this.save(attrEntity); // 2、保存关联关系 // 基本属性有属性分组,销售属性是没有的,所以需要做一个判断。是基本属性的话才存属性和分组的关系 // 新增时是可以不选择分组的,所以如果没有提供分组,则不存储关联关系 if (attrVo.getAttrGroupId() != null) { AttrAttrgroupRelationEntity relationEntity = new AttrAttrgroupRelationEntity(); relationEntity.setAttrGroupId(attrVo.getAttrGroupId()); // 这里的attrId使用的是MP的主键返回来插入 relationEntity.setAttrId(attrEntity.getAttrId()); attrAttrgroupRelationService.save(relationEntity); } }- 1
- 2
- 3
- 4
- 5
- 6
- 7
- 8
- 9
- 10
- 11
- 12
- 13
- 14
- 15
- 16
- 17
2 规格参数列表
/** * 列表 */ @RequestMapping("/base/list/{catelogId}") // @RequiresPermissions("product:attr:list") public R listByCatelogId(@RequestBody AttrQuery query, @PathVariable Long catelogId) { PageUtils page = attrService.queryPage(query, catelogId); return R.ok().put("page", page); }- 1
- 2
- 3
- 4
- 5
- 6
- 7
- 8
- 9
- 10
由于AttrEntity自身的属性不够前端需要展示的内容(缺少分类名称和分组名称),所以我们还需要再增加一个Vo类来返回前端需要的数据:

**但是这里的中间表只保存了属性id和分组id,还要去找分类名称,如果做多表联查的话,在大数据量的情况下,笛卡尔积现象会导致有超级大的中间表数据,是非常可怕的!!**所以我们宁可牺牲一点效率,在得到分页信息后,根据信息再去查询它的分组信息和分类信息,再组装返回。
先创建返回体Vo实体类:(因为大部分属性都和AttrVo相同,所以直接继承)
// equals和hashCode方法也涉及父类的属性 @EqualsAndHashCode(callSuper = true) @Data public class AttrResVo extends AttrVo { /** * 分类名称 */ private String catelogName; /** * 分组名称 */ private String groupName; }- 1
- 2
- 3
- 4
- 5
- 6
- 7
- 8
- 9
- 10
- 11
- 12
- 13
@Override public PageUtils queryPage(AttrQuery query, Long catelogId) { QueryWrapper<AttrEntity> wrapper = new QueryWrapper<>(); String key = query.getKey(); // 如果有传检索关键字 if (key != null && !key.isEmpty()) { // 这个or是在括号内的,所以需要这种写法 wrapper.and((obj) -> { obj.eq("attr_id", key).or().like("attr_name", key); }); } // 有提供分类id if (catelogId != 0) { wrapper.eq("catelog_id", catelogId); } // Page<AttrEntity> page = this.page( new Page<>(query.getPage(), query.getLimit()), wrapper); PageUtils pageUtils = new PageUtils(page); List<AttrEntity> list = page.getRecords(); // 使用Stream流来查询相关数据 // TODO:这里循环查库了,会有问题,之后要改 List<AttrResVo> attrResVoList = list.stream().map(attr -> { AttrResVo attrResVo = new AttrResVo(); BeanUtils.copyProperties(attr, attrResVo); // 获取分类名称 CategoryEntity categoryEntity = categoryService.getById(attr.getCatelogId()); attrResVo.setCatelogName(categoryEntity.getName()); // 获取分组名称 AttrAttrgroupRelationEntity relation = attrAttrgroupRelationService.getOne(new QueryWrapper<AttrAttrgroupRelationEntity>().eq("attr_id", attr.getAttrId())); if (relation != null && relation.getAttrGroupId() != null){ AttrGroupEntity attrGroupEntity = attrGroupService.getById(relation.getAttrGroupId()); attrResVo.setGroupName(attrGroupEntity.getAttrGroupName()); } return attrResVo; }).collect(Collectors.toList()); pageUtils.setList(attrResVoList); return pageUtils; }- 1
- 2
- 3
- 4
- 5
- 6
- 7
- 8
- 9
- 10
- 11
- 12
- 13
- 14
- 15
- 16
- 17
- 18
- 19
- 20
- 21
- 22
- 23
- 24
- 25
- 26
- 27
- 28
- 29
- 30
- 31
- 32
- 33
- 34
- 35
- 36
- 37
- 38
- 39
- 40

3 规格参数修改
/** * 修改 */ @RequestMapping("/update") public R update(@RequestBody AttrVo attr) { attrService.updateAttr(attr); return R.ok(); }- 1
- 2
- 3
- 4
- 5
- 6
- 7
- 8
- 9
@Override public void updateAttr(AttrVo attr) { AttrEntity attrEntity = new AttrEntity(); BeanUtils.copyProperties(attr, attrEntity); // 更新自己 this.updateById(attrEntity); // 更新关联关系 if (attr.getAttrGroupId() != null){ AttrAttrgroupRelationEntity relationEntity = new AttrAttrgroupRelationEntity(); relationEntity.setAttrGroupId(attr.getAttrGroupId()); attrAttrgroupRelationService.update(relationEntity, new QueryWrapper<AttrAttrgroupRelationEntity>().eq("attr_id", attrEntity.getAttrId())); } }- 1
- 2
- 3
- 4
- 5
- 6
- 7
- 8
- 9
- 10
- 11
- 12
- 13
4 销售属性维护
因为销售属性和基本属性是存在同一张表中的,用
attr_type字段来区分。所以查询的时候要以这个字段做一个区分。可是应该如何区分呢?查询基本属性的请求:/product/attr/
base/list/0查询销售属性的请求:/product/attr/
sale/list/0所以可以修改请求地址:使用
{attrType}来获取到底是查基本属性还是销售属性。/** * 列表 * attrType传进来的是base(基本属性)或者sale(销售属性) */ @RequestMapping("/{attrType}/list/{catelogId}") public R listByCatelogId(@RequestBody AttrQuery query, @PathVariable Long catelogId, @PathVariable String attrType) { PageUtils page = attrService.queryPage(query, catelogId, attrType); return R.ok().put("page", page); }- 1
- 2
- 3
- 4
- 5
- 6
- 7
- 8
- 9
- 10
- 11
- 12
基本属性的
attr_type是1,销售属性的attr_type是0。为了之后能够更好地维护,我们使用枚举类来表示基本属性、销售属性
在common模块中创建枚举类:
package com.example.common.constant; import lombok.Data; @Data public class ProductConstant { public enum AttrEnum { ATTR_TYPE_BASE(1, "基本属性"), ATTR_TYPE_SALE(0, "销售属性"); private final int code; private final String msg; AttrEnum(int code, String msg) { this.code = code; this.msg = msg; } public int getCode() { return code; } public String getMsg() { return msg; } } }- 1
- 2
- 3
- 4
- 5
- 6
- 7
- 8
- 9
- 10
- 11
- 12
- 13
- 14
- 15
- 16
- 17
- 18
- 19
- 20
- 21
- 22
- 23
- 24
- 25
- 26
修改查询方法:
@Override public PageUtils queryPage(AttrQuery query, Long catelogId, String attrType) { QueryWrapper<AttrEntity> wrapper = new QueryWrapper<>(); // 判断查询哪个属性,使用枚举类 wrapper.eq("attr_type", attrType.equals("base") ? ProductConstant.AttrEnum.ATTR_TYPE_BASE.getCode() : ProductConstant.AttrEnum.ATTR_TYPE_SALE.getCode()); String key = query.getKey(); // 如果有传检索关键字 if (key != null && !key.isEmpty()) { // 这个or是在括号内的,所以需要这种写法 wrapper.and((obj) -> { obj.eq("attr_id", key).or().like("attr_name", key); }); } // 有提供分类id if (catelogId != 0) { wrapper.eq("catelog_id", catelogId); } // Page<AttrEntity> page = this.page( new Page<>(query.getPage(), query.getLimit()), wrapper); PageUtils pageUtils = new PageUtils(page); List<AttrEntity> list = page.getRecords(); // 使用Stream流来查询相关数据 // TODO:这里循环查库了,会有问题,之后要改 List<AttrResVo> attrResVoList = list.stream().map(attr -> { AttrResVo attrResVo = new AttrResVo(); BeanUtils.copyProperties(attr, attrResVo); // 获取分类名称 CategoryEntity categoryEntity = categoryService.getById(attr.getCatelogId()); attrResVo.setCatelogName(categoryEntity.getName()); // 获取分组名称 AttrAttrgroupRelationEntity relation = attrAttrgroupRelationService.getOne(new QueryWrapper<AttrAttrgroupRelationEntity>().eq("attr_id", attr.getAttrId())); if (relation != null && relation.getAttrGroupId() != null) { AttrGroupEntity attrGroupEntity = attrGroupService.getById(relation.getAttrGroupId()); attrResVo.setGroupName(attrGroupEntity.getAttrGroupName()); } return attrResVo; }).collect(Collectors.toList()); pageUtils.setList(attrResVoList); return pageUtils; }- 1
- 2
- 3
- 4
- 5
- 6
- 7
- 8
- 9
- 10
- 11
- 12
- 13
- 14
- 15
- 16
- 17
- 18
- 19
- 20
- 21
- 22
- 23
- 24
- 25
- 26
- 27
- 28
- 29
- 30
- 31
- 32
- 33
- 34
- 35
- 36
- 37
- 38
- 39
- 40
- 41
- 42
因为销售属性是没有属性分组的,所以我们还需要改一下新增、查询详细信息的功能——查询基本属性的时候要去处理属性分组,查询销售属性的时候不需要。
5 查询分组关联属性
接口文档:https://easydoc.net/s/78237135/ZUqEdvA4/LnjzZHPj
/** * 查询分组关联属性 */ @GetMapping("/{attrgroupId}/attr/relation") public R attrRelation(@PathVariable("attrgroupId") String attrgroupId) { List<AttrEntity> list = attrService.getRelationAttr(attrgroupId); return R.ok().put("data", list); }- 1
- 2
- 3
- 4
- 5
- 6
- 7
- 8
- 9
@Override public List<AttrEntity> getRelationAttr(String attrgroupId) { QueryWrapper<AttrAttrgroupRelationEntity> wrapper = new QueryWrapper<>(); wrapper.eq("attr_group_id", attrgroupId); List<AttrAttrgroupRelationEntity> list = attrAttrgroupRelationService.list(wrapper); // 使用Stream流来快速获取该分组下的所有属性id List<Long> attrIdList = list.stream().map(AttrAttrgroupRelationEntity::getAttrId).collect(Collectors.toList()); return this.listByIds(attrIdList); }- 1
- 2
- 3
- 4
- 5
- 6
- 7
- 8
- 9
6 删除关联

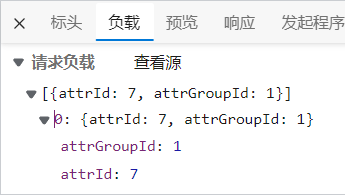
- controller层
//http://localhost:88/api/product/attrgroup/attr/relation/delete /** * 删除关联 */ @PostMapping("/attr/relation/delete") public R deleteRelation(@RequestBody AttrGroupRelationVo[] vos) { attrService.deleteRelation(vos); return R.ok(); }- 1
- 2
- 3
- 4
- 5
- 6
- 7
- 8
- 9
- 10
- 属性的service层(接口实现类)
@Override public void deleteRelation(AttrGroupRelationVo[] vos) { List<AttrGroupRelationVo> relationList = Arrays.asList(vos); // 用Stream流把属性id和分组id放到了AttrAttrgroupRelationEntity的集合中,用于删除关联关系。 List<AttrAttrgroupRelationEntity> relationEntityList = relationList.stream().map(relation -> { AttrAttrgroupRelationEntity relationEntity = new AttrAttrgroupRelationEntity(); BeanUtils.copyProperties(relation, relationEntity); return relationEntity; }).collect(Collectors.toList()); // 有传参才删除,否则不删。防止越过前端直接删除。 if (!relationList.isEmpty()){ // 这里调用关联关系的service主要是希望调用关系规范一些,不要这个service调用别人的dao。但是service之间互相调用没问题。 attrAttrgroupRelationService.deleteBatchRelation(relationEntityList); } }- 1
- 2
- 3
- 4
- 5
- 6
- 7
- 8
- 9
- 10
- 11
- 12
- 13
- 14
- 15
- 16
- 属性与属性分组的关系的service层(实现类)
@Override public void deleteBatchRelation(List<AttrAttrgroupRelationEntity> relationEntityList) { attrAttrgroupRelationDao.deleteBatchRelations(relationEntityList); }- 1
- 2
- 3
- 4
- 属性与属性分组的关系的删除方法的mapper映射
<delete id="deleteBatchRelations"> delete from gulimall_pms.pms_attr_attrgroup_relation where <foreach collection="relationEntityList" item="relation" separator=" or "> (attr_id = #{relation.attrId} and attr_group_id = #{relation.attrGroupId}) foreach> delete>- 1
- 2
- 3
- 4
- 5
- 6
看到弹幕都说用or或in都不好,但我确实不知道怎么做更好了。等后期看老师优化吧。
7 新增关联

点击新增关联按钮,要展示当前分类下,没有被其他分组关联的属性。
查询未被关联的属性
//http://localhost:88/api/product/attrgroup/2/noattr/relation?t=1661152895484&page=1&limit=10&key= /** * 查询当前分类下未被关联的属性 */ @PostMapping("/{attrgroupId}/noattr/relation") public R attrNoRelation(@PathVariable("attrgroupId") String attrgroupId, @RequestBody PageQuery pageQuery) { PageUtils page = attrService.getNoRelationAttr(attrgroupId, pageQuery); return R.ok().put("page", page); }- 1
- 2
- 3
- 4
- 5
- 6
- 7
- 8
- 9
- 10
- 11
@Override public PageUtils getNoRelationAttr(String attrgroupId, PageQuery pageQuery) { // 1、获取当前分组所在分类id。 AttrGroupEntity attrGroupEntity = attrGroupService.getById(attrgroupId); Long catelogId = attrGroupEntity.getCatelogId(); // 2、获取当前分类下所有未被关联的属性。 // 2.1、获取当前分类下的组ids List<AttrGroupEntity> attrGroupList = attrGroupService.list(new QueryWrapper<AttrGroupEntity>().eq("catelog_id", catelogId)); List<Long> attrGroupIdList = attrGroupList.stream().map(AttrGroupEntity::getAttrGroupId).collect(Collectors.toList()); // 2.2、获取这些组和属性的关联关系 List<AttrAttrgroupRelationEntity> relationList = attrAttrgroupRelationService.list(new QueryWrapper<AttrAttrgroupRelationEntity>().in("attr_group_id", attrGroupIdList)); List<Long> attrIdList = relationList.stream().map(AttrAttrgroupRelationEntity::getAttrId).collect(Collectors.toList()); // 2.3、排除已被关联的属性 // 组装查询条件:当前分类下、基本属性 QueryWrapper<AttrEntity> wrapper = new QueryWrapper<AttrEntity>().eq("catelog_id", catelogId).eq("attr_type", ProductConstant.AttrEnum.ATTR_TYPE_BASE.getCode()); if (!attrIdList.isEmpty()){ wrapper.notIn("attr_id", attrIdList); } if (pageQuery.getKey() != null && !pageQuery.getKey().isEmpty()){ wrapper.and(obj->{ obj.eq("attr_id", pageQuery.getKey()).or().like("attr_name", pageQuery.getKey()); }); } // 组装分页信息,用于返回 Page<AttrEntity> page = this.page( new Page<>(pageQuery.getPage(), pageQuery.getLimit()), wrapper); return new PageUtils(page); }- 1
- 2
- 3
- 4
- 5
- 6
- 7
- 8
- 9
- 10
- 11
- 12
- 13
- 14
- 15
- 16
- 17
- 18
- 19
- 20
- 21
- 22
- 23
- 24
- 25
- 26
- 27
- 28
- 29
新增关联关系
/** * 新增属性与分组的关联关系 */ @PostMapping("/attr/relation") public R addRelation(@RequestBody List<AttrGroupRelationVo> attrGroupRelationVoList) { attrAttrgroupRelationService.saveRelationBatch(attrGroupRelationVoList); return R.ok(); }- 1
- 2
- 3
- 4
- 5
- 6
- 7
- 8
- 9
@Override public void saveRelationBatch(List<AttrGroupRelationVo> attrGroupRelationVoList) { // 使用Stream流将接收到的属性放到数据库对应实体类中。 List<AttrAttrgroupRelationEntity> attrAttrgroupRelationEntityList = attrGroupRelationVoList.stream().map(item -> { AttrAttrgroupRelationEntity relationEntity = new AttrAttrgroupRelationEntity(); BeanUtils.copyProperties(item, relationEntity); return relationEntity; }).collect(Collectors.toList()); // 批量保存 this.saveBatch(attrAttrgroupRelationEntityList); }- 1
- 2
- 3
- 4
- 5
- 6
- 7
- 8
- 9
- 10
- 11
-
相关阅读:
ES6中什么是Promise?
【安卓开发】安卓网络编程
Spring面试题19:说一说Spring注解?什么是基于Java的Spring注解配置?什么是基于注解的容器配置?
matlab导入txt数据
文件上传功能实现
Python-Requests
JZ47 礼物的最大价值
C#语言实例源码系列-实现自定义屏保
ClickHouse(19)ClickHouse集成Hive表引擎详细解析
Beam failure Recovery
- 原文地址:https://blog.csdn.net/qq_46095164/article/details/126873769
