-
Springboot如何整合Kafka
springboot:整合Kafka
一、环境配置
依赖
<dependency> <groupId>org.springframework.kafkagroupId> <artifactId>spring-kafkaartifactId> dependency>- 1
- 2
- 3
- 4
yaml配置
spring: application: name: demo kafka: bootstrap-servers: 1.14.252.45:19092,1.14.252.45:19093,1.14.252.45:19094 producer: # producer 生产者 retries: 0 # 重试次数 acks: 1 # 应答级别:多少个分区副本备份完成时向生产者发送ack确认(可选0、1、all/-1) batch-size: 16384 # 批量大小 buffer-memory: 33554432 # 生产端缓冲区大小 key-serializer: org.apache.kafka.common.serialization.StringSerializer value-serializer: org.apache.kafka.common.serialization.StringSerializer consumer: # consumer消费者 group-id: javagroup # 默认的消费组ID enable-auto-commit: true # 是否自动提交offset auto-commit-interval: 100 # 提交offset延时(接收到消息后多久提交offset) # earliest:当各分区下有已提交的offset时,从提交的offset开始消费;无提交的offset时,从头开始消费 # latest:当各分区下有已提交的offset时,从提交的offset开始消费;无提交的offset时,消费新产生的该分区下的数据 # none:topic各分区都存在已提交的offset时,从offset后开始消费;只要有一个分区不存在已提交的offset,则抛出异常 auto-offset-reset: latest key-deserializer: org.apache.kafka.common.serialization.StringDeserializer value-deserializer: org.apache.kafka.common.serialization.StringDeserializer- 1
- 2
- 3
- 4
- 5
- 6
- 7
- 8
- 9
- 10
- 11
- 12
- 13
- 14
- 15
- 16
- 17
- 18
- 19
- 20
- 21
- 22
- 23
二、springboot整合Kafka
简单demo
下面示例创建了一个生产者,发送消息到topic1,消费者监听topic1消费消息。监听器用@KafkaListener注解,topics表示监听的topic,支持同时监听多个,用英文逗号分隔。
KafkaTemplate调用send时默认采用异步发送,如果需要同步获取发送结果,调用get方法
@RestController public class KafkaController { @Autowired private KafkaTemplate<String, Object> kafkaTemplate; @GetMapping("/kafka/normal/{message}") public void sendMessage1(@PathVariable("message") String normalMessage) { kafkaTemplate.send("topic1", normalMessage); } @KafkaListener(topics = {"topic1"}) public void onMessage1(ConsumerRecord<?, ?> record){ // 消费的哪个topic、partition的消息,打印出消息内容 System.out.println("简单消费:"+record.topic()+"-"+record.partition()+"-"+record.value()); } }- 1
- 2
- 3
- 4
- 5
- 6
- 7
- 8
- 9
- 10
- 11
- 12
- 13
- 14
- 15
- 16
- 17
带回调的生产者
kafkaTemplate提供了一个回调方法addCallback,我们可以在回调方法中监控消息是否发送成功 或 失败时做补偿处理,有两种写法
@GetMapping("/kafka/callbackOne/{message}") public void sendMessage2(@PathVariable("message") String callbackMessage) { kafkaTemplate.send("topic1", callbackMessage).addCallback(success -> { // 消息发送到的topic String topic = success.getRecordMetadata().topic(); // 消息发送到的分区 int partition = success.getRecordMetadata().partition(); // 消息在分区内的offset long offset = success.getRecordMetadata().offset(); System.out.println("发送消息成功:" + topic + "-" + partition + "-" + offset); }, failure -> { System.out.println("发送消息失败:" + failure.getMessage()); }); }- 1
- 2
- 3
- 4
- 5
- 6
- 7
- 8
- 9
- 10
- 11
- 12
- 13
- 14
@GetMapping("/kafka/callbackTwo/{message}") public void sendMessage3(@PathVariable("message") String callbackMessage) { kafkaTemplate.send("topic1", callbackMessage).addCallback(new ListenableFutureCallback<SendResult<String, Object>>() { @Override public void onFailure(Throwable ex) { System.out.println("发送消息失败:"+ex.getMessage()); } @Override public void onSuccess(SendResult<String, Object> result) { System.out.println("发送消息成功:" + result.getRecordMetadata().topic() + "-" + result.getRecordMetadata().partition() + "-" + result.getRecordMetadata().offset()); } }); }- 1
- 2
- 3
- 4
- 5
- 6
- 7
- 8
- 9
- 10
- 11
- 12
- 13
- 14
分区策略
我们知道,kafka中每个topic被划分为多个分区,那么生产者将消息发送到topic时,具体追加到哪个分区呢?这就是所谓的分区策略,Kafka 为我们提供了默认的分区策略,同时它也支持自定义分区策略。其路由机制为
- 若发送消息时指定了分区(即自定义分区策略),则直接将消息append到指定分区
- 若发送消息时未指定 patition,但指定了 key(kafka允许为每条消息设置一个key),则对key值进行hash计算,根据计算结果路由到指定分区,这种情况下可以保证同一个 Key 的所有消息都进入到相同的分区
- patition 和 key 都未指定,则使用kafka默认的分区策略,轮询选出一个 patition
验证默认分区策略
创建一个first分区,分区分别为0,1,2
docker部署kafdrop可视化界面
docker run -dit -p --name kafdrop 9000:9000 -e JVM_OPTS="-Xms32M -Xmx64M" -e KAFKA_BROKERCONNECT=1.14.252.45:19092,1.14.252.45:19093,1.14.252.45:19094 -e SERVER_SERVLET_CONTEXTPATH="/" obsidiandynamics/kafdrop- 1

//指定分区发送,不管key是什么,到同一个分区 @GetMapping("/kafka/partitionSend/{key}") public void setPartition(@PathVariable("key") String key) { kafkaTemplate.send("first", 0, key, "key=" + key + ",msg=指定0号分区"); } //指定key发送,不指定分区,根据key做hash,相同key到同一个分区 @GetMapping("/kafka/keysend/{key}") public void setKey(@PathVariable("key") String key) { kafkaTemplate.send("first", key, "key=" + key + ",msg=不指定分区"); } @KafkaListener(topics = {"first"},topicPattern = "0") public void onMessage(ConsumerRecord<?, ?> consumerRecord) { Optional<?> optional = Optional.ofNullable(consumerRecord.value()); if (optional.isPresent()) { Object msg = optional.get(); log.info("partition=0,message:[{}]", msg); } } @KafkaListener(topics = {"first"},topicPattern = "1") public void onMessage1(ConsumerRecord<?, ?> consumerRecord) { Optional<?> optional = Optional.ofNullable(consumerRecord.value()); if (optional.isPresent()) { Object msg = optional.get(); log.info("partition=1,message:[{}]", msg); } } @KafkaListener(topics = {"first"},topicPattern = "2") public void onMessage2(ConsumerRecord<?, ?> consumerRecord) { Optional<?> optional = Optional.ofNullable(consumerRecord.value()); if (optional.isPresent()) { Object msg = optional.get(); log.info("partition=1,message:[{}]", msg); } }- 1
- 2
- 3
- 4
- 5
- 6
- 7
- 8
- 9
- 10
- 11
- 12
- 13
- 14
- 15
- 16
- 17
- 18
- 19
- 20
- 21
- 22
- 23
- 24
- 25
- 26
- 27
- 28
- 29
- 30
- 31
- 32
- 33
- 34
- 35
- 36
- 37
- 38
测试
启动项目,可以看到

访问设置key,不设置分区,可以看到key相同的被hash到了同一个分区

访问设置分区,并且设置key的,可以看到这里是根据设置的分区来设置的

自定义分区策略
新建一个分区器类实现Partitioner接口,重写方法,其中partition方法的返回值就表示将消息发送到几号分区
public class CustomizePartitioner implements Partitioner { @Override public int partition(String topic, Object key, byte[] keyBytes, Object value, byte[] valueBytes, Cluster cluster) { //定义自己的分区策略,如果key以0开头,发到0号分区,其他都扔到1号分区 String keyStr = key+""; if (keyStr.startsWith("0")){ return 0; }else { return 1; } } @Override public void close() { } @Override public void configure(Map<String, ?> configs) { } }- 1
- 2
- 3
- 4
- 5
- 6
- 7
- 8
- 9
- 10
- 11
- 12
- 13
- 14
- 15
- 16
- 17
- 18
- 19
自定义配置类
@Configuration public class MyPartitionTemplate { @Value("${spring.kafka.bootstrap-servers}") private String bootstrapServers; KafkaTemplate<String,String> kafkaTemplate; @PostConstruct public void setKafkaTemplate() { Map<String, Object> props = new HashMap<>(); props.put(ProducerConfig.BOOTSTRAP_SERVERS_CONFIG, bootstrapServers); props.put(ProducerConfig.KEY_SERIALIZER_CLASS_CONFIG, StringSerializer.class); props.put(ProducerConfig.VALUE_SERIALIZER_CLASS_CONFIG, StringSerializer.class); //注意分区器在这里!!! props.put(ProducerConfig.PARTITIONER_CLASS_CONFIG, CustomizePartitioner.class); this.kafkaTemplate = new KafkaTemplate<String, String>(new DefaultKafkaProducerFactory<>(props)); } public KafkaTemplate<String,String> getKafkaTemplate(){ return kafkaTemplate; } }- 1
- 2
- 3
- 4
- 5
- 6
- 7
- 8
- 9
- 10
- 11
- 12
- 13
- 14
- 15
- 16
- 17
- 18
- 19
- 20
- 21
- 22
编写接口
@Autowired private MyPartitionTemplate myPartitionTemplate; @GetMapping("/kafka/myPartitionSend/{key}") public void setPartition3(@PathVariable("key") String key) { myPartitionTemplate.getKafkaTemplate().send("first", key,"key="+key+",msg=自定义分区策略"); }- 1
- 2
- 3
- 4
- 5
- 6
- 7

指定topic、partition、offset消费
/** * @Title 指定topic、partition、offset消费 * @Description 同时监听topic1和topic2,监听topic1的0号分区、topic2的 "0号和1号" 分区,指向1号分区的offset初始值为8 **/ @KafkaListener(id = "consumer1",groupId = "felix-group",topicPartitions = { @TopicPartition(topic = "topic1", partitions = { "0" }), @TopicPartition(topic = "topic2", partitions = "0", partitionOffsets = @PartitionOffset(partition = "1", initialOffset = "8")) }) public void onMessage3(ConsumerRecord<?, ?> record) { System.out.println("topic:"+record.topic()+"|partition:"+record.partition()+"|offset:"+record.offset()+"|value:"+record.value()); }- 1
- 2
- 3
- 4
- 5
- 6
- 7
- 8
- 9
- 10
- 11
topics和topicPartitions不能同时使用
批量消费
配置application.properties
#设置批量消费 spring.kafka.listener.type=batch #批量消费每次最多消费多少条消息 spring.kafka.consumer.max-poll-records=50- 1
- 2
- 3
- 4
接收消息时用List来接收,监听代码如下
@KafkaListener(id = "consumer2",groupId = "felix-group", topics = "topic1") public void onMessage3(List<ConsumerRecord<?, ?>> records) { System.out.println(">>>批量消费一次,records.size()="+records.size()); for (ConsumerRecord<?, ?> record : records) { System.out.println(record.value()); } }- 1
- 2
- 3
- 4
- 5
- 6
- 7
ConsumerAwareListenerErrorHandler 异常处理器
新建一个 ConsumerAwareListenerErrorHandler 类型的异常处理方法,用@Bean注入,BeanName默认就是方法名,然后我们将这个异常处理器的BeanName放到@KafkaListener注解的errorHandler属性里面,当监听抛出异常的时候,则会自动调用异常处理器
@Bean public ConsumerAwareListenerErrorHandler consumerAwareErrorHandler() { return (message, exception, consumer) -> { System.out.println("消费异常:"+message.getPayload()); return null; }; }- 1
- 2
- 3
- 4
- 5
- 6
- 7
// 将这个异常处理器的BeanName放到@KafkaListener注解的errorHandler属性里面 @KafkaListener(topics = {"topic1"},errorHandler = "consumerAwareErrorHandler") public void onMessage4(ConsumerRecord<?, ?> record) throws Exception { throw new Exception("简单消费-模拟异常"); } // 批量消费也一样,异常处理器的message.getPayload()也可以拿到各条消息的信息 @KafkaListener(topics = "topic1",errorHandler="consumerAwareErrorHandler") public void onMessage5(List<ConsumerRecord<?, ?>> records) throws Exception { System.out.println("批量消费一次..."); throw new Exception("批量消费-模拟异常"); }- 1
- 2
- 3
- 4
- 5
- 6
- 7
- 8
- 9
- 10
- 11
消息过滤器
消息过滤器可以在消息抵达consumer之前被拦截,在实际应用中,我们可以根据自己的业务逻辑,筛选出需要的信息再交由KafkaListener处理,不需要的消息则过滤掉
配置消息过滤只需要为 监听器工厂 配置一个RecordFilterStrategy(消息过滤策略),返回true的时候消息将会被抛弃,返回false时,消息能正常抵达监听容器
// 消息过滤器 @Bean public ConcurrentKafkaListenerContainerFactory filterContainerFactory(ConsumerFactory consumerFactory) { ConcurrentKafkaListenerContainerFactory factory = new ConcurrentKafkaListenerContainerFactory(); factory.setConsumerFactory(consumerFactory); // 被过滤的消息将被丢弃 factory.setAckDiscarded(true); // 消息过滤策略 factory.setRecordFilterStrategy(consumerRecord -> { if (Integer.parseInt(consumerRecord.value().toString()) % 2 == 0) { return false; } //返回true消息则被过滤 return true; }); return factory; }- 1
- 2
- 3
- 4
- 5
- 6
- 7
- 8
- 9
- 10
- 11
- 12
- 13
- 14
- 15
- 16
- 17
// 消息过滤监听 @KafkaListener(topics = {"topic1"},containerFactory = "filterContainerFactory") public void onMessage6(ConsumerRecord<?, ?> record) { System.out.println(record.value()); } @GetMapping("/kafka/filterContainerFactory/{message}") public void sendMessage6(@PathVariable("message") String normalMessage) { kafkaTemplate.send("topic1", normalMessage); }- 1
- 2
- 3
- 4
- 5
- 6
- 7
- 8
- 9
消息转发
在实际开发中,我们可能有这样的需求,应用A从TopicA获取到消息,经过处理后转发到TopicB,再由应用B监听处理消息,即一个应用处理完成后将该消息转发至其他应用,完成消息的转发
在SpringBoot集成Kafka实现消息的转发也很简单,只需要通过一个@SendTo注解,被注解方法的return值即转发的消息内容,如下
@GetMapping("/kafka/filterContainerFactory/{message}") public void sendMessage6(@PathVariable("message") String normalMessage) { kafkaTemplate.send("topic1", normalMessage); } @KafkaListener(topics = {"topic1"}) @SendTo("topic2") public String onMessage7(ConsumerRecord<?, ?> record) { return record.value()+"-forward message"; } @KafkaListener(topics = {"topic2"}) public void onMessage8(ConsumerRecord<?, ?> record) { System.out.println(record.value()); }- 1
- 2
- 3
- 4
- 5
- 6
- 7
- 8
- 9
- 10
- 11
- 12
- 13
- 14
- 15
offset提交
自动提交
前面的案例中,我们设置了以下两个选项,则kafka会按延时设置自动提交
enable-auto-commit: true # 是否自动提交offset auto-commit-interval: 100 # 提交offset延时(接收到消息后多久提交offset,默认单位为ms)- 1
- 2
手动提交
有些时候,我们需要手动控制偏移量的提交时机,比如确保消息严格消费后再提交,以防止丢失或重复
@Configuration @Slf4j public class MyOffsetConfig { @Value("${spring.kafka.bootstrap-servers}") private String bootstrapServers; @Bean public KafkaListenerContainerFactory<?> manualKafkaListenerContainerFactory() { Map<String, Object> configProps = new HashMap<>(); configProps.put(ConsumerConfig.BOOTSTRAP_SERVERS_CONFIG, bootstrapServers); configProps.put(ConsumerConfig.KEY_DESERIALIZER_CLASS_CONFIG, StringDeserializer.class); configProps.put(ConsumerConfig.VALUE_DESERIALIZER_CLASS_CONFIG, StringDeserializer.class); // 注意这里!!!设置手动提交 configProps.put(ConsumerConfig.ENABLE_AUTO_COMMIT_CONFIG, "false"); ConcurrentKafkaListenerContainerFactory<String, String> factory = new ConcurrentKafkaListenerContainerFactory<>(); factory.setConsumerFactory(new DefaultKafkaConsumerFactory<>(configProps)); // ack模式: // AckMode针对ENABLE_AUTO_COMMIT_CONFIG=false时生效,有以下几种: // RECORD // 每处理一条commit一次 // BATCH(默认) // 每次poll的时候批量提交一次,频率取决于每次poll的调用频率 // TIME // 每次间隔ackTime的时间去commit(跟auto commit interval有什么区别呢?) // COUNT // 累积达到ackCount次的ack去commit // COUNT_TIME // ackTime或ackCount哪个条件先满足,就commit // MANUAL // listener负责ack,但是背后也是批量上去 // MANUAL_IMMEDIATE // listner负责ack,每调用一次,就立即commit factory.getContainerProperties().setAckMode(ContainerProperties.AckMode.MANUAL_IMMEDIATE); return factory; } }- 1
- 2
- 3
- 4
- 5
- 6
- 7
- 8
- 9
- 10
- 11
- 12
- 13
- 14
- 15
- 16
- 17
- 18
- 19
- 20
- 21
- 22
- 23
- 24
- 25
- 26
- 27
- 28
- 29
- 30
- 31
- 32
- 33
- 34
- 35
- 36
- 37
- 38
- 39
@KafkaListener(topics = "test", groupId = "myoffset-group-1", containerFactory = "manualKafkaListenerContainerFactory") public void manualCommit(@Payload String message, @Header(KafkaHeaders.RECEIVED_PARTITION_ID) int partition, @Header(KafkaHeaders.RECEIVED_TOPIC) String topic, Consumer consumer, Acknowledgment ack) { log.info("手动提交偏移量 , partition={}, msg={}", partition, message); // 同步提交 consumer.commitSync(); //异步提交 //consumer.commitAsync(); // ack提交也可以,会按设置的ack策略走(参考MyOffsetConfig.java里的ack模式) // ack.acknowledge(); } @KafkaListener(topics = "test", groupId = "myoffset-group-2", containerFactory = "manualKafkaListenerContainerFactory") public void noCommit(@Payload String message, @Header(KafkaHeaders.RECEIVED_PARTITION_ID) int partition, @Header(KafkaHeaders.RECEIVED_TOPIC) String topic, Consumer consumer, Acknowledgment ack) { log.info("忘记提交偏移量, partition={}, msg={}", partition, message); // 不做commit! } /** * 现实状况: * commitSync和commitAsync组合使用 ** 手工提交异步 consumer.commitAsync(); * 手工同步提交 consumer.commitSync() *
* commitSync()方法提交最后一个偏移量。在成功提交或碰到无怯恢复的错误之前, * commitSync()会一直重试,但是commitAsync()不会。 *
* 一般情况下,针对偶尔出现的提交失败,不进行重试不会有太大问题 * 因为如果提交失败是因为临时问题导致的,那么后续的提交总会有成功的。 * 但如果这是发生在关闭消费者或再均衡前的最后一次提交,就要确保能够提交成功。否则就会造成重复消费 * 因此,在消费者关闭前一般会组合使用commitAsync()和commitSync()。 */
// @KafkaListener(topics = "test", groupId = "myoffset-group-3",containerFactory = "manualKafkaListenerContainerFactory") public void manualOffset(@Payload String message, @Header(KafkaHeaders.RECEIVED_PARTITION_ID) int partition, @Header(KafkaHeaders.RECEIVED_TOPIC) String topic, Consumer consumer, Acknowledgment ack) { try { log.info("同步异步搭配 , partition={}, msg={}", partition, message); //先异步提交 consumer.commitAsync(); //继续做别的事 } catch (Exception e) { System.out.println("commit failed"); } finally { try { consumer.commitSync(); } finally { consumer.close(); } } }- 1
- 2
- 3
- 4
- 5
- 6
- 7
- 8
- 9
- 10
- 11
- 12
- 13
- 14
- 15
- 16
- 17
- 18
- 19
- 20
- 21
- 22
- 23
- 24
- 25
- 26
- 27
- 28
- 29
- 30
- 31
- 32
- 33
- 34
- 35
- 36
- 37
- 38
- 39
- 40
- 41
- 42
- 43
- 44
- 45
- 46
- 47
- 48
- 49
- 50
- 51
- 52
- 53
- 54
- 55
- 56
- 57
- 58
- 59
定时启动、停止监听器
@EnableScheduling @Component public class CronTimer { /** * @KafkaListener注解所标注的方法并不会在IOC容器中被注册为Bean, * 而是会被注册在KafkaListenerEndpointRegistry中, * 而KafkaListenerEndpointRegistry在SpringIOC中已经被注册为Bean **/ @Autowired private KafkaListenerEndpointRegistry registry; @Autowired private ConsumerFactory consumerFactory; // 监听器容器工厂(设置禁止KafkaListener自启动) @Bean public ConcurrentKafkaListenerContainerFactory delayContainerFactory() { ConcurrentKafkaListenerContainerFactory container = new ConcurrentKafkaListenerContainerFactory(); container.setConsumerFactory(consumerFactory); //禁止KafkaListener自启动 container.setAutoStartup(false); return container; } // 监听器 @KafkaListener(id="timingConsumer",topics = "topic1",containerFactory = "delayContainerFactory") public void onMessage1(ConsumerRecord<?, ?> record){ System.out.println("消费成功:"+record.topic()+"-"+record.partition()+"-"+record.value()); } // 定时启动监听器 @Scheduled(cron = "0 42 11 * * ? ") public void startListener() { System.out.println("启动监听器..."); // "timingConsumer"是@KafkaListener注解后面设置的监听器ID,标识这个监听器 if (!registry.getListenerContainer("timingConsumer").isRunning()) { registry.getListenerContainer("timingConsumer").start(); } //registry.getListenerContainer("timingConsumer").resume(); } // 定时停止监听器 @Scheduled(cron = "0 45 11 * * ? ") public void shutDownListener() { System.out.println("关闭监听器..."); registry.getListenerContainer("timingConsumer").pause(); } }- 1
- 2
- 3
- 4
- 5
- 6
- 7
- 8
- 9
- 10
- 11
- 12
- 13
- 14
- 15
- 16
- 17
- 18
- 19
- 20
- 21
- 22
- 23
- 24
- 25
- 26
- 27
- 28
- 29
- 30
- 31
- 32
- 33
- 34
- 35
- 36
- 37
- 38
- 39
- 40
- 41
- 42
- 43
- 44
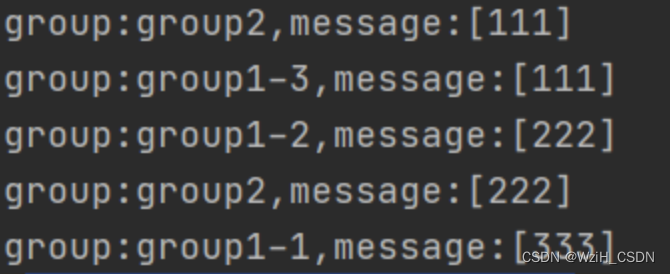
消费组别
创建一个first主题,有三个分区,这里创建俩个监听者
@KafkaListener(topics = {"first"},groupId = "group1") public void onMessage(ConsumerRecord<?, ?> consumerRecord) { Optional<?> optional = Optional.ofNullable(consumerRecord.value()); if (optional.isPresent()) { Object msg = optional.get(); log.info("group:group1-1,message:[{}]", msg); } } @KafkaListener(topics = {"first"},groupId = "group1") public void onMessage1(ConsumerRecord<?, ?> consumerRecord) { Optional<?> optional = Optional.ofNullable(consumerRecord.value()); if (optional.isPresent()) { Object msg = optional.get(); log.info("group:group1-2,message:[{}]", msg); } } @KafkaListener(topics = {"first"},groupId = "group1") public void onMessage4(ConsumerRecord<?, ?> consumerRecord) { Optional<?> optional = Optional.ofNullable(consumerRecord.value()); if (optional.isPresent()) { Object msg = optional.get(); log.info("group:group1-3,message:[{}]", msg); } } @KafkaListener(topics = {"first"},groupId = "group2") public void onMessage2(ConsumerRecord<?, ?> consumerRecord) { Optional<?> optional = Optional.ofNullable(consumerRecord.value()); if (optional.isPresent()) { Object msg = optional.get(); log.info("group:group2,message:[{}]", msg); } }- 1
- 2
- 3
- 4
- 5
- 6
- 7
- 8
- 9
- 10
- 11
- 12
- 13
- 14
- 15
- 16
- 17
- 18
- 19
- 20
- 21
- 22
- 23
- 24
- 25
- 26
- 27
- 28
- 29
- 30
- 31
- 32
- 33
- 34

发送三条消息,可以看到:
- 同一group下的两个消费者,在group1均分消息
- group2下只有一个消费者,得到全部消息
三、kafka的工具类
/** * 操作kafka的工具类 **/ @Component public class KafkaUtils { @Value("${spring.kafka.bootstrap-servers}") private String springKafkaBootstrapServers; private AdminClient adminClient; @Autowired private KafkaTemplate<String, Object> kafkaTemplate; /** * 初始化AdminClient * '@PostConstruct该注解被用来修饰一个非静态的void()方法。 * 被@PostConstruct修饰的方法会在服务器加载Servlet的时候运行,并且只会被服务器执行一次。 * PostConstruct在构造函数之后执行,init()方法之前执行。 */ @PostConstruct private void initAdminClient() { Map<String, Object> props = new HashMap<>(1); props.put(AdminClientConfig.BOOTSTRAP_SERVERS_CONFIG, springKafkaBootstrapServers); adminClient = KafkaAdminClient.create(props); } /** * 新增topic,支持批量 */ public void createTopic(Collection<NewTopic> newTopics) { adminClient.createTopics(newTopics); } /** * 删除topic,支持批量 */ public void deleteTopic(Collection<String> topics) { adminClient.deleteTopics(topics); } /** * 获取指定topic的信息 */ public String getTopicInfo(Collection<String> topics) { AtomicReference<String> info = new AtomicReference<>(""); try { adminClient.describeTopics(topics).all().get().forEach((topic, description) -> { for (TopicPartitionInfo partition : description.partitions()) { info.set(info + partition.toString() + "\n"); } }); } catch (InterruptedException | ExecutionException e) { e.printStackTrace(); } return info.get(); } /** * 获取全部topic */ public List<String> getAllTopic() { try { return adminClient.listTopics().listings().get().stream().map(TopicListing::name).collect(Collectors.toList()); } catch (InterruptedException | ExecutionException e) { e.printStackTrace(); } return Lists.newArrayList(); } /** * 往topic中发送消息 */ public void sendMessage(String topic, String message) { kafkaTemplate.send(topic, message); } }- 1
- 2
- 3
- 4
- 5
- 6
- 7
- 8
- 9
- 10
- 11
- 12
- 13
- 14
- 15
- 16
- 17
- 18
- 19
- 20
- 21
- 22
- 23
- 24
- 25
- 26
- 27
- 28
- 29
- 30
- 31
- 32
- 33
- 34
- 35
- 36
- 37
- 38
- 39
- 40
- 41
- 42
- 43
- 44
- 45
- 46
- 47
- 48
- 49
- 50
- 51
- 52
- 53
- 54
- 55
- 56
- 57
- 58
- 59
- 60
- 61
- 62
- 63
- 64
- 65
- 66
- 67
- 68
- 69
- 70
- 71
- 72
- 73
- 74
- 75
-
相关阅读:
火车头采集器文章组合聚合
必问207道java架构和大数据面试题及答案
渗透测试高级技巧(二):对抗前端动态密钥与非对称加密防护
【附源码】计算机毕业设计SSM泰兴市公交信息系统
03_RabbitMQ快速入门案例
React xlsx(工具库) 处理表头合并
基于Java毕业设计信贷管理系统源码+系统+mysql+lw文档+部署软件
如何使用 Bootstrap 创建一个简单的仪表板
数据结构 | 【红黑树】图解原理
webmin远程命令执行漏洞(CVE-2019-15107)
- 原文地址:https://blog.csdn.net/WziH_CSDN/article/details/126870127
