-
【JavaWeb】会话的学习笔记:Cookie和Session的知识点,这一次我总算学明白了
1 会话
1.1 什么是会话?
用户打开浏览器,访问Web服务器的资源,会话建立,直到有一方断开连接,会话结束。在一次会话中可以包含多次请求和响应。
1.2 会话跟踪
一种维护浏览器状态的方法,服务器需要识别多次请求是否来自于同一浏览器,以便在同一次会话的多次请求间共享数据。
1.3 为什么要会话跟踪?
Http协议是无状态的,每次浏览器向服务器请求时,服务器都会将该请求视为新的请求,因此我们需要会话跟踪技术来实现会话内数据共享。
1.4 如何实现会话跟踪
- 客户端会话技术:Cookie
- 服务端会话跟踪技术:Session
2 Cookie
2.1 Cookie的基本使用
2.1.1 发送Cookie
2.1.1.1 核心方法
方法名 方法类型 方法作用 addCookie(Cookie cookie) void 向服务器发送Cookie 2.1.1.2 例子
@WebServlet("/demo01Cookie") public class CookieDemo01 extends HttpServlet { @Override protected void doGet(HttpServletRequest req, HttpServletResponse resp) throws ServletException, IOException { /* 1、设置Cookie */ Cookie cookie = new Cookie("username","zhangsan"); /* 2、发送Cookie */ resp.addCookie(cookie); } @Override protected void doPost(HttpServletRequest req, HttpServletResponse resp) throws ServletException, IOException { this.doPost(req,resp); } }- 1
- 2
- 3
- 4
- 5
- 6
- 7
- 8
- 9
- 10
- 11
- 12
- 13
- 14
- 15
- 16
2.1.1.3 效果
访问"demo01Cookie"
右键-检查-Application-Cookies 看到了手动发送的Cookie

2.1.2 获取Cookie
2.1.2.1 核心方法
方法名 方法类型 方法作用 getCookies Cookie[] 获取所有的Cookie getName String 获取Cookie的名字 getValue String 获取Cookie的值 2.1.2.2 例子
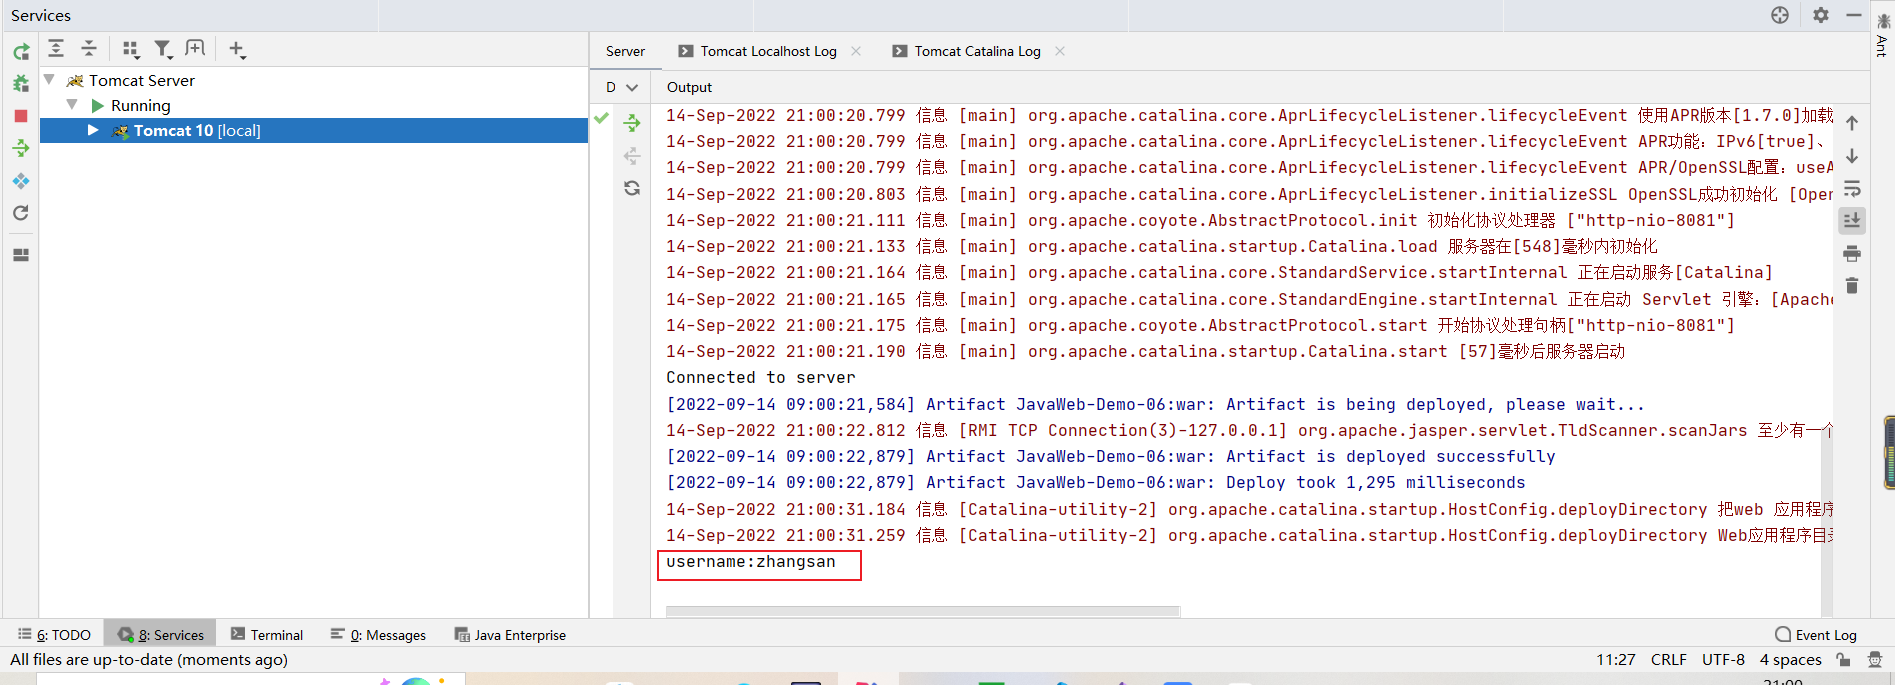
@WebServlet("/demo02Cookie") public class CookieDemo02 extends HttpServlet { @Override protected void doGet(HttpServletRequest req, HttpServletResponse resp) throws ServletException, IOException { /* 1、获取Cookies */ Cookie[] cookies = req.getCookies(); /* 2、遍历Cookies,获取自己想要的Cookie */ for (Cookie cookie : cookies) { /* 3、获取cookie的名字 */ String name = cookie.getName(); if(name.equals("username")) { /* 4、获取cookie的值 */ String value = cookie.getValue(); System.out.println(name+":"+value); } } } @Override protected void doPost(HttpServletRequest req, HttpServletResponse resp) throws ServletException, IOException { this.doGet(req,resp); } }- 1
- 2
- 3
- 4
- 5
- 6
- 7
- 8
- 9
- 10
- 11
- 12
- 13
- 14
- 15
- 16
- 17
- 18
- 19
- 20
- 21
- 22
- 23
- 24
2.1.2.3 效果

2.2 Cookie 的原理

Cookie是基于Http协议的,服务器第一次访问Servlet的时候,Servlet通过响应头set-Cookie将Cookie发送到浏览器,浏览器会自动cookie存放到Cookie
Servlet发送Cookie

浏览器存放Cookie

2.3 Cookie的细节
2.3.1 Cookie的生命周期
默认情况下,Cookie在浏览器关闭之后就会自动消失。
2.3.1.1设置Cookie的生命的周期
方法名 方法类型 方法作用 setMaxAge(int expiry) void 设置Cookie的生命周期,单位是秒 其中expiry的值有三种情况:
- 正数:将Cookie写入电脑的硬盘,持久化存储,到时间子哦对那个删除
- 负数:默认
- 零:删除对应的Cookie

2.3.2 Cookie存储中文
默认情况下,是不支持存储中文的,甚至会报错,这里采用的方法是对字符串先转码再解码的方式存储中文。
2.3.2.1 核心方法
方法名 方法类型 方法作用 URLEncoder.encode(String s, String enc) String 对s进行转码 URLDecoder.decode(String s, String enc) String 对s进行解码 2.3.2.2 例子
发送Cookie端
@WebServlet("/demo01Cookie") public class CookieDemo01 extends HttpServlet { @Override protected void doGet(HttpServletRequest req, HttpServletResponse resp) throws ServletException, IOException { /* 1、设置Cookie */ /*Cookie cookie = new Cookie("username","zhangsan");*/ /* 1.1 对字符串转码 */ String value = "张三"; value = URLEncoder.encode(value,"UTF-8"); /* 1.2 设置Cookie */ Cookie cookie = new Cookie("username",value); System.out.println("value的值是:"+value); /* 2、设置Cookie的生命周期(单位是s) */ /* 设置Cookie的生命周期是7天 */ cookie.setMaxAge(60*60*24*7); /* 3、发送Cookie */ resp.addCookie(cookie); } @Override protected void doPost(HttpServletRequest req, HttpServletResponse resp) throws ServletException, IOException { this.doPost(req,resp); } }- 1
- 2
- 3
- 4
- 5
- 6
- 7
- 8
- 9
- 10
- 11
- 12
- 13
- 14
- 15
- 16
- 17
- 18
- 19
- 20
- 21
- 22
- 23
- 24
- 25
- 26
- 27
- 28
- 29
- 30
接受Cookie端
@WebServlet("/demo02Cookie") public class CookieDemo02 extends HttpServlet { @Override protected void doGet(HttpServletRequest req, HttpServletResponse resp) throws ServletException, IOException { /* 1、获取Cookies */ Cookie[] cookies = req.getCookies(); /* 2、遍历Cookies,获取自己想要的Cookie */ for (Cookie cookie : cookies) { /* 3、获取cookie的名字 */ String name = cookie.getName(); if(name.equals("username")) { /* 4、获取cookie的值 */ String value = cookie.getValue(); System.out.println("获取的值是:"+value); /* 4.1 解码 */ value = URLDecoder.decode(value,"UTF-8"); System.out.println(name+":"+value); } } } @Override protected void doPost(HttpServletRequest req, HttpServletResponse resp) throws ServletException, IOException { this.doGet(req,resp); } }- 1
- 2
- 3
- 4
- 5
- 6
- 7
- 8
- 9
- 10
- 11
- 12
- 13
- 14
- 15
- 16
- 17
- 18
- 19
- 20
- 21
- 22
- 23
- 24
- 25
- 26
- 27
2.3.2.3 效果

3 Session
- Session是服务端会话跟踪技术:将数据保存在服务端
- JavaEE提供HttpSession接口,来实现依次会话的多次请求间数据共享的功能
3.1 Session的使用
3.1.1 核心方法
方法名 方法类型 方法左右 request.getSession() HttpSession 获取Session的对象 setAttribute(String name, Object value) void 设置Session的键值对 getAttribute(String name) Object 根据name找到value removeAttribute(String name) void 根据name移除Session 3.1.2 例子
Session是不需要发送的,因为Session本身就存放在服务端
设置Session的一端
@WebServlet("/Session01Demo") public class SessionDemo01 extends HttpServlet { @Override protected void doGet(HttpServletRequest req, HttpServletResponse resp) throws ServletException, IOException { /* 1、获取Session对象 */ HttpSession session = req.getSession(); /* 2、设置Session对象 */ session.setAttribute("username","zhangsan"); } @Override protected void doPost(HttpServletRequest req, HttpServletResponse resp) throws ServletException, IOException { this.doGet(req,resp); } }- 1
- 2
- 3
- 4
- 5
- 6
- 7
- 8
- 9
- 10
- 11
- 12
- 13
- 14
- 15
- 16
- 17
- 18
- 19
获取Session的一段
@WebServlet("/Session02Demo") public class SessionDemo02 extends HttpServlet { @Override protected void doGet(HttpServletRequest req, HttpServletResponse resp) throws ServletException, IOException { /* 1、获取Session对象 */ HttpSession session = req.getSession(); /* 2、根据名字获取Session */ Object username = session.getAttribute("username"); session.removeAttribute("username"); System.out.println(username); } @Override protected void doPost(HttpServletRequest req, HttpServletResponse resp) throws ServletException, IOException { this.doGet(req,resp); } }- 1
- 2
- 3
- 4
- 5
- 6
- 7
- 8
- 9
- 10
- 11
- 12
- 13
- 14
- 15
- 16
- 17
- 18
3.1.3 效果

3.2 Session的原理
- Session是基于Cookie实现的
- Session有一个唯一的标识Id
服务器请求Servlet,Servlet会自动生成一个SessionID 并存在本地,并将这个id通过set-cookie:JSESSIONID发送到浏览器,浏览器存储在Cookies中,下一次浏览器访问Servlet的时候,会携带JSESSIONID,Servlet通过这个Id去本地文件查找session。

3.3 Session 细节
3.3.1 Session钝化、活化
- 钝化: 在服务器正常关闭后,Tomcat会自动将Session数据写入硬盘的文件中。
- **活化:**再次启动服务器,从文件中加载数据到Session中
3.3.2 Session的销毁
3.3.2.1 web.xml配置
默认情况下,如果你没有任何操作,Session会在30分钟后自动销毁。
<session-config> <session-timeout>100session-timeout> session-config>- 1
- 2
- 3

3.3.2.2 Invalidate方法
调用session.invalidate()方法销毁Session
Session销毁有什么用吗?
*再次启动服务器,从文件中加载数据到Session中
3.3.2 Session的销毁
3.3.2.1 web.xml配置
默认情况下,如果你没有任何操作,Session会在30分钟后自动销毁。
<session-config> <session-timeout>100session-timeout> session-config>- 1
- 2
- 3
[外链图片转存中…(img-DlOIMn8T-1663206985748)]
3.3.2.2 Invalidate方法
调用session.invalidate()方法销毁Session
Session销毁有什么用吗?
Session一般用在登录登出功能之上,Session的销毁可以便于完成登出的功能!
-
相关阅读:
【问题解决】蓝牙显示已配对,无法连接,蓝牙设备显示在其他设备中。
【填坑】ESP32 bootloader初探(下)
直播带货前途渺茫了
unity NPR 卡通渲染
前端JavaScript入门到精通,javascript核心进阶ES6语法、API、js高级等基础知识和实战 —— Web APIs(五)
「项目管理」加强沟通管理和制定项目进度计划
Vue3+ElementPlus纯前端分页(手撕分页),无需修改后端
Springboot毕设项目收费书屋管理系统8xjjejava+VUE+Mybatis+Maven+Mysql+sprnig)
聚观早报 | 推特临时培训员工应对世界杯;世界杯足球内置传感器
Spring Boot 中 Nacos 配置中心使用实战
- 原文地址:https://blog.csdn.net/m0_59792745/article/details/126865439