-
JAVA线程模型
java当中的线程和操作系统的线程是什么关系?
关于操作系统的线程
linux操作系统的线程控制原语
 int pthread_create(pthread_t *thread, const pthread_attr_t *attr,
                          void *(*start_routine) (void *), void *arg);

根据man配置的信息可以得出pthread_create会创建一个线程,这个函数是linux系统的函数,可以用C或者C++直接调用,上面信息也告诉程序员这个函数在pthread.h, 这个函数有四个参数
pthread_t *thread 传出参数,调用之后会传出被创建线程的id 定义 pthread_t pid;继而 取地址 &pid const pthread_attr_t *attr 线程属性,关于线程属性是linux的知识 在学习pthread_create函数的时候一般穿NULL,保持默认属性 void (start_routine) (void *) 线程的启动后的主体函数相当于java当中的run 需要你定义一个函数,然后传函数名即可 void *arg 主体函数的参数 如果没有可以传NULL 在linux上启动一个线程的代码:
#include
//头文件 #include pthread_t pid; //定义一个变量,接受创建线程后的线程id void* thread_entity(void* args){ while(1){ usleep(500); printf("i am new Thread!\n"); } } int main() { //调用操作系统的函数创建线程,注意四个参数 pthread_create(&pid,NULL,thread_entity,NULL); while(1){ usleep(500); printf("main\n"); } return 0; } 执行 gcc -o xx thread.c -pthread 编译thread.c文件
运行 xx文件 ./xx
注意:这里面必须要让主线程进行一个死循环 否则主线程执行完毕之后 进程就被结束,无法去创建一个子线程出来。这和我们Java中创建一个线程不同
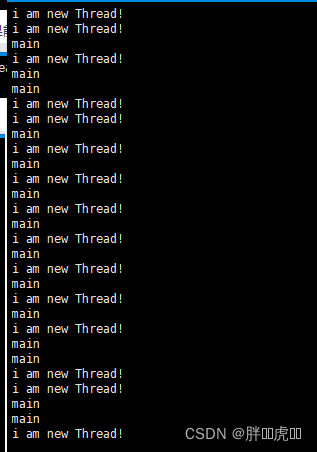
运行结果如下

我们可以看到使用我们c语言也能实现多线程,那么我们操作系统中的线程和我们JAVA中的线程之前又有什么关系呢?这两个是相同的嘛?从上面我们能够知道操作系统的多线程是调用pthread_create并且利用mutex(互斥)机制来完成,那么我们Java中的多线程是如何实现的呢。首先我们在使用的时候会去通过new thread创建一个线程,然后在执行thread.start()方法,去等待cpu的调度。一旦cpu执行到,那么将会执行我们自己的主题函数run(),最后去完成逻辑。
在这里为了大家更好的理解先来介绍一下我们的jdk,众所周知jdk是我们java运行时可以提供的一套内库,比如我们String类、Io类,但是sun公司除了提供这一套内库之外,sun公司还提供了一些C文件,那么sun公司它为什么要提供这些C文件呢?首先我们来看这些C文件的
作用,这些C文件大体来分的话,可以被分为两个作用。
-
其一:实现调用操作系统的函数
-
其二:实现调用JVM的一些代码
注意jdk中除了上文说的这些文件之外,还提供了java.exe【如果是windows系统】,那我们如何去理解java.exe呢,如果你去将这个java.exe进行放大的话,它是我们某一个项目编译完成得到的。那么这项目又是什么项目呢?其实是我们大名鼎鼎的hostpot
我们java层面去创建一个线程,其实并没有通过c语言直接去调用操作系统的pthread_create方法,【为什么???】而是通过c文件去先执行hotspot【因为我们hotspost虚拟机就是用c或者c++写的】在hotspost虚拟机中有我们的JavaThread,进而通过JavaThread类再去调用我们的os系统中的pthread_create方法。
这个hotspot中的JavaThread和我们的Java层面的API是一一对应的,举个例子,比如我们Java层面的 start、sleep、wait等这些方法在JavaThread中都会唯一对应一个。
为什么我们在Java层面通过API不去直接调用os层面的线程创建呢?
-
如果我们在api层面去直接调用os系统的话 我们就需要在每一个c文件中写上重复的线程创建代码,这样就会导致你的c文件很臃肿,因为核心都是差不多的c文件。
-
Jvm无法去对我们线程做管理了,此时将我们的执行权完全交出去了,导致脱离了Jvm。
那C语言又是如何调到我们的hotspot虚拟机?
我们先来看一下这个C文件在哪
D:\ChromeDownloads\openjdk8-master\openjdk\jdk\src\share\native\java\lang
/* * Copyright (c) 1994, 2012, Oracle and/or its affiliates. All rights reserved. * DO NOT ALTER OR REMOVE COPYRIGHT NOTICES OR THIS FILE HEADER. * * This code is free software; you can redistribute it and/or modify it * under the terms of the GNU General Public License version 2 only, as * published by the Free Software Foundation. Oracle designates this * particular file as subject to the "Classpath" exception as provided * by Oracle in the LICENSE file that accompanied this code. * * This code is distributed in the hope that it will be useful, but WITHOUT * ANY WARRANTY; without even the implied warranty of MERCHANTABILITY or * FITNESS FOR A PARTICULAR PURPOSE. See the GNU General Public License * version 2 for more details (a copy is included in the LICENSE file that * accompanied this code). * * You should have received a copy of the GNU General Public License version * 2 along with this work; if not, write to the Free Software Foundation, * Inc., 51 Franklin St, Fifth Floor, Boston, MA 02110-1301 USA. * * Please contact Oracle, 500 Oracle Parkway, Redwood Shores, CA 94065 USA * or visit www.oracle.com if you need additional information or have any * questions. */ /*- * Stuff for dealing with threads. * originally in threadruntime.c, Sun Sep 22 12:09:39 1991 */ #include "jni.h" #include "jvm.h" #include "java_lang_Thread.h" #define THD "Ljava/lang/Thread;" #define OBJ "Ljava/lang/Object;" #define STE "Ljava/lang/StackTraceElement;" #define STR "Ljava/lang/String;" #define ARRAY_LENGTH(a) (sizeof(a)/sizeof(a[0])) static JNINativeMethod methods[] = { {"start0", "()V", (void *)&JVM_StartThread}, {"stop0", "(" OBJ ")V", (void *)&JVM_StopThread}, {"isAlive", "()Z", (void *)&JVM_IsThreadAlive}, {"suspend0", "()V", (void *)&JVM_SuspendThread}, {"resume0", "()V", (void *)&JVM_ResumeThread}, {"setPriority0", "(I)V", (void *)&JVM_SetThreadPriority}, {"yield", "()V", (void *)&JVM_Yield}, {"sleep", "(J)V", (void *)&JVM_Sleep}, {"currentThread", "()" THD, (void *)&JVM_CurrentThread}, {"countStackFrames", "()I", (void *)&JVM_CountStackFrames}, {"interrupt0", "()V", (void *)&JVM_Interrupt}, {"isInterrupted", "(Z)Z", (void *)&JVM_IsInterrupted}, {"holdsLock", "(" OBJ ")Z", (void *)&JVM_HoldsLock}, {"getThreads", "()[" THD, (void *)&JVM_GetAllThreads}, {"dumpThreads", "([" THD ")[[" STE, (void *)&JVM_DumpThreads}, {"setNativeName", "(" STR ")V", (void *)&JVM_SetNativeThreadName}, }; #undef THD #undef OBJ #undef STE #undef STR JNIEXPORT void JNICALL Java_java_lang_Thread_registerNatives(JNIEnv *env, jclass cls) { (*env)->RegisterNatives(env, cls, methods, ARRAY_LENGTH(methods)); } 我们可以怎么去理解呢?
从源码中我们可以看到JNINativeMethod是一个静态变量,并且是数组类型,而在数组中的内容都是我们一些在Java中定义的native方法,我选取数组中的一种来举个例子
   {"start0",           "()V",        (void *)&JVM_StartThread}
   本地定义的native方法                hotspot虚拟机中的一个叫JVM_StartThread方法
而StartThread这个方法不在我们jdk这个包下,在hostpot这个文件下的一个jvm.cpp
D:\ChromeDownloads\openjdk8-master\openjdk\hotspot\src\share\vm\prims
找到jvm.cpp的核心源码;
JVM_ENTRY(void, JVM_StartThread(JNIEnv* env, jobject jthread)) JVMWrapper("JVM_StartThread"); JavaThread *native_thread = NULL; // We cannot hold the Threads_lock when we throw an exception, // due to rank ordering issues. Example: we might need to grab the // Heap_lock while we construct the exception. bool throw_illegal_thread_state = false; // We must release the Threads_lock before we can post a jvmti event // in Thread::start. { // Ensure that the C++ Thread and OSThread structures aren't freed before // we operate. MutexLocker mu(Threads_lock); // Since JDK 5 the java.lang.Thread threadStatus is used to prevent // re-starting an already started thread, so we should usually find // that the JavaThread is null. However for a JNI attached thread // there is a small window between the Thread object being created // (with its JavaThread set) and the update to its threadStatus, so we // have to check for this if (java_lang_Thread::thread(JNIHandles::resolve_non_null(jthread)) != NULL) { throw_illegal_thread_state = true; } else { // We could also check the stillborn flag to see if this thread was already stopped, but // for historical reasons we let the thread detect that itself when it starts running jlong size = java_lang_Thread::stackSize(JNIHandles::resolve_non_null(jthread)); // Allocate the C++ Thread structure and create the native thread. The // stack size retrieved from java is signed, but the constructor takes // size_t (an unsigned type), so avoid passing negative values which would // result in really large stacks. size_t sz = size > 0 ? (size_t) size : 0; // 可以清楚看到在这个jvm.cpp里 new了一个JavaThread对象,而这个对象就是和我们java中的 // 线程一一对应。因此 我们也可以理解我们java中的线程创建方式就是从我们jvm中new Thread创建开始的。像我们的sleep方法就在这个类中 native_thread = new JavaThread(&thread_entry, sz); // At this point it may be possible that no osthread was created for the // JavaThread due to lack of memory. Check for this situation and throw // an exception if necessary. Eventually we may want to change this so // that we only grab the lock if the thread was created successfully - // then we can also do this check and throw the exception in the // JavaThread constructor. if (native_thread->osthread() != NULL) { // Note: the current thread is not being used within "prepare". native_thread->prepare(jthread); } } } if (throw_illegal_thread_state) { THROW(vmSymbols::java_lang_IllegalThreadStateException()); } assert(native_thread != NULL, "Starting null thread?"); if (native_thread->osthread() == NULL) { // No one should hold a reference to the 'native_thread'. delete native_thread; if (JvmtiExport::should_post_resource_exhausted()) { JvmtiExport::post_resource_exhausted( JVMTI_RESOURCE_EXHAUSTED_OOM_ERROR | JVMTI_RESOURCE_EXHAUSTED_THREADS, "unable to create new native thread"); } THROW_MSG(vmSymbols::java_lang_OutOfMemoryError(), "unable to create new native thread"); } Thread::start(native_thread);在这里再唠叨一次,jdk包含三部分内容
-
Java中类库,比如String、Io类
-
C中的类库,比如本地native方法
-
hotspot虚拟机
虽然你在jdk中没有看到hostpot虚拟机,但是你可以看到叫java.exe的应用程序,而这个java.exe的应用程序其实就是我们hostpot项目编译完成得到的。
那操作系统是如何去创建一个线程的,我们在次找到源码中的位置
D:\ChromeDownloads\openjdk8-master\openjdk\hotspot\src\os\linux\vm 下的os_linux.cpp文件中
int ret = pthread_create(&tid, &attr, (void* (*)(void*)) java_start, thread);
从上面我们至少可以猜想一个结论
JAVA中Thread和我们操作系统中线程是1----->1的关系
假设有了上面知识的铺垫,那么可以试想一下java的线程模型到底是什么情况呢?
在java代码里启动一个线程的代码
public class Example4Start { public static void main(String[] args) { Thread thread = new Thread(){ @Override public void run() { System.out.println("i am new Thread!"); } }; thread.start(); } }这里启动的线程和上面我们通过linux的pthread_create函数启动的线程有什么关系呢?
只能去可以查看start()的源码了,看看java的start()到底干了什么事才能对比出来.
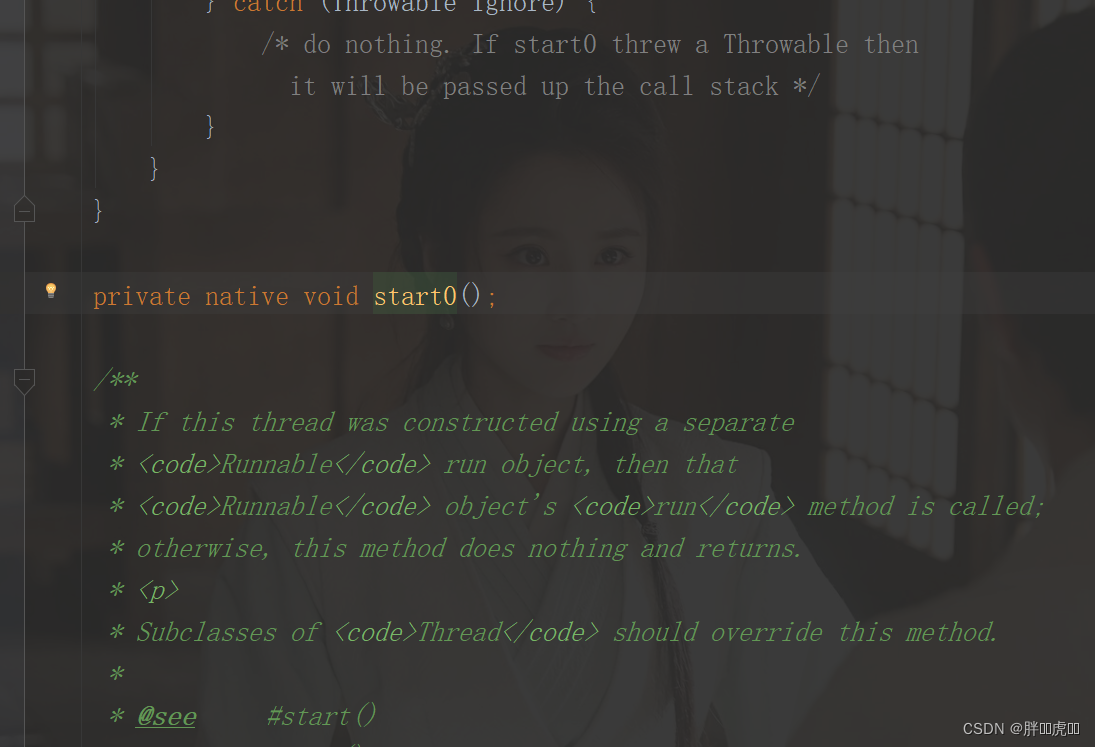
start源码的部分截图,可以看到这个方法最核心的就是调用了一个start0方法,而start0方法又是一个native方法,故而如果要搞明白start0我们需要查看Hotspot的源码,好吧那我们就来看一下Hotspot的源码吧,Hotspot的源码怎么看么?一般直接看openjdk的源码,在没有openjdk的情况下,我们做一个大胆的猜测,java级别的线程其实就是操作系统级别的线程,什么意思呢?说白了我们大胆验证 start-start0-ptherad_create
我们鉴于这个猜想来模拟实现一下。


如何来模拟实现呢?
public class LubanThread {
    public static void main(String[] args) {
     HzkThread hzkThread =new HzkThread();
        hzkThread.start0();
    }
    private native void start0();
}
这里我们让自己写的start0调用一个本地方法,在本地方法里面去启动一个系统线程,好吧我们写一个c程序来启动本地线程
#include
#include
pthread_t pid;
void* thread_entity(void* arg)
{
    while(1){
		usleep(100);
    	printf("I am new Thread\n");
    }
}
int main()
{
    pthread_create(&pid,NULL,thread_entity,NULL);
    while(1){
		usleep(100);
		printf("I am  main\n");
	}
}
在linux上编译、运行上述C程序
gcc thread.c -o thread.out -pthread
./thread.out

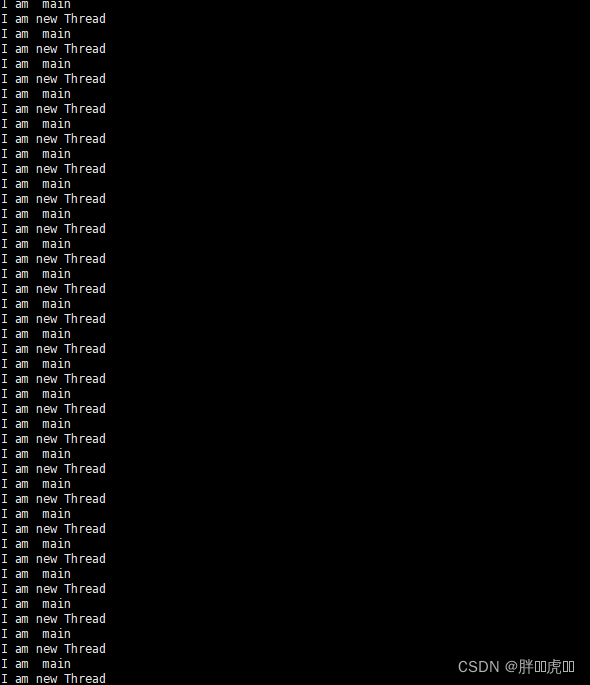
结果是两个线程一直在交替执行,得到我们预期的结果。现在的问题就是我们如何通过start0调用这个c程序,这里就要用到JNI了,
好吧你要是实在不懂,再说一遍
java代码如下:
/**
 * Created by 撸码的小孩 on 2022/1/10
 * time  15:55
 */
public class HzkThread {

    static {
        System.loadLibrary( "HzkThreadNative" );
    }
    private native void start0();


    public static void main(String[] args) {
        HzkThread hzkThread = new HzkThread();
        hzkThread.start0();


    }


}
装载库,保证JVM在启动的时候就会装载,故而一般是也给static
System.loadLibrary( "LubanThreadNative" );
编译成class文件

生成.h头文件
javah packageName.className
需要注意的运行javah命令得在包外面和编译不一样,编译运行javac得在包当中
javah HzkThread

继而开始编写C程序,要上面那个thread.c程序上做一点修改,这里我复制一份出来修改,修改的时候需要参考那个这个.h文件,一下是.h文件的内容
/* DO NOT EDIT THIS FILE - it is machine generated */
#include
/* Header for class HzkThread */

#ifndef _Included_HzkThread
#define _Included_HzkThread
#ifdef __cplusplus
extern "C" {
#endif
/*
 * Class:     HzkThread
 * Method:    start0
 * Signature: ()V
 */
JNIEXPORT void JNICALL Java_HzkThread_start0
  (JNIEnv *, jobject);

#ifdef __cplusplus
}
#endif
#endif
上面代码中的Java_HzkThread_start0方法就是你需要在C程序中定义的方法。
首先复制一份thread.c
#include //头文件
#include
#include "HzkThread.h" //记得导入刚刚编译的那个.h文件
pthread_t pid; //定义一个变量,接受创建线程后的线程id

void*  thread_entity(void* args){

	while(1){

    usleep(500);
	printf("i am new Thread!\n");
	}

}


//这个方法要参考.h文件的代码,这里的参数得注意,你写死就行,不用明白为什么
JNIEXPORT void JNICALL Java_HzkThread_start0 (JNIEnv *env, jobject c1)
{
     //调用操作系统的函数创建线程,注意四个参数
    pthread_create(&pid,NULL,thread_entity,NULL);

    while(1){
        usleep(500);
        printf("main\n");
    }


}
解析类,把这个thread.c编译成为一个动态链接库,这样在java代码里会被laod到内存
libHzkThreadNative这个命名需要注意libxx,xx就等于你java那边写的字符串
gcc -fPIC -I /usr/lib/jvm/java-1.8.0-openjdk/include -I /usr/lib/jvm/java-1.8.0-openjdk/include/linux -shared -o libHzkThreadNative.so thread.c
做完这一系列事情之后需要把这个.so文件加入到path,这样java才能load到
export LD_LIBRARY_PATH=$LD_LIBRARY_PATH:{libLubanThreadNative.so}所在的路径回车


牛逼!我们已经通过自己写的一个类,启动了一个线程,但是这个线程函数体是不是java的是C程序的,这个java线程的run方法不同。接下来我们来实现一下这个run
首先在java的代码里面提供一个run方法
-
-
相关阅读:
spring注入的几种方式(文件配置以及注解方式)
【node】发送邮件及附件简要使用说明
什么是 DevOps?看这一篇就够了!
matlab解方程组解析解
Axure9 基本操作(二)
设计模式-建造者模式
JVM内存和垃圾回收-14.垃圾回收相关概念
CSS3与HTML5
hadoop分布式系统复习题 大题
Go | 函数注意事项
- 原文地址:https://blog.csdn.net/lbw18/article/details/126771968