-
Vuex 3使用总结
版本问题
截止博客发布前,Vuex 拥有 3.x 和 4.x 版本。
本文总结的是与 Vue 2 匹配的 Vuex 3 的使用。
更多操作请参考官方文档:https://v3.vuex.vuejs.org/
与 Vue 3 匹配的 Vuex 4 的文档: https://vuex.vuejs.org/
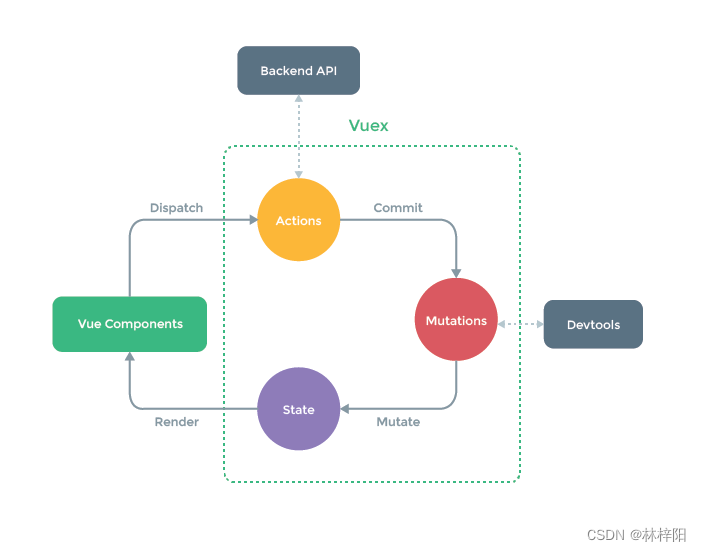
状态管理模式
写过 vue 项目的程序员应该都知道父子组件传参的方式,通过子组件的 props 参数,和 $emit 来触发事件。
但是当遇到多个组件共享状态时,传参的方法对于多层嵌套的组件将会非常繁琐,并且对于兄弟组件间的状态传递无能为力,甚至会导致无法维护的代码。
基于此,把组件的共享状态抽取出来,以一个全局单例模式管理,vuex 就产生了。
安装使用
Vue 2 的脚手架项目,安装 3.6.2版本。
npm install vuex@3.6.2 --save- 1
在 src 目录下新建 store 文件夹,在该目录下新建 index.js
index.js
import Vue from 'vue' import Vuex from 'vuex' Vue.use(Vuex) const state = { count: 1 } const getters = { } const mutations = { add(state, n) { state.count += n }, reduce(state) { state.count-- } } const actions = { } export default new Vuex.Store({ state, getters, mutations, actions })- 1
- 2
- 3
- 4
- 5
- 6
- 7
- 8
- 9
- 10
- 11
- 12
- 13
- 14
- 15
- 16
- 17
- 18
- 19
- 20
- 21
- 22
- 23
- 24
- 25
- 26
- 27
- 28
- 29
- 30
- 31
- 32
- 33
- 34
- 35
- 36
- 37
- 38
- 39
- 40
入口文件引入
main.js
import store from './store' new Vue({ el: '#app', store, components: { App }, template: '' }) - 1
- 2
- 3
- 4
- 5
- 6
- 7
- 8
- 9
- 10
- 11
- 12
简单示例
通过 commit 提交 mutation 中的方法修改 state。
组件代码
<template> <div> <el-button @click="$store.commit('add', 1)">add- 1
- 2
-
相关阅读:
Flutter学习三-Flutter基本结构和原理
c++——红黑树
【MongoDB】索引 - 复合索引
远程拷贝Windows上的文件到Linux指定的文件夹
公司里的VMware vSphere是用来干嘛的?—— vSphere服务器架构简单讲解
关于windows上运行bitsandbytes老是报错的(说cuda版本有问题)解决方案
万用表数据导出变化曲线图——pycharm实现视频数据导出变化曲线图
cpp primer plus笔记07-内存模型和命名空间
Python机器学习项目开发实战:如何进行语音识别
【基于pyAudioKits的Python音频信号处理(八)】语音增强:谱减法、维纳滤波和卡尔曼滤波
- 原文地址:https://blog.csdn.net/weixin_43930421/article/details/126813136
