-
Tensorflow笔记———循环神经网络RNN
目录
循环神经网络(Recurrent Neural Network,RNN)
循环神经网络(Recurrent Neural Network,RNN)
1.卷积神经网络与循环神经网络简单对比
CNN:借助卷积核(kernel)提取特征后,送入后续网络(如全连接网络Dense)进行分类、目标检测等操作。CNN借助卷积核从空间维度提取信息,卷积核参数共享。
RNN:借助循环核(cell)提取特征后,送入后续网络(如全连接网络Dense)进行预测等操作。RNN借助循环核从时间维度提取信息,循环核参数时间共享。
2.详解RNN
RNN是一种可以专门用来处理时间序列数据的模型。它可以关注到时间连续这一特性,从而从数据中提取相应的信息。典型的时序数据像:股价,天气,文本。
下图是一个传统的神经网络:输入层——隐藏层——输出层。
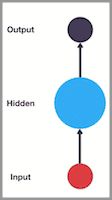
而RNN 跟传统神经网络最大的区别在于每次都会将前一次的输出结果,带到下一次的隐藏层中,一起训练 ,如下图所示

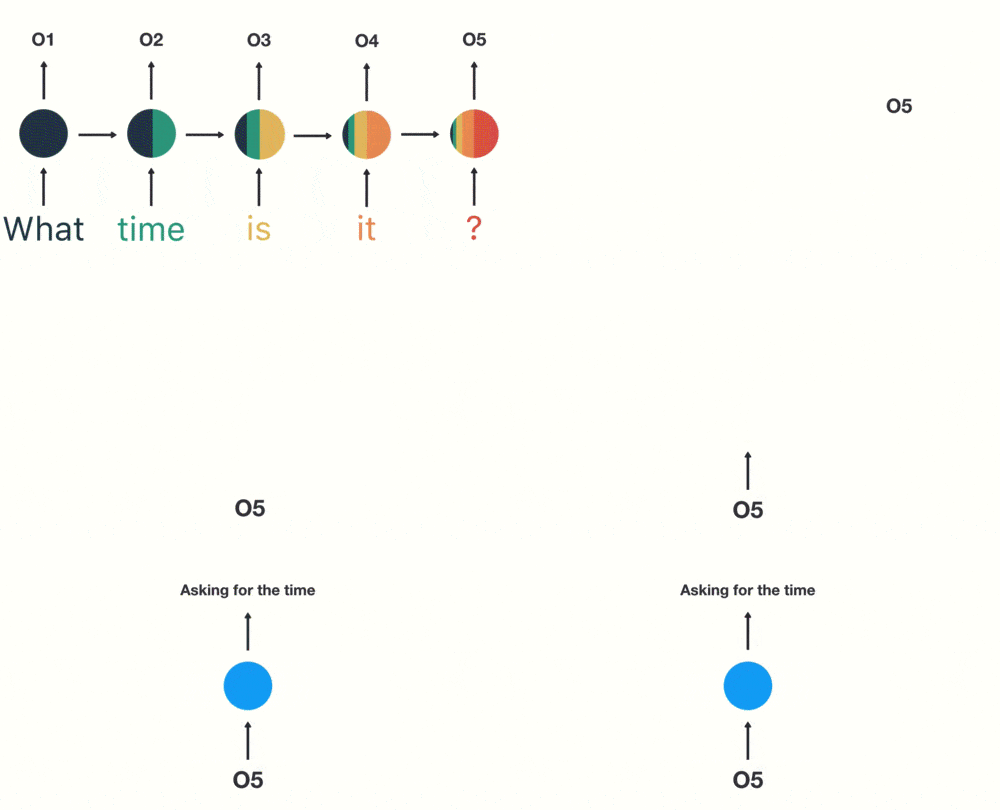
接下来简单举个例子来说明RNN是如何工作的,假如我们要判断一个人说话的意图(问时间,问天气.....),比如用户说了一句“what time is it ?”,首先我们需要对这句话进行分词

然后按照时间先后顺序输入RNN,首先我们将what输入RNN,得到输出“01”

然后在按照顺序将time输入RNN,得到输出02,这时我们会发现前面输入的what对此时输入的time产生了影响,如图中隐藏层中有一般是黑色即是第一步输入what产生的影响

以此类推,前面所有的输入都对未来的输出产生了影响,可以看到圆形隐藏层中包含了前面所有的颜色:

当我们判断意图时,只需要在最后一层输入05,即可得出:
而RNN也具备明显的缺点

通过上面的例子,我们已经发现,短期的记忆影响较大(如橙色区域),但是长期的记忆影响就很小(如黑色和绿色区域),这就是 RNN 存在的短期记忆问题。
- RNN 有短期记忆问题,无法处理很长的输入序列
- 训练 RNN 需要投入极大的成本
2.1循环核
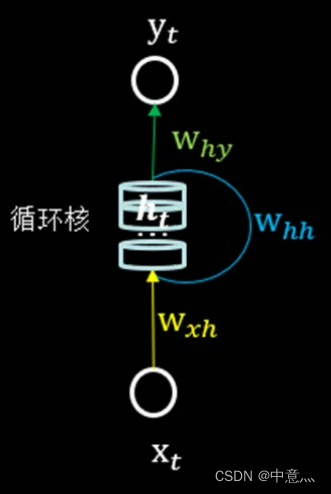
循环核具有记忆力,通过不同时刻的参数共享,实现对时间序列的信息提取。每个循环核具有多个记忆体,如上图中的多个小圆柱,。记忆体内存储着每个时刻的状态信息
,这里的
。其中,
、
为权重矩阵,bh为偏置矩阵,
为当前输入特征矩阵,
为记忆体上一时刻存储的状态信息,tanh为激活函数。
当前时刻循环核的输出特征
,其中
为权重矩阵、by为偏置、softmax为激活函数,其实就相当于一层全连接层。我们可以设定记忆体的个数从而改变记忆容量,当记忆体个数被指定、输入
输出
维度被指定,周围这些待训练参数的维度也就被限定了。在向前传播时,记忆体内存储的状态信息
在每个时刻都被刷新,而三个参数矩阵
、
、
和两个偏置项bh、by自始至终都是固定不变的。在反向传播时,三个参数矩阵和两个偏置项由梯度下降法更新。
2.2循环核按时间步展开
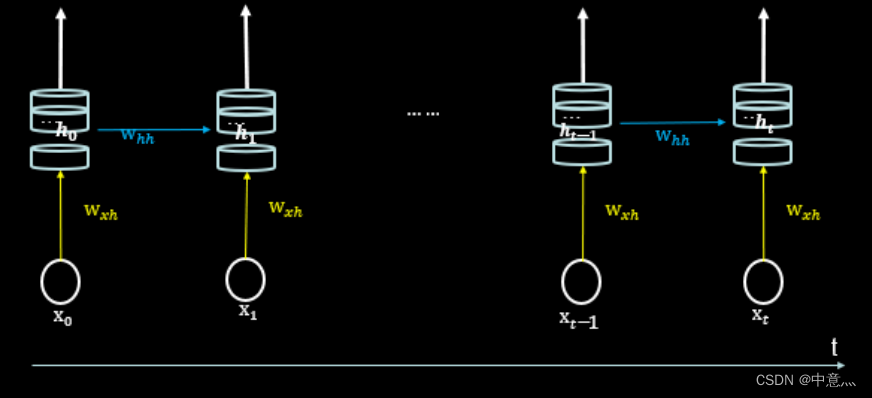
将循环核按时间步展开,就是把循环核按照时间轴方向展开,可以得到如下图的形式。
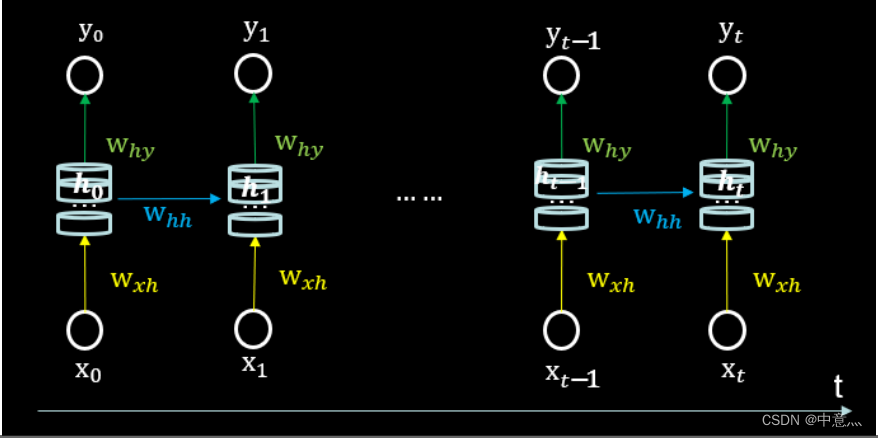
每个记忆体状态信息
被刷新,记忆体周围的参数矩阵和两个偏置项是固定不变的,我们训练优化的就是这些参数矩阵。训练完成后,使用效果最好的参数矩阵执行前向传播,然后输出预测结果。其实这和我们人类预测是一致的:我们脑中的记忆体每个时刻都根据当前的输入而更新;当前的预测推理是根据我们以往的知识积累用固化下来的“参数矩阵”进行的推理判断。
可以看出,循环神经网络就是借助循环核实现时间特征提取后把提取到的信息送入全连接网络,从而实现联系数据的预测。
2.3循环计算层:向输出方向生长
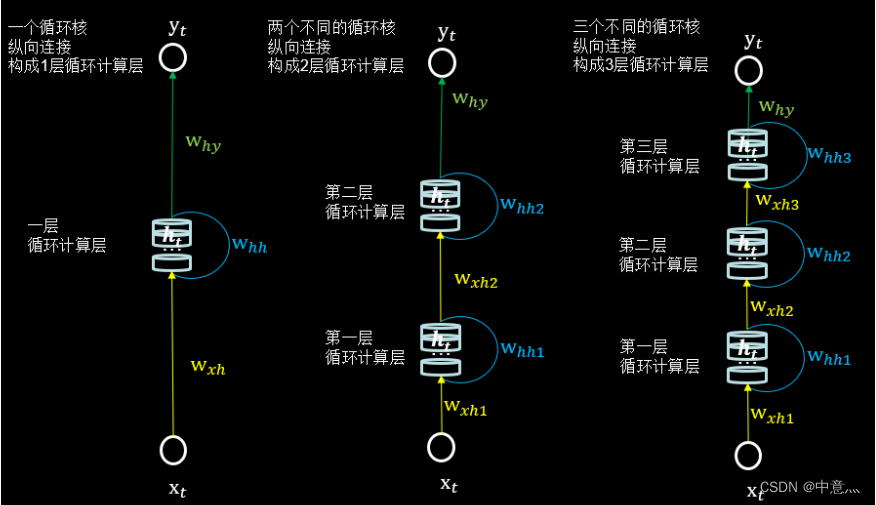
在RNN中,每个循环核构成一层循环计算层,循环计算层的层数是向输出方向增长的。如下图,左图的网络中有一个循环核,构成了一层循环计算层;中图的网络中有两个循环核,构成了两层循环计算层;右图的网络有三个循环层,构成了三层循环计算层。其中,三个网络中每个循环核中记忆体的个数可以根据我们的需求任意指定。
3.RNN训练
得到RNN的前向传播结果后,和其他神经网络一样,需要定义损失函数,使用反向传播梯度下降算法训练模型。RNN唯一的区别在于:由于它每个时刻的节点都有可能一个输出,所以RNN的总损失为所有时刻(或部分时刻)上的损失和。
3.1Tensorflow中实现循环计算层(简述)
- tf.keras.layers.SimpleRNN(
- units,
- activation='tanh',
- return_sequences=False)
(1)units:神经元个数即循环核中的记忆体的个数
(2)activation:激活函数,默认为tanh
(3)return_sequences:在输出序列中,返回最后时间步的输出值
还是返回全部时间步的输出。Ture返回全部时刻,如下图
False返回最后时刻,如下图
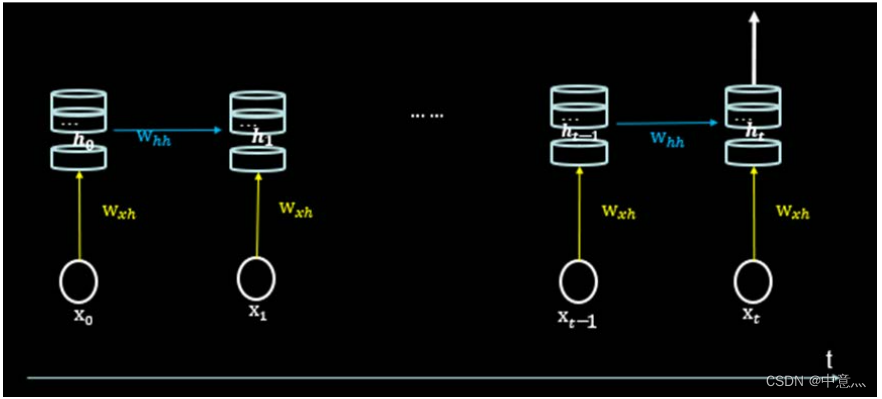
当下一层依然是RNN层,通常True,反之如果后面是Dense层,通常为False。
(4)输入维度要求:三维张量(输入样本数,循环核时间展开步数,每个时间步输入特征个数)
如下图,左图一共要送入RNN层两组数据,每组数据经过一个时间步就会得到一个输出结果,每个时间步送入三个数值,则输入循环层的数据维度就是[2,1,3];右图输入只有一组数据,分四个时间步送入送入循环层,每个时间步送入两个数值,则输入循环层的数据维度就是[1,4,2]。

(5)输出维度:当return_sequenc=True,三维张量(输入样本数,循环核时间展开步数,本层的神经元个数);当return_sequenc=False,二维张量(输入样本数,本层的神经元个数)
例:SimpleRNN(3,return_sequences=True),定义了一个具有三个记忆体的循环核,这个循环核会在每个时间步输出
。
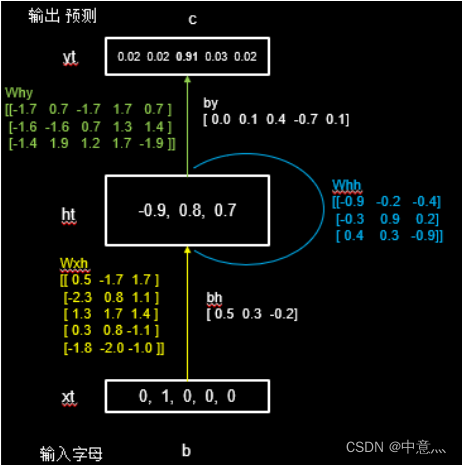
3.2循环计算过程之1prel
RNN最典型的应用就是利用历史数据预测下一时刻将发生什么,即根据以前见过的历史规律做预测。举一个简单的字母预测例子:输入一个字母预测下一个字母———输入a预测出b、输入b预测出c、输入c预测出d、输入d预测出a。计算机不认输字母,只能处理数字,所以我们需要对字母进行编码,这里采用One-Hot Encoding(也可采用其他的编码方式),编码结果如下所示

假设输入
=[0,1,0,0,0],循环核中的参数矩阵为默认,其上一时刻的
=0,则其过程如下图所示
4.实践
4.1.用python实现单字母预测
- # -*- coding: utf-8 -*-
- # @Time : 2022/9/11 15:43
- # @Author : 中意灬
- # @FileName: 字母预测.py
- # @Software: PyCharm
- """第一步:导入相应的库"""
- import os.path
- import tensorflow as tf
- import matplotlib.pyplot as plt
- import numpy as np
- from tensorflow.keras.layers import Dense,SimpleRNN
- """第二步:准备数据集"""
- input_shape='abcde'
- w_to_id={'a':0,'b':1,'c':2,'d':3,'e':4}
- id_to_onehot={0:[1.,0.,0.,0.,0.],1:[0.,1.,0.,0.,0.],2:[0.,0.,1.,0.,0.],3:[0.,0.,0.,1.,0.],4:[0.,0.,0.,0.,1.]}
- id_to_w={0:'a',1:'b',2:'c',3:'d',4:'e'}
- x_train=[id_to_onehot[w_to_id['a']],id_to_onehot[w_to_id['b']],id_to_onehot[w_to_id['c']],id_to_onehot[w_to_id['d']],id_to_onehot[w_to_id['e']]]
- y_train=[w_to_id['b'],w_to_id['c'],w_to_id['d'],w_to_id['e'],w_to_id['a']]
- np.random.seed(3)
- np.random.shuffle(x_train)
- np.random.seed(3)
- np.random.shuffle(y_train)
- # 使x_train符合SimpleRNN输入要求:[送入样本数, 循环核时间展开步数, 每个时间步输入特征个数]。
- # 此处整个数据集送入,送入样本数为len(x_train);输入1个字母出结果,循环核时间展开步数为1; 表示为独热码有5个输入特征,每个时间步输入特征个数为5
- x_train=np.reshape(x_train,(len(x_train),1,5))
- y_train=np.array(y_train)
- """第三步:使用model.Sequential搭建神经网络结构"""
- model=tf.keras.Sequential([
- SimpleRNN(units=3,activation='tanh',return_sequences=False),
- Dense(5,activation='softmax')
- ])
- """第四步:使用model.compile配置训练参数"""
- model.compile(optimizer=tf.keras.optimizers.Adam(0.01),
- loss=tf.keras.losses.SparseCategoricalCrossentropy(from_logits=False),
- metrics=['sparse_categorical_accuracy'])
- checkpoint_save_path="./checkpoint/rnn_onehot_1prel.ckpt"
- #回滚操作
- if os.path.exists(checkpoint_save_path+'.index'):
- print("========= loading the model ==========")
- model.load_weights(checkpoint_save_path)
- cp_callback=tf.keras.callbacks.ModelCheckpoint(filepath=checkpoint_save_path,
- save_weights_only=True,
- save_best_only=True,
- monitor='loss')#由于不存在测试集,所以我们只需要监测loss值即可
- """第五步:用model.fit训练模型"""
- history=model.fit(x_train,y_train,batch_size=32,epochs=50,callbacks=[cp_callback])
- #导出最优参数
- f=open('trainable_bariables.txt','w')
- f.write(str(model.trainable_variables))
- f.close()
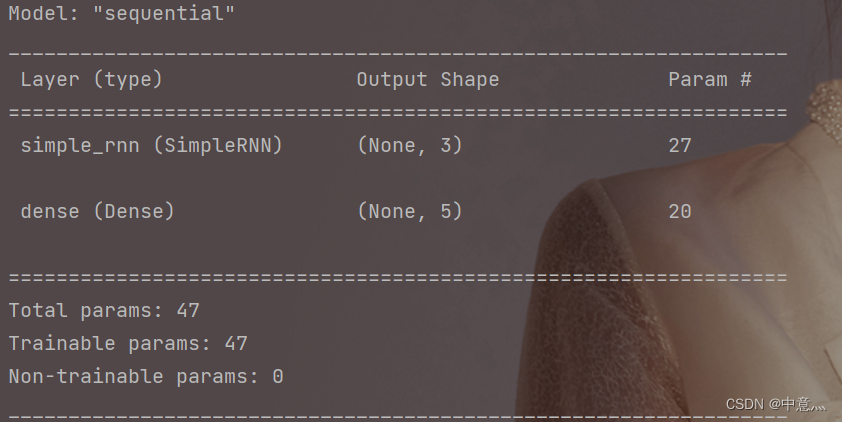
- """第六步:使用model.summary打印网络结构"""
- model.summary()
- #绘制loss核acc曲线图
- plt.figure()
- plt.subplot(1,2,1)
- plt.plot(history.history["sparse_categorical_accuracy"],label='Train accuracy')
- plt.title('Train accuracy')
- plt.legend()
- plt.subplot(1,2,2)
- plt.plot(history.history['loss'],label='Train loss')
- plt.legend()
- plt.title('Train loss')
- plt.show()
- #预测
- preNum=int(input("请输入你要预测字母的数量:"))
- for i in range(preNum):
- alphabetl=input('请输入字母:')
- alphabet=[id_to_onehot[w_to_id[alphabetl]]]
- alphabet=np.reshape(alphabet,(1,1,5))
- result=model.predict([alphabet])
- pred=np.argmax(result,axis=1)
- pred=int(pred)
- print(alphabetl+'-->'+id_to_w[pred])


4.2.用python实现多字母预测
- # -*- coding: utf-8 -*-
- # @Time : 2022/9/11 17:18
- # @Author : 中意灬
- # @FileName: 多字母预测.py
- # @Software: PyCharm
- """第一步:导入相关的库"""
- import os.path
- import numpy as np
- import tensorflow as tf
- from tensorflow.keras.layers import Dense,SimpleRNN
- from tensorflow.keras import Model
- import matplotlib.pyplot as plt
- """第二步:准备数据集"""
- input_word='abcde'
- w_to_id={'a':0,'b':1,'c':2,'d':3,'e':4}
- id_to_onehot={0:[1.,0.,0.,0.,0.],1:[0.,1.,0.,0.,0.],2:[0.,0.,1.,0.,0.],3:[0.,0.,0.,1.,0.],4:[0.,0.,0.,0.,1.]}
- id_to_w={0:'a',1:'b',2:'c',3:'d',4:'e'}
- x_train=[
- [id_to_onehot[w_to_id['a']],id_to_onehot[w_to_id['b']],id_to_onehot[w_to_id['c']],id_to_onehot[w_to_id['d']]],
- [id_to_onehot[w_to_id['b']],id_to_onehot[w_to_id['c']],id_to_onehot[w_to_id['d']],id_to_onehot[w_to_id['e']]],
- [id_to_onehot[w_to_id['c']],id_to_onehot[w_to_id['d']],id_to_onehot[w_to_id['e']],id_to_onehot[w_to_id['a']]],
- [id_to_onehot[w_to_id['d']],id_to_onehot[w_to_id['e']],id_to_onehot[w_to_id['a']],id_to_onehot[w_to_id['b']]],
- [id_to_onehot[w_to_id['e']],id_to_onehot[w_to_id['a']],id_to_onehot[w_to_id['b']],id_to_onehot[w_to_id['c']]]
- ]
- y_train=[w_to_id['e'],w_to_id['a'],w_to_id['b'],w_to_id['c'],w_to_id['d']]
- np.random.seed(3)
- np.random.shuffle(x_train)
- np.random.seed(3)
- np.random.shuffle(y_train)
- x_train=np.reshape(x_train,(len(x_train),4,5))
- y_train=np.array(y_train)
- """第三步:使用class搭建神经网络结构"""
- class prelModel(Model):
- def __init__(self):
- super(prelModel, self).__init__()
- self.c1=SimpleRNN(3,activation='tanh',return_sequences=False)
- self.d1=Dense(5,activation='softmax')
- def call(self,x):
- x=self.c1(x)
- x=self.d1(x)
- return x
- """第四步:使用model.compile配置训练参数"""
- model=prelModel()
- model.compile(
- optimizer=tf.keras.optimizers.Adam(0.01),
- loss='sparse_categorical_crossentropy',
- metrics=['sparse_categorical_accuracy']
- )
- #断点续训,回滚操作
- checkpoint_save_path='./checkpoint/rnn_onhot_4prel.ckpt'
- if os.path.exists(checkpoint_save_path+'.index'):
- print('==========load the model==========')
- model.load_weights(checkpoint_save_path)
- cp_callback=tf.keras.callbacks.ModelCheckpoint(filepath=checkpoint_save_path,
- save_weights_only=True,
- save_best_only=True,
- monitor='loss')
- """第五步:使用model.fit训练模型"""
- history=model.fit(x_train,y_train,batch_size=32,epochs=50,callbacks=[cp_callback])
- #保存参数
- file=open('./weights.txt','w')
- for v in model.trainable_variables:
- file.write(str(v.name)+'\n')
- file.write(str(v.shape)+'\n')
- file.write(str(v.numpy())+'\n')
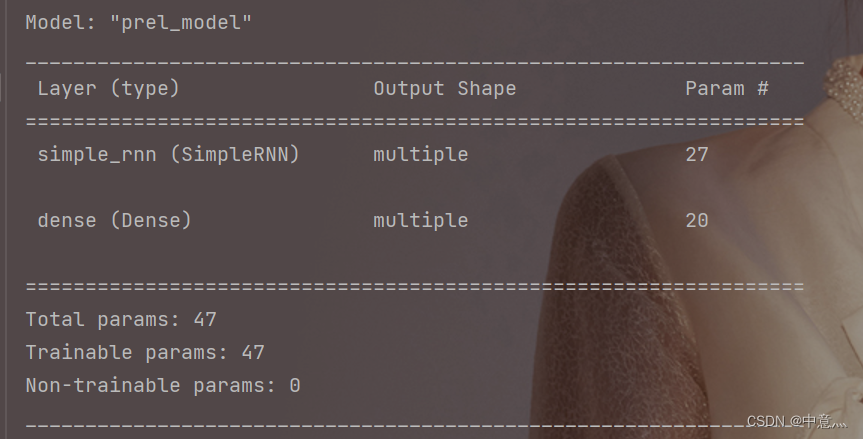
- """第六步:使用model.summary打印网络结构"""
- model.summary()
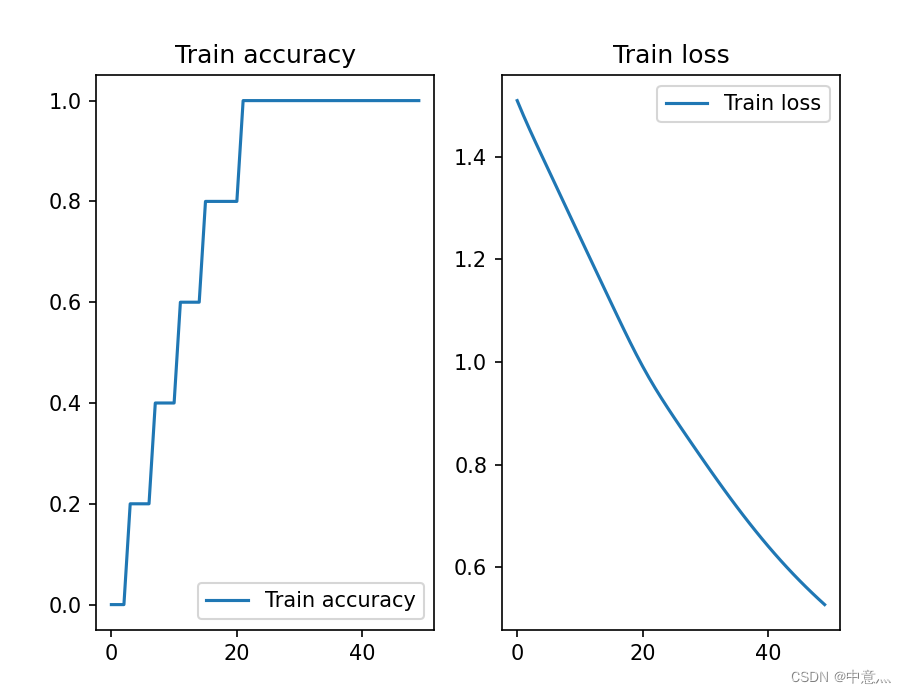
- #绘制loss与accuray曲线
- plt.figure()
- plt.subplot(1,2,1)
- plt.plot(history.history['sparse_categorical_accuracy'],label='Train accuracy')
- plt.title('Train accuracy')
- plt.legend()
- plt.subplot(1,2,2)
- plt.plot(history.history['loss'],label="Train loss")
- plt.title('Train loss')
- plt.legend()
- plt.show()
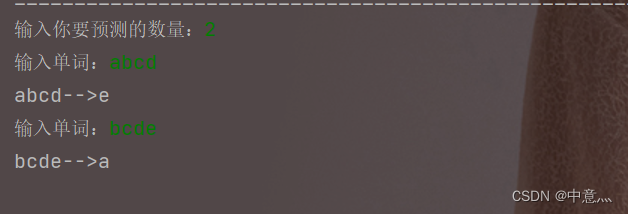
- #预测
- preNum=int(input('输入你要预测的数量:'))
- for i in range(preNum):
- alphabet1=input('输入单词:')
- alphabet=[id_to_onehot[w_to_id[a]] for a in alphabet1]
- alphabet=np.reshape(alphabet,(1,4,5))
- result=model.predict(alphabet)
- pred=np.argmax(result,axis=1)
- pred=int(pred)
- print(alphabet1+'-->'+id_to_w[pred])
4.3Embedding编码
独热码:数据量大、过于稀疏,映射之间是独立的,没有表现出关联性
Embedding:是一种单词编码方式,用低维向量实现了编码。这种编码通过神经网络训练优化,能表达出单词间的相关性。
Tensorflow中的词向量空间编码层:
- tf.keras.layers.Embedding(
- input_dim,
- output_dim
- )
input_dim:词汇表大小,编码一共要表示多少个单词
output_dim:编码维度,编码一共要表示多少个单词
输入维度:二维张量[送入样本,循环核时间展开步数]
输出维度:三维张量[送入样本数,循环核时间展开步数,编码维度]
例:tf.keras.layers.Embedding(100,3)。对数字1-100进行编码,词汇表大小就是100;每个自然数用三个数字表示,编码维度就是3;所以Embedding层的参数是100和3。比如数字[4] embedding 为[0.25,0.1,0.11]。
4.4用Embedding编码的方式实现字母预测
- # -*- coding: utf-8 -*-
- # @Time : 2022/9/12 14:00
- # @Author : 中意灬
- # @FileName: Embedding实现多字母预测.py
- # @Software: PyCharm
- """第1步:导入相关的库"""
- import os.path
- import tensorflow as tf
- import numpy as np
- from tensorflow.keras.layers import SimpleRNN,Dense,Embedding
- from tensorflow.keras import Model
- import matplotlib.pyplot as plt
- """第2步:准备数据集"""
- input_word='abcdefghijklmnopqrstuvwxyz'
- w_to_id={'a':0,'b':1,'c':2,'d':3,'e':4,'f':5,'g':6,'h':7,'i':8,'j':9,'k':10,'l':11,'m':12,'n':13,'o':14,
- 'p':15,'q':16,'r':17,'s':18,'t':19,'u':20,'v':21,'w':22,'x':23,'y':24,'z':25}
- training_set_scaled=[0,1,2,3,4,5,6,7,8,9,10,11,12,13,14,15,16,17,18,19,20,21,22,23,24,25]
- x_train=[]
- y_train=[]
- for i in range(0,22):
- x_train.append(training_set_scaled[i:i+4])
- y_train.append(training_set_scaled[i+4])
- np.random.seed(3)
- np.random.shuffle(x_train)
- np.random.seed(3)
- np.random.shuffle(y_train)
- x_train=np.reshape(x_train,(len(x_train),4))#转换为送入embedding的格式
- y_train=np.array(y_train)
- """第3步:使用class搭建模型结构"""
- class prelModel(Model):
- def __init__(self):
- super(prelModel, self).__init__()
- self.e1=Embedding(26,2)
- self.r1=SimpleRNN(5,activation='tanh',return_sequences=False)
- self.d1=Dense(26,activation='softmax')
- def call(self,x):
- x=self.e1(x)
- x=self.r1(x)
- x=self.d1(x)
- return x
- """第4步:使用model.compile"""
- model=prelModel()
- model.compile(optimizer=tf.keras.optimizers.Adam(0.01),
- loss='sparse_categorical_crossentropy',
- metrics=['sparse_categorical_accuracy'])
- #断点续训
- checkpoint_save_path='./checkpoint/embedding_4prelRnn.ckpt'
- if os.path.exists(checkpoint_save_path+'.index'):
- print('==========load the model==========')
- model.load_weights(checkpoint_save_path)
- #回滚操作
- cp_callback=tf.keras.callbacks.ModelCheckpoint(filepath=checkpoint_save_path,
- save_weights_only=True,
- save_best_only=True,
- monitor='loss')
- """第5步:使用model.fit训练模型"""
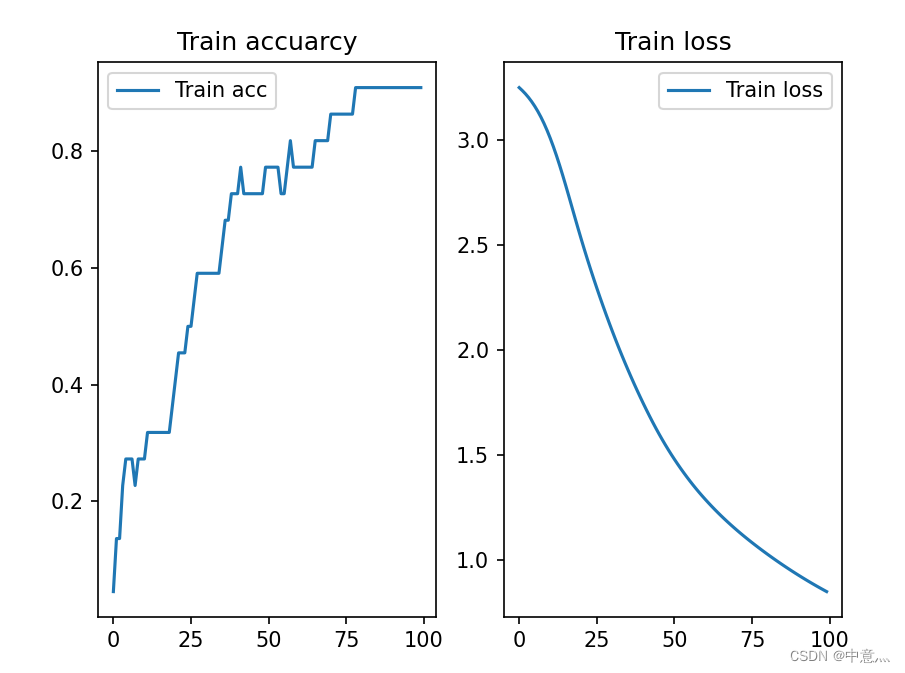
- history=model.fit(x_train,y_train,batch_size=32,epochs=100,callbacks=[cp_callback])
- #保存参数
- file=open('./weights.txt','w')
- for v in model.trainable_variables:
- file.write(str(v.name)+'\n')
- file.write(str(v.shape)+'\n')
- file.write(str(v.numpy())+'\n')
- '''第6步:使用model.summary打印网络结构'''
- model.summary()
- #绘制loss与accuarcy去向
- plt.figure()
- plt.subplot(1,2,1)
- plt.plot(history.history['sparse_categorical_accuracy'],label='Train acc')
- plt.title('Train accuarcy')
- plt.legend()
- plt.subplot(1,2,2)
- plt.plot(history.history['loss'],label='Train loss')
- plt.title('Train loss')
- plt.legend()
- plt.show()
- #预测
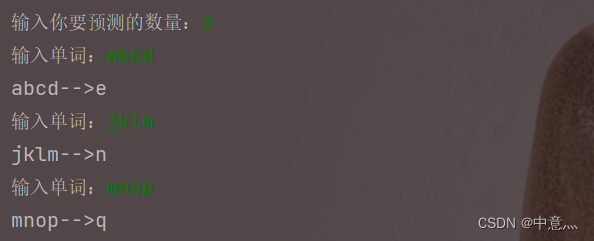
- preNum=int(input('输入你要预测的数量:'))
- for i in range(preNum):
- alphabet1=input('输入单词:')
- alphabet=[w_to_id[a] for a in alphabet1]
- alphabet=np.reshape(alphabet,(1,4))
- result=model.predict(alphabet)
- pred=np.argmax(result,axis=1)
- pred=int(pred)
- print(alphabet1+'-->'+input_word[pred])

-
相关阅读:
第四篇文章:Object类(equals方法和hashcode方法)
如何快速用一条命令配置好本地yum源(6/7/8版本)
C# 开发Windows Service
宇宙都要毁灭了你还在玩汉诺塔?(动画讲解汉诺塔问题)
了解代理模式
【matplotlib基础】--图例
全网最全Java微服务面试题总结(SpringCloud+Spring Boot)
0928vue/cli脚手架,node.js
Golang 编码规范
用Python在PDF文档中插入单图像水印和平铺图像水印
- 原文地址:https://blog.csdn.net/qq_55977554/article/details/126784068
