-
【Android development】系列_03布局管理器
一、布局管理器
布局管理器是用于控制组件是如何摆放的。
1、常用布局管理器
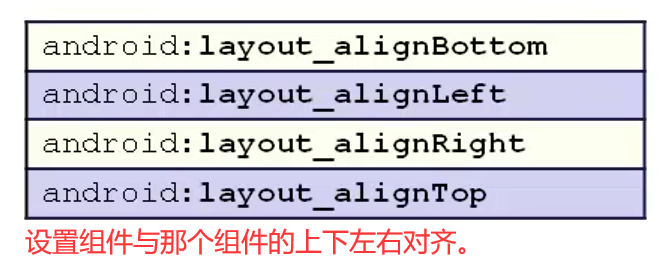
【1】RelativeLayout(相对布局管理器)
相对布局管理器需要首先确定一个参考点,别的组件则相对这个参考点进行摆放。作为参考点的组件可以是兄弟组件,也可以是父容器。

遇到可以通过组件当中相对位置来控制组件的摆放,这样的设计需求时,就可以使用相对布局管理器。通过相对布局管理器的内部类:LayoutParams其中的XML属性,能够很好的控制相对布局管理器当中各组件的分布方式。


实例:应用相对布局管理实现软件更新提示界面。activity_main.xml:
<RelativeLayout xmlns:android="http://schemas.android.com/apk/res/android" xmlns:app="http://schemas.android.com/apk/res-auto" xmlns:tools="http://schemas.android.com/tools" android:layout_width="match_parent" android:layout_height="match_parent" android:paddingBottom="16dp" android:paddingLeft="16dp" android:paddingRight="16dp" android:paddingTop="16dp" android:background="@mipmap/background" tools:context=".MainActivity"> <TextView android:id="@+id/textView1" android:layout_width="wrap_content" android:layout_height="wrap_content" android:layout_centerInParent="true" android:text="发现有新版本,您想现在安装吗?" app:layout_constraintBottom_toBottomOf="parent" app:layout_constraintEnd_toEndOf="parent" app:layout_constraintStart_toStartOf="parent" app:layout_constraintTop_toTopOf="parent" /> <Button android:layout_width="wrap_content" android:layout_height="wrap_content" android:id="@+id/button2" android:text="以后再说" android:layout_below="@id/textView1" android:layout_alignRight="@id/textView1"/> <Button android:layout_width="wrap_content" android:layout_height="wrap_content" android:id="@+id/button1" android:text="现在更新" android:layout_below="@id/textView1" android:layout_toLeftOf="@id/button2"/> RelativeLayout>- 1
- 2
- 3
- 4
- 5
- 6
- 7
- 8
- 9
- 10
- 11
- 12
- 13
- 14
- 15
- 16
- 17
- 18
- 19
- 20
- 21
- 22
- 23
- 24
- 25
- 26
- 27
- 28
- 29
- 30
- 31
- 32
- 33
- 34
- 35
- 36
- 37
- 38
- 39

【2】LinearLayout(线性布局管理器)
线性布局管理器是将放入其中的组件按照垂直或者水平的方式进行排列的:

对于垂直线性布局管理器来说:每一行都只有一个组件,其余的不被显示出来。定义线性布局管理器:使用 < L i n e a r L a y o u t >


android:orientation="vertical":


让布局管理器对齐右下角:android:gravity="right|bottom"
layout_weight属性:用于设置组件所占的权重,即用于设置组件在父容器中剩余空间的比例。默认值是0,即不设置的时候,表示组件有多大,就占据多大的空间。如果设置了一个大于0的值,每个组件就会对剩余容器进行分割,分割的大小取决于每个组件设置的layout_weight的值。
由上图知:组件1和组件2都分配了剩余空间的一半。<Button android:layout_width="wrap_content" android:layout_height="wrap_content" android:layout_weight="1" android:text="按钮1" /> <Button android:layout_width="wrap_content" android:layout_height="wrap_content" android:layout_weight="1" android:text="按钮2" />- 1
- 2
- 3
- 4
- 5
- 6
- 7
- 8
- 9
- 10

实例:使用线性布局管理器实现微信登录界面添加编辑框组件:EditText


<LinearLayout xmlns:android="http://schemas.android.com/apk/res/android" xmlns:app="http://schemas.android.com/apk/res-auto" xmlns:tools="http://schemas.android.com/tools" android:layout_width="match_parent" android:layout_height="match_parent" android:paddingBottom="16dp" android:paddingLeft="16dp" android:paddingRight="16dp" android:paddingTop="16dp" android:orientation="vertical" tools:context=".MainActivity"> <EditText android:layout_width="match_parent" android:layout_height="wrap_content" android:paddingBottom="20dp" android:hint="QQ号/微信号/Email" android:drawableLeft="@mipmap/zhanghao" /> <EditText android:layout_width="match_parent" android:layout_height="wrap_content" android:paddingBottom="20dp" android:hint="密码" android:drawableLeft="@mipmap/mima" /> <Button android:layout_width="match_parent" android:layout_height="wrap_content" android:text="登录" android:text_color="#FFFFFF" android:background="#009688" /> <TextView android:layout_width="wrap_content" android:layout_height="wrap_content" android:text="登录遇到问题?" android:layout_gravity="center_horizontal" android:paddingTop="20dp"/> LinearLayout>- 1
- 2
- 3
- 4
- 5
- 6
- 7
- 8
- 9
- 10
- 11
- 12
- 13
- 14
- 15
- 16
- 17
- 18
- 19
- 20
- 21
- 22
- 23
- 24
- 25
- 26
- 27
- 28
- 29
- 30
- 31
- 32
- 33
- 34
- 35
- 36
- 37
- 38
- 39

【3】FrameLayout(帧布局管理器)
帧布局管理器通常用于显示层叠的内容:使用 < F r a m e L a y o u t >


实例:使用帧布局管理器居中显示层叠的正方形
<FrameLayout xmlns:android="http://schemas.android.com/apk/res/android" xmlns:app="http://schemas.android.com/apk/res-auto" xmlns:tools="http://schemas.android.com/tools" android:layout_width="match_parent" android:layout_height="match_parent" android:paddingBottom="16dp" android:paddingLeft="16dp" android:paddingRight="16dp" android:paddingTop="16dp" tools:context=".MainActivity"> <TextView android:layout_width="280dp" android:layout_height="280dp" android:layout_gravity="center" android:background="#FF0000FF" android:textColor="#FFFFFF" android:text="蓝色背景的TextView"/> <TextView android:layout_width="230dp" android:layout_height="230dp" android:layout_gravity="center" android:background="#FF0077FF" android:textColor="#FFFFFF" android:text="天蓝色背景的TextView"/> <TextView android:layout_width="180dp" android:layout_height="180dp" android:layout_gravity="center" android:background="#FF00B4FF" android:textColor="#FFFFFF" android:text="水蓝色背景的TextView"/> FrameLayout>- 1
- 2
- 3
- 4
- 5
- 6
- 7
- 8
- 9
- 10
- 11
- 12
- 13
- 14
- 15
- 16
- 17
- 18
- 19
- 20
- 21
- 22
- 23
- 24
- 25
- 26
- 27
- 28
- 29
- 30
- 31
- 32
- 33

【4】TableLayout(表格布局管理器)
表格布局管理器是以行列的形式来管理组件的。
< T a b l e R o w >
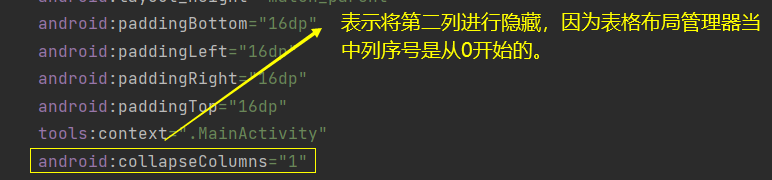
通过表格布局管理器的属性,可以设置哪些列被拉伸,被隐藏,被收缩。
1、
android:collapseColumns:允许表格指定列被隐藏。此外,还可以同时隐藏多列,此时将需要隐藏的列使用逗号进行分割。

2、
android:stretchColumns:指定允许某列被拉伸。3、android:shrinkColumns:允许被收缩,当一行当中的内容超出屏幕的时候,缩小某一列的宽度,从而让其他的内容显示出来。

<TableRow> <Button android:layout_width="match_parent" android:layout_height="wrap_content" android:text="按钮1" android:text_color="#FFFFFF" android:background="#009688" /> <Button android:layout_width="74dp" android:layout_height="wrap_content" android:background="#009688" android:text="按钮2" android:text_color="#FFFFFF" /> <Button android:layout_width="match_parent" android:layout_height="wrap_content" android:text="按钮31111111111111111" android:text_color="#FFFFFF" android:background="#009688" /> TableRow> <TableRow> <Button android:layout_width="match_parent" android:layout_height="wrap_content" android:background="#009688" android:text="按钮4" android:text_color="#FFFFFF" /> <Button android:layout_width="match_parent" android:layout_height="wrap_content" android:background="#009688" android:text="按钮5" android:text_color="#FFFFFF" /> <Button android:layout_width="match_parent" android:layout_height="wrap_content" android:text="按钮61111111111111111" android:text_color="#FFFFFF" android:background="#009688" /> TableRow>- 1
- 2
- 3
- 4
- 5
- 6
- 7
- 8
- 9
- 10
- 11
- 12
- 13
- 14
- 15
- 16
- 17
- 18
- 19
- 20
- 21
- 22
- 23
- 24
- 25
- 26
- 27
- 28
- 29
- 30
- 31
- 32
- 33
- 34
- 35
- 36
- 37
- 38
- 39
- 40
- 41
- 42
- 43
- 44
- 45
【5】AbsoluteLayout(绝对布局管理器)
【6】GridLayout(网格布局管理器)
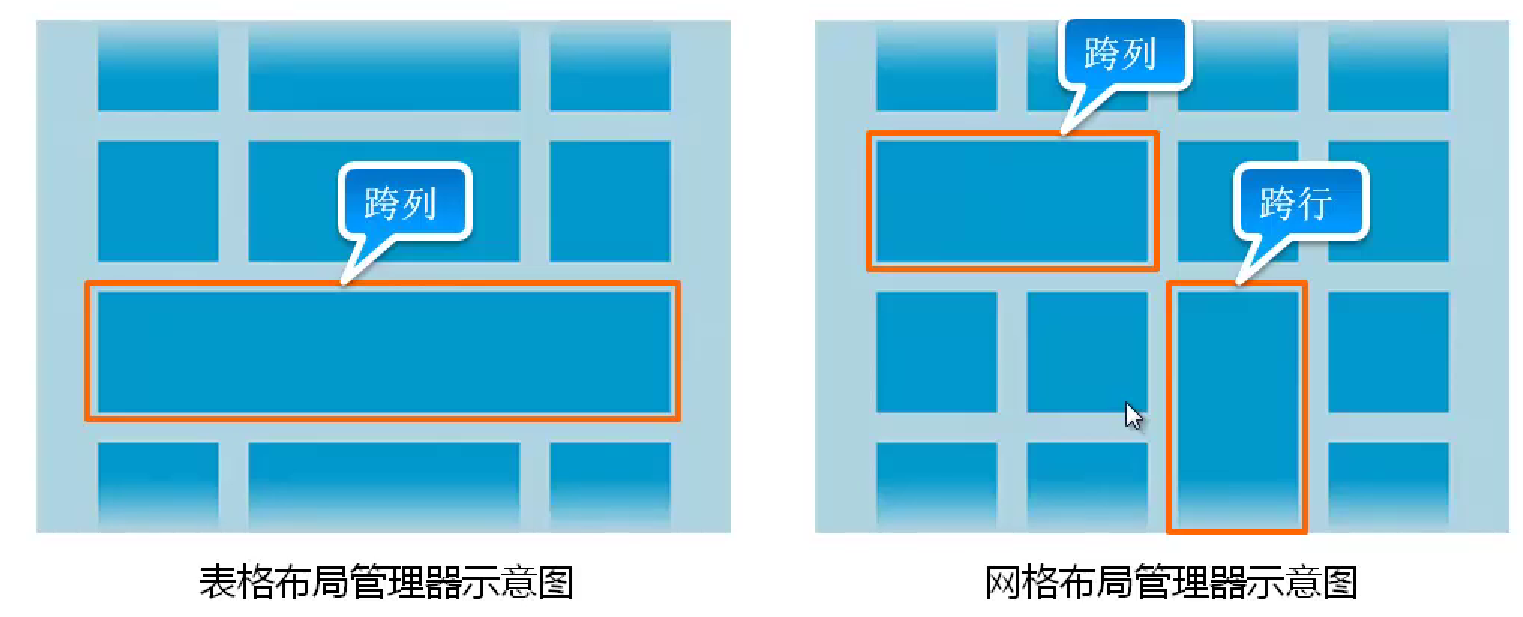
在网格布局管理器当中,当一行代码超出容器的组件会自动换行。而表格布局管理器当中,超出容器的组件不会被显示。
< G r i d L a y o u t >
1、
android:columnCount="2":表示设置最大列数是两列。2、
android:orientation="vertical":设置为垂直排列。3、
android:rowCount="2":设置最大行数为2行。为了控制网格布局管理器当中各子组件的分布方式,还提供的一个内部类: L a y o u t P a r a m s LayoutParams LayoutParams,通过这个内部类的xml属性,可以控制网格布局管理器当中各子组件的分布。
- 1、
android:layout_column:用于指定子组件位于网格的第几列的。 - 2、
android:layout_columnSpan:用于指定子组件横向跨几列的。 - 3、
android:layout_columnWeight:用于指定子组件在水平方向的权重的,即子组件分配水平剩余空间的比例。 - 4、
android:layout_gravity:设置子组件采用什么方式占据此网格的空间的。 - 5、
android:layout_row:用于指定子组件位于网格的第几行的。 - 6、
android:layout_rowSpan:用于指定子组件纵向跨几行的。 - 7、
android:layout_rowWeight:垂直方向上的权重。
<Button android:layout_width="match_parent" android:layout_height="wrap_content" android:layout_column="0" android:layout_row="0" android:text="按钮1"/>- 1
- 2
- 3
- 4
- 5
- 6


2、布局管理器的嵌套
通过多种布局管理器混合使用达到需要的效果。
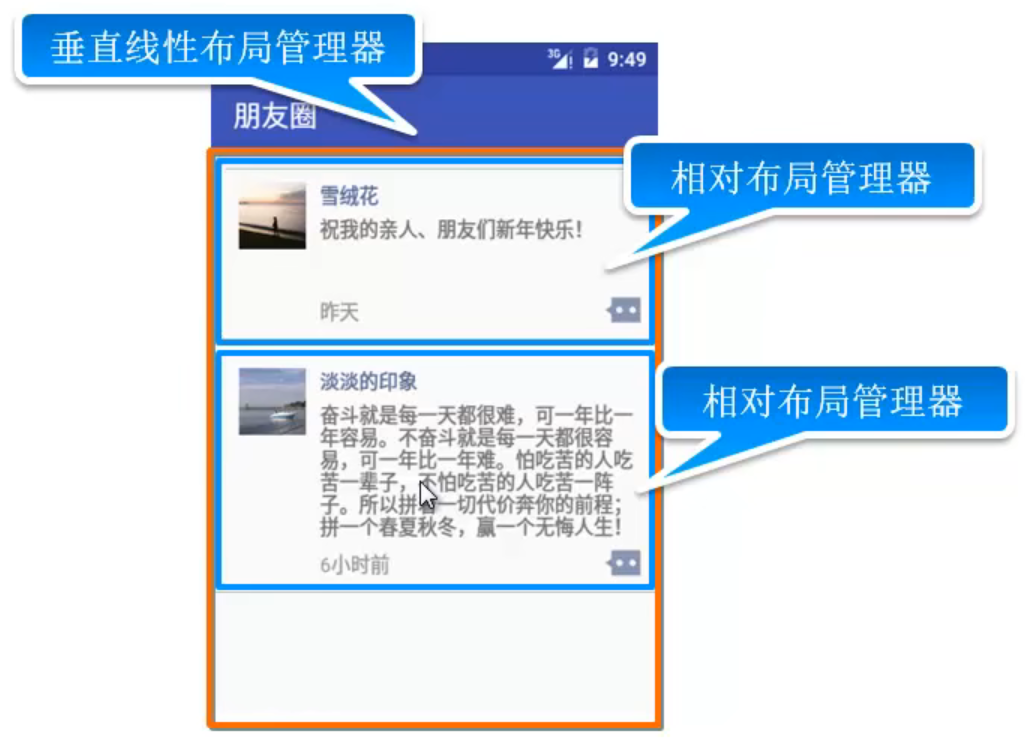
布局管理器的嵌套的原则:1、根布局管理器必须包含xmlns属性。
2、在一个布局文件中,最多只能有一个根布局管理器,如果需要有多个,则还需要使用一个根布局管理器将它们括起来。
3、不能嵌套太深,如果嵌套太深,则会影响性能。
实现类似上图的微信朋友圈界面展示:
<LinearLayout xmlns:android="http://schemas.android.com/apk/res/android" xmlns:app="http://schemas.android.com/apk/res-auto" xmlns:tools="http://schemas.android.com/tools" android:layout_width="match_parent" android:layout_height="match_parent" android:paddingBottom="16dp" android:paddingLeft="16dp" android:paddingRight="16dp" android:paddingTop="16dp" tools:context=".MainActivity" android:orientation="vertical"> <RelativeLayout android:layout_width="match_parent" android:layout_height="wrap_content"> <ImageView android:id="@+id/ico1" android:layout_width="94dp" android:layout_height="56dp" android:layout_alignParentLeft="true" android:layout_marginStart="10dp" android:layout_marginTop="10dp" android:layout_marginEnd="10dp" android:layout_marginBottom="10dp" android:src="@mipmap/v_ico1" /> <TextView android:id="@+id/name1" android:layout_width="wrap_content" android:layout_height="wrap_content" android:text="派大星" android:textColor="#576B95" android:layout_marginTop="10dp" android:layout_toRightOf="@id/ico1"/> <TextView android:id="@+id/content1" android:layout_width="wrap_content" android:layout_height="wrap_content" android:text="祝我的亲人、朋友们中秋节快乐!" android:layout_marginTop="5dp" android:layout_toRightOf="@id/ico1" android:layout_below="@id/name1" android:layout_marginBottom="5dp" android:minLines="3"/> <TextView android:id="@+id/time1" android:layout_width="wrap_content" android:layout_height="wrap_content" android:text="昨天" android:textColor="#9A9A9A" android:layout_marginTop="3dp" android:layout_toRightOf="@id/ico1" android:layout_below="@id/content1"/> <ImageView android:layout_width="wrap_content" android:layout_height="wrap_content" android:layout_alignParentRight="true" android:layout_below="@id/content1" android:src="@mipmap/comment1" /> RelativeLayout> <ImageView android:layout_width="match_parent" android:layout_height="10dp" android:background="@mipmap/line" android:src="@mipmap/comment1" /> LinearLayout>- 1
- 2
- 3
- 4
- 5
- 6
- 7
- 8
- 9
- 10
- 11
- 12
- 13
- 14
- 15
- 16
- 17
- 18
- 19
- 20
- 21
- 22
- 23
- 24
- 25
- 26
- 27
- 28
- 29
- 30
- 31
- 32
- 33
- 34
- 35
- 36
- 37
- 38
- 39
- 40
- 41
- 42
- 43
- 44
- 45
- 46
- 47
- 48
- 49
- 50
- 51
- 52
- 53
- 54
- 55
- 56
- 57
- 58
- 59
- 60
- 61
- 62
- 63
- 64
- 65
- 66
- 67
- 68
-
相关阅读:
UOS统信操作系统QIcon::fromTheme详解
VS使用ImageMagick++库建立图像
goaccess 日志分析 nginx
智能合约漏洞,Dyna 事件分析
《视觉SLAM十四讲》-- 后端 1(下)
【C++】字典序:比较字符串或序列
Apollo自动驾驶系统概述(文末参与活动赠送百度周边)
【2 线性表】顺序表中负值排在前面。
【 2023华为杯C题】大规模创新类竞赛评审方案研究(思路、代码......)
论文解读(AGE)《Adaptive Graph Encoder for Attributed Graph Embedding》
- 原文地址:https://blog.csdn.net/wxfighting/article/details/126753576
