-
【网络服务&数据库教程】09 Tomcat 与 Rsync 服务
网络服务—RSYNC
1 RSYNC概述
rsync是类 Unix系统下的数据镜像备份工具。一款支持快速完全备份和增量备份的工具,支持本地复制,远程同步等,类似于scp命令;rsync命令在同步文件之前要先登录目标主机进行用户身份认证,认证过后才能进行数据同步,身份认证方式取决于所使用的协议类型,rsync一般使用两种协议进行数据同步:ssh协议和rsync协议。
RSYNC 用于数据的同步以及数据的备份。增量备份和差异备份消耗的系统资源相对较少,并且备份压力较小;而完全备份则会更加的安全。
2 RSYNC特性
- 能更新整个目录树和文件系统
- 有选择性的保留符号链接、硬链接、文件属性、权限、设备以及时间等
- 对于安装来说,无任何特殊权限要求
- 对于多个文件来说,文件传输效率高
- 能用 ssh 或自定义端口作为传输入口端口
3 RSYNC 工作原理
既然涉及到数据同步,必要的两个概念是:源地址(文件),目标地址(文件),以及以哪一方为基准,例如,想让目标主机上的文件和本地文件保持同步,则是以本地文件为同步基准,将本地文件作为源文件推送到目标主机上。
rsync在进行数据同步之前需要先进行用户身份验证,验证方式取决于使用的连接方式:
- ssh登录验证模式:使用 ssh 协议作为基础进行用户身份认证,然后进行数据同步。
- rsync登录验证模式:使用 rsync 协议进行用户身份认证(非系统用户),然后进行数据同步。
数据同步方式:推送(上传)、拉取(下载)

3.1 RYSNC选项及功能
OPTION选项 功能 -a 这是归档模式,表示以递归方式传输文件,并保持所有属性,它等同于-r、-l、-p、-t、-g、-o、-D 选项。-a 选项后面可以跟一个 --no-OPTION,表示关闭 -r、-l、-p、-t、-g、-o、-D 中的某一个,比如-a --no-l 等同于 -r、-p、-t、-g、-o、-D 选项。 -r 表示以递归模式处理子目录,它主要是针对目录来说的,如果单独传一个文件不需要加 -r 选项,但是传输目录时必须加。 -v 表示打印一些信息,比如文件列表、文件数量等。 -l 表示保留软连接。 -L 表示像对待常规文件一样处理软连接。如果是 SRC 中有软连接文件,则加上该选项后,将会把软连接指向的目标文件复制到 DEST。 -p 表示保持文件权限。 -o 表示保持文件属主信息。 -g 表示保持文件属组信息。 -D 表示保持设备文件信息。 -t 表示保持文件时间信息。 –delete 表示删除 DEST 中 SRC 没有的文件。 –exclude=PATTERN 表示指定排除不需要传输的文件,等号后面跟文件名,可以是通配符模式(如 *.txt)。 –progress 表示在同步的过程中可以看到同步的过程状态,比如统计要同步的文件数量、 同步的文件传输速度等。 -u 表示把 DEST 中比 SRC 还新的文件排除掉,不会覆盖。 -z 加上该选项,将会在传输过程中压缩。 4 RSYNC 实验演示
我们一般使用rsync来进行单向数据同步,因此我们需要确定一个基准,比如:两台服务器,一台NFS作为网站数据服务器(基准服务器),另外一台专门做rsync数据备份服务器,我们以此为基础开始我们的实验。将两台服务器的防火墙关闭和SELinux功能取消。
4.1 ssh协议数据同步:将NFS服务器数据同步备份到 rsync服务器
实验环境:一台NFS服务器,一台rsync服务器
在两台服务器上分别创建目录(/filesrc、/filedst)
mkdir -pv /filesrc /filedst- 1
下行同步(下载)
格式: rsync -avz服务器地址:/服务器目录/*/本地目录
示例: rsync -avz root@192.168.88.10:/filesrc/* /filedst
-a :归档模式,递归并保留对象属性
-v :显示同步过程
-z :在传输文件时进行压缩
范例:
40~ touch /filesrc/{1..5}.txt 41~ rsync -avz root@10.0.0.40:/filesrc/* /filedst The authenticity of host '10.0.0.40 (10.0.0.40)' can't be established. RSA key fingerprint is a9:66:14:15:29:9a:53:57:67:72:74:ae:36:ea:72:be. Are you sure you want to continue connecting (yes/no)? yes Warning: Permanently added '10.0.0.40' (RSA) to the list of known hosts. root@10.0.0.40's password: receiving incremental file list 1.txt 2.txt 3.txt 4.txt 5.txt 41~ ls /filedst 1.txt 2.txt 3.txt 4.txt 5.txt- 1
- 2
- 3
- 4
- 5
- 6
- 7
- 8
- 9
- 10
- 11
- 12
- 13
- 14
- 15
- 16
- 17
上行同步(上传)
格式: rsync -avz/本地目录/*服务器地址:/服务器目录
示例: rsync -avz /filedst/* root@192.168.88.10:/filesrc
注意:使用root用户进行实验可以,但生产环境中尽量使用单独创建的普通用户,减少权限溢出
创建用来做数据同步的用户,并给予用户对目录的相应权限,一般使用ACL设置权限。
useradd zhangsan passwd zhangsan setfacl -m u:zhangsan:rwx /filesrc- 1
- 2
- 3
范例:
40~ rm -rf /filesrc/* 41~ rsync -avz /filedst/* root@10.0.0.40:/filesrc root@10.0.0.40's' password: sending incremental file list 1.txt 2.txt 3.txt 4.txt 5.txt sent 250 bytes received 107 bytes 47.60 bytes/sec total size is 0 speedup is 0.00 40~ ls /filesrc/ 1.txt 2.txt 3.txt 4.txt 5.txt- 1
- 2
- 3
- 4
- 5
- 6
- 7
- 8
- 9
- 10
- 11
- 12
- 13
- 14
- 15
- 16
拓展:若要实现免密码数据同步,只需要做好ssh密钥对登录即可
40~ ssh-keygen -t rsa -b 2048 40~ ssh-copy-id root@10.0.0.41 41~ ssh-keygen -t rsa -b 2048 41~ ssh-copy-id root@10.0.0.40 40~ rm -rf /filesrc/* #无需输入密码 41~ rsync -avz /filedst/* root@10.0.0.40:/filesrc #验证 40~ ls 1.txt 2.txt 3.txt 4.txt 5.txt- 1
- 2
- 3
- 4
- 5
- 6
- 7
- 8
- 9
- 10
- 11
4.2 rsync协议数据同步:将NFS服务器数据同步备份到rsync服务器
实验环境:一台服务器,一台客户端。
- 在两台服务器上分别创建目录(/filesrc、/filedst)
- 搭建rsync服务(仅需要在NFS服务器上搭建即可)
a.创建主配置文件(/etc/rsyncd.conf)
~ vim /etc/rsyncd.conf address = 10.0.0.40 #rsync服务绑定IP port 873 #默认服务端口873 log file = /var/log/rsyncd.log #日志文件位置 pid file = /var/run/rsyncd.pid #进程号文件位置 [web] #共享名:用来连接是写在url上的,切记 comment = web directory backup #共享描述话语 path = /filesrc #实际共享目录 read only = no #是否仅允许读取 dont compress = *.gz *.bz2 *.xz *.zip #哪些文件类型不进行压缩 auth users = user1 #登录用户名(非系统用户,需要自行创建) secrets file = /etc/rsyncd_users.db #认证所需账户密码文件(需自行创建-同上)- 1
- 2
- 3
- 4
- 5
- 6
- 7
- 8
- 9
- 10
- 11
- 12
- 13
- 14
- 15
- 16
- 17
- 18
- 19
- 20
- 21
- 22
- 23
b.创建认证所需账户密码文件
~ vim /etc/rsyncd_users.db user1:123456 ~ chmod 600 /etc/rsyncd_users.db #必须修改权限,否则登录报错- 1
- 2
- 3
- 4
c.启动服务
~ rsync --daemon #默认rsync开启端口为 873 ~ netstat -antlp | grep :873- 1
- 2
- 3
d.设置映射用户对共享目录有权限(r)
setfacl -m u:nobody:rwx /filesrc- 1
注意:关闭服务可使用kill命令,但偶尔会造成服务被结束,但进程号配置文件不被删除的问题,若遇到此类问题可自己手动删除,再启动则正常(建议自己写一个rsync的服务管理脚本)
下行同步(下载)
- 格式: rsync -avz rsync://用户名@服务器地址/共享模块名 /本地目录
- 示例: rsync -avz rsync: //user1@192.168.88.10/web /filedst
- 拓展:–delete:删除本地比服务器多出来的文件(源地址没有,目标地址有的删掉)。其–delete参数只能用于 rsync 协议,ssh 协议无法使用。
rsync -avz --delete rsync://user1@192.168.88.10/web /filedst
范例:将NFS服务器数据同步备份到rsync服务器
40~ cp /etc/passwd /filesrc 40~ cp /etc/issue /filesrc 41~ rsync -avz rsync://user1@10.0.0.40:/web /filedst Password: receiving incremental file list ./ issue passwd sent 95 bytes received 907 bytes 222.67 bytes/sec total size is 1660 speedup is 1.66 41~ ls 1.txt 2.txt 3.txt 4.txt 5.txt issue passwd- 1
- 2
- 3
- 4
- 5
- 6
- 7
- 8
- 9
- 10
- 11
- 12
- 13
- 14
- 15
范例:使用 --delete 参数
40~ ls /filesrc issue passwd 41~ ls /filedst/ 1.txt 2.txt 3.txt 4.txt 5.txt issue passwd #--delete会严格同步远程服务器目录的内容,本地同步目录有的文件将会删除 41~ rsync -avz --delete rsync://user1@10.0.0.40:/web /filedst Password: receiving incremental file list deleting 5.txt deleting 4.txt deleting 3.txt deleting 2.txt deleting 1.txt ./ sent 57 bytes received 130 bytes 74.80 bytes/sec total size is 1660 speedup is 8.88 41~ ls /filedst/ issue passwd- 1
- 2
- 3
- 4
- 5
- 6
- 7
- 8
- 9
- 10
- 11
- 12
- 13
- 14
- 15
- 16
- 17
- 18
- 19
- 20
上行同步(上传)
- 格式:rsync -avz/本地目录/*rsync://用户名@服务器地址/共享模块名
- 示例: rsync -avz /filedst/* rsync://user1@192.168.88.10/web
拓展: rsync协议的免密码可以借助一个环境变量实现
export RSYNC_PASSWORD=虚拟用户密码(客户端生成)
40~ rm -rf /filesrc/* 41~ rsync -avz /filedst/* rsync://user1@10.0.0.40:/web Password: sending incremental file list issue passwd sent 818 bytes received 46 bytes 345.60 bytes/sec total size is 1660 speedup is 1.92 #验证 40~ ls /filesrc issue passwd 41~ export RSYNC_PASSWORD=123456 41~ rm -rf /filedst/* 41~ touch /filedst/{a..f}.txt 41~ rsync -avz --delete rsync://user1@10.0.0.40:/web /filedst/ receiving incremental file list deleting f.txt deleting e.txt deleting d.txt deleting c.txt deleting b.txt deleting a.txt ./ issue passwd sent 95 bytes received 909 bytes 2008.00 bytes/sec total size is 1660 speedup is 1.65 41~ ls /filedst/ issue passwd- 1
- 2
- 3
- 4
- 5
- 6
- 7
- 8
- 9
- 10
- 11
- 12
- 13
- 14
- 15
- 16
- 17
- 18
- 19
- 20
- 21
- 22
- 23
- 24
- 25
- 26
- 27
- 28
- 29
- 30
- 31
- 32
- 33
5 配置rsync+inotify 实时同步
定期同步的缺点:
- 执行备份的时间固定,延期明显,实时性差
- 当同步源长期不变化时,密集的定期任务是不必要的(浪费资源)
实时同步的优点:
- 一旦同步源出现变化,立即启动备份,实时性好
- 只要同步源无变化,则不执行备份,节省资源
5.1 inotify 简介
inotify 是一个Linux内核特性,它监控文件系统,并且及时向专门的应用程序发出相关的事件警告,比如删除、读、写和卸载操作等。要使用inotify,必须具备一台带有2.6.13版本的内核操作系统。
5.2 inotify 两个监控命令
- inotifywait:用于持续监控,实时输出结果(常用)
- inotifywatch:用于短期监控,任务完成后再出结果
5.3 inotify 部署
yum -y install gcc* && yum install -y inotify-tools #tar -xf inotify-tools-3.14.tar.gz #cd inotify-tools-3.14 #./configure && make && make insta11- 1
- 2
- 3
- 4
5.4 inotifywait 命令格式
格式:
inotifywait -mrq -e 监控动作1,监控动作2 /监控目录 &- 1
示例:
inotifywait -mrq -e create,delete,modify /filesrc &- 1
- -m :始终保持事件监听状态
- -r :递归查询目录
- -q :只打印监控事件的信息
监控动作: modify(内容), create(创建), attrib(权限) , move(移动), delete(删除)

利用 rsync+inotifywait 结合脚本实现单向实时同步
101~ vim rsync-src.sh #!/bin/bash a="inotifywait -mrq -e create,delete,modify /filesrc" #b="rsync -avz /filesrc/* root@10.0.0.102:/filedst" b="rsync -avz --delete /filesrc/* root@10.0.0.102:/filedst" $a | while read directory event file # while判断释放接收到监控记录 do $b done 101~ rm -rf /filesrc/* #将脚本后台执行 101~ bash rsync-src.sh & 102~ rm -rf /filedst/* #进行实验结果验证 101~ touch /filesrc/{1..3}.txt 102~ ls /filedst/ 1.txt 2.txt 3.txt 101~ rm -rf /filesrc/3.txt- 1
- 2
- 3
- 4
- 5
- 6
- 7
- 8
- 9
- 10
- 11
- 12
- 13
- 14
- 15
- 16
- 17
- 18
- 19
- 20

注意:用户登录时要求免密码验证
实验结果验证。
在服务器端创建,删除文件,查看备份端是否正常(使用删除文件时,因为利用 ssh 协议,无法进行删除操作)
扩展:调整 inotify 监控文件数量
调整 inotify 内核参数( /etc/sysctl.conf ) 功能 mak_queue_events 监控队列大小 mak_user_instances 最多监控实例数 max_user_watches 每个实例最多监控文件数 6 配置 unison+inotify 实现双向实时同步
rsync在单向同步上支持的非常好,且效率很高,但是在双向同步支持较差;unison则是双向同步的优秀工具,但其缺点是同步效率较低。
6.1 环境要求
1)准备好同步所需的两个目录
2)如若用root来实现登录的话,生成密钥对,以便于免密码验证
3)准备好inotify 和 unison的软件包
6.2 安装步骤
(1)先安装 inotify
tar -xf inotify-tools-3.14.tar.gz cd inotify-tools-3.14 ./configure && make && make install #yum install -y inotify-tools- 1
- 2
- 3
- 4
- 5
(2)再安装 ocaml
tar -xf ocaml-3.10.1.tar.gz cd ocaml-3.10.1 ./configure #忽略所有报错 make world opt && make install #yum install -y ocaml- 1
- 2
- 3
- 4
- 5
- 6
(3)安装 unison
tar -xf unison-2.13.16.tar.gz cd unison-2.13.16 make UISTYLE=text THREADS=true STATIC=true #已经存在Makefile文件,不需要./configure cp unison /usr/bin/ #把生成的脚本拷贝出来 #yum install -y unison- 1
- 2
- 3
- 4
- 5
- 6
- 7
- 8
注意:同样的操作再服务器端也做也做一遍
6.3 配置脚本
注:双向自动同步,监控目录和数据同步时,源目录不能使用*通配符传输,否则会变成死循环。
filesrc 端:
tee > filesrc-rsync.sh <<-'EOF' #!/bin/bash a="inotifywait -mrq -e create,delete,modify /filesrc" b="/usr/bin/unison -batch /filesrc/ ssh://10.0.0.102//filedst/" #-batch:批处理 $a | while read directory event file do $b done EOF- 1
- 2
- 3
- 4
- 5
- 6
- 7
- 8
- 9
- 10
filedst 端:
tee > filedst-rsync.sh <<-'EOF' #!/bin/bash a="inotifywait -mrq -e create,delete,modify /filedst" b="/usr/bin/unison -batch /filedst/ ssh://10.0.0.101//filesrc/" #-batch:批处理 $a | while read directory event file do $b done EOF- 1
- 2
- 3
- 4
- 5
- 6
- 7
- 8
- 9
- 10
测试:
将两个脚本放入后台执行:
bash filesrc-rsync.sh & bash filedst-rsync.sh &- 1
- 2
分别在两个主机上创建文件查看是否可以实现双向实时同步(可能会有延迟)
测试结果符合预期的设想
网络服务——Tomcat
Java Web 环境搭建,主要用于 Java 编写的Web应用。
1 初识Tomcat
Tomcat服务器是一个免费的开放源代码的Web 应用服务器,属于轻量级应用服务器,在中小型系统和并发访问用户不是很多的场合下被普遍使用,是开发和调试JSP程序的首选。Tomcat 是 Apache服务器的扩展,但运行时它是独立运行的,所以当你运行tomcat 时,它实际上作为一个与Apache 独立的进程单独运行的。

LAMP,Apache 需要添加 php.so 模块
LNMP,Nginx 需要使用PHP开发的 fastcgi 程序进行对接
Tomcat 是Apache基金会的一个分支项目,是目前主要的 Java Web项目
2 Java web 环境:Nginx + JDK + Tomcat + MySQL
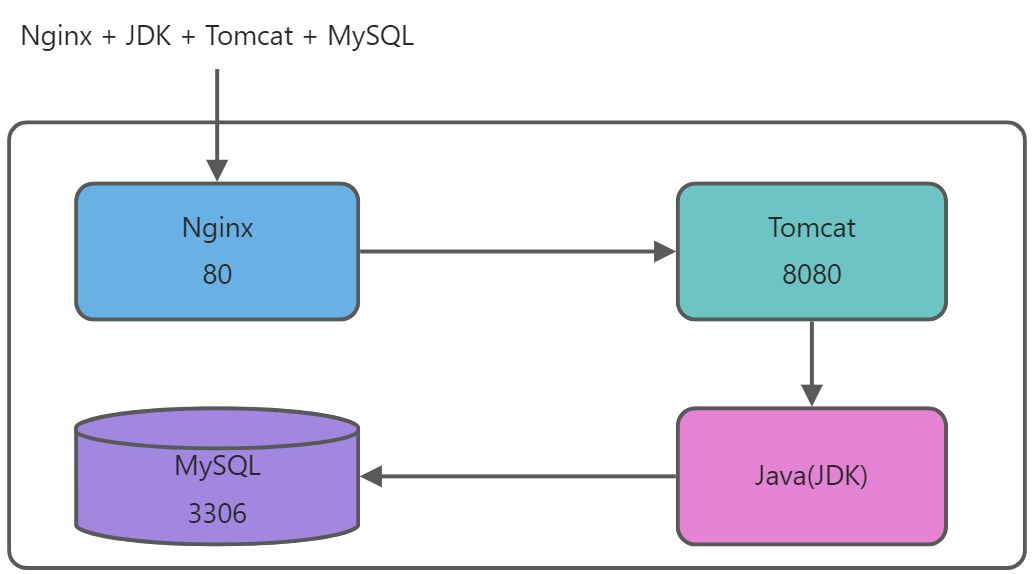
- 所有服务部署在同一个主机上,也可分开部署
- Nginx默认开启的是80端口,用来接收用户的web 请求
- Tomcat 默认开启的是8080端口,用来接收Nginx转发过来的web 请求
Nginx,和Apache(Apache HTTP server)主要处理静态,Tomcat是处理动态的
Tomcat 服务器的并发量比较小,使用Nginx来做代理提高并发量
3 环境部署流程
3.1 安装JDK(Java解析器)
3.1.1 首先安装 gcc
yum install -y gcc*- 1
3.1.2 将软件包上传、解压、并移至指定位置
tar -xvf jdk-7u25-linux-x64.tar.gz cp -av jdk1.7.0_25 /usr/local/jdk1.7- 1
- 2
3.1.3 配置JDK的环境变量
#环境变量作用:相当于执行命令时不用绝对路径 #jdk:java开发工具包(包含了jre) #添加以下内容 tee >> /etc/profile <<-'EOF' #KubeSphere JAVA ENV export JAVA_HOME=/usr/local/jdk1.7 export JAVA_BIN=/usr/local/jdk1.7/bin export PATH=$JAVA_HOME/bin:$PATH export CLASSPATH=.:$JAVA_HOME/lib/dt.jar:$JAVA_HOME/lib/tools.jar EOF source /etc/profile- 1
- 2
- 3
- 4
- 5
- 6
- 7
- 8
- 9
- 10
- 11
- 12
- 13
3.1.4 查看Java 是否安装成功
~ java -version java version "1.7.0_25" Java(TM) SE Runtime Environment (build 1.7.0_25-b15) Java HotSpot(TM) 64-Bit Server VM (build 23.25-b01, mixed mode)- 1
- 2
- 3
- 4

3.2 安装 Tomcat
3.2.1 将软件包上传,解压,并移至指定位置
tar -xvf apache-tomcat-7.0.42.tar.gz cp -av apache-tomcat-7.0.42 /usr/local/tomcat- 1
- 2
3.2.2 配置Tomcat的环境变量
tee >> /etc/profile <<-'EOF' # Kubesphere Tomcat ENV export TOMCAT_HOME=/usr/local/tomcat export PATH=$PATH:$TOMCAT_HOME/bin EOF source /etc/profile- 1
- 2
- 3
- 4
- 5
- 6
- 7
- 8
3.2.3 将 Tomcat 的启动脚本赋予执行权限
chmod +x /usr/local/tomcat/bin/*- 1
3.2.4 开启Tomcat
/usr/local/tomcat/bin/catalina.sh start netstat -antlp |grep 8080 #查看端口,确认是否启动- 1
- 2
- 3
3.2.5 在客户端访问页面进行测试:
:8080 curl 10.0.0.102:8080 elinks 10.0.0.102:8080- 1
- 2

3.3 安装MySQL数据库
3.3.1 安装依赖包 ncurses-devel
yum install -y ncurses-devel gcc*- 1
3.3.2 将 MySQL文件进行传输到 10.0.0.101 上进行安装
useradd -r -s /sbin/nologin -c "MySQL User" mysql tar -xvf mysql-5.1.55.tar.gz ; cd ./mysql-5.1.55 ./configure --prefix=/usr/local/mysql --with-charset=utf8 \ --with-collation=utf8_general_ci --with-extra-charsets=gbk,gb2312 make -j 2 && make install echo $?- 1
- 2
- 3
- 4
- 5
- 6
3.3.3 生成配置文件
\cp -a ./mysql-5.1.55/support-files/mysql-medium.cnf /etc/my.cnf ln -sv /usr/local/mysql/bin/* /usr/local/bin- 1
- 2
3.3.4 初始化数据库,生成授权表
cd /usr/local/mysql/ ./bin/mysql_install_db --user=mysql- 1
- 2
3.3.5 生成启动管理脚本,启动mysql并设置开机自启
cd ~/mysql-5.1.55/support-files cp -a mysql.server /etc/init.d/mysqld chmod +x /etc/init.d/mysqld chkconfig --add mysqld chkconfig mysqld on service mysqld start- 1
- 2
- 3
- 4
- 5
- 6
3.3.6 为数据库的管理用户 root 设置登录密码
mysqladmin -uroot password 123456- 1
3.3.7 登录数据库,查看是否安装正确
mysql -uroot -p123456- 1

3.4 安装Nginx
3.4.1 解压 Nginx
tar -xvf nginx-1.2.9.tar.gz- 1
3.4.2 安装 Nginx 依赖包
yum install -y pcre-devel zlib-devel gcc*- 1
3.4.3 添加用户
useradd -r -s /sbin/nologin -c "Nginx User" nginx- 1
3.4.4 编译并安装
cd nginx-1.2.9 ./configure --user=nginx --group=nginx make -j 2 && make install echo $?- 1
- 2
- 3
- 4
3.4.5 修改 Nginx 配置文件
~ vim /usr/local/nginx/conf/nginx.conf user nginx; upstream tomcat { #添加负载调度(为了后期扩展更多的Tomcat服务器方便) server 10.0.0.102:8080; } location / { #添加反向代理 proxy_pass http://tomcat; proxy_set_header Host $host; }- 1
- 2
- 3
- 4
- 5
- 6
- 7
- 8
- 9
- 10
- 11

3.4.6 重启服务
cp -a /usr/local/nginx/sbin/* /usr/sbin/ nginx -t nginx netstat -tnlp pkill -HUP nginx- 1
- 2
- 3
- 4
- 5
- 6

3.4.7 在客户端进行测试,输入nginx地址,打开的为tomcat部署的网站
curl 10.0.0.102 elinks 10.0.0.102- 1
- 2

3.5 部署Java 的WAR包
3.5.1 在 /usr/local/tomcat/conf/server.xml 配置文件中 server 区域中添加标红内容
vim /usr/local/tomcat/conf/server.xml <Host name="localhost" appBase="webapps" unpackWARs="true" autoDeploy="true"> #添加以下内容: <Context path="" docBase="test.war" debug="0" privileged="true"/>- 1
- 2
- 3
- 4

3.5.2 将war包拷贝到webapps目录中
cp -a test.war /usr/local/tomcat/webapps/- 1
3.5.3 删除网站的ROOT目录
cd /usr/local/tomcat/webapps/ rm -rf ROOT- 1
- 2
3.5.4 重启 tomcat 服务
/usr/local/tomcat/bin/catalina.sh stop /usr/local/tomcat/bin/catalina.sh start- 1
- 2
3.5.5 测试
使用客户端浏览器访问 Nginx 服务的端口。需要等待一段时间进行解析。因为需要war包进行解压缩,解压缩之后才能看到。
curl 10.0.0.102- 1
注意:原本的 tomcat使用8080端口进行访问,也可以将端口修改为80使用IP直接访问,修改 /usr/local/tomcat/conf/server.xml配置中的8080改变为80(切记不要和其他web服务器冲突)。

4 创建多个 tomcat 实例(扩展)
4.1 首先将tomcat进行停止,
/usr/local/tomcat/bin/catalina.sh stop- 1
4.2拷贝原来的Tomcat到另外一个目录,如 tomcat-2,清除logs目录
cd /usr/local/ cp -a tomcat/ tomcat-2 rm -rf tomcat-2/logs/*- 1
- 2
- 3
4.3 修改Tomcat-2中的/corf/server.xml文件,把 shutdown和 Connector端口修改成另外的数值关闭端口修改为8006,连接端口修改为8090 .
vim /usr/local/tomcat-2/conf/server.xml <Server port="8006" shutdown="SHUTDOWN"> <Connector port="8090" protocol="HTTP/1.1" connectionTimeout="20000" redirectPort="8443"/>- 1
- 2
- 3
- 4
4.4 修改startup.sh和 shutdown.sh文件
-
在第一行均加入:
-
cd /usr/local/tomcat-2/bin
-
vim startup.sh | vim shutdown.sh
export CATALINA_HOME=/usr/local/tomcat-2
-
或者使用
-
sed -i.bak -r ‘$a\export CATALINA_HOME=/usr/local/tomcat-2’ /usr/local/tomcat-2/bin/startup.sh
-
sed -i.bak -r ‘$a\export CATALINA_HOME=/usr/local/tomcat-2’ /usr/local/tomcat-2/bin/shutdown.sh
4.5 启动Tomcat
/usr/local/tomcat/bin/catalina.sh start /usr/local/tomcat-2/bin/catalina.sh start netstat -antp #查看8080和8090端口是否正常启动- 1
- 2
- 3
- 4

4.6 查看结果
浏览:http://10.0.0.102:8080
浏览:http://10.0.0.102:8090
可以直接将8090 写入配置好的Nginx负载均衡中
#修改Nginx的负载均衡 ~ vim /usr/local/nginx/conf/nginx.conf upstream tomcat { server 10.0.0.41:8080; server 10.0.0.41:8090; }- 1
- 2
- 3
- 4
- 5
- 6
-
相关阅读:
Java四大引用详解:强引用、软引用、弱引用、虚引用
PAM从入门到精通(一)
OBIA:900+ 患者、193w+ 影像,中科院基因组所发布我国首个生物影像共享数据库
Socket发送缓冲区接收缓冲区快问快答
Markdown写作应用推荐
Mybatis学习笔记9 动态SQL
Android Handler/Looper视角看UI线程的原理
tag单调栈-单调栈预备知识-lt.739. 每日温度
【Python】练习题附带答案
【HDU No. 1166】 敌兵布阵
- 原文地址:https://blog.csdn.net/weixin_40274679/article/details/126800974
