-
corosync+packmaker+drbd+nfs高可用存储
一. 环境部署:
服务器地址 主机名 服务器角色 192.168.188.223 centosnode1 主服务器 192.168.188.226 centosnode2 从服务器 二. 配置drbd,主从节点配置要同步:
1. 配置drbd主配置文件和资源文件:
- [root@centosnode1 ~]# cd /usr/local/drbd-utils/etc/drbd.d/
- ##配置drbd全局配置
- [root@centosnode1 drbd.d]# vim global_common.conf
- global {
- usage-count no;
- }
- common {
- net {
- protocol C;
- }
- }
- ##配置drbd资源配置
- [root@centosnode1 drbd.d]# vim nfs.res ##该文件文件名一定要以.res结尾
- resource nfs { ##nfs是资源名,一定要与文件名一致
- disk /dev/sdc; ##磁盘目录
- device /dev/drbd0; ##设备目录
- meta-disk internal; ##磁盘元数据
- on centosnode1 {
- address 192.168.188.223:7789;
- }
- on centosnode2 {
- address 192.168.188.226:7789;
- }
- }
2. 创建drbd元数据:
- ##创建元数据
- [root@centosnode1 drbd.d]# drbdadm create-md nfs
- [root@centosnode1 drbd.d]# drbdadm up nfs ##激活nfs资源,主从节点同步
- [root@centosnode1 drbd.d]# drbdadm role nfs ##查看资源角色
- Secondary ##Secondary表示是从节点
- ##查看启动后生成的伪文件,下载的rpm包该文件可以看到数据同步的百分比进度
- [root@centosnode1 drbd.d]# cat /proc/drbd
- version: 9.1.5 (api:2/proto:110-121)
- GIT-hash: f41bc23cec1e919932ce35947f1b4e67d9e6db74 build by root@centosnode1, 2022-09-08 11:54:41
- Transports (api:17): tcp (9.1.5)
- ##查看连接状态:下载的rpm包没有该命令
- [root@centosnode1 drbd.d]# drbd-overview.pl
- NOTE: drbd-overview will be deprecated soon.
- Please consider using drbdmon.
- 0:nfs/0 Connected(2*) Secondary(2*) Incons/Incons
- ##将centosnode1节点强制设为主节点,只配置主节点
- [root@centosnode1 ~]# drbdadm primary --force nfs
- ##查看资源连接状态:
- [root@centosnode1 ~]# drbdadm cstate nfs
- ##查看当前节点资源的角色
- [root@centosnode1 ~]# drbdadm role nfs
- ##查看本地和对等节点磁盘的状态
- [root@centosnode1 ~]# drbdadm dstate nfs
将centosnode1节点强制设为主节点后,需要等待主从节点同步信息,可以通过drbd-overview.pl 命令来查看同步状态,直至状态为下图所示,就是同步完成。

3. 格式化并挂载磁盘:
- ##在主节点格式化并挂载
- [root@centosnode1 ~]# mkfs.xfs /dev/drbd0
- ##在主从节点上都创建挂载目录
- [root@centosnode1 ~]# mkdir /data1
- ##在主节点上临时挂载
- [root@centosnode1 ~]# mount /dev/drbd0 /data1
补充:手动管理drbd:
- ##将备用节点nfs资源升级,使其为主节点
- [root@centosnode2 ~]# drbdadm primary nfs
- ##将主用节点nfs资源降级,使其为从节点
- [root@centosnode1 ~]# drbdadm secondary nfs
- ##卸载挂载目录
- [root@centosnode1 ~]# umount /data1
4. 安装并配置nfs:
- [root@centosnode1 ~]# yum install rpcbind nfs-utils
- ##nfs配置,主从节点都要配置
- [root@centosnode1 ~]# vim /etc/exports
- /data1 192.168.188.0/24 (rw,sync)
- ##主从节点启动nfs服务
- [root@centosnode1 ~]# systemctl restart rpcbind
- [root@centosnode1 ~]# systemctl restart nfs
三. 安装并配置pacemaker和corosync:
1. 安装pacemaker之前,首先要配置主从节点ssh的免密钥登录:
- [root@centosnode1 ~]# ssh-keygen -f ~/.ssh/id_rsa -P '' -q
- [root@centosnode1 ~]# ssh-copy-id centosnode1
- [root@centosnode1 ~]# ssh-copy-id centosnode2
2. yum安装corosync和pacemaker:
[root@centosnode1 ~]# yum install corosync pacemaker -y3. 安装pacemaker的管理工具pcs,并设置pcs的开机自启:
- [root@centosnode1 ~]# yum install pcs -y
- [root@centosnode1 ~]# systemctl enable pcsd.service --now
4. 安装完软件后会自动生成一个用户hacluster 但是没有密码 因此要赋予密码:
[root@centosnode1 ~]# echo "123456" | passwd --stdin hacluster5. 进行节点验证 以下操作都只在centosnode1节点:
- ##进行节点验证
- 语法:pcs cluster auth 节点1 节点2 ...
- [root@centosnode1 ~]# pcs cluster auth centosnode1 centosnode2
6. 创建集群:
- 语法:pcs cluster setup --name 集群名 集群节点
- [root@centosnode1 ~]# pcs cluster setup --name nfscluster centosnode1 centosnode2
7. 当集群创建完后 会自动生成一个corosync.conf文件 其中包含集群节点的配置信息:
- [root@centosnode1 ~]# cat /etc/corosync/corosync.conf
- totem {
- version: 2
- cluster_name: nfscluster
- secauth: off
- transport: udpu
- }
- nodelist {
- node {
- ring0_addr: centosnode1
- nodeid: 1
- }
- node {
- ring0_addr: centosnode2
- nodeid: 2
- }
- }
- quorum {
- provider: corosync_votequorum
- two_node: 1
- }
- logging {
- to_logfile: yes
- logfile: /var/log/cluster/corosync.log
- to_syslog: yes
- }
8. 开启集群:
- ##分别开启集群中的单个节点
- [root@centosnode1 ~]# pcs cluster start centosnode1
- [root@centosnode1 ~]# pcs cluster start centosnode2
- ##开启集群中全部节点
- [root@centosnode1 ~]# pcs cluster start --all
- ##设置集群全部节点的开机自启
- [root@centosnode1 ~]# pcs cluster enable --all
9. 查看集群中信息:
- ##查看节点自身状态
- [root@centosnode1 ~]# corosync-cfgtool -s
- Printing ring status.
- Local node ID 1
- RING ID 0
- id = 192.168.188.223
- status = ring 0 active with no faults
- ##查看集群中全部节点的状态
- [root@centosnode1 ~]# corosync-cmapctl | grep members
- runtime.totem.pg.mrp.srp.members.1.config_version (u64) = 0
- runtime.totem.pg.mrp.srp.members.1.ip (str) = r(0) ip(192.168.188.223)
- runtime.totem.pg.mrp.srp.members.1.join_count (u32) = 1
- runtime.totem.pg.mrp.srp.members.1.status (str) = joined
- runtime.totem.pg.mrp.srp.members.2.config_version (u64) = 0
- runtime.totem.pg.mrp.srp.members.2.ip (str) = r(0) ip(192.168.188.226)
- runtime.totem.pg.mrp.srp.members.2.join_count (u32) = 1
- runtime.totem.pg.mrp.srp.members.2.status (str) = joined
- ##查看集群状态
- [root@centosnode1 ~]# pcs status
- Cluster name: nfscluster
- WARNINGS:
- No stonith devices and stonith-enabled is not false
- Stack: corosync
- Current DC: centosnode2 (version 1.1.23-1.el7_9.1-9acf116022) - partition with quorum
- Last updated: Thu Sep 8 18:05:37 2022
- Last change: Thu Sep 8 18:01:40 2022 by hacluster via crmd on centosnode2
- 2 nodes configured
- 0 resource instances configured
- Online: [ centosnode1 centosnode2 ]
- No resources
- Daemon Status:
- corosync: active/enabled
- pacemaker: active/enabled
- pcsd: active/enabled
10. 没有Fencing设备时,禁用STONITH自检功能:
[root@centosnode1 ~]# pcs property set stonith-enabled=false11. 改变集群前,建议查看当前配置的合法性:
[root@centosnode1 ~]# crm_verify -L -V12. 添加资源VIP:
- ##列出可用的标准资源
- [root@centosnode1 ~]# pcs resource standards
- ##查看资源的提供者
- [root@centosnode1 ~]# pcs resource providers
- ##查找包含指定内容的资源
- [root@centosnode1 ~]# pcs resource list | grep -i ip
- ##查看指定资源的用法
- [root@centosnode1 ~]# pcs resource describe ocf:heartbeat:IPaddr2
- ##设置名为ClusterIP的vip资源
- 语法:pcs resource create 自定义集群名 资源名 ip=vip cidr_netmask=子网掩码
- [root@centosnode1 ~]# pcs resource create ClusterIP ocf:heartbeat:IPaddr2 ip=192.168.188.100 cidr_netmask=24
13. 创建nfsserver资源:
- 语法:pcs resource create 自定义集群名 资源名 nfs_ip=vip
- [root@centosnode1 ~]# pcs resource create NfsShare
- ocf:heartbeat:nfsserver nfs_ip=192.168.188.100
14. 将VIP和nfs-server.service集群绑定在同一台服务器上,即配置主机约束:
[root@centosnode1 ~]# pcs constraint colocation add ClusterIP with NfsShare INFINITY15. 配置资源的顺序约束,即服务的启动顺序:
- ##ClusterIP集群要比NfsShare集群先启动
- [root@centosnode1 ~]# pcs constraint order ClusterIP then NfsShare
16. 设置服务器优先级,使服务优先运行在哪台服务器上,即位置约束:
- ##优先级默认为0
- [root@centosnode1 ~]# pcs constraint location NfsShare prefers centosnode1=50
17. 查看资源一致性的状态:
[root@centosnode1 ~]# pcs constraint18. 查看优先级:
[root@centosnode1 ~]# crm_simulate -sL四. 创建drbd设备集群:
1. 生成 drbd_cfg 文件,将配置导入文件,再推送文件提交配置:
- ##pcs cluster cib 文件名
- [root@centosnode1 ~]# pcs cluster cib drbd_cfg
2. 配置drbd集群,并将配置导入drbd配置文件:
- ##使用-f选项,将配置保存到drbd_cfg文件
- [root@centosnode1 ~]# pcs -f drbd_cfg resource create NfsData ocf:linbit:drbd
- drbd_resource=nfs(drbd的资源名) drbdconf="/usr/local/drbd-utils/etc/drbd.conf"
- (drbd配置文件) op monitor interval=60s
- [root@centosnode1 ~]# pcs -f drbd_cfg resource master NfsDataClon NfsData master-max=1
- master-node-max=1 clone-max=2 clone-node-max=1 notify=true
3. 查看drbd_cfg中配置:
[root@centosnode1 ~]# pcs -f drbd_cfg resource show
4. 对所有更改改到满意后,通过将drbd_cfg文件推送到实时CIB中来一次提交所有更改:
[root@centosnode1 ~]# pcs cluster cib-push drbd_cfg --config注意:通过pacemaker来管理时,不能将drbd启动起来。
5. 再查看 Pacemaker 的状态 查看Pacemaker 是否启动:
[root@centosnode1 ~]# pcs status五. 创建文件系统集群:
1. 生成 drbd_cfg 文件,将配置导入文件,再推送文件提交配置:
[root@centosnode1 ~]# pcs cluster cib fs_cfg2. 修改文件系统配置文件:
- [root@centosnode1 ~]# pcs -f fs_cfg resource create NfsFs ocf:heartbeat:Filesystem
- device="/dev/drbd0"(设备路径) directory="/data1"(挂载点) fstype="xfs"
3. 设置NfsFs和NfsDataClon资源在Master服务器上:
- [root@centosnode1 ~]# pcs -f fs_cfg constraint colocation add NfsFs with
- NfsDataClon INFINITY with-rsc-role=Master
4. 设置NfsFs(nfs集群服务)和NfsDataClon(drbd集群服务)资源的启动顺序:
- ##NfsDataClon的启动要在NfsFs之前启动
- [root@centosnode1 ~]# pcs -f fs_cfg constraint order promote NfsDataClon then start NfsFs
5. 让Nfs集群和NfsShare在同一台服务器上:
[root@centosnode1 ~]# pcs -f fs_cfg constraint colocation add NfsShare with NfsFs INFINITY6. 设置NfsShare和NfsFs资源的启动顺序:
- ##NfsFs要在NfsShare之前启动
- [root@centosnode1 ~]# pcs -f fs_cfg constraint order NfsFs then NfsShare
7. 查看fs_cfg中配置
[root@centosnode1 ~]# pcs -f fs_cfg resource show
8. 对所有更改满意后,通过将fs_cfg文件推送到实时CIB中来一次提交所有更改:
[root@centosnode1 ~]# pcs cluster cib-push fs_cfg --config9. 再查看 Pacemaker 的状态 查看Pacemaker配置是否生效:
- [root@centosnode1 ~]# pcs status
- ##查看资源之间关系
- [root@centosnode1 ~]# pcs constraint show

六:测试集群是否配置成功:
1. 停止centosnode1节点的所有集群服务,以此来模拟故障转移:
- [root@centosnode1 ~]# pcs cluster stop centosnode1
- ##主节点降级,验证资源漂移
- [root@centosnode1 ~]# pcs cluster standby centosnode1
- [root@centosnode1 ~]# pcs status
- ##centosnode1重新上线
- [root@centosnode1 ~]# pcs cluster unstandby centosnode1
- [root@centosnode1 ~]# pcs status
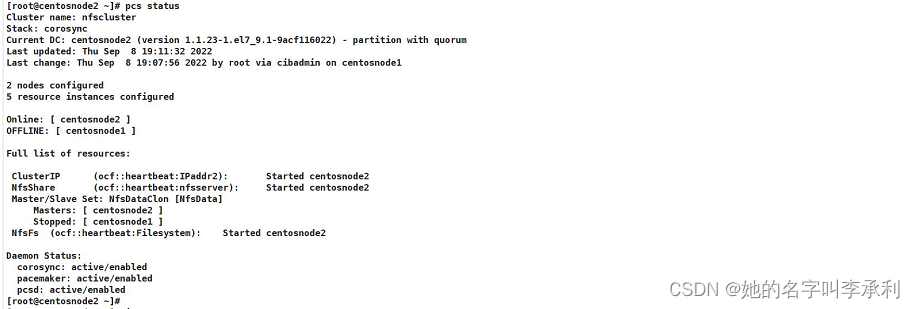
2. 在centosnode2节点查看Pacemaker状态:

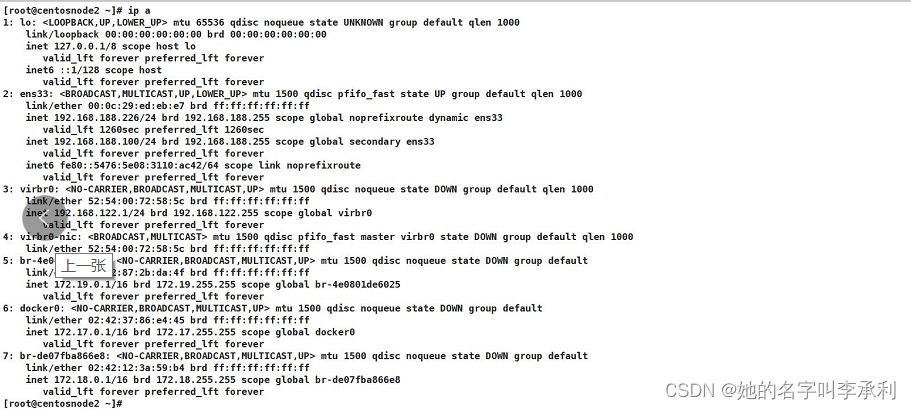
3. 在centosnode2节点查看vip是否飘移:

4. 在centosnode2节点数据是否挂载:

-
相关阅读:
自动化测试
Qt之使用bitblt抓取bitmap(位图)并转QImage
一篇全面而且透彻的RabbitMQ性能优化指南
day15 | 层序遍历、 226.翻转二叉树、 101. 对称二叉树
easyexcel导入导出百万条数据思路分析
Bellman-Ford算法
【沁恒 CH32V208 开发板免费试用】+ U盘/ SD NAND读写与多功能数码相框
Spring与OAuth2:实现第三方认证和授权的最佳实践
GB/T 23996-2009 室内装修用溶剂型金属板涂料检测
awk,gawk,mawk,nawk的重定向笔记221107
- 原文地址:https://blog.csdn.net/NancyLCL/article/details/126772459
