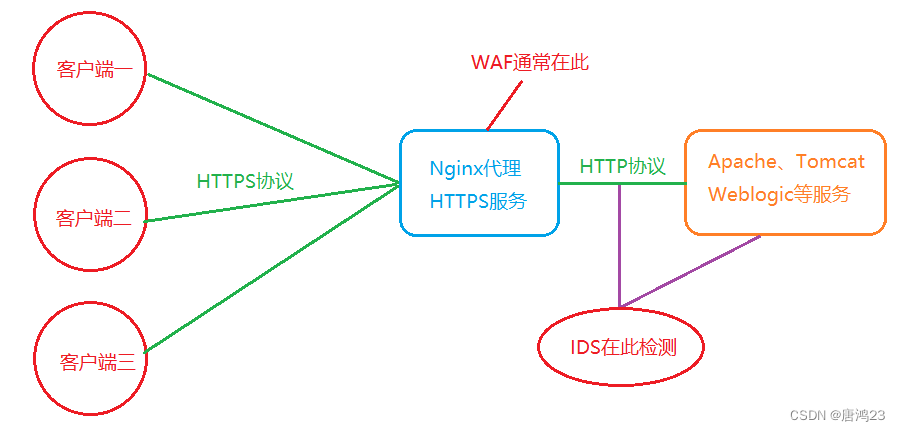
-
配置nginx反向代理,监控https流量
 访问代理的192.168.194.141,即可获得192.168.194.132资源
实验之前先检查,关闭防火墙。特别是iptables,已踩坑
systemctl stop firewalld
yum remove iptables一、服务环境
1、apache:集成环境
yum install -y wget
wget https://sourceforge.net/projects/xampp/files/latest/download
./ xampp-linux-x64-8.1.6-0-installer.run
/opt/lampp/lampp restart
1、tomcat
wget https://archive.apache.org/dist/tomcat/tomcat-10/v10.0.0/bin/apache-tomcat-10.0.0.tar.gz
tar -zxvf apache-tomcat-10.0.0.tar.gz
cd apache-tomcat-10.0.0/bin
./startup.sh
2、安装suricata
二进制安装(推荐)
https://www.cnblogs.com/eveplw/p/16602047.htmlyum -y install epel-release yum-plugin-copr
yum -y copr enable @oisf/suricata-7.0
yum -y install suricata二、代理
这里只用于反向代理,获取https内容,所以基础配置nginx就行
1、安装nginx
下载nginx压缩包,版本:nginx-1.21.2
yum -y install wget
wget http://nginx.org/download/nginx-1.21.2.tar.gz
先安装GCC编译器:yum -y install gcc pcre-devel zlib-devel openssl openssl-devel
解压
tar -zxvf nginx-1.21.0.tar.gz
进入到nginx源码文件中
cd nginx-1.21.0
配置:[root@localhost nginx-1.21.0]# /opt/nginx-1.21.0/configure --prefix=/usr/local/nginx --with-http_ssl_module
编译C语言的源代码为二进制文件:make
安装:make install
启动nginx:/usr/local/nginx/sbin/nginx
浏览器访问:http://192.168.112.188,默认80端口,如果看到Welcome说明安装成功2、配置代理
查看版本
openssl version
生成私钥-设置密码类123456
openssl genrsa -des3 -out server.pass.key 2048
去除私钥密码
openssl rsa -in server.pass.key -out server.key
生成csr证书
openssl req -new -key server.key -out server.csr -subj “/C=CN/ST=BeiJing/L=BeiJing/O=dev/OU= dev/CN=localhost”
生成ssl证书
openssl x509 -req -days 365 -in server.csr -signkey server.key -out server.crt
移动到配置目录
cp server.crt /usr/local/nginx/conf/server.crt
cp server.csr /usr/local/nginx/conf/server.csr
cp server.key /usr/local/nginx/conf/server.key
cp server.pass.key /usr/local/nginx/conf/server.pass.key
开启nginx
/usr/local/nginx/sbin/nginx
3、修改配置文件
vi /usr/local/nginx/conf
在server 节点外添加服务器的ip端口upstream mytomcat { server 192.168.194.132:80 weight=1; }- 1
- 2
- 3
在server内添加,重要的proxy_pass后面服务器ip必须跟上路径,也就是说格式必须完全一致
listen 443 ssl; server_name localhost; ssl_certificate server.crt; ssl_certificate_key server.key; ssl_session_cache shared:SSL:1m; ssl_session_timeout 5m; ssl_ciphers HIGH:!aNULL:!MD5; ssl_prefer_server_ciphers on; location / { root html; index index.html index.htm; } location /upload-labs-master/ { proxy_pass http://mytomcat/upload-labs-master/; proxy_redirect default; }- 1
- 2
- 3
- 4
- 5
- 6
- 7
- 8
- 9
- 10
- 11
- 12
- 13
- 14
- 15
- 16
- 17
3、重启,代理跟服务器内服务都要重启
/usr/local/nginx/sbin/nginx -s reload
/opt/lampp/lampp restart4、访问,这里就相当于server 节点外添加服务器的ip跟上路径
192.168.194.132/upload-labs-master/5、完成,可以抓包查看追踪
-
相关阅读:
nginx配置中$http_host、$host、$host:$proxy_port和$host:$server_port区别
tiup dm reload
大三学生HTML期末作业,网页制作作业——HTML+CSS+JavaScript饮品饮料茶(7页)
如何保持 SSH 会话不中断?
研发效能负责人/研发效能1号位 |DevOps负责人
变电站远程维护解决方案,工程师从此不再“跑断腿“
[羊城杯 2023] web
找准边界,吃定安全 | 云化下的新边界,东西南北流量该如何防护?
算法金 | 决策树、随机森林、bagging、boosting、Adaboost、GBDT、XGBoost 算法大全
在Ubuntu18.04(Bionic)上安装ROS Melodic
- 原文地址:https://blog.csdn.net/qq_44775960/article/details/126774911
