-
C++文件服务器项目—Redis—2
C++文件服务器项目—Redis—2
前言
本文简单介绍了一下redis以及
C接口的客户端库hiredis的使用本专栏知识点是通过零声教育的线上课学习,进行梳理总结写下文章,对c/c++linux课程感兴趣的读者,可以点击链接 C/C++后台高级服务器课程介绍 详细查看课程的服务。
1. 数据库类型
1.1 基本概念
- 关系型数据库 - sql
- 操作数据必须要使用sql语句
- 数据存储在磁盘
- 存储的数据量大
- 举例:
- mysql
- oracle
- sqlite - 文件数据库
- sql server
- 非关系数据库 - nosql
- 操作不使用sql语句
- 使用命令
- 数据默认存储在内存
- 速度快, 效率高
- 存储的数据量小
- 不需要数据库表
- 以键值对的方式存储的
- 操作不使用sql语句
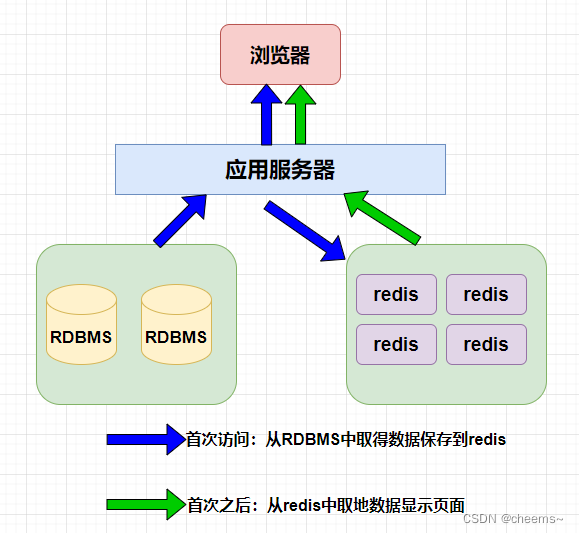
1.2 关系/非关系型数据库搭配使用

RDBMS: Relational Database Management System-关系数据库管理系统
- 所有的数据默认存储在关系型数据库中
- 客户端访问服务器, 有一些数据, 服务器需要频繁的查询数据
- 服务器首先将数据从关系型数据库中读出 -> 第一次
- 将数据写入到redis中
- 客户端第二次以及以后访问服务器
- 服务器从redis中直接读数据
- 如果redis没有再从关系型数据库中去读
- 服务器首先将数据从关系型数据库中读出 -> 第一次
2. redis基础知识点
2.1 redis安装
- 英文官方: https://redis.io/
- 中文官方: http://redis.cn/
- git:https://github.com/redis/redis
#下载 git clone https://github.com/redis/redis.git cd redis make make install- 1
- 2
- 3
- 4
- 5
2.2 redis中的两个角色
# 服务器 - 启动 redis-server # 默认启动 redis-server confFileName # 根据配置文件的设置启动 # 客户端 redis-cli # 默认连接本地, 绑定了6379默认端口的服务器 redis-cli -p 端口号 redis-cli -h IP地址 -p 端口 # 连接远程主机的指定端口的redis # 通过客户端关闭服务器 shutdown # 客户端的测试命令 ping [MSG]- 1
- 2
- 3
- 4
- 5
- 6
- 7
- 8
- 9
- 10
- 11
- 12
2.3 redis中数据的组织格式
- 键值对
- key: 必须是字符串 -> “hello”
- value: 可选的
- String类型
- List类型
- Set类型
- SortedSet类型
- Hash类型
2.4 redis中常用数据类型
-
String类型
- 字符串
-
List类型
- 存储多个string字符串
-
Set类型
- redis集合
- 元素不重复, 数据是无序的
- redis集合
-
SortedSet类型
- 排序集合, 集合中的每个元素分为两部分
- [分数, 成员] -> [66, ‘‘tom’’]
- 排序集合, 集合中的每个元素分为两部分
-
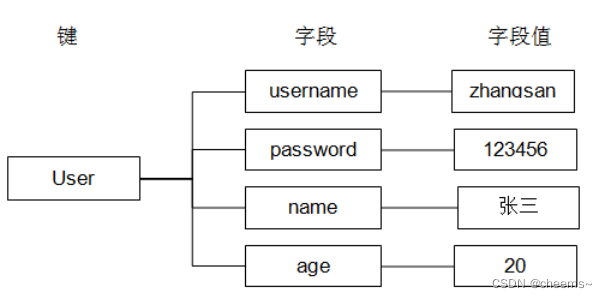
Hash类型
- 跟map数据组织方式一样: key:value
- Map -> 红黑树
- hash -> 数组
- a[index] = xx
- 跟map数据组织方式一样: key:value
3. redis常用命令
3.1 String类型
# key -> string # value -> string # 设置一个键值对->string:string SET key value # 通过key得到value GET key # 同时设置一个或多个 key-value 对 MSET key value [key value ...] # 同时查看多个key MGET key [key ...] # 如果 key 已经存在并且是一个字符串, APPEND 命令将 value 追加到 key 原来的值的末尾 # key: hello, value: world, append: 12345 APPEND key value # 返回 key 所储存的字符串值的长度 STRLEN key # 将 key 中储存的数字值减一。 # 前提, value必须是数字字符串 -"12345" DECR key- 1
- 2
- 3
- 4
- 5
- 6
- 7
- 8
- 9
- 10
- 11
- 12
- 13
- 14
- 15
- 16
- 17
- 18
- 19
- 20
- 21
- 22
- 23
- 24
3.2 List类型 - 存储多个字符串
# key -> string # value -> list # 将一个或多个值 value 插入到列表 key 的表头 LPUSH key value [value ...] # 将一个或多个值 value 插入到列表 key 的表尾 (最右边)。 RPUSH key value [value ...] # list中删除元素 LPOP key # 删除最左侧元素 RPOP key # 删除最右侧元素 # 遍历 LRANGE key start stop start: 起始位置, 0 stop: 结束位置, -1 # 通过下标得到对应位置的字符串 LINDEX key index # list中字符串的个数 LLEN key- 1
- 2
- 3
- 4
- 5
- 6
- 7
- 8
- 9
- 10
- 11
- 12
- 13
- 14
- 15
- 16
- 17
- 18
- 19
- 20
- 21
- 22
3.3 Set类型
# key -> string # value -> set类型 ("string", "string1") # 添加元素 # 将一个或多个 member 元素加入到集合 key 当中,已经存在于集合的 member 元素将被忽略 SADD key member [member ...] # 遍历 SMEMBERS key # 差集 SDIFF key [key ...] # 交集 SINTER key [key ...] # 并集 SUNION key [key ...]- 1
- 2
- 3
- 4
- 5
- 6
- 7
- 8
- 9
- 10
- 11
- 12
- 13
- 14
- 15
- 16
- 17
3.4 SortedSet 类型
# key -> string # value -> sorted ([socre, member], [socre, member], ...) # 添加元素 ZADD key score member [[score member] [score member] ...] # 遍历 ZRANGE key start stop [WITHSCORES] # -> 升序集合 ZREVRANGE key start stop [WITHSCORES] # -> 降序集合 # 指定分数区间内元素的个数 ZCOUNT key min max- 1
- 2
- 3
- 4
- 5
- 6
- 7
- 8
- 9
- 10
- 11
3.5 Hash类型

# key ->string # value -> hash ([key:value], [key:value], [key:value], ...) # 添加数据 HSET key field value # 取数据 HGET key field # 批量插入键值对 HMSET key field value [field value ...] # 批量取数据 HMGET key field [field ...] # 删除键值对 HDEL key field [field ...]- 1
- 2
- 3
- 4
- 5
- 6
- 7
- 8
- 9
- 10
- 11
- 12
- 13
- 14
- 15
- 16
3.6 Key 相关的命令
# 删除键值对 DEL key [key ...] # 查看key值 # 查找所有符合给定模式 pattern 的 key # KEYS * 匹配数据库中所有 key # KEYS h?llo 匹配 hello , hallo 和 hxllo 等。 # KEYS h*llo 匹配 hllo 和 heeeeello 等。 # KEYS h[ae]llo 匹配 hello 和 hallo ,但不匹配 hillo KEYS pattern # 给key设置生存时长 EXPIRE key seconds # 取消生存时长 PERSIST key # key对应的valued类型 TYPE key- 1
- 2
- 3
- 4
- 5
- 6
- 7
- 8
- 9
- 10
- 11
- 12
- 13
- 14
- 15
- 16
- 17
- 18
- 19
4. redis配置文件
配置文件是给redis服务器使用 的,配置文件位置在
源码安装目录.redis.conf。一般不修改这个文件,而是拷贝出来一份就行修改,在启动redis服务器的时候,指定这个拷贝出来的配置文件即可。4.1 基础配置项
下面的配置文件配置项只是一部分,还有数据持久化的配置在下一节介绍。
# redis服务器绑定谁之后, 谁就能访问redis服务器 # 想要任何客户端ip都能访问服务器, 需要注释该选项 bind 127.0.0.1 192.168.1.100 # 保护模式, 如果要远程客户端访问服务器, 该模式要关闭(no) protected-mode yes # reids服务器启动时候绑定的端口, 默认为6379 port 6379 # 超时时长, 0位关闭该选项, >0则开启 timeout 0 # 服务器启动之后不是守护进程 daemonize no # 如果服务器是守护进程, 就会生成一个pid文件 # ./ -> reids服务器启动时候对应的目录 # pidfile ./redis.pid pidfile /var/run/redis_6379.pid # 日志级别 loglevel notice # 如果服务器是守护进程, 才会写日志文件 logfile "" -> 这是没写 logfile ./redis.log # redis中数据库的个数 databases 16 #- 切换 select dbID [dbID == 0 ~ 16-1]- 1
- 2
- 3
- 4
- 5
- 6
- 7
- 8
- 9
- 10
- 11
- 12
- 13
- 14
- 15
- 16
- 17
- 18
- 19
- 20
- 21
- 22
- 23
4.2 数据持久化配置项
持久化: 将数据从内存保存到磁盘的过程
持久化有两种方式:
-
rdb方式
-
特点
- 这是一种默认的持久化方式, 默认打开
- 磁盘的持久化文件xxx.rdb
- 将内存数据以二进制的方式直接写入磁盘文件
- 快照的方式,存储的是内存的数据,按照一定
频率做持久化
-
优点
- 文件比较小, 恢复时间短, 效率高
-
缺点
- 存储频率太低,同步不及时,容易丢失数据
- 存储频率太高,存储效率低
-
-
aof方式
- 特点
- 默认是关闭的
- 磁盘的持久化文件xxx.aof
- 直接将生成数据的命令写入磁盘文件
- 存储的是命令,按照时间间隔存储
- 优点
- 以时间为单位存储,数据完整性高
- 缺点
- 文件比较大, 恢复时间长, 效率低
- 特点
持久化配置项的相关参数# rdb的同步频率, 任意一个满足都可以 # Unless specified otherwise, by default Redis will save the DB: # * After 3600 seconds (an hour) if at least 1 change was performed # * After 300 seconds (5 minutes) if at least 100 changes were performed # * After 60 seconds if at least 10000 changes were performed save 3600 1 save 300 100 save 60 10000 # rdb文件的名字 dbfilename dump.rdb # 生成的持久化文件保存的那个目录下, rdb和aof dir ./ # 是不是要打开aof模式 appendonly no -> 打开: yes # 设置aof文件的名字 appendfilename "appendonly.aof" # aof更新的频率 # appendfsync always appendfsync everysec # appendfsync no- 1
- 2
- 3
- 4
- 5
- 6
- 7
- 8
- 9
- 10
- 11
- 12
- 13
- 14
- 15
- 16
- 17
- 18
- 19
- 20
- 21
- 22
-
aof和rdb能不能同时打开? —> 可以
-
aof和rdb能不能同时关闭?—> 可以
-
rdb如何关闭?—>
save "" -
两种模式同时开启, 如果要进行数据恢复, 如何选择?
- 效率上考虑: rdb模式
- 数据的完整性: aof模式
5. hiredis的使用
5.1 hiredis安装
git clone https://github.com/redis/hiredis.git cd hiredis make make install- 1
- 2
- 3
- 4
5.2 hiredis API接口 介绍
- 连接数据库
// 连接数据库 redisContext *redisConnect(const char *ip, int port); redisContext *redisConnectWithTimeout(const char *ip, int port, const struct timeval tv);- 1
- 2
- 3
- 4
- 执行redis命令函数
// 执行redis命令,注意这里返回的内存需要释放 void *redisCommand(redisContext *c, const char *format, ...); // redisCommand 函数实际的返回值类型 typedef struct redisReply { /* 命令执行结果的返回类型 */ int type; /* 存储执行结果返回为整数 */ long long integer; /* str变量的字符串值长度 */ size_t len; /* 存储命令执行结果返回是字符串, 或者错误信息 */ char *str; /* 返回结果是数组, 代表数据的大小 */ size_t elements; /* 存储执行结果返回是数组*/ struct redisReply **element; } redisReply;- 1
- 2
- 3
- 4
- 5
- 6
- 7
- 8
- 9
- 10
- 11
- 12
- 13
- 14
- 15
- 16
- 17
- 释放资源
// 释放资源 void freeReplyObject(void *reply); void redisFree(redisContext *c);- 1
- 2
- 3
状态表示 含义 REDIS_REPLY_STRING==1 返回值是字符串,字符串储存在redis->str当中,字符串长度为len REDIS_REPLY_ARRAY== 2 返回值是数组,数组大小存在redis->elements里面,数组值存储在redis->element[i]里面。数组里面存储的是指向redisReply的指针,数组里面的返回值可以通过redis->element[i]->str来访问,数组的结果里全是type==REDIS_REPLY_STRING的redisReply对象指针。 REDIS_REPLY_INTEGER == 3 返回整数long long,从integer字段获取值 REDIS_REPLY_NIL==4 返回值为空表示执行结果为空 REDIS_REPLY_STATUS ==5 返回命令执行的状态,比如set foo bar 返回的状态为OK,存储在str当中 reply->str == “OK” 。 REDIS_REPLY_ERROR ==6 命令执行错误,错误信息存放在 reply->str当中。 5.3 hiredis使用Demo
hiredis提供的接口使用起来非常的简单,参考example.c,直接一葫芦画瓢即可在程序中操作redis。

#include#include #include #include int main(int argc, char **argv) { redisContext *c; redisReply *reply; //1. 连接redis服务器 c = redisConnect("127.0.0.1", 6379); if (c == NULL || c->err) { printf("Connection error: %s\n", c->errstr); redisFree(c); exit(1); } //2. 执行redis命令 /* PING server */ reply = redisCommand(c, "PING"); printf("PING: %s\n", reply->str); freeReplyObject(reply); /* Set a key */ reply = redisCommand(c, "SET %s %s", "foo", "hello world"); printf("SET: %s\n", reply->str); freeReplyObject(reply); /* Set a key using binary safe API */ reply = redisCommand(c, "SET %b %b", "bar", (size_t) 3, "hello", (size_t) 5); printf("SET (binary API): %s\n", reply->str); freeReplyObject(reply); /* Try a GET and two INCR */ reply = redisCommand(c, "GET foo"); printf("GET foo: %s\n", reply->str); freeReplyObject(reply); reply = redisCommand(c, "INCR counter"); printf("INCR counter: %lld\n", reply->integer); freeReplyObject(reply); /* again ... */ reply = redisCommand(c, "INCR counter"); printf("INCR counter: %lld\n", reply->integer); freeReplyObject(reply); /* Create a list of numbers, from 0 to 9 */ reply = redisCommand(c, "DEL mylist"); freeReplyObject(reply); int j = 0; for (j = 0; j < 10; j++) { char buf[64]; snprintf(buf, 64, "%u", j); reply = redisCommand(c, "LPUSH mylist element-%s", buf); freeReplyObject(reply); } /* Let's check what we have inside the list */ reply = redisCommand(c, "LRANGE mylist 0 -1"); if (reply->type == REDIS_REPLY_ARRAY) { for (j = 0; j < reply->elements; j++) { printf("%u) %s\n", j, reply->element[j]->str); } } freeReplyObject(reply); /* Disconnects and frees the context */ redisFree(c); return 0; } - 1
- 2
- 3
- 4
- 5
- 6
- 7
- 8
- 9
- 10
- 11
- 12
- 13
- 14
- 15
- 16
- 17
- 18
- 19
- 20
- 21
- 22
- 23
- 24
- 25
- 26
- 27
- 28
- 29
- 30
- 31
- 32
- 33
- 34
- 35
- 36
- 37
- 38
- 39
- 40
- 41
- 42
- 43
- 44
- 45
- 46
- 47
- 48
- 49
- 50
- 51
- 52
- 53
- 54
- 55
- 56
- 57
- 58
- 59
- 60
- 61
- 62
- 63
- 64
- 65
- 66
- 67
- 68
- 69
- 70
- 71
- 72
- 关系型数据库 - sql
-
相关阅读:
企业如何拥有自己的超级 App?
TSINGSEE青犀视频平台EasyCVR如何搭建自然保护区视频监控系统
Python多元非线性回归及绘图
Teams Tab App 的 manifest 分析
web前端期末大作业——HTML+CSS简单的旅游网页设计与实现
neo4j安装、运行以及项目的构建和功能实现
如何使用 JavaScript 读取文件
docker容器启动成功外部访问不到
互联网Java工程师面试题·Redis 篇·第二弹
Fiddler抓包工具详解
- 原文地址:https://blog.csdn.net/qq_42956653/article/details/126720725
