-
【模型剪枝】| yolov5 模型分析及剪枝
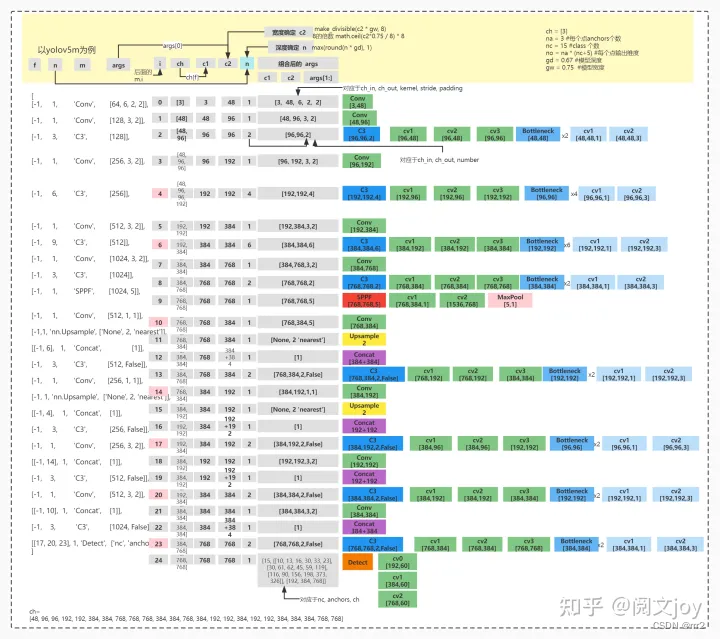
# parameters nc: 80 # number of classes depth_multiple: 0.33 # model depth multiple width_multiple: 0.50 # layer channel multiple # anchors anchors: - [10,13, 16,30, 33,23] # P3/8 - [30,61, 62,45, 59,119] # P4/16 - [116,90, 156,198, 373,326] # P5/32 # YOLOv5 backbone backbone: # [from, number, module, args] [[-1, 1, Focus, [64, 3]], # 0-P1/2 [-1, 1, Conv, [128, 3, 2]], # 1-P2/4 [-1, 3, C3, [128]], [-1, 1, Conv, [256, 3, 2]], # 3-P3/8 [-1, 9, C3, [256]], [-1, 1, Conv, [512, 3, 2]], # 5-P4/16 [-1, 9, C3, [512]], [-1, 1, Conv, [1024, 3, 2]], # 7-P5/32 [-1, 1, SPP, [1024, [5, 9, 13]]], [-1, 3, C3, [1024, False]], # 9 ] # YOLOv5 head head: [[-1, 1, Conv, [512, 1, 1]], [-1, 1, nn.Upsample, [None, 2, 'nearest']], [[-1, 6], 1, Concat, [1]], # cat backbone P4 [-1, 3, C3, [512, False]], # 13 [-1, 1, Conv, [256, 1, 1]], [-1, 1, nn.Upsample, [None, 2, 'nearest']], [[-1, 4], 1, Concat, [1]], # cat backbone P3 [-1, 3, C3, [256, False]], # 17 (P3/8-small) [-1, 1, Conv, [256, 3, 2]], [[-1, 14], 1, Concat, [1]], # cat head P4 [-1, 3, C3, [512, False]], # 20 (P4/16-medium) [-1, 1, Conv, [512, 3, 2]], [[-1, 10], 1, Concat, [1]], # cat head P5 [-1, 3, C3, [1024, False]], # 23 (P5/32-large) [[17, 20, 23], 1, Detect, [nc, anchors]], # Detect(P3, P4, P5) ]- 1
- 2
- 3
- 4
- 5
- 6
- 7
- 8
- 9
- 10
- 11
- 12
- 13
- 14
- 15
- 16
- 17
- 18
- 19
- 20
- 21
- 22
- 23
- 24
- 25
- 26
- 27
- 28
- 29
- 30
- 31
- 32
- 33
- 34
- 35
- 36
- 37
- 38
- 39
- 40
- 41
- 42
- 43
- 44
- 45
- 46
- 47
- 48
Conv
包含了bn SiLU
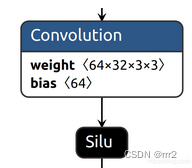
class Conv(nn.Module): # Standard convolution def __init__(self, c1, c2, k=1, s=1, p=None, g=1, act=True): # ch_in, ch_out, kernel, stride, padding, groups super(Conv, self).__init__() self.conv = nn.Conv2d(c1, c2, k, s, autopad(k, p), groups=g, bias=False) self.bn = nn.BatchNorm2d(c2) self.act = nn.SiLU() if act is True else (act if isinstance(act, nn.Module) else nn.Identity()) def forward(self, x): return self.act(self.bn(self.conv(x))) def fuseforward(self, x): return self.act(self.conv(x))- 1
- 2
- 3
- 4
- 5
- 6
- 7
- 8
- 9
- 10
- 11
- 12
- 13
Focus 块

class Focus(nn.Module): # Focus wh information into c-space def __init__(self, c1, c2, k=1, s=1, p=None, g=1, act=True): # ch_in, ch_out, kernel, stride, padding, groups super(Focus, self).__init__() self.conv = Conv(c1 * 4, c2, k, s, p, g, act) def forward(self, x): # x(b,c,w,h) -> y(b,4c,w/2,h/2) return self.conv(torch.cat([x[..., ::2, ::2], x[..., 1::2, ::2], x[..., ::2, 1::2], x[..., 1::2, 1::2]], 1))- 1
- 2
- 3
- 4
- 5
- 6
- 7
- 8
- 9
输入进行下采样w h 减半,然后沿着通道方向拼接,然后经过一个Conv模块。
C3

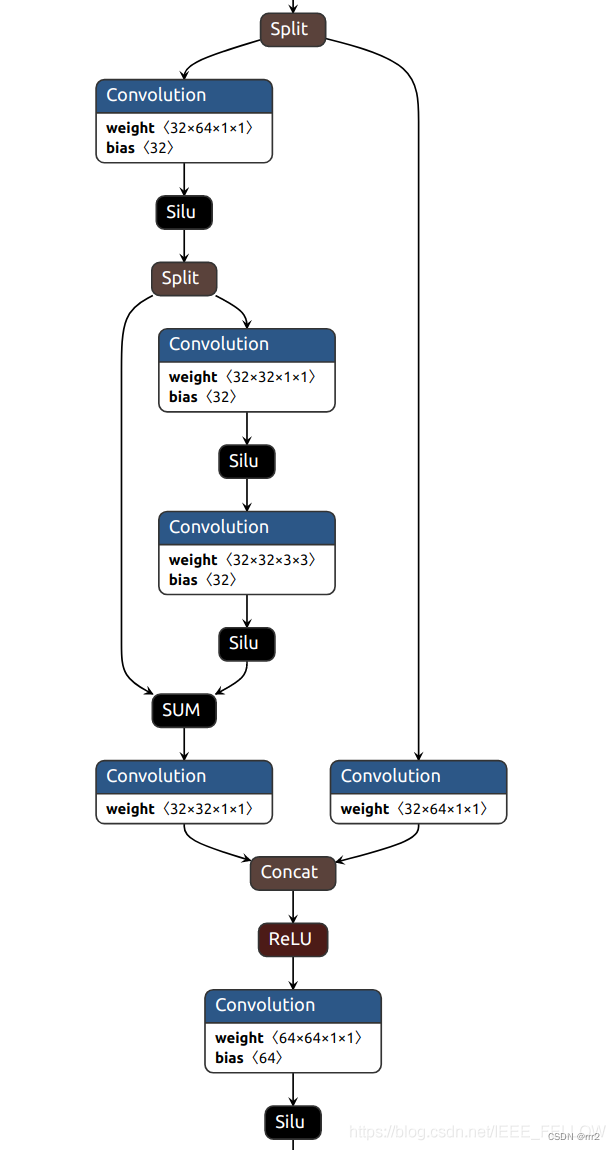
class C3(nn.Module): # CSP Bottleneck with 3 convolutions def __init__(self, c1, c2, n=1, shortcut=True, g=1, e=0.5): # ch_in, ch_out, number, shortcut, groups, expansion super(C3, self).__init__() c_ = int(c2 * e) # hidden channels self.cv1 = Conv(c1, c_, 1, 1) self.cv2 = Conv(c1, c_, 1, 1) self.cv3 = Conv(2 * c_, c2, 1) # act=FReLU(c2) self.m = nn.Sequential(*[Bottleneck(c_, c_, shortcut, g, e=1.0) for _ in range(n)]) def forward(self, x): return self.cv3(torch.cat((self.m(self.cv1(x)), self.cv2(x)), dim=1))- 1
- 2
- 3
- 4
- 5
- 6
- 7
- 8
- 9
- 10
- 11
- 12
C3 参数为(c1,c2,n)[channel in,channel_out, number]
Bottleneck
class Bottleneck(nn.Module): # Standard bottleneck def __init__(self, c1, c2, shortcut=True, g=1, e=0.5): # ch_in, ch_out, shortcut, groups, expansion super(Bottleneck, self).__init__() c_ = int(c2 * e) # hidden channels self.cv1 = Conv(c1, c_, 1, 1) self.cv2 = Conv(c_, c2, 3, 1, g=g) self.add = shortcut and c1 == c2 def forward(self, x): return x + self.cv2(self.cv1(x)) if self.add else self.cv2(self.cv1(x))- 1
- 2
- 3
- 4
- 5
- 6
- 7
- 8
- 9
- 10
- 11
其中的add属性很重要,决定了是否有shortcut,其实在yolov5的backbone中的Bottleneck都是有shortcut的,在head中的Bottleneck都没有shortcut。
一个包含add的Bottleneck一个分支包含两个convadd = True对应有shortcut的不进行剪枝,如果add=False,则进行剪枝。
由于C3中的self.cv2和self.m是通道拼接,所有 self.cv2是可以剪枝的。self.cv3是可以剪枝的。
SPP

class SPP(nn.Module): # Spatial pyramid pooling layer used in YOLOv3-SPP def __init__(self, c1, c2, k=(5, 9, 13)): super(SPP, self).__init__() c_ = c1 // 2 # hidden channels self.cv1 = Conv(c1, c_, 1, 1) self.cv2 = Conv(c_ * (len(k) + 1), c2, 1, 1) self.m = nn.ModuleList([nn.MaxPool2d(kernel_size=x, stride=1, padding=x // 2) for x in k]) def forward(self, x): x = self.cv1(x) return self.cv2(torch.cat([x] + [m(x) for m in self.m], 1))- 1
- 2
- 3
- 4
- 5
- 6
- 7
- 8
- 9
- 10
- 11
先通过一个Conv,然后分别进行不同kernel的pooling,3个pooling和输入拼接,在通过一个Conv。
这里两个Conv都是可以剪枝的。
# equivalent to SPP(k=(5, 9, 13)) class SPPF(nn.Module): # Spatial Pyramid Pooling - Fast (SPPF) layer for YOLOv5 by Glenn Jocher def __init__(self, c1, c2, k=5): # equivalent to SPP(k=(5, 9, 13)) super().__init__() c_ = c1 // 2 # hidden channels self.cv1 = Conv(c1, c_, 1, 1) self.cv2 = Conv(c_ * 4, c2, 1, 1) self.m = nn.MaxPool2d(kernel_size=k, stride=1, padding=k // 2) def forward(self, x): x = self.cv1(x) with warnings.catch_warnings(): warnings.simplefilter('ignore') # suppress torch 1.9.0 max_pool2d() warning y1 = self.m(x) y2 = self.m(y1) return self.cv2(torch.cat([x, y1, y2, self.m(y2)], 1))- 1
- 2
- 3
- 4
- 5
- 6
- 7
- 8
- 9
- 10
- 11
- 12
- 13
- 14
- 15
- 16
- 17

下采样3次,再把每次的结果(一共4个)拼起来nn.Upsample
yolov5中使用nearest方式上采样和之前的层融合。
Concat
拼接层,用于拼接之前的层,例如
[[-1, 6], 1, Concat, [1]], # cat backbone P4
其中[-1, 6]是将上一层和第6个模块的输出进行通道拼接。
for i, (f, n, m, args) in enumerate(d['backbone'] + d['head']): # from, number, module, args # xxx elif m is Concat: c2 = sum(ch[x] for x in f) if i == 0: ch = [] # balabala ch.append(c2)- 1
- 2
- 3
- 4
- 5
- 6
- 7
- 8
最开始的时候,ch=[3],但是第一层会重新初始化,所以ch存储的就是各个层的输出通道数,
如前5层后,ch=[64,128,128,256,256],而不是ch=[3,64,128,128,256,256]Detect
最后一个模块Detect是网络输出
[[17, 20, 23], 1, Detect, [nc, anchors]], # Detect(P3, P4, P5)- 1
这里有三个输出,第17, 20, 23模块的输出进行预测:
例如第23模块对应的输出卷积层:
255是3×(80+5),对应3个anchor, 80个类别,使用bce做二分类判断是否为当前类别,4个坐标预测,1个是判断是否为目标或者背景。
这里没有bn层,不做剪枝。

Detect
ref
https://blog.csdn.net/IEEE_FELLOW/article/details/117536808
https://zhuanlan.zhihu.com/p/446639532
https://github.com/midasklr/yolov5prune -
相关阅读:
VS 常用的快捷键指令
避免风险,亚马逊、沃尔玛、阿里国际站选择什么样的测评方式最安全?
OpenCV计算机视觉学习(14)——浅谈常见图像后缀(png, jpg, bmp)的区别(opencv读取语义分割mask的坑)
保姆级使用PyTorch训练与评估自己的HorNet网络教程
Vue组件之间通信
德鲁伊数据库连接池的使用
自注意力机制(Self-attention)【第四章】
GAMES202 Real-Time Global Illumination
y46.第三章 Kubernetes从入门到精通 -- ceph 在k8s中的使用案例(十九)
Java 流处理之收集器
- 原文地址:https://blog.csdn.net/qq_35608277/article/details/126587249
