-
FigDraw 19. SCI文章中绘图之坡度图(Slope Chart)

点击关注,桓峰基因
桓峰基因公众号推出基于R语言绘图教程并配有视频在线教程,目前整理出来的教程目录如下:
FigDraw 1. SCI 文章的灵魂 之 简约优雅的图表配色
FigDraw 2. SCI 文章绘图必备 R 语言基础
FigDraw 3. SCI 文章绘图必备 R 数据转换
FigDraw 4. SCI 文章绘图之散点图 (Scatter)
FigDraw 5. SCI 文章绘图之柱状图 (Barplot)
FigDraw 6. SCI 文章绘图之箱线图 (Boxplot)FigDraw 7. SCI 文章绘图之折线图 (Lineplot)
FigDraw 8. SCI 文章绘图之饼图 (Pieplot)
FigDraw 9. SCI 文章绘图之韦恩图 (Vennplot)
FigDraw 10. SCI 文章绘图之直方图 (HistogramPlot)
FigDraw 11. SCI 文章绘图之小提琴图 (ViolinPlot)
FigDraw 12. SCI 文章绘图之相关性矩阵图(Correlation Matrix)
FigDraw 13. SCI 文章绘图之桑葚图及文章复现(Sankey)
FigDraw 14. SCI 文章绘图之和弦图及文章复现(Chord Diagram)
FigDraw 15. SCI 文章绘图之多组学圈图(OmicCircos)
FigDraw 16. SCI 文章绘图之树形图(Dendrogram)
FigDraw 17. SCI 文章绘图之主成分绘图(pca3d)
FigDraw 18. SCI 文章绘图之矩形树状图 (treemap)
FigDraw 19. SCI 文章中绘图之坡度图(Slope Chart)
前 言
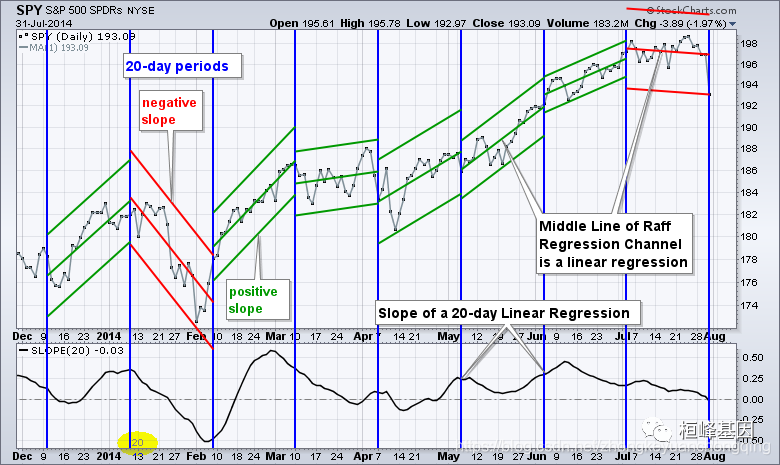
坡度图是一个伟大的工具,您想要可视化的变化的价值和排名之间的类别。这更适用于时间点很少的时间序列。
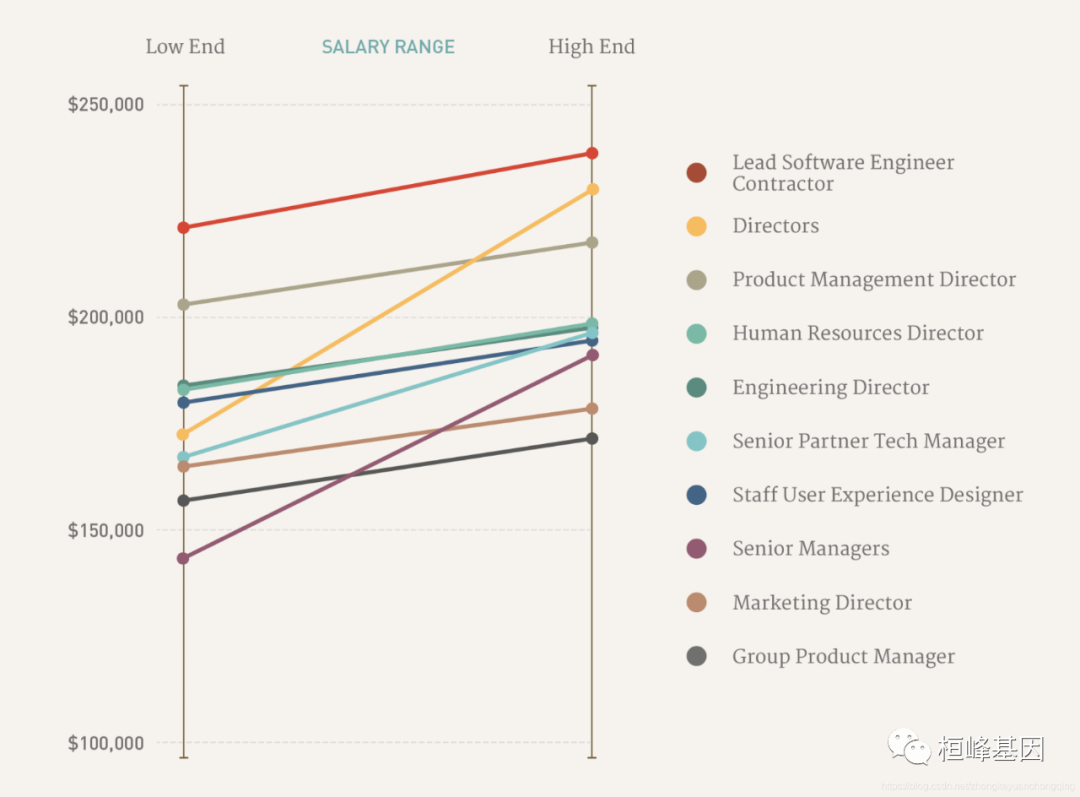
坡度图(Slope Chart)可以高效地可视化。同一个核心指标随着时间推移的变化情况。
软件安装
目前,还没有现成的构建函数来绘制坡度图。我们可以利用gglot2 及扩展包来解决这个问题。简单安装一个ggalt 软件包:
if(!require(ggalt)) install.packages("ggalt")- 1
- 2
- 3
数据读取
这里我们选取《R语言数据可视化之美》这本书里面的两个例子,以及来之r-statistics 的一个例子。
1. 两年份对比
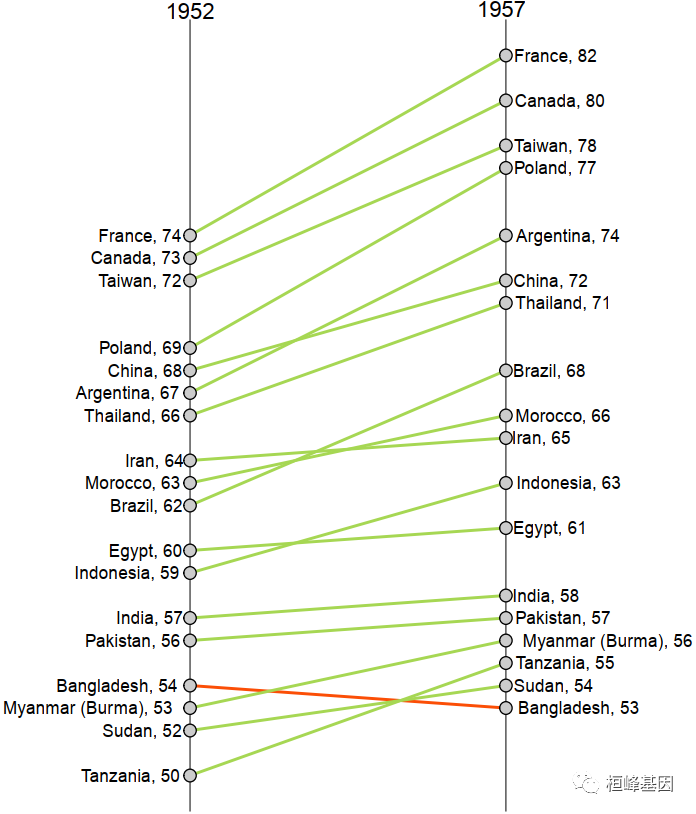
两年份对比结果可视化,如下:
library(ggplot2) library(scales) library(reshape) #--------------------------------------(a)两年份对比--------------------------------------------------------------- df1 <- read.csv("Slopecharts_Data1.csv") colnames(df1) <- c("continent", "1952", "1957") left_label <- paste(df1$continent, round(df1$`1952`), sep = ", ") right_label <- paste(df1$continent, round(df1$`1957`), sep = ", ") df1$class <- ifelse((df1$`1957` - df1$`1952`) < 0, "red", "green") head(df1) ## continent 1952 1957 class ## 1 Argentina 67 74 green ## 2 Bangladesh 54 53 red ## 3 Brazil 62 68 green ## 4 Canada 73 80 green ## 5 China 68 72 green ## 6 Egypt 60 61 green- 1
- 2
- 3
- 4
- 5
- 6
- 7
- 8
- 9
- 10
- 11
- 12
- 13
- 14
- 15
- 16
- 17
- 18
- 19
- 20
2. 多年份对比
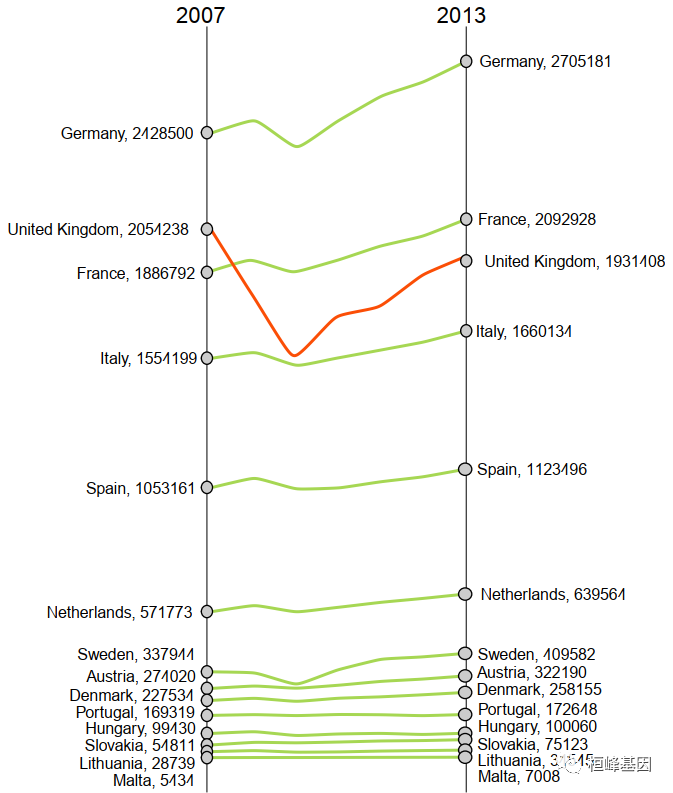
多年份结果可视化比较结果:
library(ggalt) df2 <- read.csv("Slopecharts_Data2.csv") colnames(df2) <- c("continent", 2007:2013) dfm <- melt(df2, id = "continent") dfm$value <- as.numeric(dfm$value) dfm$variable <- as.numeric(dfm$variable) left_label <- paste(dfm$continent, round(dfm$value), sep = ", ") right_label <- paste(dfm$continent, round(dfm$value), sep = ", ") left_point <- dfm$value right_point <- dfm$value class <- dfm$variable for (i in1:nrow(dfm)) { if (dfm$variable[i] != 1) { left_label[i] <- "" left_point[i] <- NaN } if (dfm$variable[i] != 7) { right_label[i] <- "" right_point[i] <- NaN } if (df2[df2$continent == dfm$continent[i], 2] > df2[df2$continent == dfm$continent[i], 8]) { class[i] <- "green" } else { class[i] <- "red" } } head(dfm) ## continent variable value ## 1 Germany 1 2428500 ## 2 United Kingdom 1 2054238 ## 3 France 1 1886792 ## 4 Italy 1 1554199 ## 5 Spain 1 1053161 ## 6 Netherlands 1 571773- 1
- 2
- 3
- 4
- 5
- 6
- 7
- 8
- 9
- 10
- 11
- 12
- 13
- 14
- 15
- 16
- 17
- 18
- 19
- 20
- 21
- 22
- 23
- 24
- 25
- 26
- 27
- 28
- 29
- 30
- 31
- 32
- 33
- 34
- 35
- 36
- 37
- 38
- 39
- 40
- 41
- 42
- 43
- 44
- 45
- 46
3. 癌症的生存比例
分析癌症的生存情况:
library(dplyr) source_df <- read.csv("cancer_survival_rates.csv") head(source_df) ## group year value ## 1 Oral cavity 5 56.7 ## 2 Oesophagus 5 14.2 ## 3 Stomach 5 23.8 ## 4 Colon 5 61.7 ## 5 Rectum 5 62.6 ## 6 Liver and intrahepatic bile duct 5 7.5 # Define functions. Source: https://github.com/jkeirstead/r-slopegraph tufte_sort <- function(df, x = "year", y = "value", group = "group", method = "tufte", min.space = 0.05) { ## First rename the columns for consistency ids <- match(c(x, y, group), names(df)) df <- df[, ids] names(df) <- c("x", "y", "group") ## Expand grid to ensure every combination has a defined value tmp <- expand.grid(x = unique(df$x), group = unique(df$group)) tmp <- merge(df, tmp, all.y = TRUE) df <- mutate(tmp, y = ifelse(is.na(y), 0, y)) ## Cast into a matrix shape and arrange by first column require(reshape2) tmp <- dcast(df, group ~ x, value.var = "y") ord <- order(tmp[, 2]) tmp <- tmp[ord, ] min.space <- min.space * diff(range(tmp[, -1])) yshift <- numeric(nrow(tmp)) ## Start at 'bottom' row Repeat for rest of the rows until you hit the top for (i in2:nrow(tmp)) { ## Shift subsequent row up by equal space so gap between two entries is ## >= minimum mat <- as.matrix(tmp[(i - 1):i, -1]) d.min <- min(diff(mat)) yshift[i] <- ifelse(d.min < min.space, min.space - d.min, 0) } tmp <- cbind(tmp, yshift = cumsum(yshift)) scale <- 1 tmp <- melt(tmp, id = c("group", "yshift"), variable.name = "x", value.name = "y") ## Store these gaps in a separate variable so that they can be scaled ypos ## = a*yshift + y tmp <- transform(tmp, ypos = y + scale * yshift) return(tmp) }- 1
- 2
- 3
- 4
- 5
- 6
- 7
- 8
- 9
- 10
- 11
- 12
- 13
- 14
- 15
- 16
- 17
- 18
- 19
- 20
- 21
- 22
- 23
- 24
- 25
- 26
- 27
- 28
- 29
- 30
- 31
- 32
- 33
- 34
- 35
- 36
- 37
- 38
- 39
- 40
- 41
- 42
- 43
- 44
- 45
- 46
- 47
- 48
- 49
- 50
- 51
- 52
- 53
例子实操
数据我们准备好之后,就可以绘图了,因为没有现成的R软件包,所有我们需要利用ggplot2中的函数进行组合绘制坡度图。
1. 两年份对比
p <- ggplot(df1) + geom_segment(aes(x=1, xend=2, y=`1952`, yend=`1957`, col=class), size=.75, show.legend=F) + #连接线 geom_vline(xintercept=1, linetype="solid", size=.1) + # 1952年的垂直直线 geom_vline(xintercept=2, linetype="solid", size=.1) + # 1957年的垂直直线 geom_point(aes(x=1, y=`1952`), size=3,shape=21,fill="grey80",color="black") + # 1952年的数据点 geom_point(aes(x=2, y=`1957`), size=3,shape=21,fill="grey80",color="black") + # 1957年的数据点 scale_color_manual(labels = c("Up", "Down"), values = c("green"="#A6D854","red"="#FC4E07")) + xlim(.5, 2.5) p # 添加文本信息 p <- p + geom_text(label=left_label, y=df1$`1952`, x=rep(1, NROW(df1)), hjust=1.1, size=3.5) p <- p + geom_text(label=right_label, y=df1$`1957`, x=rep(2, NROW(df1)), hjust=-0.1, size=3.5) p <- p + geom_text(label="1952", x=1, y=1.02*(max(df1$`1952`, df1$`1957`)), hjust=1.2, size=5) p <- p + geom_text(label="1957", x=2, y=1.02*(max(df1$`1952`, df1$`1957`)), hjust=-0.1, size=5) p<-p+theme_void() p- 1
- 2
- 3
- 4
- 5
- 6
- 7
- 8
- 9
- 10
- 11
- 12
- 13
- 14
- 15
- 16
- 17
- 18
2. 多年份对比
p <- ggplot(dfm) + geom_xspline(aes(x = variable, y = value, group = continent, colour = class), size = 0.75) + geom_vline(xintercept = 1, linetype = "solid", size = 0.1) + geom_vline(xintercept = 7, linetype = "solid", size = 0.1) + geom_point(aes(x = variable, y = left_point), size = 3, shape = 21, fill = "grey80", color = "black") + geom_point(aes(x = variable, y = right_point), size = 3, shape = 21, fill = "grey80", color = "black") + scale_color_manual(labels = c("Up", "Down"), values = c(green = "#FC4E07", red = "#A6D854")) + xlim(-4, 12) p <- p + geom_text(label = left_label, y = dfm$value, x = rep(1, NROW(dfm)), hjust = 1.1, size = 3.5) p <- p + geom_text(label = right_label, y = dfm$value, x = rep(7, NROW(dfm)), hjust = -0.1, size = 3.5) p <- p + geom_text(label = "2007", x = 1, y = 1.02 * (max(df2$value)), hjust = 1.2, size = 5) # title p <- p + geom_text(label = "2013", x = 7, y = 1.02 * (max(df2$value)), hjust = -0.1, size = 5) # title- 1
- 2
- 3
- 4
- 5
- 6
- 7
- 8
- 9
- 10
- 11
- 12
- 13
- 14
- 15
- 16
3. 癌症的生存比例
## Plot plot_slopegraph(df) + labs(title = "Estimates of % survival rates") + theme(axis.title = element_blank(), axis.ticks = element_blank(), plot.title = element_text(hjust = 0.5, family = "American Typewriter", face = "bold"), axis.text = element_text(family = "American Typewriter", face = "bold")) + theme_classic()- 1
- 2
- 3
- 4
- 5
- 6
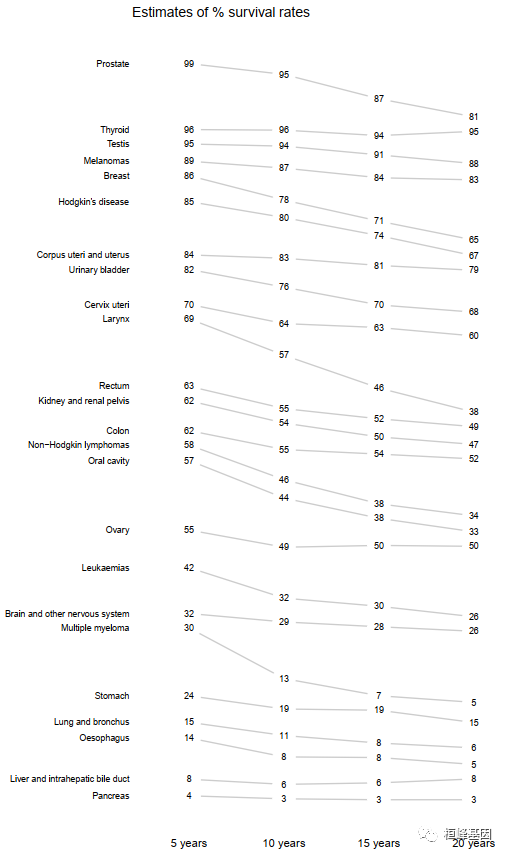
软件包里面自带的例子,我这里都展示了一遍为了方便大家选择适合自己的图形,另外需要代码的将这期教程转发朋友圈,并配文“学生信,找桓峰基因,铸造成功的你!”即可获得!
桓峰基因,铸造成功的您!
有想进生信交流群的老师可以扫最后一个二维码加微信,备注“单位+姓名+目的”,有些想发广告的就免打扰吧,还得费力气把你踢出去!
References:
- 张杰. 《R语言数据可视化之美》

-
相关阅读:
计算机毕业设计Java毕业设计管理系统(源码+系统+mysql数据库+lw文档)
(一) selenium自动化测试环境搭建
关于天干地支及其计算
web自动化测试进阶篇03 ———自动化并发测试应用
107.(前端)分类管理增加值实现——使用elementui中的动态编辑标签发送请求
scrapy爬虫系列之安装及入门介绍
Web服务器解析:从基础到高级的全面指南
第2-4-5章 规则引擎Drools高级语法-业务规则管理系统-组件化-中台
我用PYQT5做的第一个实用的上位机项目(三)
ROS 开源项目 TurtleBot3 安装与使用
- 原文地址:https://blog.csdn.net/weixin_41368414/article/details/126692185
