-
Mock笔记
一 使用场景
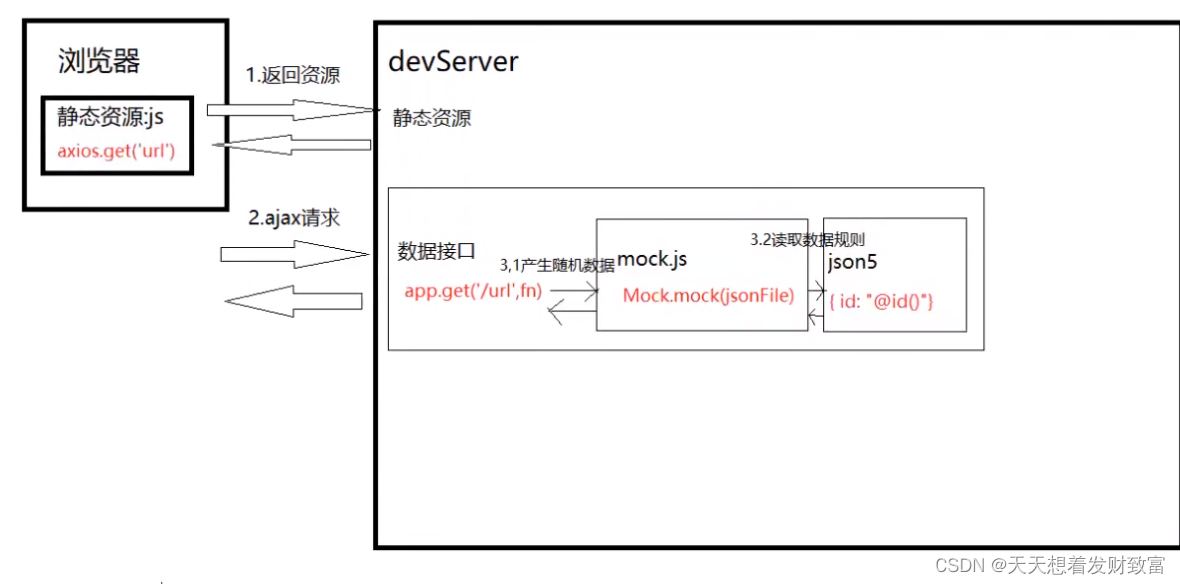
当前端工程师需要独立于后端并行开发时,后端接口还没有完成,前端可以考虑前端搭建web server自己模拟假数据,这里我们选第三方库mockjs用来生成随机数据,拦截Ajax请求。
二 在Vue中搭建测试项目
步骤一 创建项目
vue create mock-demo
步骤二 安装依赖
cd mock-demo
#使用axios发送ajax
npm install axios --save
#使用mockjs产生随机数据
npm install mockjs --save-dev
#使用json5解决json文件,无法添加注释问题
npm install json5 --save-dev步骤三
新建mock文件夹,新建testMock.js
- const Mock = require('mockjs'); //mockjs导入依赖模块
- var id = Mock.mock('@id')//得到随机的id,字符串
- console.log(Mock.mock('@id'),typeof id)
- var obj = Mock.mock({
- id:"@id()",//得到随机的id,对象
- username: "@cname()",//随机生成中文名字
- date: "@date()",//随机生成日期
- avatar: "@image('200x200','red', '#fff','avatar')" ,//生成图片,参数:size,background,foreground, text
- description: "@paragraph()" ,//描述
- ip: "@ip()",//IP地址
- email: "@email()"//emai1
- })
- console.log(obj)

步骤四 ----引入json5来解析json5格式
json文件存在注释,文件和编辑器都会报错,所以应该采用json5格式来让json格式可以存在注释
步骤4.1 编辑器安装json5扩展
步骤4.2 引入JSON5库来解析JSON5格式
userInfo.json5文件:
- {
- id:"@id()",//得到随机的id,对象
- username: "@cname()",//随机生成中文名字
- date: "@date()",//随机生成日期
- avatar: "@image('200x200','red', '#fff','avatar')" ,//生成图片,参数:size,background,foreground, text
- description: "@paragraph()" ,//描述
- ip: "@ip()",//IP地址
- email: "@email()"//emai1
- }
在mock文件夹下,创建testJSON.js
- const fs=require('fs')
- const path=require('path')
- const JSON5=require('json5')
- //读取文件
- function getJsonFile(filePath){
- //读取指定json文件
- /**readFileSync(文件路径(不可省略),读出文件的编码方式(可省略,省略后读出的数据是buffer数据格式))
- 它是同步任务,而readFile是异步任务
- */
- // path.resolve总是返回一个以相对于当前的工作目录的绝对路径。
- var json=fs.readFileSync(path.resolve(__dirname,filePath),'utf-8');
- //解析并返回
- return JSON5.parse(json)
- }
- var json=getJsonFile('./userInfo.json5');
- console.log('json',json)
步骤五 mock与vue-cli结合
步骤5.1 新建index.js
- const fs=require('fs')
- const path=require('path')
- const Mock=require('mockjs')
- const JSON5=require('json5')
- function getJsonFile(filePath){
- //读取指定json文件
- var json=fs.readFileSync(path.resolve(__dirname,filePath),'utf-8');
- //解析并返回
- return JSON5.parse(json)
- }
- //返回一个函数
- module.exporst=function(app){
- //监听http请求
- app.get('/user/userinfo',function(req,res){
- //每次响应请求时读取mock data的json文 件
- //getJsonFile方法定义了如何读取jison文件并解析成数据对象
- var json=getJsonFile('./userInfo.json5');
- //将json传入Mock. mock方法中,生成的数据返回给浏览器
- res.json(Mock.mock(json))
- })
- }
步骤5.2
在项目根目录下,新建vue.config.js
- module.exports={
- devserver: {
- before: require('./mock/index.js')//引入mock/index.js
- }
- }
步骤5.3 发送ajax请求
在src\components\Helloworld. vue中发送aja请求
- export default {
- name: 'HelloWorld',
- props: {
- msg: String
- },
- mounted:function(){
- axios.get('user/userinfo').then(res=>{
- console.log(res)
- })
- .catch(err=>{
- console.error(err)
- })
- }
- }

三 在jQuery项目中使用

步骤一 创建项目
1.1 新建文件夹jquery-mock-demo
1.2 新建index . html,引入jquery. js文件和mock.js
- < !DOCTYPE html>
- <html lang="en">
- <head>
- <meta charset="UTF-8">
- <meta name="viewport" content= "width=device -width, initial-scale=1.0">
- <meta http- equiv= "X -UA -Compatible" content= " ie=edge " >
- <title>Document</title>
- <script src="https://cdn.bootcss.com/jquery/2.2.4/jquery.min.js"></script>
- <script src=" https://cdn.bootcss.com/Mock.js/1.0.0/mock-min.js"></script>
- </head>
- <body>
- /body]
- </html>
步骤二 mock与jQuery结合
2.1 书写mock/index.js
- Mock.mock('user/userinfo','get',{
- id:"@id()",//得到随机的id,对象
- username: "@cname()",//随机生成中文名字
- date: "@date()",//随机生成日期
- avatar: "@image('200x200','red', '#fff','avatar')" ,//生成图片,参数:size,background,foreground, text
- description: "@paragraph()" ,//描述
- ip: "@ip()",//IP地址
- email: "@email()"//emai1
- })
2.2 使用jQuery发送ajax请求
在index.html中写
- <script src="./mock/index.js"></script>
- <script>
- $.ajax({
- url:'/user/userinfo',
- dataType:'json',
- success:(data)=>{
- console.log(data)
- }
- })
- </script>
步骤三 移除mock
方法一:
方法二:
在index.html中添加
<script>Mock='true'</script>将mock/index.js中的内容改为
- if(Mock=='true'){
- Mock.mock('user/userinfo','get',{
- id:"@id()",//得到随机的id,对象
- username: "@cname()",//随机生成中文名字
- date: "@date()",//随机生成日期
- avatar: "@image('200x200','red', '#fff','avatar')" ,//生成图片,参数:size,background,foreground, text
- description: "@paragraph()" ,//描述
- ip: "@ip()",//IP地址
- email: "@email()"//emai1
- })
- }
-
相关阅读:
mac 移动硬盘推出
用map 统计英文单词个数
摩尔信使MThings的报文管理功能
9.5QTday6作业
java基于Springboot+vue的在线听歌音乐网站与分享平台 elementui
UML_类图_时序图
决策中心:构建企业长期战略竞争力
C# 中的“智能枚举”:如何在枚举中增加行为
CLWY权限管理(六)--- 权限实现
5. informer源码分析-概要分析
- 原文地址:https://blog.csdn.net/qq_62401904/article/details/126681985
