-
stm32f4xx-USART串口
一、通信接口
UART

处理器与外部设备通信的两种方式:
-
并行通信
- 传输原理:数据各个位同时传输。
- 优点:速度快
- 缺点:占用引脚资源多
-
串行通信
- 传输原理:数据按位顺序传输。
- 优点:占用引脚资源少
- 缺点:速度相对较慢
1.串行通信:
按照数据传送方向,分为:
- 单工:
数据传输只支持数据在一个方向上传输
- 半双工:
允许数据在两个方向上传输,但是,在某一时刻,只允许数据在一个方向上传输,它实际上是一种切换方向的单工通信;
- 全双工:
允许数据同时在两个方向上传输,因此,全双工通信是两个单工通信方式的结合,它要求发送设备和接收设备都有独立的接收和发送能力。

2.串行通信的通信方式
-
同步通信:带时钟同步信号传输。
- SPI,IIC通信接口
-
**异步通信:**不带时钟同步信号。
- UART(通用异步收发器),单总线

3.STM32的串口通信接口
UART:通用异步收发器
USART:通用同步异步收发器
uart和usart的区别 UART与USART都是单片机上的串口通信,他们之间的区别如下: 首先从名字上看: UART:universal asynchronous receiver and transmitter通用异步收/发器 USART:universal synchronous asynchronous receiver and transmitter通用同步/异步收/发器 从名字上可以看出,USART在UART基础上增加了同步功能,即USART是UART的增强型,事实也确实是这样。但是具体增强到了什么地方呢? 其实当我们使用USART在异步通信的时候,它与UART没有什么区别,但是用在同步通信的时候, 区别就很明显了:大家都知道同步通信需要时钟来触发数据传输,也就是说USART相对UART的区别之一就是能提供主动时钟- 1
- 2
- 3
- 4
- 5
- 6
- 7
- 8
- 9
- 10
- 11
- 12
- 13
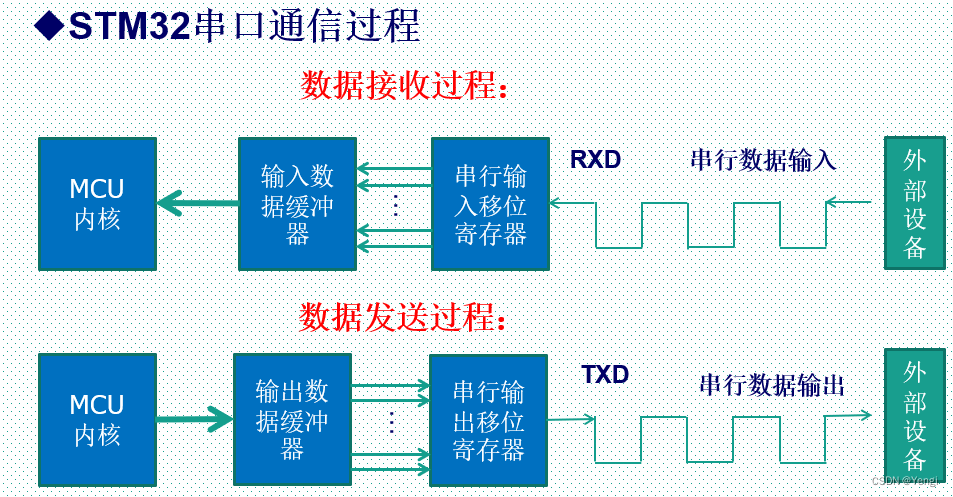
UART异步通信方式引脚连接方法:
-RXD:数据输入引脚。数据接受。
-TXD:数据发送引脚。数据发送。

4.UART异步通信方式特点
全双工异步通信。
小数波特率发生器系统,提供精确的波特率。
可配置的16倍过采样或8倍过采样,因而为速度容差与时钟容差的灵活配置提供了可能。
可编程的数据字长度(8位或者9位);
可配置的停止位(支持1或者2位停止位);
可配置的使用DMA多缓冲器通信。
单独的发送器和接收器使能位。
检测标志:① 接受缓冲器 ②发送缓冲器空 ③传输结束标志
多个带标志的中断源。触发中断。
其他:校验控制,四个错误检测标志。

5.流控
数据在两个串口之间进行通讯,常常会出现丢失数据的现象,比如当接收端数据缓冲区满了,而发送端还有数据发送过来,本质原因是速度不匹配,处理能力不匹配。
流控就是为了解决这个速度匹配的问题,它的含义非常简单,当接收端处理数据处理不过来时,就向发送端发送不在接收信息,当发送端接收到这个信号之后,就会停止发送,直到收到可以继续发送信号在继续发送。
流控的方式有两种,一种是硬件流控,一种是软件流控
二、库函数
1、很多模块默认出厂设置硬件参数配置如下:
配置串口,遵循“9600, N, 8,1”
9600,波特率
N,无校验位
8,数据位
1,停止位
对于ARM的高速芯片,波特率默认上浮到115200bps
1.硬件时钟
使能端口A的硬件时钟
使能串口1的硬件时钟
2、硬件配置
端口A引脚配置为复用功能模式
引脚连接到串口1硬件
配置串口相关的参数:波特率、校验位、数据位、停止位
配置串口中断
编写中断服务函数(用来接收数据)
串口1发送数据、接收数据
注意:
乱码情况,文本的格式可能不一样,PLL参数是否正确
3.串口配置的一般步骤

三、test
#include "usart.h" #include "stm32f4xx.h" #include//usart a9t a10r static uint8_t USART1_buf[64];//接收缓存区 void USART1_init(uint32_t bps) { GPIO_InitTypeDef GPIO_InitStructure; USART_InitTypeDef USART_InitStructure; NVIC_InitTypeDef NVIC_InitStructure; // GPIOA时钟使能 RCC_AHB1PeriphClockCmd(RCC_AHB1Periph_GPIOA,ENABLE); // 使能串口1的硬件时钟 RCC_APB2PeriphClockCmd(RCC_APB2Periph_USART1, ENABLE); // 引脚连接到串口1硬件 GPIO_PinAFConfig(GPIOA, GPIO_PinSource9, GPIO_AF_USART1); GPIO_PinAFConfig(GPIOA, GPIO_PinSource10, GPIO_AF_USART1); // 端口A引脚A9、A10配置为复用功能模式 GPIO_InitStructure.GPIO_Pin = GPIO_Pin_9 | GPIO_Pin_10; //第9号跟10号引脚 GPIO_InitStructure.GPIO_Mode = GPIO_Mode_AF; //复用模式 GPIO_InitStructure.GPIO_Speed = GPIO_Speed_100MHz; //高速 GPIO_InitStructure.GPIO_OType = GPIO_OType_PP; //推挽输出,增加输出电流能力 GPIO_InitStructure.GPIO_PuPd = GPIO_PuPd_NOPULL; //没有上拉下拉电阻 GPIO_Init(GPIOA, &GPIO_InitStructure); // 配置串口相关的参数:波特率、校验位、数据位、停止位 USART_InitStructure.USART_BaudRate = bps; //波特率设置 USART_InitStructure.USART_WordLength = USART_WordLength_8b; //数据位长度8位 USART_InitStructure.USART_StopBits = USART_StopBits_1; //停止位1位 /* When using Parity the word length must be configured to 9 bits */ USART_InitStructure.USART_Parity = USART_Parity_No; //无奇偶校验 USART_InitStructure.USART_HardwareFlowControl = USART_HardwareFlowControl_None; //无硬件流控 USART_InitStructure.USART_Mode = USART_Mode_Rx | USART_Mode_Tx; //允许发送、接收数据 USART_Init(USART1, &USART_InitStructure); // 配置串口1的中断优先级 NVIC_InitStructure.NVIC_IRQChannel = USART1_IRQn; NVIC_InitStructure.NVIC_IRQChannelPreemptionPriority = 0; NVIC_InitStructure.NVIC_IRQChannelSubPriority = 0; NVIC_InitStructure.NVIC_IRQChannelCmd = ENABLE; NVIC_Init(&NVIC_InitStructure); // 配置串口1中断触发方式,接收一个字节触发中断 USART_ITConfig(USART1, USART_IT_RXNE, ENABLE); // 使能串口1工作 USART_Cmd(USART1, ENABLE); } //串口1中断服务函数 接收数据 void USART1_IRQHandler(void) { uint16_t d; static uint16_t cnt = 0; if(USART_GetITStatus(USART1,USART_IT_RXNE) == SET)//检测中断标志 { if(cnt < 63)//接收数据 { USART1_buf[cnt] = USART_ReceiveData(USART1); } else { cnt = 0; } //将接收到的数据,返发给PC USART_SendData(USART1, USART1_buf[cnt]); cnt ++; while(USART_GetFlagStatus(USART1, USART_FLAG_TXE) == RESET); //清空标准位 USART_ClearITPendingBit(USART1,USART_IT_RXNE); } } void USART1_SendChar(uint16_t c) { USART_SendData(USART1,c); while(USART_GetFlagStatus(USART1,USART_FLAG_TXE) == RESET); } void USART1_SendData(char *data) { while(*data!='\0') { USART1_SendChar(*data); data++; } } //buf:接收缓存首地址 //len:读到的数据长度 void MyUSART1_RcvData(char *buf,uint8_t *len) { uint8_t i=0; while(USART1_buf[i]!='\0') { buf[i] = USART1_buf[i]; i++; } if(i==0) *len = 0; else *len = i-1; } int main(void) { NVIC_PriorityGroupConfig(NVIC_PriorityGroup_2);//设置系统中断优先级分组2 init_led_beep(); USART1_init(9600); USART1_SendData("hello world\r\n"); char buf[64]={0}; uint8_t len; while(1) { memset(buf,0,64); delay_xms(40); MyUSART1_RcvData(buf,&len); if(len == 0) continue; if(strstr(buf,"open beep")!= NULL) BEEP = 1; if(strstr(buf,"close beep")!= NULL) BEEP = 0; if(strstr(buf,"open led")!= NULL) Led_All_On2(); if(strstr(buf,"close led")!= NULL) Led_All_off2(); } } - 1
- 2
- 3
- 4
- 5
- 6
- 7
- 8
- 9
- 10
- 11
- 12
- 13
- 14
- 15
- 16
- 17
- 18
- 19
- 20
- 21
- 22
- 23
- 24
- 25
- 26
- 27
- 28
- 29
- 30
- 31
- 32
- 33
- 34
- 35
- 36
- 37
- 38
- 39
- 40
- 41
- 42
- 43
- 44
- 45
- 46
- 47
- 48
- 49
- 50
- 51
- 52
- 53
- 54
- 55
- 56
- 57
- 58
- 59
- 60
- 61
- 62
- 63
- 64
- 65
- 66
- 67
- 68
- 69
- 70
- 71
- 72
- 73
- 74
- 75
- 76
- 77
- 78
- 79
- 80
- 81
- 82
- 83
- 84
- 85
- 86
- 87
- 88
- 89
- 90
- 91
- 92
- 93
- 94
- 95
- 96
- 97
- 98
- 99
- 100
- 101
- 102
- 103
- 104
- 105
- 106
- 107
- 108
- 109
- 110
- 111
- 112
- 113
- 114
- 115
- 116
- 117
- 118
- 119
- 120
- 121
- 122
- 123
- 124
- 125
- 126
- 127
- 128
- 129
- 130
- 131
- 132
- 133
- 134
- 135
- 136
- 137
四、重定向printf
《CortexM3与M4权威指南.pdf》583页 18.1章节
A common task for beginners is to generate a simple output message of“Hello world!” In C language, this is commonly handled with a “printf” state-ment. Under the hood, the message output can be redirected to different formsof communication interfaces. Typically this is known as re-targeting. Forexample, it is very common to retarget printf to a UART during embedded soft-ware development
《CortexM3与M4权威指南.pdf》584页 18.2.2章节
In Keil ? MDK-ARM (or other ARM ? toolchains such as DS-5 ? Professional), thefunction that needs to be implemented to support printf is “fputc.”

/* Short version of retarget.c - Minimum code to support simple printf in Keil MDK-ARM */ /**************************************************************/ /* Minimum retarget functions for ARM DS-5 Professional / Keil MDK */ /**************************************************************/ #pragma import(__use_no_semihosting_swi) #include "stm32f4xx.h" #includestruct __FILE { int handle; /* Add whatever you need here */ }; FILE __stdout; FILE __stdin; int fputc(int ch, FILE *f) { return (ITM_SendChar(ch)); } void _sys_exit(int return_code) { label: goto label; /* endless loop */ } - 1
- 2
- 3
- 4
- 5
- 6
- 7
- 8
- 9
- 10
- 11
- 12
- 13
- 14
- 15
- 16
- 17
- 18
- 19
#pragma import(__use_no_semihosting_swi)
Pragma用于指示编译器完成一些特定的动作
在嵌入式程序编译时如果出现printf、fopen、fclose等文件操作,因程序中并没有对这些函数的底层实现,使得设备运行时会出现软件中断BAEB处,这时就需要
__use_no_semihosting_swi这个声明,使程序遇到这些文件操作函数时不停在此中断处
应用,指纹锁、手机无线传输模块,如WiFi模块,蓝牙模块,GPRS模块,GPS模块,4G模块、串口屏
test
struct __FILE { int handle; /* Add whatever you need here */ }; FILE __stdout; FILE __stdin; static uint8_t USART1_buf[64];//接收缓存区 //重定向printf,实际上是重定向这个fputc int fputc(int ch, FILE *f) { USART_SendData(USART1, ch); while(USART_GetFlagStatus(USART1, USART_FLAG_TXE) == RESET); return ch; }- 1
- 2
- 3
- 4
- 5
- 6
- 7
- 8
- 9
- 10
- 11
test
#include "myusart.h" #include "stdio.h" struct __FILE { int handle; /* Add whatever you need here */ }; FILE __stdout; FILE __stdin; //重定向printf int fputc(int ch,FILE *f) { USART_SendData(USART1,ch); while(USART_GetFlagStatus(USART1,USART_FLAG_TXE) == RESET); return ch; } void MYUSAERT_Init(uint32_t bps) { USART_InitTypeDef USART_InitStructure; GPIO_InitTypeDef GPIO_InitStructure; NVIC_InitTypeDef NVIC_InitStructure; //串口时钟使能,GPIO时钟使能 RCC_AHB1PeriphClockCmd(RCC_AHB1Periph_GPIOA,ENABLE); RCC_APB2PeriphClockCmd(RCC_APB2Periph_USART1,ENABLE); //引脚复用 GPIO_PinAFConfig(GPIOA,GPIO_PinSource9,GPIO_AF_USART1); GPIO_PinAFConfig(GPIOA,GPIO_PinSource10,GPIO_AF_USART1); //GPIO端口模式设置 /* Configure PG6 and PG8 in output pushpull mode */ GPIO_InitStructure.GPIO_Pin = GPIO_Pin_9 | GPIO_Pin_10; GPIO_InitStructure.GPIO_Mode = GPIO_Mode_AF; //复用 GPIO_InitStructure.GPIO_OType = GPIO_OType_PP; GPIO_InitStructure.GPIO_Speed = GPIO_Speed_100MHz; GPIO_InitStructure.GPIO_PuPd = GPIO_PuPd_NOPULL; GPIO_Init(GPIOA, &GPIO_InitStructure); //串口初始化 /* USARTx configured as follows: - BaudRate = bps baud - Word Length = 8 Bits - One Stop Bit - No parity - Hardware flow control disabled (RTS and CTS signals) - Receive and transmit enabled */ USART_InitStructure.USART_BaudRate = bps; USART_InitStructure.USART_WordLength = USART_WordLength_8b; USART_InitStructure.USART_StopBits = USART_StopBits_1; USART_InitStructure.USART_Parity = USART_Parity_No; USART_InitStructure.USART_HardwareFlowControl = USART_HardwareFlowControl_None; USART_InitStructure.USART_Mode = USART_Mode_Rx | USART_Mode_Tx; //收发 USART_Init(USART1,&USART_InitStructure); //开启中断并初始化NVIC NVIC_InitStructure.NVIC_IRQChannel = USART1_IRQn; NVIC_InitStructure.NVIC_IRQChannelPreemptionPriority = 0; NVIC_InitStructure.NVIC_IRQChannelSubPriority = 0; NVIC_InitStructure.NVIC_IRQChannelCmd = ENABLE; NVIC_Init(&NVIC_InitStructure); USART_ITConfig(USART1,USART_IT_RXNE,ENABLE); //使能串口 USART_Cmd(USART1,ENABLE); } //中断处理函数 void USART1_IRQHandler(void) { //串口数据收发 //串口传输动态获取 if(USART_GetITStatus(USART1,USART_IT_RXNE)== SET)//检测中断标志,如果中断被触发,接收到一个字节的数据 { uint16_t d = USART_ReceiveData(USART1); //从USART1获取数据 USART_SendData(USART1,d); //将接收到的数据返回给PC while(USART_GetFlagStatus(USART1,USART_FLAG_TXE)== RESET); USART_ClearITPendingBit(USART1,USART_IT_RXNE);//清空标志位 } } int main(void) { /* Configure two bits for preemption priority */ NVIC_PriorityGroupConfig(NVIC_PriorityGroup_2);//设置系统中断优先级分组2 MYUSAERT_Init(9600); printf("hello world"); while(1); }- 1
- 2
- 3
- 4
- 5
- 6
- 7
- 8
- 9
- 10
- 11
- 12
- 13
- 14
- 15
- 16
- 17
- 18
- 19
- 20
- 21
- 22
- 23
- 24
- 25
- 26
- 27
- 28
- 29
- 30
- 31
- 32
- 33
- 34
- 35
- 36
- 37
- 38
- 39
- 40
- 41
- 42
- 43
- 44
- 45
- 46
- 47
- 48
- 49
- 50
- 51
- 52
- 53
- 54
- 55
- 56
- 57
- 58
- 59
- 60
- 61
- 62
- 63
- 64
- 65
- 66
- 67
- 68
- 69
- 70
- 71
- 72
- 73
- 74
- 75
- 76
- 77
- 78
- 79
- 80
- 81
- 82
- 83
- 84
- 85
- 86
- 87
-
-
相关阅读:
容联七陌助力鱼跃医疗升级智能联络中心,让客户服务更“鱼跃”
使用 @Transactional 时常犯的N种错误
从实时应用角度谈通信总线仲裁机制和网络流控
Mongodb----部署副本集 实现读写分离
动态规划-构建乘积数组
02Nacos和Feign及Gateway配置
Radius 身份认证 Java 客户端(FreeRADIUS)
2022-11-16 mysql列存储引擎-支持COUNT中DISTINCT-需求分析
HRNet 源码分析
Gerrit 使用操作手册
- 原文地址:https://blog.csdn.net/qq_45698138/article/details/126681534
