-
Spring MVC注解Controller源码流程解析--映射建立
本篇为spring mvc源码解析高级篇,其中关于DispathcerServlet的前置知识块,建议大家先通过我的spring源码专栏学习一下:
引言
DispatcherServlet通过SPI机制来加载默认提供的相关组件,而SPI的核心就在于DispathcerServlet.properties文件:

该文件内部列举了各个组件会提供哪些默认实现,使用这些默认实现的前提是,DispathcerServlet在初始化各个组件时,并没有在当前容器内发现各个组件已有的实现。Controller的寻找是通过HandlerMapping完成的,而调用则是通过HandlerAdaptor完成的。
对于注解版本Controller寻找是通过RequestMappingHandlerMapping完成的,RequestMappingHandlerMapping主要负责在自身初始化阶段搜寻出当前容器内所有可用Controller实现,然后建立相关映射关系; 在请求到来时,再通过这些映射关系寻找到对应处理方法后返回。
对于注解版本的Controller请求处理方法调用是通过RequestMappingHandlerAdapter完成的,RequestMappingHandlerAdapter负责拿到RequestMappingHandlerMapping返回的方法后,进行一系列处理后,调用目标方法处理请求,这一系列处理包括: 数据绑定和数据校验,返回值处理等等…
整个注解版本Controller源码解析流程较为繁琐,但是大体上还是分为两个阶段:
- 映射建立
- 处理请求
因此,本节先分析前半部分,即RequestMappingHandlerMapping是如何建立映射关系的
类图分析
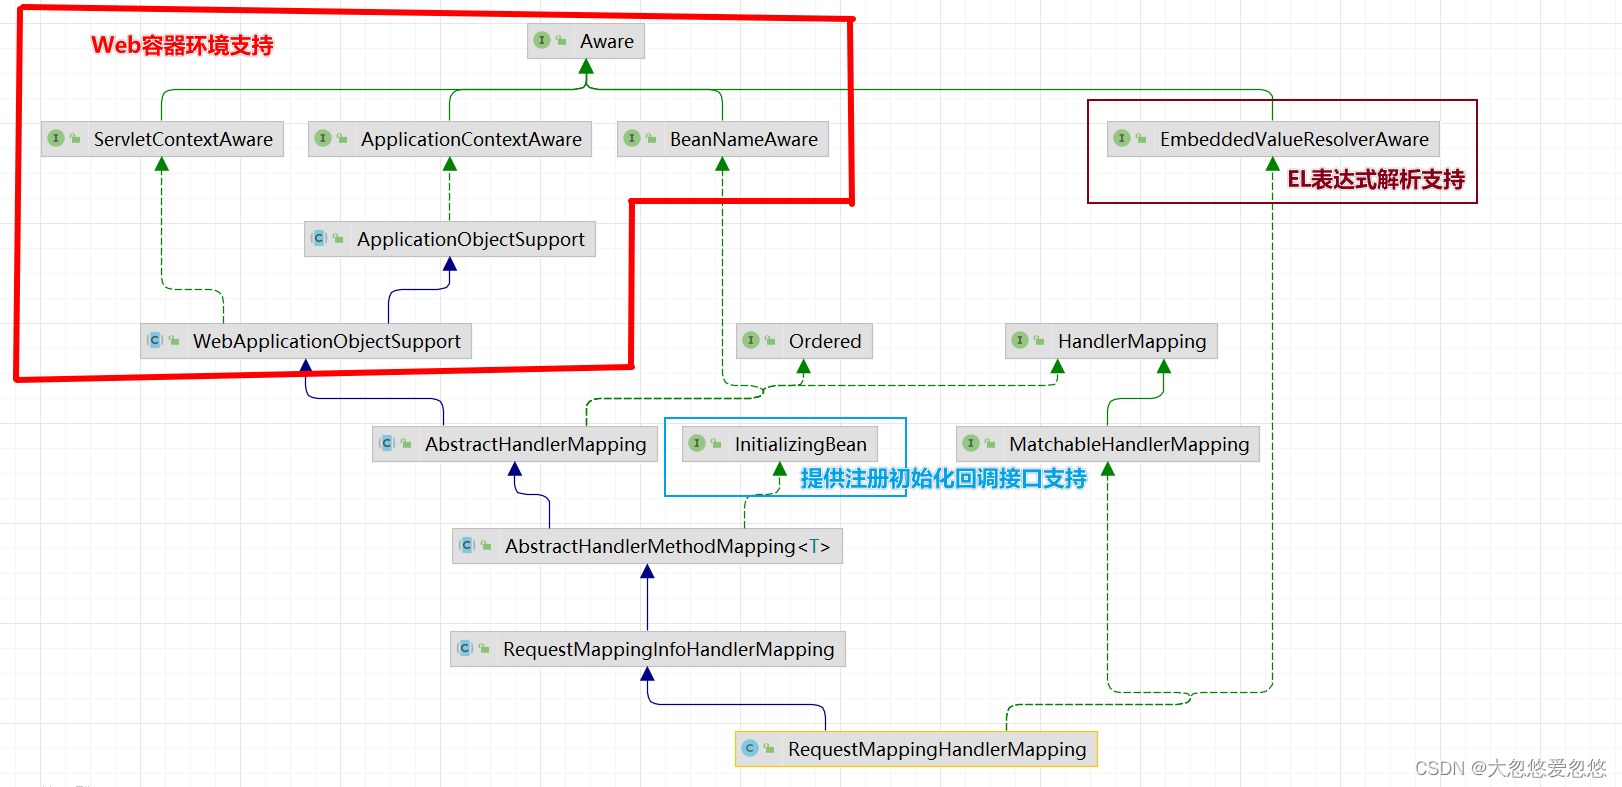
再正式讲解流程前,先来对RequestMappingHandlerMapping的类图进行分析,建立一个大局观念:

- AbstractHandlerMapping: 提供基础设施支持,例如: 路径解析,拦截器,跨域。 规定了根据request得到handler的模板方法处理流程getHandler,具体如何根据request寻找到某个handler,则是由子类实现。
- AbstractHandlerMethodMapping: 囊括了对注解Controller寻找,建立映射和根据request找到对应handler的流程支持,核心在于建立Reuqest和HandlerMethod的映射关系,将识别处理器方法和建立映射的任务交给子类实现。
- RequestMappingHandlerMapping: 核心在于解析处理器方法和对应Controller上@RequestMapping注解,然后合并生成一个RequestMappingInfo作为映射的关键一环返回。
映射建立
Reuqest和HandlerMethod的映射的建立过程由AbstractHandlerMethodMapping实现的初始化回调接口afterPropertiesSet完成:
public void afterPropertiesSet() { initHandlerMethods(); }- 1
- 2
- 3
initHandlerMethods是映射建立的入口,我们需要深入其中:
protected void initHandlerMethods() { //getCandidateBeanNames可以简单的理解为是获取当前容器内部的所有bean实例 for (String beanName : getCandidateBeanNames()) { ... //需要判断当前bean是不是我们需要的候选bean,如果是就进行处理 processCandidateBean(beanName); } //简单的日志记录 handlerMethodsInitialized(getHandlerMethods()); }- 1
- 2
- 3
- 4
- 5
- 6
- 7
- 8
- 9
- 10
processCandidateBean是核心方法,该方法内部完成了bean的筛选和对某个Controller内部所有handlerMethod的探测。
protected void processCandidateBean(String beanName) { Class<?> beanType = null; //获取当前bean类型 beanType = obtainApplicationContext().getType(beanName); .. //默认AbstractHandlerMethodMapping是不提供对处理器的识别的,具体如何识别某个bean是不是handler,是由子类决定的 //这里是AbstractHandlerMethodMapping实现的,筛选规则如下: //检验当前bean上是否存在Controller或者RequestMapping注解 if (beanType != null && isHandler(beanType)) { //如果当前bean是一个handler,那么需要探测出该handler内部所有handlerMethod实现 detectHandlerMethods(beanName); } }- 1
- 2
- 3
- 4
- 5
- 6
- 7
- 8
- 9
- 10
- 11
- 12
- 13
handlerMethod才是处理请求的终点,因此我们需要探测当前handler内部有哪些handlerMethod,并且建立好相关映射关系:
protected void detectHandlerMethods(Object handler) { //先获取到当前handler的type Class<?> handlerType = (handler instanceof String ? obtainApplicationContext().getType((String) handler) : handler.getClass()); if (handlerType != null) { //如果当前handler是被cglib代理过的对象,那么需要获取当前代理对象的superClass //因为这才是目标handler的类型 Class<?> userType = ClassUtils.getUserClass(handlerType); //MethodIntrospector类主要提供对方法的筛选和通用处理封装 //这里selectMethods就是筛选出当前handler内部所有符合要求的handlerMethod Map<Method, T> methods = MethodIntrospector.selectMethods(userType, //筛选出某个handlerMethod,利用注册的回调接口生成映射关系 (MethodIntrospector.MetadataLookup<T>) method -> { try { return getMappingForMethod(method, userType); } catch (Throwable ex) { throw new IllegalStateException("Invalid mapping on handler class [" + userType.getName() + "]: " + method, ex); } }); ... methods.forEach((method, mapping) -> { //对jdk动态代理的情况进行处理--一般情况下可以忽略,因此controller层一般都是采用cglib代理 Method invocableMethod = AopUtils.selectInvocableMethod(method, userType); //注册 registerHandlerMethod(handler, invocableMethod, mapping); }); } }- 1
- 2
- 3
- 4
- 5
- 6
- 7
- 8
- 9
- 10
- 11
- 12
- 13
- 14
- 15
- 16
- 17
- 18
- 19
- 20
- 21
- 22
- 23
- 24
- 25
- 26
- 27
- 28
- 29
- 30
- 31
MethodIntrospector.selectMethods作用可以简单看做是遍历handler类内部所有方法,包括其父类和实现接口里面的所有方法,然后交给注册进来的回调接口进行处理,回调接口的返回值作为生成的映射信息,如果返回值不为空,就和当前method组成一条记录,放入map中; 遍历完所有方法后,返回该map集合。
selectMethods完成方法筛选的关键就在于目标方法经过回调接口处理过后,返回值是否为空,如果为空,说明当前方法需要被过滤掉
所以,上面注册的回调接口中的getMappingForMethod方法才是我们需要关注的重点,该方法完成了对当前method信息的提取,最终组装返回一个请求映射信息。
和上面识别handler一样,具体是如何完成对method解析的过程,也是由RequestMappingHandlerMapping子类实现的。
解析handlerMethod
protected RequestMappingInfo getMappingForMethod(Method method, Class<?> handlerType) { //根据当前方法,创建一个请求映射信息 RequestMappingInfo info = createRequestMappingInfo(method); //如果当前方法并没有标注@RequestMapping等注解,那么也就不是一个handlerMethod,那么就返回null //该方法就会在selectMethods中被过滤掉 if (info != null) { //当前handlerMethod属于的handler上是否也存在@RequestMapping注解,如果存在就解析 RequestMappingInfo typeInfo = createRequestMappingInfo(handlerType); if (typeInfo != null) { //如果handler上确实存在,那么就需要将方法上的@RequestMapping注解和类上的@RequestMapping注解注解进行合并 info = typeInfo.combine(info); } //关于前缀的问题,下一节会展开讲,这里先跳过 String prefix = getPathPrefix(handlerType); if (prefix != null) { info = RequestMappingInfo.paths(prefix).options(this.config).build().combine(info); } } return info; }- 1
- 2
- 3
- 4
- 5
- 6
- 7
- 8
- 9
- 10
- 11
- 12
- 13
- 14
- 15
- 16
- 17
- 18
- 19
- 20
createRequestMappingInfo方法会对传入的AnnotatedElement上的RequestMapping注解进行解析,然后生成RequestMappingInfo返回。
AnnotatedElement是JDK反射包提供的顶层接口,实现了该接口的元素,都是可以标注注解的元素,例如: Class,Method,Parameter等都实现了该接口
private RequestMappingInfo createRequestMappingInfo(AnnotatedElement element) { //拿到当前元素上的注解信息 RequestMapping requestMapping = AnnotatedElementUtils.findMergedAnnotation(element, RequestMapping.class); //用户可以实现相关方法来创建自定义的请求匹配条件 RequestCondition<?> condition = (element instanceof Class ? getCustomTypeCondition((Class<?>) element) : getCustomMethodCondition((Method) element)); return (requestMapping != null ? //如果存在注解,就创建对应的RequestMappingInfo createRequestMappingInfo(requestMapping, condition) : null); }- 1
- 2
- 3
- 4
- 5
- 6
- 7
- 8
- 9
- 10
RequestMappingInfo可以看出,就是@RequestMapping注解对应信息的实体载体。
protected RequestMappingInfo createRequestMappingInfo( RequestMapping requestMapping, @Nullable RequestCondition<?> customCondition) { RequestMappingInfo.Builder builder = RequestMappingInfo //requestMapping注解中的path属性会经过EL解析器解析,也就是我们在路径中可以通过el表达式获取上下文中的值 //例如: ${user.dir} .paths(resolveEmbeddedValuesInPatterns(requestMapping.path())) //通过请求访问限制匹配 .methods(requestMapping.method()) //通过请求参数中必须携带某个请求参数进行限制匹配 .params(requestMapping.params()) //通过请求头中必须携带某个请求头进行限制匹配 .headers(requestMapping.headers()) //通过限制请求头中的content-type来进行限制匹配 .consumes(requestMapping.consumes()) //规定响应的content-type类型 .produces(requestMapping.produces()) .mappingName(requestMapping.name()); //是否存在用户自定义匹配限制 if (customCondition != null) { builder.customCondition(customCondition); } //构建RequestMappingInfo后返回 return builder.options(this.config).build(); }- 1
- 2
- 3
- 4
- 5
- 6
- 7
- 8
- 9
- 10
- 11
- 12
- 13
- 14
- 15
- 16
- 17
- 18
- 19
- 20
- 21
- 22
- 23
- 24
- 25
@RequestMapping注解中各个属性含义详解如下:
// @since 2.5 用于将Web请求映射到具有灵活方法签名的请求处理类中的方法的注释 Both Spring MVC and `Spring WebFlux` support this annotation // @Mapping这个注解是@since 3.0 但它目前还只有这个地方使用到了~~~ 我感觉是多余的 @Target({ElementType.METHOD, ElementType.TYPE}) // 能够用到类上和方法上 @Retention(RetentionPolicy.RUNTIME) @Documented @Mapping public @interface RequestMapping { //给这个Mapping取一个名字。若不填写,就用HandlerMethodMappingNamingStrategy去按规则生成 String name() default ""; // 路径 数组形式 可以写多个。 一般都是按照Ant风格进行书写~ @AliasFor("path") String[] value() default {}; @AliasFor("value") String[] path() default {}; // 请求方法:GET, HEAD, POST, PUT, PATCH, DELETE, OPTIONS, TRACE // 显然可以指定多个方法。如果不指定,表示适配所有方法类型~~ // 同时还有类似的枚举类:org.springframework.http.HttpMethod RequestMethod[] method() default {}; // 指定request中必须包含某些参数值时,才让该方法处理 // 使用 params 元素,你可以让多个处理方法处理到同一个URL 的请求, 而这些请求的参数是不一样的 // 如:@RequestMapping(value = "/fetch", params = {"personId=10"} 和 @RequestMapping(value = "/fetch", params = {"personId=20"} // 这两个方法都处理请求`/fetch`,但是参数不一样,进入的方法也不一样~~~~ // 支持!myParam和myParam!=myValue这种~~~ String[] params() default {}; // 指定request中必须包含某些指定的header值,才能让该方法处理请求 // @RequestMapping(value = "/head", headers = {"content-type=text/plain"} String[] headers() default {}; // 指定处理请求request的**提交内容类型**(Content-Type),例如application/json、text/html等 // 相当于只有指定的这些Content-Type的才处理 // @RequestMapping(value = "/cons", consumes = {"application/json", "application/XML"} // 不指定表示处理所有~~ 取值参见枚举类:org.springframework.http.MediaType // 它可以使用!text/plain形如这样非的表达方式 String[] consumes() default {}; // 指定返回的内容类型,返回的内容类型必须是request请求头(Accept)中所包含的类型 // 仅当request请求头中的(Accept)类型中包含该指定类型才返回; // 参见枚举类:org.springframework.http.MediaType // 它可以使用!text/plain形如这样非的表达方式 String[] produces() default {}; }- 1
- 2
- 3
- 4
- 5
- 6
- 7
- 8
- 9
- 10
- 11
- 12
- 13
- 14
- 15
- 16
- 17
- 18
- 19
- 20
- 21
- 22
- 23
- 24
- 25
- 26
- 27
- 28
- 29
- 30
- 31
- 32
- 33
- 34
- 35
- 36
- 37
- 38
- 39
- 40
- 41
- 42
- 43
- 44
- 45
- 46
- 47
Spring4.3之后提供了组合注解5枚:
@GetMapping @PostMapping @PutMapping @DeleteMapping @PatchMapping- 1
- 2
- 3
- 4
- 5
consumes 与 headers 区别:
- consumes produces params headers四个属性都是用来缩小请求范围。
- consumes只能指定 content-Type 的内容类型,但是headers可以指定所有。
所以可以认为:headers是更为强大的(所有需要指定key和value嘛),而consumes和produces是专用的,头的key是固定的,所以只需要写value值即可,使用起来也更加的方便~。
推荐一个类:org.springframework.http.HttpHeaders,它里面有常量:几乎所有的请求头的key,以及我们可以很方便的构建一个HttpHeader,平时可以作为参考使用
合并定义
protected RequestMappingInfo getMappingForMethod(Method method, Class<?> handlerType) { //根据当前方法,创建一个请求映射信息 RequestMappingInfo info = createRequestMappingInfo(method); //如果当前方法并没有标注@RequestMapping等注解,那么也就不是一个handlerMethod,那么就返回null //该方法就会在selectMethods中被过滤掉 if (info != null) { //当前handlerMethod属于的handler上是否也存在@RequestMapping注解,如果存在就解析 RequestMappingInfo typeInfo = createRequestMappingInfo(handlerType); if (typeInfo != null) { //如果handler上确实存在,那么就需要将方法上的@RequestMapping注解和类上的@RequestMapping注解注解进行合并 info = typeInfo.combine(info); } ... } return info; }- 1
- 2
- 3
- 4
- 5
- 6
- 7
- 8
- 9
- 10
- 11
- 12
- 13
- 14
- 15
- 16
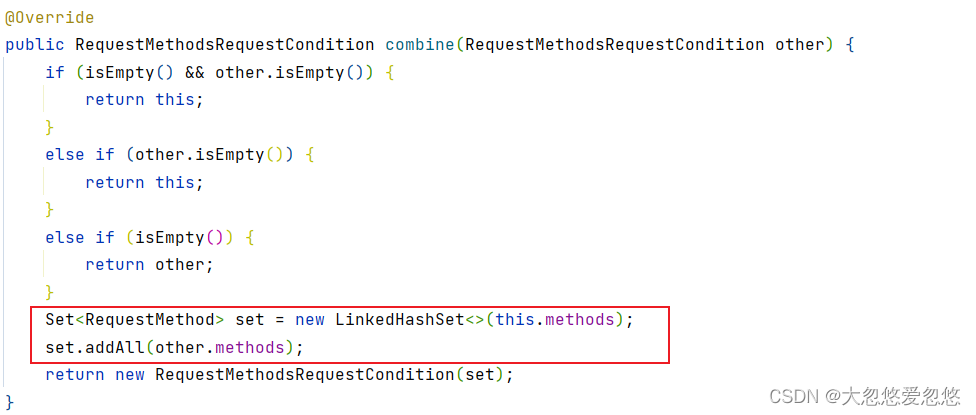
如果当前handleMethod对应的Handler上也存在@RequestMapping注解,那么就需要将类上的提供的@RequestMapping注解信息,与当前类内部所有handlerMethod提供的@RequestMapping注解信息进行合并,具体合并规则如下:
- 请求路径就是拼接:
@RequestMapping("/admin") @RestController public class AdminController { @PostMapping("/login") public Result login(){ ... } }- 1
- 2
- 3
- 4
- 5
- 6
- 7
- 8
HandlerMethod这里对应的就是login方法,而Handler对应的就是AdminController,此时合并完之后,得到的RequestMappingInfo 中的path路径为/admin/login。
- 其他属性就是简单的合并


注册HandlerMethod
protected void detectHandlerMethods(Object handler) { //先获取到当前handler的type Class<?> handlerType = (handler instanceof String ? obtainApplicationContext().getType((String) handler) : handler.getClass()); if (handlerType != null) { //如果当前handler是被cglib代理过的对象,那么需要获取当前代理对象的superClass //因为这才是目标handler的类型 Class<?> userType = ClassUtils.getUserClass(handlerType); //MethodIntrospector类主要提供对方法的筛选和通用处理封装 //这里selectMethods就是筛选出当前handler内部所有符合要求的handlerMethod Map<Method, T> methods = MethodIntrospector.selectMethods(userType, //筛选出某个handlerMethod,利用注册的回调接口生成映射关系 (MethodIntrospector.MetadataLookup<T>) method -> { try { return getMappingForMethod(method, userType); } catch (Throwable ex) { throw new IllegalStateException("Invalid mapping on handler class [" + userType.getName() + "]: " + method, ex); } }); ... methods.forEach((method, mapping) -> { //对jdk动态代理的情况进行处理--一般情况下可以忽略,因此controller层一般都是采用cglib代理 Method invocableMethod = AopUtils.selectInvocableMethod(method, userType); //注册 registerHandlerMethod(handler, invocableMethod, mapping); }); } }- 1
- 2
- 3
- 4
- 5
- 6
- 7
- 8
- 9
- 10
- 11
- 12
- 13
- 14
- 15
- 16
- 17
- 18
- 19
- 20
- 21
- 22
- 23
- 24
- 25
- 26
- 27
- 28
- 29
- 30
- 31
MethodIntrospector.selectMethods通过getMappingForMethod回调接口筛选出相关方法,并且建立好Method和对应RequestMappingInfo 映射关系后,返回了一个map集合,下面就是需要将这些映射关系进行注册。
子类RequestMappingHandlerMapping重写了父类的registerHandlerMethod方法,主要提供了对ConsumesCondition扩展点的支持:
@Override protected void registerHandlerMethod(Object handler, Method method, RequestMappingInfo mapping) { super.registerHandlerMethod(handler, method, mapping); updateConsumesCondition(mapping, method); }- 1
- 2
- 3
- 4
- 5
这里,我们先将目光着眼于父类AbstractHandlerMethodMapping提供的registerHandlerMethod实现:
protected void registerHandlerMethod(Object handler, Method method, T mapping) { this.mappingRegistry.register(mapping, handler, method); }- 1
- 2
- 3
MappingRegistry映射注册中心
MappingRegistry是AbstractHandlerMethodMapping内部维护的一个映射关系的注册中心:
class MappingRegistry { //保存RequestMappingInfo和MappingRegistration的映射关系 private final Map<T, MappingRegistration<T>> registry = new HashMap<>(); //保存请求路径和RequestMappingInfo的映射关系 private final MultiValueMap<String, T> pathLookup = new LinkedMultiValueMap<>(); //保存handlerMethodName和handlerMethod的映射关系 private final Map<String, List<HandlerMethod>> nameLookup = new ConcurrentHashMap<>(); //保存handlerMethod和跨域配置的映射关系 private final Map<HandlerMethod, CorsConfiguration> corsLookup = new ConcurrentHashMap<>(); //读写锁 private final ReentrantReadWriteLock readWriteLock = new ReentrantReadWriteLock(); ...- 1
- 2
- 3
- 4
- 5
- 6
- 7
- 8
- 9
- 10
- 11
- 12
- 13
具体注册过程
考虑到并发修改注册中心带来的安全性,这里采用了写锁:
//mapping就是handlerMethod对应的RequestMappingInfo //然后是handler和handlerMethod //ps:这里的handlerMethod指的是handler中的处理请求方法 public void register(T mapping, Object handler, Method method) { this.readWriteLock.writeLock().lock(); try { //对原生处理请求方法进行了一层封装,包装为了一个HandlerMethod HandlerMethod handlerMethod = createHandlerMethod(handler, method); //进行映射校验,判断是否存在模糊映射,即一个请求URL可以同时被多个handlerMethod处理 validateMethodMapping(handlerMethod, mapping); //从RequestMappingInfo中获取当前handlerMethod能够处理的请求URL集合 Set<String> directPaths = AbstractHandlerMethodMapping.this.getDirectPaths(mapping); //将请求路径和RequestMappingInfo的映射关系添加到pathLookUp集合中保存 for (String path : directPaths) { this.pathLookup.add(path, mapping); } // 为HandlerMethod的映射分配名称 // 默认采用:RequestMappingInfoHandlerMethodMappingNamingStrategy 策略来分配名称 // 策略为:@RequestMapping指定了name属性,那就以指定的为准 否则策略为:取出Controller所有的`大写字母` + # + method.getName() // 如:AppoloController#match方法 最终的name为:AC#match String name = null; if (getNamingStrategy() != null) { name = getNamingStrategy().getName(handlerMethod, mapping); addMappingName(name, handlerMethod); } //处理方法上的CrossOrigin跨域注解---这个后面讲到跨域问题的时候再说,本文不展开 CorsConfiguration corsConfig = initCorsConfiguration(handler, method, mapping); if (corsConfig != null) { corsConfig.validateAllowCredentials(); this.corsLookup.put(handlerMethod, corsConfig); } //注册---这里是RequestMappingInfo和封装后的MappingRegistration的映射 this.registry.put(mapping, new MappingRegistration<>(mapping, handlerMethod, directPaths, name, corsConfig != null)); } finally { //释放写锁 this.readWriteLock.writeLock().unlock(); } }- 1
- 2
- 3
- 4
- 5
- 6
- 7
- 8
- 9
- 10
- 11
- 12
- 13
- 14
- 15
- 16
- 17
- 18
- 19
- 20
- 21
- 22
- 23
- 24
- 25
- 26
- 27
- 28
- 29
- 30
- 31
- 32
- 33
- 34
- 35
- 36
- 37
- 38
- 39
- 40
- 41
- 42
- createHandlerMethod
protected HandlerMethod createHandlerMethod(Object handler, Method method) { if (handler instanceof String) { return new HandlerMethod((String) handler, obtainApplicationContext().getAutowireCapableBeanFactory(), obtainApplicationContext(), method); } return new HandlerMethod(handler, method); }- 1
- 2
- 3
- 4
- 5
- 6
- 7
- 8
- 9
- validateMethodMapping
private void validateMethodMapping(HandlerMethod handlerMethod, T mapping) { MappingRegistration<T> registration = this.registry.get(mapping); HandlerMethod existingHandlerMethod = (registration != null ? registration.getHandlerMethod() : null); if (existingHandlerMethod != null && !existingHandlerMethod.equals(handlerMethod)) { throw new IllegalStateException( "Ambiguous mapping. Cannot map '" + handlerMethod.getBean() + "' method \n" + handlerMethod + "\nto " + mapping + ": There is already '" + existingHandlerMethod.getBean() + "' bean method\n" + existingHandlerMethod + " mapped."); } }- 1
- 2
- 3
- 4
- 5
- 6
- 7
- 8
- 9
- 10
小结
到此为止,关于RequestMappingHandlerMapping解析handlerMethod并建立映射关系的前半部分就结束了,总的来说,不是很复杂,spring把整体体系架构设计的很清晰,这一点很值得大家细品。
-
相关阅读:
srpingboot security demo
搜狗输入法安装教程
log4j设置日志的时区
Linux 性能分析工具- Atop安装和使用
Day_15 > 内存相关的函数
多输入分类|GWO-CNN-LSTM|灰狼算法优化的卷积-长短期神经网络分类预测(Matlab)
EMQX Newsletter 2022-08|企业版 5.0 开发进行中、EMQX Kubernetes Operator 2.0 即将发布
C/C++仓库管理系统
Rocketmq学习2——Rocketmq消息过滤&事务消息&延迟消息原理源码浅析
031-从零搭建微服务-监控中心(一)
- 原文地址:https://blog.csdn.net/m0_53157173/article/details/126657122
