-
《Coding Monkey的自我修养》之MyBatis批量插入数据的三种方法
目录

批量插入数据到数据库中在我们日常工作中是一个比较常见的业务功能之一,如果处理不好,会导致插入数据的时间过长或者在插入数据库时出现程序报错等问题,以下,我们通过MyBatis的三种方式来进行数据的批量插入操作,并进行响应的性能测试比较,以及分析其相应的执行原理。
目前MyBatis涉及到的批量插入数据方式有三种,它们分别是:
- 循环单次插入数据。
- MP批量插入数据。
- 原生批量插入数据。
Ready:准备工作
开始之前我们先来创建数据库和测试数据,执行的 SQL 脚本如下:
- -- ----------------------------
- -- 创建数据库
- -- ----------------------------
- SET NAMES utf8mb4;
- SET FOREIGN_KEY_CHECKS = 0;
- DROP DATABASE IF EXISTS `testdb`;
- CREATE DATABASE `testdb`;
- USE `testdb`;
- -- ----------------------------
- -- 创建 user 表
- -- ----------------------------
- DROP TABLE IF EXISTS `user`;
- CREATE TABLE `user` (
- `id` int(11) NOT NULL AUTO_INCREMENT,
- `name` varchar(255) CHARACTER SET utf8mb4 COLLATE utf8mb4_bin NULL DEFAULT NULL,
- `password` varchar(255) CHARACTER SET utf8mb4 COLLATE utf8mb4_bin NULL DEFAULT NULL,
- `createtime` datetime NULL DEFAULT CURRENT_TIMESTAMP,
- PRIMARY KEY (`id`) USING BTREE
- ) ENGINE = InnoDB AUTO_INCREMENT = 6 CHARACTER SET = utf8mb4 COLLATE = utf8mb4_bin ROW_FORMAT = Dynamic;
- -- ----------------------------
- -- 添加测试数据
- -- ----------------------------
- INSERT INTO `user` VALUES (1, '赵云', '123456', '2021-09-10 18:11:16');
- INSERT INTO `user` VALUES (2, '张飞', '123456', '2021-09-10 18:11:28');
- INSERT INTO `user` VALUES (3, '关羽', '123456', '2021-09-10 18:11:34');
- INSERT INTO `user` VALUES (4, '刘备', '123456', '2021-09-10 18:11:41');
- INSERT INTO `user` VALUES (5, '曹操', '123456', '2021-09-10 18:12:02');
- SET FOREIGN_KEY_CHECKS = 1;
数据库的数据最终展示效果如下:

1. 循环单次插入数据
使用 SpringBoot 项目,批量插入 10W 条数据来分别测试各个方法的执行时间。
循环单次插入的(测试)核心代码如下:
- import com.example.demo.model.User;
- import com.example.demo.service.impl.UserServiceImpl;
- import org.junit.jupiter.api.Test;
- import org.springframework.beans.factory.annotation.Autowired;
- import org.springframework.boot.test.context.SpringBootTest;
- @SpringBootTest
- class UserControllerTest {
- // 最大循环次数
- private static final int MAXCOUNT = 100000;
- @Autowired
- private UserServiceImpl userService;
- /**
- * 循环单次插入
- */
- @Test
- void save() {
- long stime = System.currentTimeMillis(); // 统计开始时间
- for (int i = 0; i < MAXCOUNT; i++) {
- User user = new User();
- user.setName("test:" + i);
- user.setPassword("123456");
- userService.save(user);
- }
- long etime = System.currentTimeMillis(); // 统计结束时间
- System.out.println("执行时间:" + (etime - stime));
- }
- }
运行以上程序,花费了 88574 毫秒,如下图所示:

2.MP批量插入数据
MP 批量插入功能核心实现类有三个:UserController(控制器)、UserServiceImpl(业务逻辑实现类)、UserMapper(数据库映射类),它们的调用流程如下:

注意此方法实现需要先添加 MP 框架,打开 pom.xml 文件添加如下内容:
- <dependency>
- <groupId>com.baomidougroupId>
- <artifactId>mybatis-plus-boot-starterartifactId>
- <version>mybatis-plus-latest-versionversion>
- dependency>
注意:mybatis-plus-latest-version 表示 MP 框架的最新版本号,可访问 https://mvnrepository.com/artifact/com.baomidou/mybatis-plus-boot-starter 查询最新版本号,但在使用的时候记得一定要将上面的 “mybatis-plus-latest-version”替换成换成具体的版本号,如 3.4.3 才能正常的引入框架。
<1>控制器实现
- import com.example.demo.model.User;
- import com.example.demo.service.impl.UserServiceImpl;
- import org.springframework.beans.factory.annotation.Autowired;
- import org.springframework.web.bind.annotation.RequestMapping;
- import org.springframework.web.bind.annotation.RestController;
- import java.util.ArrayList;
- import java.util.List;
- @RestController
- @RequestMapping("/u")
- public class UserController {
- @Autowired
- private UserServiceImpl userService;
- /**
- * 批量插入(自定义)
- */
- @RequestMapping("/mysavebatch")
- public boolean mySaveBatch(){
- List
list = new ArrayList<>(); - // 待添加(用户)数据
- for (int i = 0; i < 1000; i++) {
- User user = new User();
- user.setName("test:"+i);
- user.setPassword("123456");
- list.add(user);
- }
- return userService.saveBatchCustom(list);
- }
- }
<2>业务逻辑层实现
- import com.baomidou.mybatisplus.extension.service.impl.ServiceImpl;
- import com.example.demo.mapper.UserMapper;
- import com.example.demo.model.User;
- import com.example.demo.service.UserService;
- import org.springframework.beans.factory.annotation.Autowired;
- import org.springframework.stereotype.Service;
- import java.util.List;
- @Service
- public class UserServiceImpl extends ServiceImpl
- implements UserService {
- @Autowired
- private UserMapper userMapper;
- public boolean saveBatchCustom(List
list) { - return userMapper.saveBatchCustom(list);
- }
- }
<3>数据持久层实现
- import com.baomidou.mybatisplus.core.mapper.BaseMapper;
- import com.example.demo.model.User;
- import org.apache.ibatis.annotations.Mapper;
- import java.util.List;
- @Mapper
- public interface UserMapper extends BaseMapper
{ - boolean saveBatchCustom(List
list) ; - }
经过以上代码实现,我们就可以使用 MP 来实现数据的批量插入功能了,但本篇除了具体的实现代码之外,我们还要知道每种方法的执行效率,所以接下来我们来编写 MP 的测试代码。
MP 性能测试
- import com.example.demo.model.User;
- import com.example.demo.service.impl.UserServiceImpl;
- import org.junit.jupiter.api.Test;
- import org.springframework.beans.factory.annotation.Autowired;
- import org.springframework.boot.test.context.SpringBootTest;
- import java.util.ArrayList;
- import java.util.List;
- @SpringBootTest
- class UserControllerTest {
- // 最大循环次数
- private static final int MAXCOUNT = 100000;
- @Autowired
- private UserServiceImpl userService;
- /**
- * MP 批量插入
- */
- @Test
- void saveBatch() {
- long stime = System.currentTimeMillis(); // 统计开始时间
- List
list = new ArrayList<>(); - for (int i = 0; i < MAXCOUNT; i++) {
- User user = new User();
- user.setName("test:" + i);
- user.setPassword("123456");
- list.add(user);
- }
- // MP 批量插入
- userService.saveBatch(list);
- long etime = System.currentTimeMillis(); // 统计结束时间
- System.out.println("执行时间:" + (etime - stime));
- }
- }
以上程序的执行总共花费了 6088 毫秒,如下图所示:

从上述结果可知,使用 MP 的批量插入功能(插入数据 10W 条),它的性能比循环单次插入的性能提升了 14.5 倍。
MP 源码分析
从 MP 和循环单次插入的执行时间我们可以看出,使用 MP 并不是像有些朋友认为的那样,还是循环单次执行的,为了更清楚的说明此问题,我们查看了 MP 的源码。
MP 的核心实现代码是 saveBatch 方法,此方法的源码如下:

继续跟进 saveBatch 的重载方法:
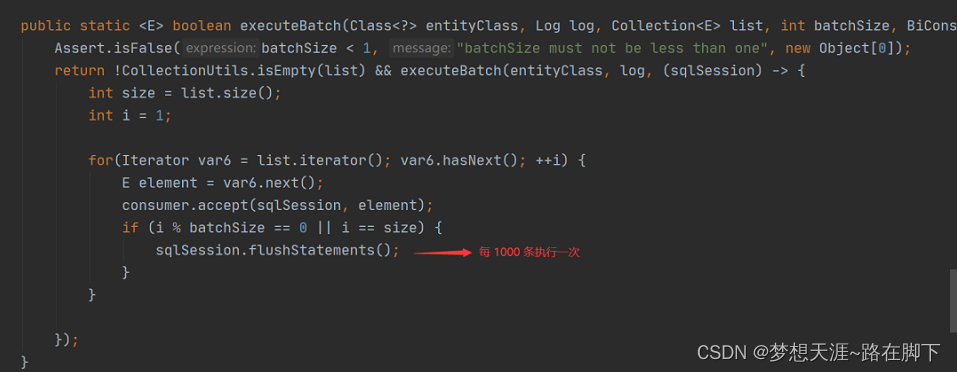
从上述源码可以看出,MP 是将要执行的数据分成 N 份,每份 1000 条,每满 1000 条就会执行一次批量插入,所以它的性能要比循环单次插入的性能高很多。
那为什么要分批执行,而不是一次执行?别着急,当我们看了第 3 种实现方法之后我们就明白了。
3.原生批量插入
原生批量插入方法是依靠 MyBatis 中的 foreach 标签,将数据拼接成一条原生的 insert 语句一次性执行的,核心实现代码如下。
<1>业务逻辑层扩展
在 UserServiceImpl 添加 saveBatchByNative 方法,实现代码如下:
- import com.baomidou.mybatisplus.extension.service.impl.ServiceImpl;
- import com.example.demo.mapper.UserMapper;
- import com.example.demo.model.User;
- import com.example.demo.service.UserService;
- import org.springframework.beans.factory.annotation.Autowired;
- import org.springframework.stereotype.Service;
- import java.util.List;
- @Service
- public class UserServiceImpl extends ServiceImpl
- implements UserService {
- @Autowired
- private UserMapper userMapper;
- public boolean saveBatchByNative(List
list) { - return userMapper.saveBatchByNative(list);
- }
- }
<2>数据持久层扩展
在 UserMapper 添加 saveBatchByNative 方法,实现代码如下:
- import com.baomidou.mybatisplus.core.mapper.BaseMapper;
- import com.example.demo.model.User;
- import org.apache.ibatis.annotations.Mapper;
- import java.util.List;
- @Mapper
- public interface UserMapper extends BaseMapper
{ - boolean saveBatchByNative(List
list) ; - }
<3>添加UserMapper.xml
创建 UserMapper.xml 文件,使用 foreach 标签拼接 SQL,具体实现代码如下:
- "1.0" encoding="UTF-8"?>
- mapper PUBLIC "-//mybatis.org//DTD Mapper 3.0//EN" "http://mybatis.org/dtd/mybatis-3-mapper.dtd">
- <mapper namespace="com.example.demo.mapper.UserMapper">
- <insert id="saveBatchByNative">
- INSERT INTO `USER`(`NAME`,`PASSWORD`) VALUES
- <foreach collection="list" separator="," item="item">
- (#{item.name},#{item.password})
- foreach>
- insert>
- mapper>
经过以上步骤,我们原生的批量插入功能就实现的差不多了,接下来我们使用单元测试来查看一下此方法的执行效率。
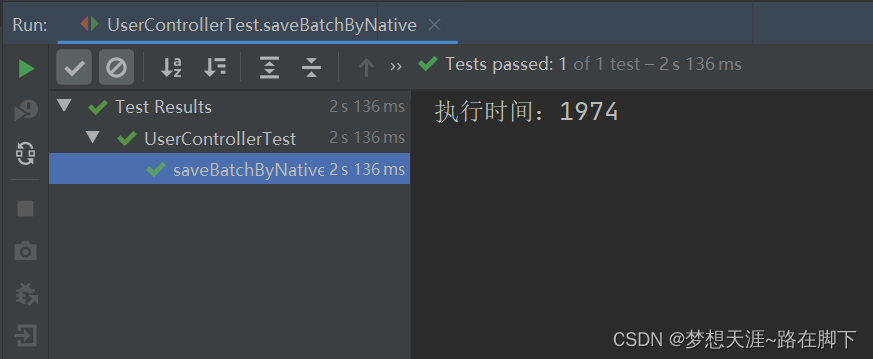
原生批量插入性能测试
- import com.example.demo.model.User;
- import com.example.demo.service.impl.UserServiceImpl;
- import org.junit.jupiter.api.Test;
- import org.springframework.beans.factory.annotation.Autowired;
- import org.springframework.boot.test.context.SpringBootTest;
- import java.util.ArrayList;
- import java.util.List;
- @SpringBootTest
- class UserControllerTest {
- // 最大循环次数
- private static final int MAXCOUNT = 100000;
- @Autowired
- private UserServiceImpl userService;
- /**
- * 原生自己拼接 SQL,批量插入
- */
- @Test
- void saveBatchByNative() {
- long stime = System.currentTimeMillis(); // 统计开始时间
- List
list = new ArrayList<>(); - for (int i = 0; i < MAXCOUNT; i++) {
- User user = new User();
- user.setName("test:" + i);
- user.setPassword("123456");
- list.add(user);
- }
- // 批量插入
- userService.saveBatchByNative(list);
- long etime = System.currentTimeMillis(); // 统计结束时间
- System.out.println("执行时间:" + (etime - stime));
- }
- }
然而,当我们运行程序时却发生了以下情况:

程序执行报错了....???
报错原因分析
从上述报错信息可以看出,当我们使用原生方法将 10W 条数据拼接成一个 SQL 执行时,由于拼接的 SQL 过大(4.56M)从而导致程序执行报错,因为默认情况下 MySQL 可以执行的最大 SQL(大小)为 4M,所以程序就报错了。这就是原生批量插入方法的缺点,也是为什么 MP 需要分批执行的原因,就是为了防止程序在执行时,因为触发了数据库的最大执行 SQL 而导致程序执行报错。
扩展延伸,可以参考我的另外一篇博客,关于MyBatis在PostgreSQL的中批量插入数据时出现数据上限问题如何解决:PostgreSQL的SQL语句参数上限 An I/O error occurred while sending to the backend_梦想天涯~路在脚下的博客-CSDN博客
解决方案
当然我们也可以通过设置 MySQL 的最大执行 SQL 来解决报错的问题,设置命令如下:
- -- 设置最大执行 SQL 为 10M
- set global max_allowed_packet=10*1024*1024;
如下图所示:

注意:以上命令需要在 MySQL 连接的客户端中执行。
但以上解决方案仍是治标不治本,因为我们无法预测程序中最大的执行 SQL 到底有多大,那么最普世的方法就是分配执行批量插入的方法了(也就是像 MP 实现的那样)。
当我们将 MySQL 的最大执行 SQL 设置为 10M 之后,运行以上单元测试代码,执行的结果如下:
扩展知识:
MySQL一次能接收的SQL最大长度是多少?
在MySQL 5.7中
最大接收默认值为 4M=4194304=4*1024*1024,由系统变量max_allowed_packet 控制。
show global variables like 'max_allowed_packet';
SQL 长度超过这个值,执行会发生什么?
- SQL 错误 [S1000]: Packet for query is too large (4,202,590 > 4,194,304).
- You can change this value on the server by setting the 'max_allowed_packet' variable.
从以上结果可以看出,查询SQL 太长,MySQL API 返回了异常,提示query 超过了max_allowed_packet 允许的最大值。

max_allowed_packet 最大值为1G,最小值为1K,默认值为4M,值为1024的倍数。
那么在MySQL 8.0 是不是与5.7 也是一样的?
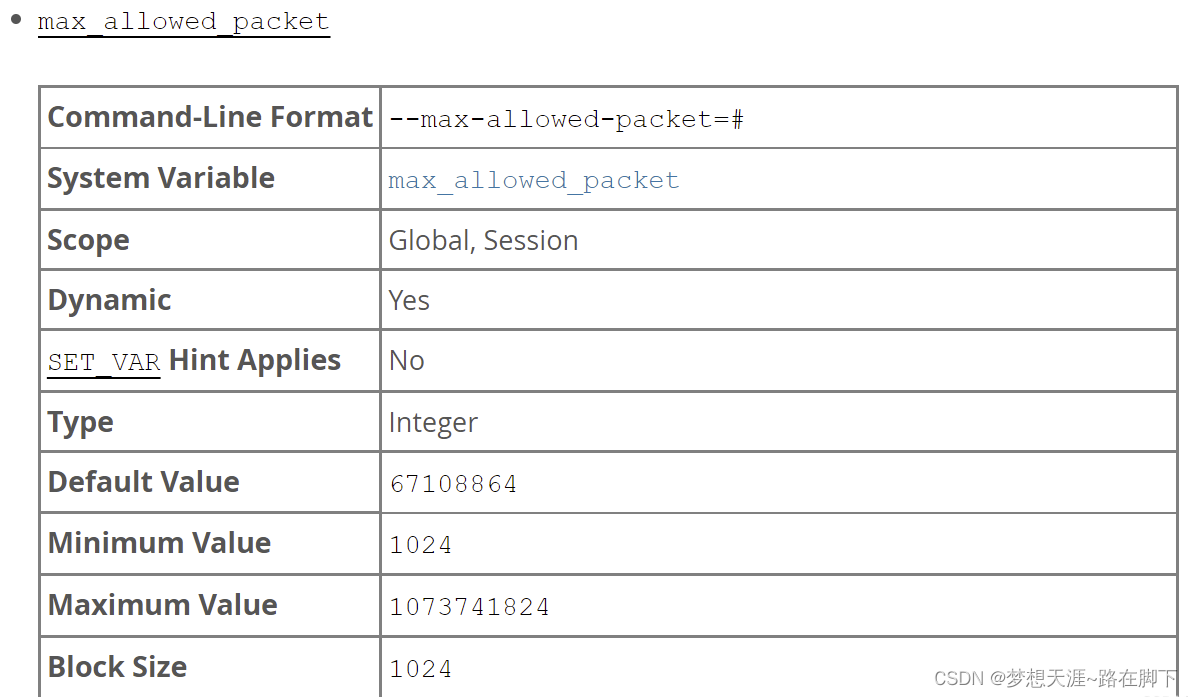
从上可以看出,MySQL 8.0 开始,默认值已经增大到了64M;但最大值还是1G,最小值是1K,值仍是1024的倍数 ,没有改变。
总结
序号 插入数据方式 10W条数据耗时 利弊分析 1 循环单次插入数据 88574毫秒(约88.574秒) 性能最低,显然这种是不可取的,如此长的耗时,在实际业务场景中是不允许出现的。 2 MP批量插入数据 6088毫秒(约6.088秒) MP在底层已经对可能出现的问题进行了风险规避,虽然在性能耗时上逊色于原生批量插入的方式,但不失为我们实际业务中进行大批量数据插入的最好选择。 3 原生批量插入数据 1974毫秒(约1.974秒) MyBatis 拼接原生 SQL 一次性插入的方法性能最高,但此方法可能会导致程序执行报错(触发了数据库最大执行 SQL 大小的限制,虽然我们可以通过调整最大执行SQL的大小,是治标不治本,因为我们无法预测程序中最大的执行 SQL 到底有多大。) 参考:Java中文社群
-
相关阅读:
y50.第三章 Kubernetes从入门到精通 -- k8s实战案例(二三)
基于ssm的在线法律咨询平台的设计与实现
Lanbda表达式
ChatGPT App迎来重大更新;人工智能应用于应对气候变化
Redis安装
SignalR中的重连机制和心跳监测机制详解
2023-9-10 能被整除的数
后端 --- Elasticsearch学习笔记(入门篇)
自学(网络安全)黑客——高效学习2024
【Java】状态修饰符 final & static
- 原文地址:https://blog.csdn.net/qq_26420601/article/details/126656190