-
【IMX6ULL笔记】-- GDB安装和VSCode图形调试
GDB 简介
GDB是GNU开源组织发布的一个强大的UNIX下的程序调试工具。
GDB 移植
方法1:
若ubuntu装了交叉编译器(正常来说肯定是装了的),那么就已经集成了自带gdb,只需要将gdbserver拷贝到开发板文件系统指定目录/bin/

测试gdb相关信息

方法2:
这个比较麻烦,需要官方网站获取 gdb 和 gdbserver 源码,路径地址:Download GDB (sourceware.org)
解压编译步骤:
tar -vxzf gdb-9.1.tar.gz //解压后生成gdb-9.1 cd gdb-9.1 mkdir build //需在gdb下新建 build 目录 cd build ../configure --target=arm-linux-gnueabihf --prefix=/home/l17/tool/gdb make //编译 make install //安装- 1
- 2
- 3
- 4
- 5
- 6
- 7
可能会出现问题:
gdb-9.1/missing: makeinfo: not found ... Makefile:490: recipe for target 'gdb.info' failed make[4]: *** [gdb.info] Error 127 ... Makefile:2006: recipe for target 'subdir_do' failed make[3]: *** [subdir_do] Error 1 ... Makefile:851: recipe for target 'all' failed make: *** [all] Error 2- 1
- 2
- 3
- 4
- 5
- 6
- 7
- 8
- 9
- 10
解决办法:
sudo apt install texinfo- 1
交叉编译gdbserver,执行完下面命令后会生成 gdbserver,将gdbserver拷贝到开发板文件系统指定目录/bin/ (建议方法1)
cd gdb-9.1/gdb/gdbserver //进入到 gdbserver 目录 ./configure --target=arm-linux-gnueabihf --host=arm-linux-gnueabihf make CC=arm-linux-gnueabihf-gcc //交叉编译 gdbserver- 1
- 2
- 3
添加环境变量
配置完成后,需要进入ubuntu的/etc/profile修改环境变量
方法1:因为安装了工具链,通常不需要做任何修改 export PATH=/usr/local/arm/gcc-linaro-4.9.4-2017.01-x86_64_arm-linux-gnueabihf/bin:$PATH 方法2:确定当前 export PATH=/usr/local/arm/gcc-linaro-4.9.4-2017.01-x86_64_arm-linux-gnueabihf/bin:/home/ l17/tool/gdb/bin:$PATH- 1
- 2
- 3
- 4
- 5
调试测试
写个简单的应用
/**************************************Start of file************************************/ /*-------------------------------------------------------------------------------------- Includes */ #include#include int main(int argc, char *argv[]) { unsigned int timerCnt = 0; while(1) { printf("system runing times:%d\r\n", timerCnt); timerCnt++; sleep(1); } } /****************************************End of file************************************/ - 1
- 2
- 3
- 4
- 5
- 6
- 7
- 8
- 9
- 10
- 11
- 12
- 13
- 14
- 15
- 16
- 17
- 18
- 19
- 20
- 21
- 22
- 23
- 24
- ubuntu交叉编译gdbApp.c输出执行文件
arm-linux-gnueabihf-gcc gdbApp.c -o gdbApp -g- 1
- 将执行文件拷贝到开发板(文件系统nfs)
cp gdbApp /home/l17/nfs/rootfs/- 1
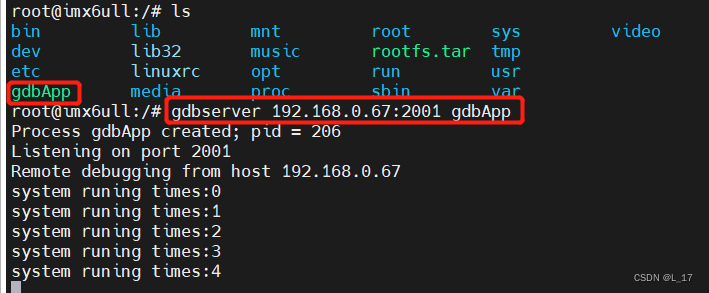
- 启动开发板,执行gdb服务命令(输入调试主机,也就ubuntu ip地址)
gdbserver 192.168.0.67:2001 gdbApp //启动开发板上的 gdbserver- 1
- ubuntu启动gdb调试指定代码
arm-linux-gnueabihf-gdb gdbApp- 1
- gdb窗口输入如下命令,连接调试设备(需知调试设备ip地址)
target remote 192.168.0.50:2001- 1

使用gdb相关命令执行调试工作(具体可以百度)
- l 命令,擦寻源码
- b命令,设置调试断点
- c命令,执行下一个断点
- q命令,退出调试
基于VSCode 界面调试
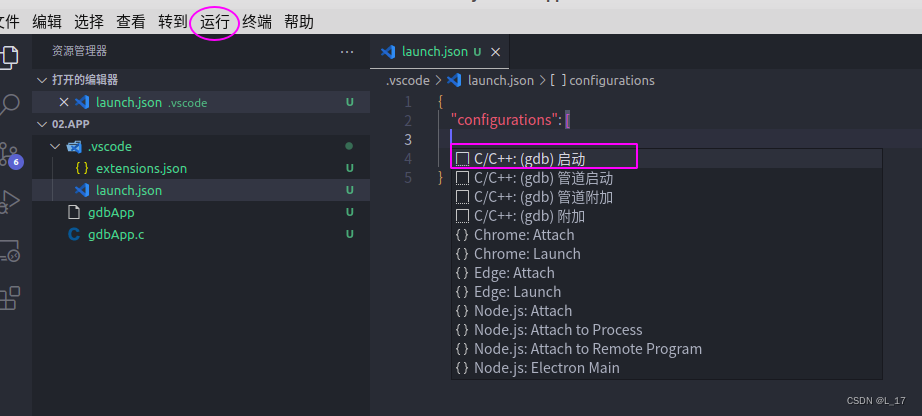
- 新建文件夹: .vscode,新建文件:launch.json

- 运行->添加配置 选择:c/c++:(gdb)启动,会自动生成配置信息(若需要知道红色字体具体描述啥意思,鼠标指向它会有提示信息,vscode yyds)
- 修改生成的配置信息,修改信息如下:
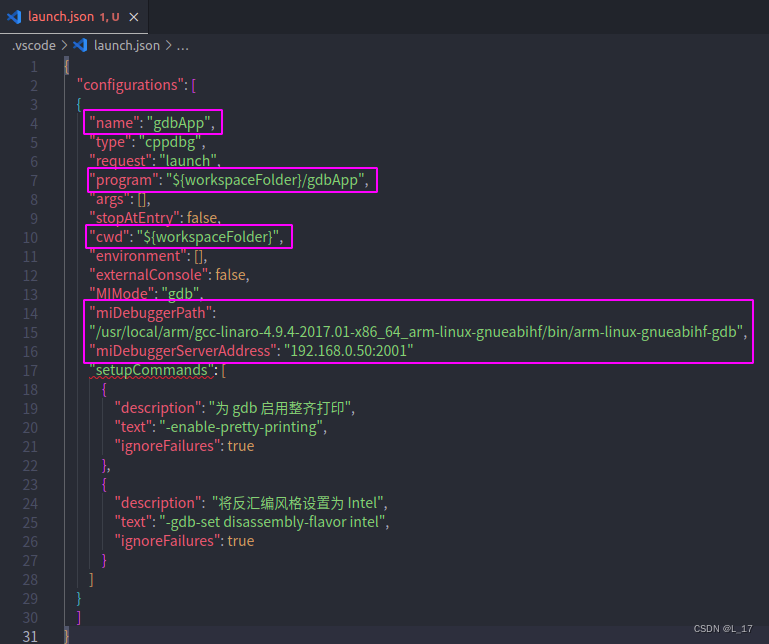
{ "configurations": [ { "name": "gdbApp", "type": "cppdbg", "request": "launch", "program": "${workspaceFolder}/gdbApp", "args": [], "stopAtEntry": false, "cwd": "${workspaceFolder}", "environment": [], "externalConsole": false, "MIMode": "gdb", "miDebuggerPath": "/usr/local/arm/gcc-linaro-4.9.4-2017.01-x86_64_arm-linux-gnueabihf/bin/arm-linux-gnueabihf-gdb", "miDebuggerServerAddress": "192.168.0.50:2001" "setupCommands": [ { "description": "为 gdb 启用整齐打印", "text": "-enable-pretty-printing", "ignoreFailures": true }, { "description": "将反汇编风格设置为 Intel", "text": "-gdb-set disassembly-flavor intel", "ignoreFailures": true } ] } ] }- 1
- 2
- 3
- 4
- 5
- 6
- 7
- 8
- 9
- 10
- 11
- 12
- 13
- 14
- 15
- 16
- 17
- 18
- 19
- 20
- 21
- 22
- 23
- 24
- 25
- 26
- 27
- 28
- 29
- 30
- 31
运行调试
- 启动开发板,执行gdb服务命令(输入调试主机,也就ubuntu ip地址)
gdbserver 192.168.0.67:2001 gdbApp //启动开发板上的 gdbserver- 1
- 运行->启动调试
这下可以像 keil iar ccs vs 等等ide工具一样使用

参考:正点原子驱动开发指南等文档 -
相关阅读:
LeetCode 496. Next Greater Element I
SpringBoot整合Mybatis-Plus(含自动配置分析)
【ICML 2018】Noise2Noise: Learning Image Restoration without Clean Data
【Python】Python 时域到频域的变换方法
企微自动群发软件:提升企业沟通效率的新利器
阿里云安全恶意程序检测(速通二)
【数理统计实验(三)】假设检验的R实现
FPGA的数字钟带校时闹钟报时功能VHDL
电脑屏幕亮度怎么调节?台式电脑找不到屏幕亮度怎么办
引线连接不紧都可能导致变压器直流电阻不平衡率超标
- 原文地址:https://blog.csdn.net/weixin_38426553/article/details/126633280
