-
Vue.extend()实现每个页面弹框
官网照明:API — Vue.js
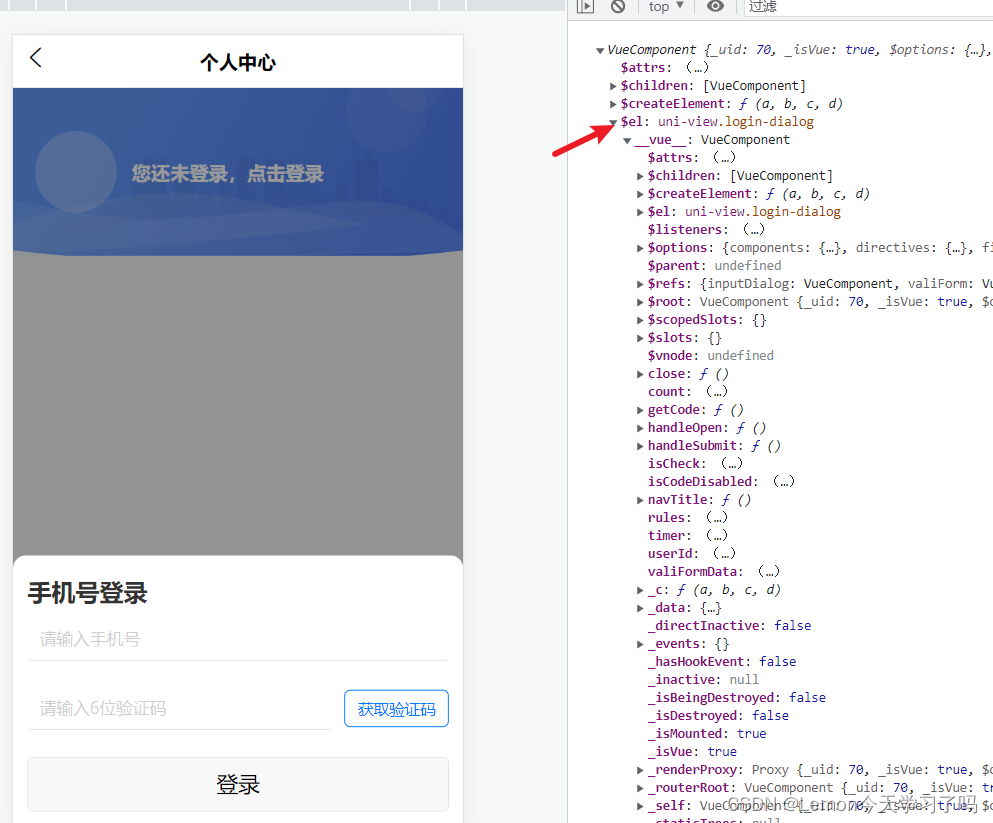
使用场景:使用基础 Vue 构造器,创建一个“子类”。当项目中想要每个页面或者特定的多个页面弹出、出现xxx内容时,可以使用Vue.extend()实现。
- 场景1:只要登录后才能实现收藏,想在所有涉及到收藏的页面判断是否登录,没有登录的在点击收藏时弹出登录框。
- 场景2:给每个页面增加一个回到首页的悬浮按钮。
代码实现:
- 先建一个LoginModal.vue文件将弹框内容实现;
- <template>
- <view class="login-dialog">
- <uni-popup class="login-popup" ref="inputDialog">
- <view class="login-title">手机号登录view>
- <uni-forms ref="valiForm" :rules="rules" :modelValue="valiFormData">
- <uni-forms-item name="mobilePhone">
- <uni-easyinput trim="all" type="tel" v-model="valiFormData.name" focus placeholder="请输入手机号" />
- uni-forms-item>
- <uni-forms-item name="validateCode">
- <view class="form-item">
- <uni-easyinput trim="all" v-model="valiFormData.age" placeholder="请输入6位验证码" />
- <button class="form-item-code" type="primary" size="mini" plain="true" @click="getCode()" :disabled="isCodeDisabled">
- {{ !isCodeDisabled ? '获取验证码' : count + 's' + '重新获取' }}
- button>
- view>
- uni-forms-item>
- uni-forms>
- <button @click="handleSubmit('valiForm')">登录button>
- uni-popup>
- view>
- template>
- <script>
- export default {
- data() {
- return {
- isCheck: '',
- valiFormData: {
- mobilePhone: '',
- validateCode: '',
- },
- count: 60,
- timer: null,
- isCodeDisabled: false,
- userId: '',
- // 校验规则
- rules: {
- mobilePhone: {
- rules: [
- {
- required: true,
- errorMessage: '手机号码不能为空',
- },
- {
- pattern: /^[1]([3-9])[0-9]{9}$/,
- errorMessage: '手机号不合法!',
- },
- ],
- },
- validateCode: {
- rules: [
- {
- required: true,
- errorMessage: '验证码不能为空',
- },
- {
- format: 'number',
- maxLength: 6,
- errorMessage: '验证码只能输入6个数字',
- },
- ],
- },
- },
- };
- },
- methods: {
- handleOpen() {
- this.$refs.inputDialog.open('bottom');
- },
- close() {
- this.$refs.inputDialog.close();
- },
- //获取短信验证码
- getCode() {
- this.$refs.valiForm
- .validateField(['mobilePhone'])
- .then(res => {
- if (!this.timer) {
- // 验证码接口
- this.$api.getPhoneCode({ mobilePhone: res.mobilePhone }).then(res => {
- if (res.result == 1) {
- this.$msg.success('手机短信已发送!');
- } else {
- this.$msg.error('服务器错误!');
- }
- });
- this.isCodeDisabled = true;
- this.timer = setInterval(() => {
- if (this.count > 0 && this.count <= 60) {
- this.count--;
- } else {
- this.isCodeDisabled = false;
- clearInterval(this.timer);
- this.timer = null;
- this.count = 60;
- }
- }, 1000);
- }
- })
- .catch(err => {
- console.log(err);
- });
- },
- handleSubmit(ref) {
- this.$refs[ref]
- .validate()
- .then(res => {
- // 登录接口
- this.$api
- .login({
- mobilePhone: res.mobilePhone,
- validateCode: res.validateCode,
- })
- .then(res => {
- if (res && res.ID_) {
- this.$msg.success('登录成功!');
- this.$refs.inputDialog.close();
- location.reload();
- } else {
- this.$msg.error(res.message);
- this.userId = '';
- res.validateCode = '';
- }
- });
- })
- .catch(err => {
- console.log('err', err);
- });
- },
- },
- };
- script>
- 创建一个LoginModal.js文件来将实例构造器挂载在页面上;
- import Vue from "vue";
- import Login from '@/pages/LoginModal.vue';
- // 1.使用基础 Vue 构造器,创建一个“子类”;
- const LoginModal = Vue.extend(Login);
- const LoginModalBox = (options = {}) => {
- // 2.创建 LoginModal 实例;
- let instance = new LoginModal(); //无传参
- // let instance = new LoginModal({
- // data: {
- // ...options, //有传参
- // },
- // });
- // 3.实例构造器需要进行挂载到页面中;
- instance.$mount();
- // 4.通过$el属性来访问创建的组件实例;
- document.body.appendChild(instance.$el);
- console.log(instance, 'instance');
- return instance;
- };
- // 5.两种方式将逻辑函数进行暴露,并且在mian.js引入挂载到全局;
- // 5-1.Vue.prototype直接暴露;
- export default LoginModalBox;
- // 5-2. vue.use()的install()暴露对象;
- export default {
- install: (Vue) => {
- Vue.prototype.$loginModal = LoginModalBox;
- },
- };

- 在mian.js引入挂载到全局;
- 如果是使用的5-1的方式直接暴露,则在main.js中直接写:Vue.prototype.$loginModal = LoginModalBox;
- 如果是使用的5-2的install()方法来暴露一个对象,则在main.js中直接写:Vue.use(LoginModalBox);
- import Vue from 'vue';
- import store from './store/index'
- import App from './App.vue';
- import router from './router';
- import LoginModalBox from '@/core/LoginModal.js'
- Vue.config.productionTip = false;
- // 方法一:在原型上定义,使其在每个Vue中的实例中可用;
- Vue.prototype.$loginModal = LoginModalBox;
- // 方法二:使用Vue.use
- // Vue.use(LoginModalBox);
- new Vue({
- router,
- store,
- render: h => h(App),
- }).$mount('#app')
- 使用创建的‘子类’;
- handleLogin() {
- // 直接调用loginModal页面的方法
- this.$loginModal().handleOpen();
- },
知识点:Vue.use 与 Vue.prototype 的区别
- Vue.prototype是在原型上定义,使其在每个Vue中的实例中可用。
- Vue.use()方法的核心就是Vue.prototype,只不过又封装了一层,执行
install方法,更加的灵活,扩展性更好。 - 两者没有本质区别。Vue.prototype适合于注册Vue生态外的插件,Vue.use适合于注册Vue生态内的插件。
-
相关阅读:
C++:哈希表和哈希桶
测试用例的书写方式以及测试模板大全
PD充电驱动解析
【使用 Python 实现算法】01 语言特性
【QT】入门心法
前端基础(三十六):你不知道的JavaScript - 原型
stream流参数总结
第六章《类的高级特性》第4节:抽象类
1、HTML——初识HTML、HTML的定义、HTML5
WPF的路由事件
- 原文地址:https://blog.csdn.net/weixin_47978760/article/details/126579516
