-
使用spring cloud config来统一管理配置文件
当一个系统中的配置文件发生改变的时候,我们需要重新启动该服务,才能使得新的配置文件生效,spring cloud config可以实现微服务中的所有系统的配置文件的统一管理,而且还可以实现当配置文件发生变化的时候,系统会自动更新获取新的配置。
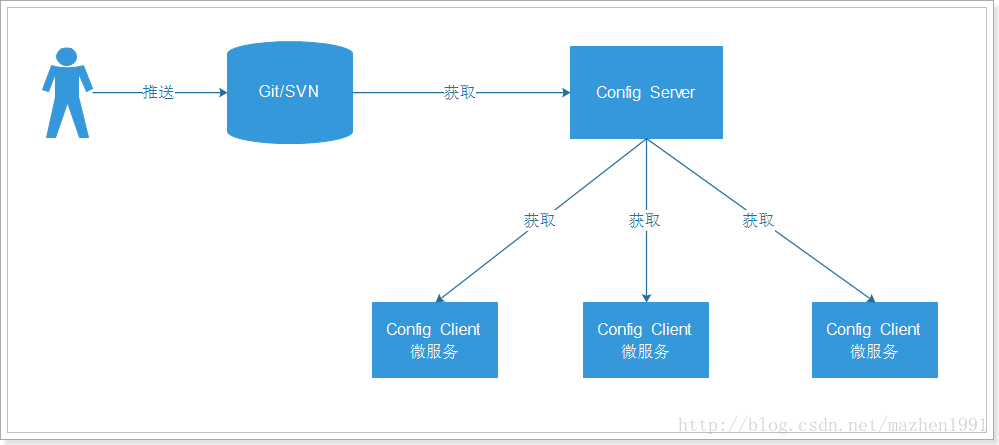
其架构原理图大致如下:

我们将配置文件放入git或者svn等服务中,通过一个Config Server服务来获取git中的配置数据,而我们需要使用的到配置文件的Config Client系统可以通过Config Server来获取对应的配置。
下面我们通过一个示例来演示一下config是如何被各个微服务系统获取到的。
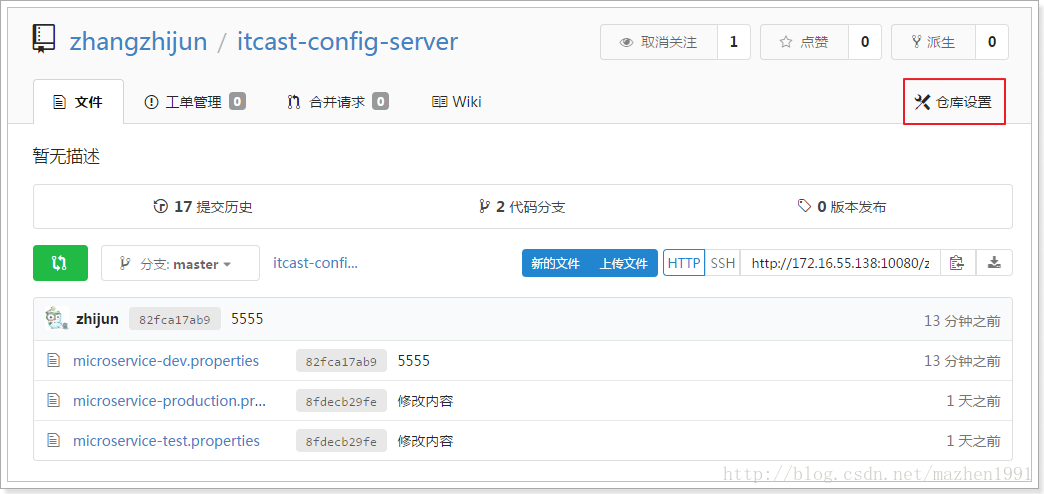
1.向git中上传示例配置文件
jdbc.driverClassName=com.mysql.jdbc.Driver jdbc.url=jdbc:mysql://127.0.0.1:3306/taotao?useUnicode=true&characterEncoding=utf8&autoReconnect=true&allowMultiQueries=true jdbc.username=root jdbc.password=root- 1
- 2
- 3
- 4
文件名分别为:
microservice-dev.properties microservice-production.properties microservice-test.properties- 1
- 2
- 3
对应不同的三个环境。
该文件的命名规则是:{application}-{profile}.properties2.搭建Config Server
2.1 添加依赖
org.springframework.boot spring-boot-starter-parent 1.5.4.RELEASE org.springframework.cloud spring-cloud-dependencies Dalston.SR3 pom import org.springframework.cloud spring-cloud-starter-eureka-server com.fasterxml.jackson.dataformat jackson-dataformat-xml org.springframework.cloud spring-cloud-config-server org.springframework.cloud spring-cloud-starter-bus-amqp ${project.artifactId} org.apache.maven.plugins maven-resources-plugin UTF-8 org.apache.maven.plugins maven-compiler-plugin 1.8 1.8 UTF-8 - 1
- 2
- 3
- 4
- 5
- 6
- 7
- 8
- 9
- 10
- 11
- 12
- 13
- 14
- 15
- 16
- 17
- 18
- 19
- 20
- 21
- 22
- 23
- 24
- 25
- 26
- 27
- 28
- 29
- 30
- 31
- 32
- 33
- 34
- 35
- 36
- 37
- 38
- 39
- 40
- 41
- 42
- 43
- 44
- 45
- 46
- 47
- 48
- 49
- 50
- 51
- 52
- 53
- 54
- 55
- 56
- 57
- 58
- 59
- 60
- 61
- 62
- 63
- 64
2.2 编写ConfigApplication
@EnableDiscoveryClient @EnableConfigServer //开启配置服务 @SpringBootApplication public class ConfigApplication { public static void main(String[] args) { SpringApplication.run(ConfigApplication.class, args); } }- 1
- 2
- 3
- 4
- 5
- 6
- 7
- 8
- 9
- 10
2.3 编写yml配置文件
server: port: 6688 #服务端口 spring: application: name: microservice-config-server #指定服务名 cloud: config: server: git: #配置git仓库地址 uri: 具体的配置文件的git地址 #username: #password: rabbitmq: #RabbitMQ相关的配置 host: 127.0.0.1 port: 5672 username: guest password: guest eureka: client: registerWithEureka: true #是否将自己注册到Eureka服务中,默认为true fetchRegistry: true #是否从Eureka中获取注册信息,默认为true serviceUrl: #Eureka客户端与Eureka服务端进行交互的地址 defaultZone: http://cloud:cloud@127.0.0.1:6868/eureka/ instance: prefer-ip-address: true #将自己的ip地址注册到Eureka服务中 ipAddress: 127.0.0.1 management: security: enabled: false #是否开启actuator安全认证- 1
- 2
- 3
- 4
- 5
- 6
- 7
- 8
- 9
- 10
- 11
- 12
- 13
- 14
- 15
- 16
- 17
- 18
- 19
- 20
- 21
- 22
- 23
- 24
- 25
- 26
- 27
- 28
- 29
- 30
- 31
这是我们启动该服务,访问该配置文件,访问路径示例如下(以该配置为例):
127.0.0.1:6688/microservice-dev.properties访问路径的写法也有多种方式:
/{application}/{profile}/[label] /{application}-{profile}.yml /{label}/{application}-{profile}.yml /{application}-{profile}.properties /{label}/{application}-{profile}.properties 其中{label}是指分支,默认是master。- 1
- 2
- 3
- 4
- 5
- 6
3. Config Client的搭建
3.1 添加依赖org.springframework.cloud spring-cloud-starter-config org.springframework.boot spring-boot-starter-actuator org.springframework.cloud spring-cloud-starter-bus-amqp - 1
- 2
- 3
- 4
- 5
- 6
- 7
- 8
- 9
- 10
- 11
- 12
3.2 添加yml配置文件
eureka: client: serviceUrl: #Eureka客户端与Eureka服务端进行交互的地址 defaultZone: http://cloud:cloud@127.0.0.1:6868/eureka/ spring: cloud: config: name: microservice #对应的配置服务中的应用名称 profile: dev #对应配置服务中的{profile} label: master #对应的分支 discovery: enabled: true #启用发现服务功能 service-id: microservice-config-server #指定服务名称 spring: application: name: itcasst-microservice-config-server #指定服务名 cloud: config: server: git: #配置git仓库地址 uri: http://172.16.55.138:10080/zhangzhijun/itcast-config-server.git #username: zhangzhijun #password: 123456 rabbitmq: #RabbitMQ相关的配置 host: 127.0.0.1 port: 5672 username: guest password: guest- 1
- 2
- 3
- 4
- 5
- 6
- 7
- 8
- 9
- 10
- 11
- 12
- 13
- 14
- 15
- 16
- 17
- 18
- 19
- 20
- 21
- 22
- 23
- 24
- 25
- 26
- 27
- 28
注意,这里的yml配置文件是:bootstrap.yml,它和application.yml文件一样,会被spring boot加载,但是bootstrap.yml会优先加载。
3.3 在application.yml文件中添加配置
management: security: enabled: false #是否开启actuator安全认证- 1
- 2
- 3
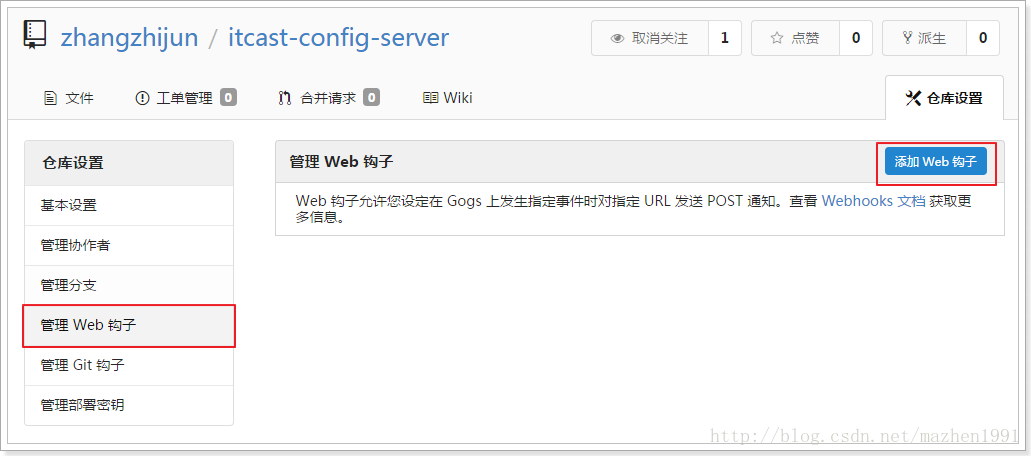
3.4 利用git的webhook实现实时更新通知


这个时候,我么通过@Value的方式,就可以获取到对应的配置了。
@RefreshScope @Component//加入到Spring容器 public class JdbcConfigBean { @Value("${jdbc.url}") private String url; @Value("${jdbc.username}") private String username; @Value("${jdbc.password}") private String password; @Value("${jdbc.driverClassName}") private String driverClassName; public String getUrl() { return url; } public void setUrl(String url) { this.url = url; } public String getUsername() { return username; } public void setUsername(String username) { this.username = username; } public String getPassword() { return password; } public void setPassword(String password) { this.password = password; } public String getDriverClassName() { return driverClassName; } public void setDriverClassName(String driverClassName) { this.driverClassName = driverClassName; } @Override public String toString() { return "JdbcConfigBean [url=" + url + ", username=" + username + ", password=" + password + ", driverClassName=" + driverClassName + "]"; } }- 1
- 2
- 3
- 4
- 5
- 6
- 7
- 8
- 9
- 10
- 11
- 12
- 13
- 14
- 15
- 16
- 17
- 18
- 19
- 20
- 21
- 22
- 23
- 24
- 25
- 26
- 27
- 28
- 29
- 30
- 31
- 32
- 33
- 34
- 35
- 36
- 37
- 38
- 39
- 40
- 41
- 42
- 43
- 44
- 45
- 46
- 47
- 48
- 49
- 50
- 51
- 52
- 53
- 54
- 55
- 56
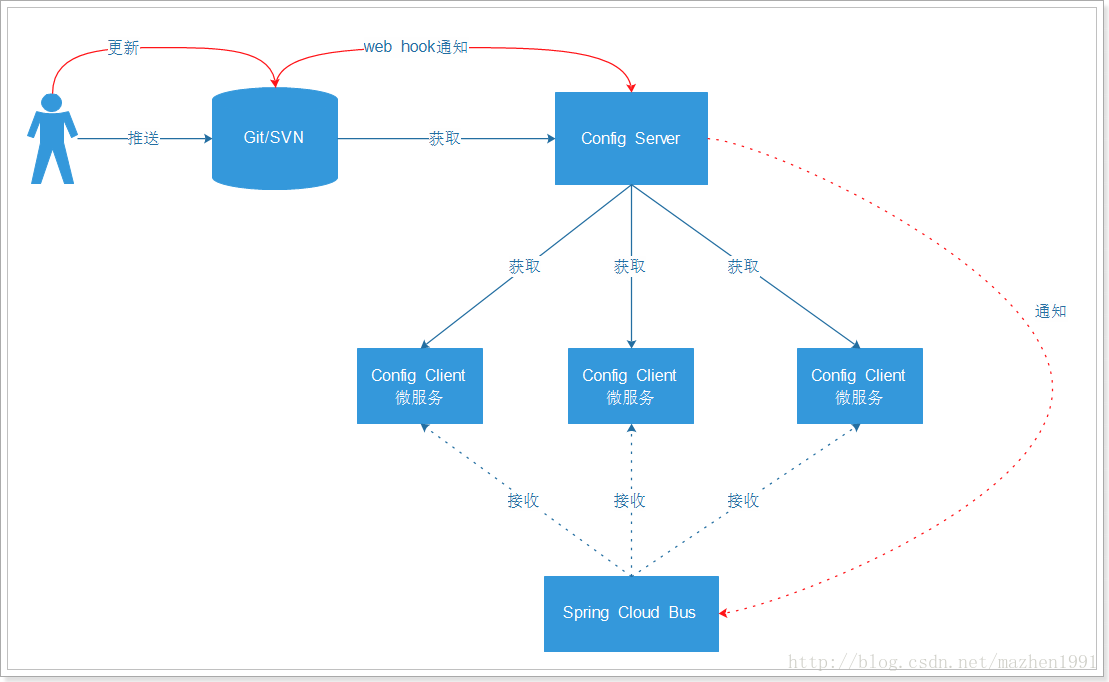
再次测试,我们发现当我们修改了git中的配置文件的内容之后,client系统中读取到的属性也是修改之后的了。
到此为止,其架构变成如下:

-
相关阅读:
lr_paramarr_len+ 取随机值 用法
2022年Redis最新面试题第6篇 - Redis淘汰策略
网络安全筑基篇——文件上传
3D封装技术发展
疫苗预约系统毕业设计,疫苗预约系统设计源码,疫苗预约系统开题报告需求分析
Java面向对象:设计对象、注意事项
JavaScript操作DOM元素的一些基础方法与属性
【Vue】利用vue.js、vuex和vue router组件、element ui plus组件来创建基于知识图谱的智能问答系统的前端部分
“第六届世界声博会暨2023科大讯飞全球1024开发者节”开幕式回顾及舆情问题
Pandas数据处理
- 原文地址:https://blog.csdn.net/web_15534206248/article/details/126577269