-
用Unity实现Bloom
用Unity实现Bloom
Bloom是一种常见的后处理效果,用来给发光的物体增加光晕。接下来让我们看看如何在Unity中实现它。
首先,需要在主相机上挂一个后处理C#脚本:
using UnityEngine; using System; [ExecuteInEditMode, ImageEffectAllowedInSceneView] public class BloomEffect : MonoBehaviour { void OnRenderImage (RenderTexture source, RenderTexture destination) { Graphics.Blit(source, destination); } }- 1
- 2
- 3
- 4
- 5
- 6
- 7
- 8
- 9
- 10
接下来,我们可以认为Bloom其实就是将原始的画面进行模糊之后,再叠加到原始画面上。那么如何进行模糊呢?我们可以参考mipmap,对原始的render texture不断进行downsample,重复一定次数之后,再不断进行upsample,回到原始render texture的大小。此时得到的render texture必然是模糊的,模糊的程度可以通过重复的次数进行调节。
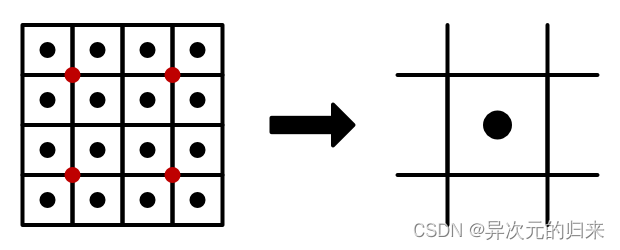
可以使用双线性插值来进行sample。所谓双线性插值,就是将目标texel周围4个texel两两插值得到最后结果。使用双线性插值的的downsample示意图如下:

再看一下使用双线性插值的upsample示意图:

不断downsample再upsample的代码如下:
int width = source.width / 2; int height = source.height / 2; RenderTextureFormat format = source.format; RenderTexture currentDestination = textures[0] = RenderTexture.GetTemporary(width, height, 0, format); Graphics.Blit(source, currentDestination); RenderTexture currentSource = currentDestination; int i = 1; for (; i < iterations; i++) { width /= 2; height /= 2; if (height < 2) { break; } currentDestination = textures[i] = RenderTexture.GetTemporary(width, height, 0, format); Graphics.Blit(currentSource, currentDestination); currentSource = currentDestination; } for (i -= 2; i >= 0; i--) { currentDestination = textures[i]; textures[i] = null; Graphics.Blit(currentSource, currentDestination); RenderTexture.ReleaseTemporary(currentSource); currentSource = currentDestination; } Graphics.Blit(currentSource, destination); RenderTexture.ReleaseTemporary(currentSource);- 1
- 2
- 3
- 4
- 5
- 6
- 7
- 8
- 9
- 10
- 11
- 12
- 13
- 14
- 15
- 16
- 17
- 18
- 19
- 20
- 21
- 22
- 23
- 24
- 25
- 26
- 27
- 28
- 29
- 30
- 31
- 32
来看下不同迭代次数下的模糊效果。首先是原图:

接下来分别是1-4次的效果:


可以看到,样子有了,但是还不够好,锯齿感太浓厚了。那么我们就要为后处理编写自定义的shader了,自定义的shader拥有两个pass,一个pass是给downsample用的,还有一个是给upsample用的:
int width = source.width / 2; int height = source.height / 2; RenderTextureFormat format = source.format; RenderTexture currentDestination = textures[0] = RenderTexture.GetTemporary(width, height, 0, format); Graphics.Blit(source, currentDestination, bloom, BoxDownPass); RenderTexture currentSource = currentDestination; int i = 1; for (; i < iterations; i++) { width /= 2; height /= 2; if (height < 2) { break; } currentDestination = textures[i] = RenderTexture.GetTemporary(width, height, 0, format); Graphics.Blit(currentSource, currentDestination, bloom, BoxDownPass); currentSource = currentDestination; } for (i -= 2; i >= 0; i--) { currentDestination = textures[i]; textures[i] = null; Graphics.Blit(currentSource, currentDestination, bloom, BoxUpPass); RenderTexture.ReleaseTemporary(currentSource); currentSource = currentDestination; } Graphics.Blit(currentSource, destination, bloom, BoxUpPass); RenderTexture.ReleaseTemporary(currentSource);- 1
- 2
- 3
- 4
- 5
- 6
- 7
- 8
- 9
- 10
- 11
- 12
- 13
- 14
- 15
- 16
- 17
- 18
- 19
- 20
- 21
- 22
- 23
- 24
- 25
- 26
- 27
- 28
- 29
- 30
- 31
- 32
为了消除锯齿,需要让画面更加模糊。我们可以增加一个box filter来融合像素。这里使用的是2*2的box kernel:
采样的4个点由于双线性插值的关系,实际上还会采样到周围4个点,这样总共真正采样到的点有4x2x2=16个。
half3 Sample (float2 uv) { return tex2D(_MainTex, uv).rgb; } half3 SampleBox (float2 uv) { float4 o = _MainTex_TexelSize.xyxy * float2(-1, 1).xxyy; half3 s = Sample(uv + o.xy) + Sample(uv + o.zy) + Sample(uv + o.xw) + Sample(uv + o.zw); return s * 0.25f; }- 1
- 2
- 3
- 4
- 5
- 6
- 7
- 8
- 9
- 10
- 11
让我们来看看迭代4次的模糊效果:

可以发现这次锯齿是彻底没有了,但是画面模糊过头了。为什么会这样呢?原因出在upsample上。每次upsample,我们是其实希望原本对应像素的信息能最大程度的保留,但是使用box filter,再加上双线性插值,导致结果并非如此:

蓝色是当前采样点,理论上来说,upsample后的结果,蓝色所在的pixel的权重应该最高,但实际上它是最小的:

如图,对蓝色点进行采样时,会对2*2的box filter的4个顶点分别进行采样,也就是红色的点。然后根据双线性插值,距离红色点近的pixel权重更高,我们假设近的权重为2,远的权重为1,得到的最后结果即如图所示。蓝色点所在的pixel权重居然只有1,也就意味着在upsample的过程中还会不断被周围的像素模糊掉。
因此,在upsample的过程中,我们需要调整一下box kernel的大小,让它变成1*1:


// downsample:delta = 1 // upsample:delta = 0.5 half3 SampleBox (float2 uv, float delta) { float4 o = _MainTex_TexelSize.xyxy * float2(-delta, delta).xxyy; half3 s = Sample(uv + o.xy) + Sample(uv + o.zy) + Sample(uv + o.xw) + Sample(uv + o.zw); return s * 0.25f; }- 1
- 2
- 3
- 4
- 5
- 6
- 7
- 8
- 9
来看看经过调整后迭代4次的模糊效果:

有了模糊效果之后,下一步要做的就是把这些效果叠加起来。我们可以把迭代的中间结果都进行叠加:

叠加本身很简单,就是在upsample的时候把blend mode设置为one one。然后在最后一次upsample时,还需要传入source render texture:
int width = source.width / 2; int height = source.height / 2; RenderTextureFormat format = source.format; RenderTexture currentDestination = textures[0] = RenderTexture.GetTemporary(width, height, 0, format); Graphics.Blit(source, currentDestination, bloom, BoxDownPass); RenderTexture currentSource = currentDestination; int i = 1; for (; i < iterations; i++) { width /= 2; height /= 2; if (height < 2) { break; } currentDestination = textures[i] = RenderTexture.GetTemporary(width, height, 0, format); Graphics.Blit(currentSource, currentDestination, bloom, BoxDownPass); currentSource = currentDestination; } for (i -= 2; i >= 0; i--) { currentDestination = textures[i]; textures[i] = null; Graphics.Blit(currentSource, currentDestination, bloom, BoxUpPass); RenderTexture.ReleaseTemporary(currentSource); currentSource = currentDestination; } bloom.SetTexture("_SourceTex", source); Graphics.Blit(currentSource, destination, bloom, ApplyBloomPass); RenderTexture.ReleaseTemporary(currentSource);- 1
- 2
- 3
- 4
- 5
- 6
- 7
- 8
- 9
- 10
- 11
- 12
- 13
- 14
- 15
- 16
- 17
- 18
- 19
- 20
- 21
- 22
- 23
- 24
- 25
- 26
- 27
- 28
- 29
- 30
- 31
- 32
- 33
Pass { // BoxUpPass Blend One One CGPROGRAM #pragma vertex VertexProgram #pragma fragment FragmentProgram half4 FragmentProgram (Interpolators i) : SV_Target { return half4(SampleBox(i.uv, 0.5), 1); } ENDCG } Pass { // ApplyBloomPass CGPROGRAM #pragma vertex VertexProgram #pragma fragment FragmentProgram half4 FragmentProgram (Interpolators i) : SV_Target { half4 c = tex2D(_SourceTex, i.uv); c.rgb += SampleBox(i.uv, 0.5); return c; } ENDCG }- 1
- 2
- 3
- 4
- 5
- 6
- 7
- 8
- 9
- 10
- 11
- 12
- 13
- 14
- 15
- 16
- 17
- 18
- 19
- 20
- 21
- 22
- 23
- 24
尝试不同迭代次数下的效果如下:

大体上已经OK了,剩下的就是一些细节补充。首先,我们希望bloom只对比较明亮的像素才生效。因此在第一次downsample时,可以做一次预处理,把不够亮的像素剔除掉:
half3 Prefilter (half3 c) { half brightness = max(c.r, max(c.g, c.b)); half contribution = max(0, brightness - _Threshold); contribution /= max(brightness, 0.00001); return c * contribution; } Pass { // BoxDownPrefilterPass CGPROGRAM #pragma vertex VertexProgram #pragma fragment FragmentProgram half4 FragmentProgram (Interpolators i) : SV_Target { return half4(Prefilter(SampleBox(i.uv, 1)), 1); } ENDCG }- 1
- 2
- 3
- 4
- 5
- 6
- 7
- 8
- 9
- 10
- 11
- 12
- 13
- 14
- 15
- 16
- 17
RenderTexture currentDestination = textures[0] = RenderTexture.GetTemporary(width, height, 0, format); Graphics.Blit(source, currentDestination, bloom, BoxDownPrefilterPass);- 1
- 2
- 3
我们提供了参数
_Threshold方便调节,来看下从0变化到1的效果:
最后,再增加一个参数来调节bloom的强度。我们将其应用于最后一次upsample的pass上:
Pass { // ApplyBloomPass CGPROGRAM #pragma vertex VertexProgram #pragma fragment FragmentProgram half4 FragmentProgram (Interpolators i) : SV_Target { half4 c = tex2D(_SourceTex, i.uv); c.rgb += _Intensity * SampleBox(i.uv, 0.5); return c; } ENDCG }- 1
- 2
- 3
- 4
- 5
- 6
- 7
- 8
- 9
- 10
- 11
- 12
最后我们看一下
_Intensity不断增加的bloom效果:
如果你觉得我的文章有帮助,欢迎关注我的微信公众号:我是真的想做游戏啊
Reference
-
相关阅读:
阿里云服务器公网带宽升级的三种方法
ubuntu20.04下源码编译colmap
【管理咨询宝藏资料25】某能源集团五年发展战略报告
最大异或对
SpringBoot中bean绑定
【Router】PC连接到路由LAN,但是无法获取到IP地址问题分析及解决方案
重生之 SpringBoot3 入门保姆级学习(16、函数式 Web 编程)
详解ConCurrentHashMap源码(jdk1.8)
软考高级系统架构设计师系列论文十八:论软件三层结构的设计
【微信小程序】新版获取用户头像昵称(uniapp)(完整版附源码)
- 原文地址:https://blog.csdn.net/weixin_45776473/article/details/126576768
