-
idea docker插件安装及使用
idea docker插件安装及使用
1、安装docker插件
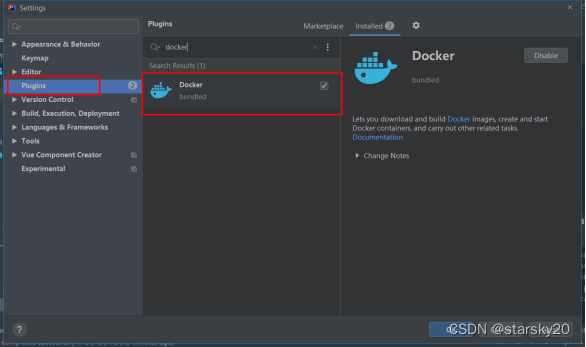
打开idea->settiings->plugins->marketplace->搜索docker插件安装,安装完成重启。
2、Dockre配置
打开idea->settings->build execution deployment->docker->点击加号添加docker配置,选择tcp链接,输入链接docker地址。这里首先要把docker端口2375对外开放才能链接。
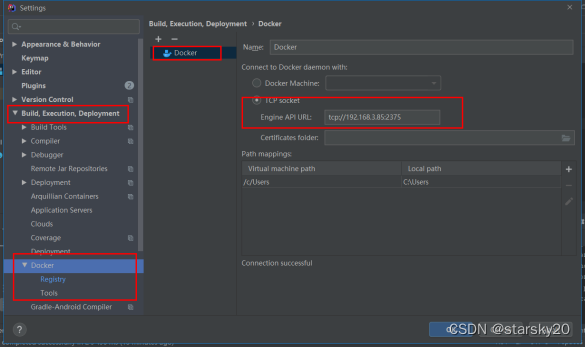
配置完后,如果出现connection successfull,表示配置成功。
添加镜像:
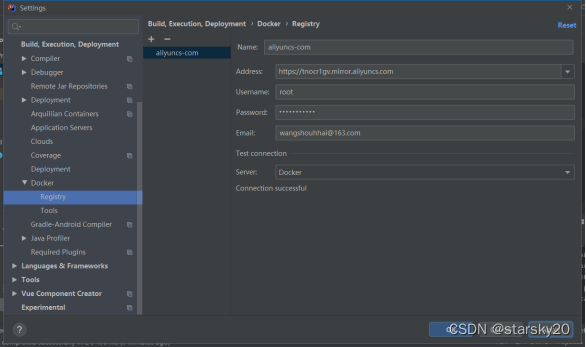
Docker选项-》register-》点击加号添加,配置address,这个是镜像地址,我这里使用阿里云地址,具体查看以上《docker镜像加速配置》。用户名,密码填写登录阿里云账号 密码,然后点击test connection, 如果出现connection successfull表示链接成功。
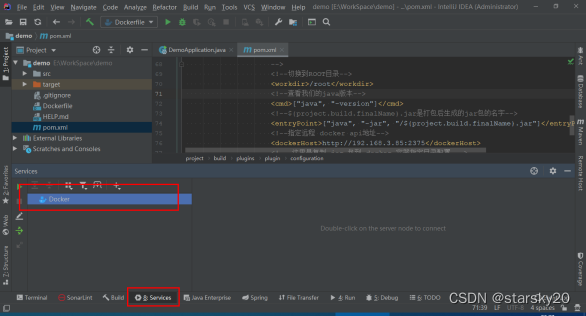
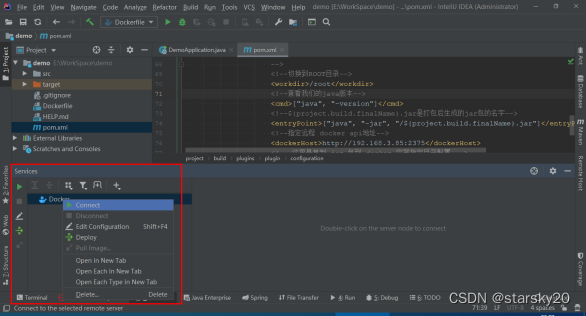
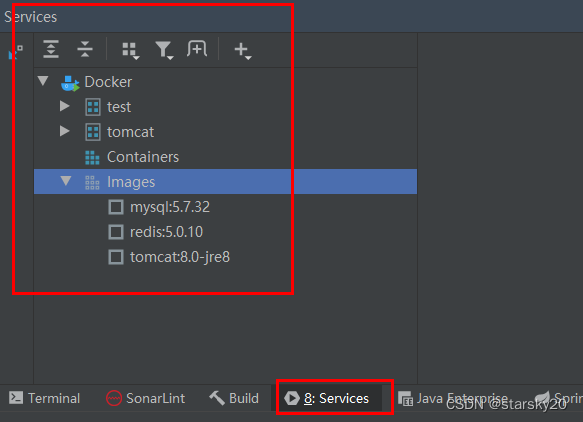
3、pom.xml文件引入docker插件依赖包
<properties> <project.build.sourceEncoding>UTF-8</project.build.sourceEncoding> <project.reporting.outputEncoding>UTF-8</project.reporting.outputEncoding> <java.version>1.8</java.version> <!--wagon plugin 配置--> <!--上传服务器文件目录--> <service-path>/home/starsky-pro</service-path> <shell-name>${service-path}/script/gateway-server.sh</shell-name> <!--上传服务器jar包--> <pack-name>${project.build.finalName}.jar</pack-name> <!--登陆服务器ip地址,端口--> <remote-addr>192.168.0.87:22</remote-addr> <!--登陆服务器用户账号、密码--> <remote-username>admin</remote-username> <remote-passwd>123456</remote-passwd> <!-- docker 打包镜像上传配置本地测试环境--> <docker-ip>192.168.0.87</docker-ip> <docker-url>https://${docker-ip}:2375</docker-url> <registry-url>${docker-ip}:8075</registry-url> </properties> <build> <finalName>${project.artifactId}-${project.version}</finalName> <plugins> <plugin> <groupId>org.springframework.boot</groupId> <artifactId>spring-boot-maven-plugin</artifactId> <configuration> <fork>true</fork> <!-- 如果没有该配置,devtools不会生效 --> </configuration> </plugin> <!-- 跳过单元测试 --> <plugin> <groupId>org.apache.maven.plugins</groupId> <artifactId>maven-surefire-plugin</artifactId> <configuration> <skipTests>true</skipTests> </configuration> </plugin> <!--使用docker-maven-plugin插件--> <plugin> <groupId>com.spotify</groupId> <artifactId>docker-maven-plugin</artifactId> <version>1.2.2</version> <!--将插件绑定在某个phase执行--> <executions> <execution> <id>build-image</id> <!--用户只需执行mvn package ,就会自动执行mvn docker:build--> <phase>package</phase> <goals> <goal>build</goal> </goals> </execution> </executions> <configuration> <!--指定远程docker api地址--> <dockerHost>http://192.168.3.110:2375</dockerHost> <!--指定生成的镜像名,这里是我们的作者名+项目名--> <imageName>starsky/${project.artifactId}</imageName> <!--指定标签 这里指定的是镜像的版本,我们默认版本是latest--> <imageTags> <imageTag>latest</imageTag> </imageTags> <!--指定基础镜像jdk1.8--> <baseImage>openjdk:8-alpine</baseImage> <!--镜像制作人本人信息--> <maintainer>1057718341@@qq.com</maintainer> <!--切换到ROOT目录--> <workdir>/root</workdir> <!--查看我们的java版本--> <cmd>["java", "-version"]</cmd> <!--${project.build.finalName}.jar是打包后生成的jar包的名字--> <entryPoint>["java", "-jar", "/${project.build.finalName}.jar"]</entryPoint> <!-- 这里是复制 jar 包到docker 容器指定目录配置 --> <resources> <resource> <targetPath>/</targetPath> <!--jar 包所在的路径 此处配置的 即对应 target 目录--> <directory>${project.build.directory}</directory> <!--用于指定需要复制的文件 需要包含的 jar包 ,这里对应的是 Dockerfile中添加的文件名 --> <include>${project.build.finalName}.jar</include> </resource> </resources> </configuration> </plugin> </plugins> <!-- 资源目录 --> <resources> <resource> <directory>src/main/resources</directory> <includes> <include>**/*.*</include> </includes> <!-- 资源根目录排除各环境的配置,防止在生成目录中多余其它目录 --> </resource> <!--激活指定文件--> <resource> <directory>src/main/resources</directory> <excludes> <exclude>application-dev.yml</exclude> <exclude>application-prod.yml</exclude> <exclude>application-test.yml</exclude> </excludes> <filtering>true</filtering> </resource> <!--打包java目录--> <resource> <directory>src/main/java</directory> <includes> <include>**/*.*</include> </includes> <excludes> <exclude>**/*.java</exclude> </excludes> <filtering>true</filtering> </resource> <!--打包docker目录--> <resource> <directory>src/main/docker</directory> <includes> <include>**/*</include> </includes> <filtering>true</filtering> </resource> </resources> </build> <repositories> <repository> <id>public</id> <name>aliyun nexus</name> <url>http://maven.aliyun.com/nexus/content/groups/public/</url> <releases> <enabled>true</enabled> </releases> </repository> </repositories> <pluginRepositories> <pluginRepository> <id>public</id> <name>aliyun nexus</name> <url>http://maven.aliyun.com/nexus/content/groups/public/</url> <releases> <enabled>true</enabled> </releases> <snapshots> <enabled>false</enabled> </snapshots> </pluginRepository> </pluginRepositories>- 1
- 2
- 3
- 4
- 5
- 6
- 7
- 8
- 9
- 10
- 11
- 12
- 13
- 14
- 15
- 16
- 17
- 18
- 19
- 20
- 21
- 22
- 23
- 24
- 25
- 26
- 27
- 28
- 29
- 30
- 31
- 32
- 33
- 34
- 35
- 36
- 37
- 38
- 39
- 40
- 41
- 42
- 43
- 44
- 45
- 46
- 47
- 48
- 49
- 50
- 51
- 52
- 53
- 54
- 55
- 56
- 57
- 58
- 59
- 60
- 61
- 62
- 63
- 64
- 65
- 66
- 67
- 68
- 69
- 70
- 71
- 72
- 73
- 74
- 75
- 76
- 77
- 78
- 79
- 80
- 81
- 82
- 83
- 84
- 85
- 86
- 87
- 88
- 89
- 90
- 91
- 92
- 93
- 94
- 95
- 96
- 97
- 98
- 99
- 100
- 101
- 102
- 103
- 104
- 105
- 106
- 107
- 108
- 109
- 110
- 111
- 112
- 113
- 114
- 115
- 116
- 117
- 118
- 119
- 120
- 121
- 122
- 123
- 124
- 125
- 126
- 127
- 128
- 129
- 130
- 131
- 132
- 133
- 134
- 135
- 136
- 137
- 138
- 139
- 140
- 141
- 142
- 143
- 144
- 145
- 146
- 147
- 148
- 149
- 150
- 151
- 152
- 153
- 154
- 155
- 156
- 157
- 158
打开右侧maven》选择clean package 执行 或者 打卡terminal 命令行执行 mvn clean package
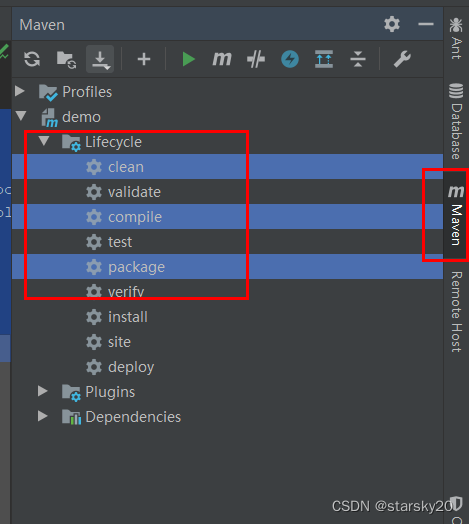
执行结果如下:E:\devtools\Java\jdk1.8.0_192\bin\java.exe -Dmaven.multiModuleProjectDirectory=E:\GitWorkSpace\shanxi-trans\starsky-pro "-Dmaven.home=E:\devtools\IntelliJ IDEA 2019.3.3\plugins\maven\lib\maven3" "-Dclassworlds.conf=E:\devtools\IntelliJ IDEA 2019.3.3\plugins\maven\lib\maven3\bin\m2.conf" "-Dmaven.ext.class.path=E:\devtools\IntelliJ IDEA 2019.3.3\plugins\maven\lib\maven-event-listener.jar" "-javaagent:E:\devtools\IntelliJ IDEA 2019.3.3\lib\idea_rt.jar=62668:E:\devtools\IntelliJ IDEA 2019.3.3\bin" -Dfile.encoding=UTF-8 -classpath "E:\devtools\IntelliJ IDEA 2019.3.3\plugins\maven\lib\maven3\boot\plexus-classworlds-2.6.0.jar" org.codehaus.classworlds.Launcher -Didea.version2019.3.3 clean package [INFO] Scanning for projects... [WARNING] [WARNING] Some problems were encountered while building the effective model for com.sdc.icbc:starsky-pro:jar:1.0.0 [WARNING] 'dependencies.dependency.version' for org.junit.jupiter:junit-jupiter:jar is either LATEST or RELEASE (both of them are being deprecated) @ line 409, column 22 [WARNING] [WARNING] It is highly recommended to fix these problems because they threaten the stability of your build. [WARNING] [WARNING] For this reason, future Maven versions might no longer support building such malformed projects. [WARNING] [INFO] [INFO] ----------------------< com.sdc.icbc:starsky-pro >---------------------- [INFO] Building starsky-pro 1.0.0 [INFO] --------------------------------[ jar ]--------------------------------- [INFO] [INFO] --- maven-clean-plugin:3.1.0:clean (default-clean) @ starsky-pro --- [INFO] Deleting E:\GitWorkSpace\shanxi-trans\starsky-pro\target [INFO] [INFO] --- maven-resources-plugin:3.1.0:resources (default-resources) @ starsky-pro --- [INFO] Using 'UTF-8' encoding to copy filtered resources. [INFO] Copying 4 resources [INFO] Copying 393 resources [INFO] [INFO] --- maven-compiler-plugin:3.8.0:compile (default-compile) @ starsky-pro --- [INFO] Changes detected - recompiling the module! [INFO] Compiling 416 source files to E:\GitWorkSpace\shanxi-trans\starsky-pro\target\classes [INFO] /E:/GitWorkSpace/shanxi-trans/starsky-pro/src/main/java/com/starsky/common/utils/poi/ExcelUtil.java: 某些输入文件使用或覆盖了已过时的 API。 [INFO] /E:/GitWorkSpace/shanxi-trans/starsky-pro/src/main/java/com/starsky/common/utils/poi/ExcelUtil.java: 有关详细信息, 请使用 -Xlint:deprecation 重新编译。 [INFO] /E:/GitWorkSpace/shanxi-trans/starsky-pro/src/main/java/com/starsky/project/system/service/impl/SysTeachingPositionServiceImpl.java: 某些输入文件使用了未经检查或不安全的操作。 [INFO] /E:/GitWorkSpace/shanxi-trans/starsky-pro/src/main/java/com/starsky/project/system/service/impl/SysTeachingPositionServiceImpl.java: 有关详细信息, 请使用 -Xlint:unchecked 重新编译。 [INFO] [INFO] --- maven-resources-plugin:3.1.0:testResources (default-testResources) @ starsky-pro --- [INFO] Using 'UTF-8' encoding to copy filtered resources. [INFO] skip non existing resourceDirectory E:\GitWorkSpace\shanxi-trans\starsky-pro\src\test\resources [INFO] [INFO] --- maven-compiler-plugin:3.8.0:testCompile (default-testCompile) @ starsky-pro --- [INFO] Changes detected - recompiling the module! [INFO] Compiling 5 source files to E:\GitWorkSpace\shanxi-trans\starsky-pro\target\test-classes [INFO] [INFO] --- maven-surefire-plugin:2.22.1:test (default-test) @ starsky-pro --- [INFO] Tests are skipped. [INFO] [INFO] --- maven-jar-plugin:3.1.0:jar (default-jar) @ starsky-pro --- [INFO] Building jar: E:\GitWorkSpace\shanxi-trans\starsky-pro\target\starsky-pro-1.0.0.jar [INFO] [INFO] --- spring-boot-maven-plugin:2.1.1.RELEASE:repackage (repackage) @ starsky-pro --- [INFO] Replacing main artifact with repackaged archive [INFO] [INFO] --- docker-maven-plugin:1.2.2:build (build-image) @ starsky-pro --- [INFO] Using authentication suppliers: [ConfigFileRegistryAuthSupplier] [INFO] Copying E:\GitWorkSpace\shanxi-trans\starsky-pro\target\starsky-pro-1.0.0.jar -> E:\GitWorkSpace\shanxi-trans\starsky-pro\target\docker\starsky-pro-1.0.0.jar [INFO] Building image starsky/starsky-pro Step 1/5 : FROM openjdk:8-alpine ---> a3562aa0b991 Step 2/5 : WORKDIR /root ---> Running in fb190bb2e03b Removing intermediate container fb190bb2e03b ---> 97011028c365 Step 3/5 : ADD /starsky-pro-1.0.0.jar // ---> 702d78d1c897 Step 4/5 : ENTRYPOINT ["java", "-jar", "/starsky-pro-1.0.0.jar"] ---> Running in 4437bbcaafe7 Removing intermediate container 4437bbcaafe7 ---> a71c06fbfa8e Step 5/5 : CMD ["java", "-version"] ---> Running in a24ec2407d49 Removing intermediate container a24ec2407d49 ---> 618771c1571a ProgressMessage{id=null, status=null, stream=null, error=null, progress=null, progressDetail=null} Successfully built 618771c1571a Successfully tagged starsky/starsky-pro:latest [INFO] Built starsky/starsky-pro [INFO] Tagging starsky/starsky-pro with latest [INFO] ------------------------------------------------------------------------ [INFO] BUILD SUCCESS [INFO] ------------------------------------------------------------------------ [INFO] Total time: 39.485 s [INFO] Finished at: 2022-08-26T15:58:07+08:00 [INFO] ------------------------------------------------------------------------- 1
- 2
- 3
- 4
- 5
- 6
- 7
- 8
- 9
- 10
- 11
- 12
- 13
- 14
- 15
- 16
- 17
- 18
- 19
- 20
- 21
- 22
- 23
- 24
- 25
- 26
- 27
- 28
- 29
- 30
- 31
- 32
- 33
- 34
- 35
- 36
- 37
- 38
- 39
- 40
- 41
- 42
- 43
- 44
- 45
- 46
- 47
- 48
- 49
- 50
- 51
- 52
- 53
- 54
- 55
- 56
- 57
- 58
- 59
- 60
- 61
- 62
- 63
- 64
- 65
- 66
- 67
- 68
- 69
- 70
- 71
- 72
- 73
- 74
- 75
- 76
- 77
- 78
- 79
- 80
- 81
- 82
- 83
- 84
- 85
可以看到打包镜像执行成功,然后登录服务器查看生成镜像。

以上标识打包镜像成功。 -
相关阅读:
spring boot logback.xml文件配置,info、error隔离
小程序canvas层级过高真机遮挡组件的解决办法
Redis篇---第十篇
一个开发者自述:我是如何设计针对冷热读写场景的 RocketMQ 存储系统
数据结构——堆排序(C语言)
世界上只有一种共识算法,那就是Paxos
代码随想录算法训练营第五十五天 | 300.最长递增子序列、674. 最长连续递增序列、718. 最长重复子数组
【481. 神奇字符串】
[模型部署] ONNX模型转TRT模型部分要点
Elasticsearch:过滤搜索结果 - filter 及 post_filter
- 原文地址:https://blog.csdn.net/seashouwang/article/details/126544562
