-
springcloud搭建kafka
环境:zk+springcloud+eureka+kafka
系统:windowsspringcloud版本:Hoxton 2.3.1
适配版本
springboot版本:2.2.5各版本对应关系
Release Train/Boot Version
Hoxton /2.2.x
Greenwich /2.1.x
Finchley /2.0.x
Edgware /1.5.x
Dalston /1.5.x搭建中遇到的问题
1.kafka启动报错如下:
java.io.IOException: Map failed
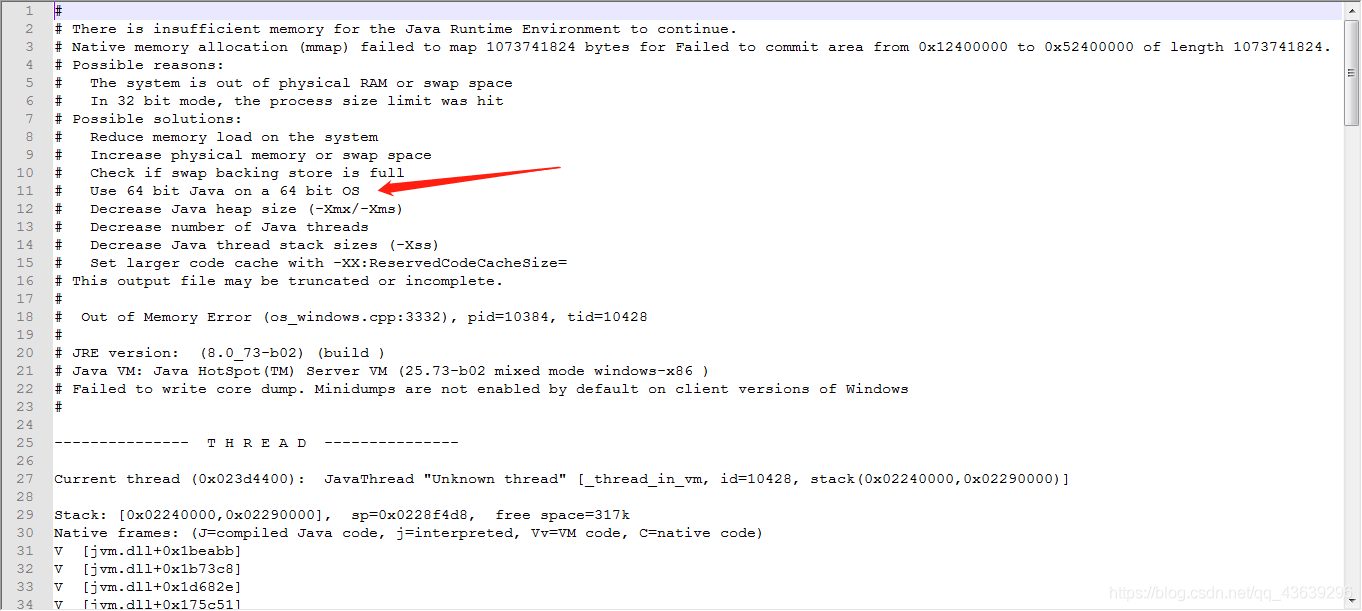
java.lang.OutOfMemoryError: Map failed
解决:从字面上看是内存不够,尝试更改jvm内存,结果失败。
分析错误日志hs_err_pid10384.log,里面有提到:在64位操作系统上使用64位Java,重新安装64位java解决问题!
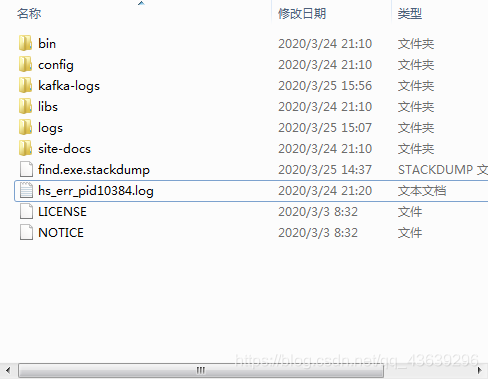
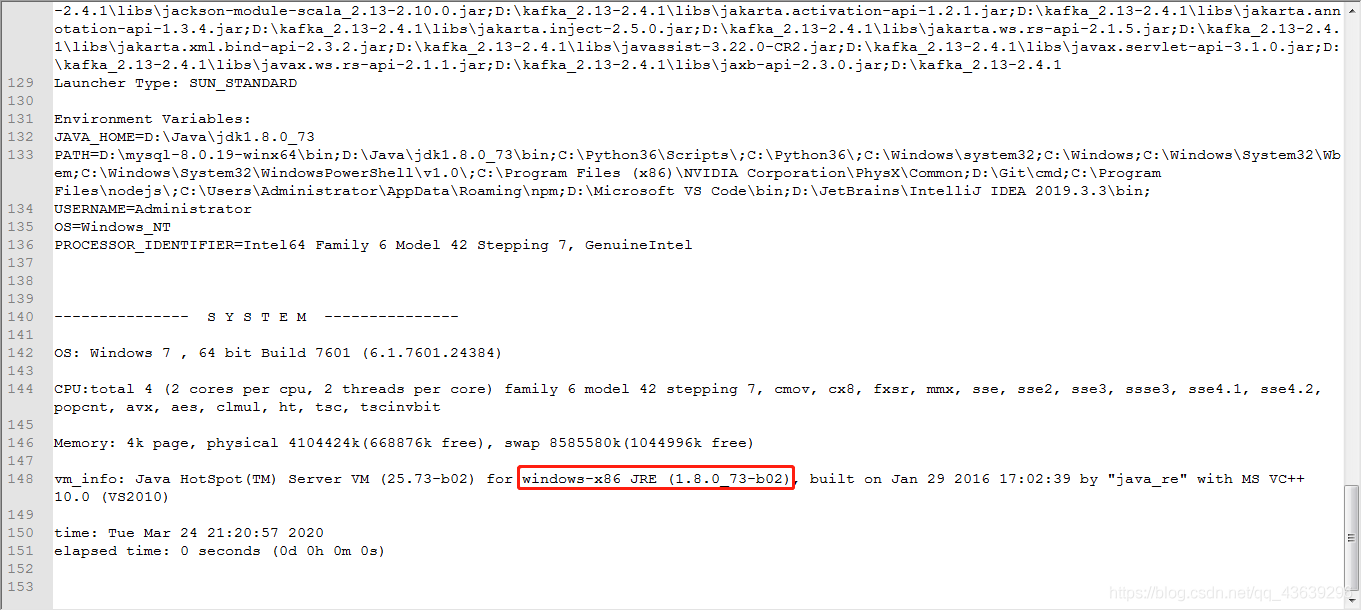
日志最下方有当前java的信息
2.Group coordinator promote.localdomain:9092 (id: 2147483647 rack: null) is unavailable or invalid, will attempt rediscovery
解决:消费者没连接上服务,原因是搭建失败。通过分析错误日志hs_err_pid10384.log发现,需要使用64位的java,。详细解决步骤同问题1步骤:
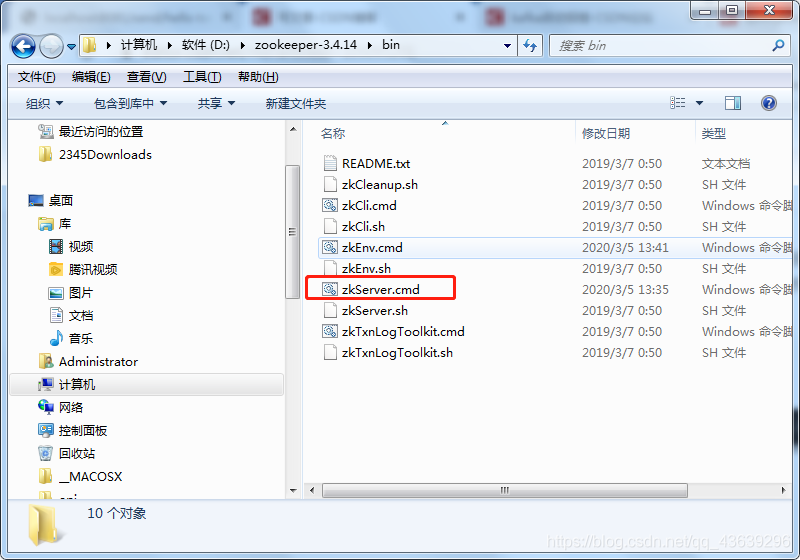
1.先启动zk,双击zkServer.cmd
2.启动kafka,bin同级目录命令框中执行一下命令.inwindowskafka-server-start.bat .configserver.properties- 1
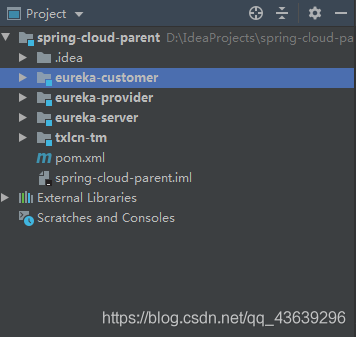
3.搭建springcloud项目
eureka用作Service发现服务
zk用作分布式协同服务,配合kafka使用
txlcn-tm是分布式事务(待完善,不影响整体)
eureka-service
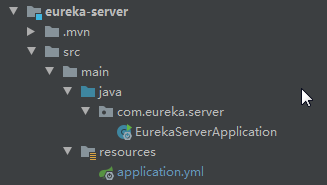
导包:org.springframework.cloud spring-cloud-starter-netflix-eureka-server - 1
- 2
- 3
- 4
配置
server: port: 8091 eureka: instance: hostname: localhost #服务注册中心实例的主机名 server: enableSelfPreservation: true #服务端开启自我保护模式。无论什么情况,服务端都会保持一定数量的服务。避免client与server的网络问题,而出现大量的服务被清除。 renewalPercentThreshold: 0.1 #在设置的时间范围类,期望与client续约的百分比。 client: register-with-eureka: false #实例是否在eureka服务器上注册自己的信息以供其他服务发现,默认为true fetch-registry: false #此客户端是否获取eureka服务器注册表上的注册信息,默认为true service-url: defaultZone: http://${eureka.instance.hostname}:${server.port}/eureka/ #服务地址- 1
- 2
- 3
- 4
- 5
- 6
- 7
- 8
- 9
- 10
- 11
- 12
- 13
启动类
import org.springframework.boot.SpringApplication; import org.springframework.boot.autoconfigure.SpringBootApplication; import org.springframework.cloud.netflix.eureka.server.EnableEurekaServer; @SpringBootApplication @EnableEurekaServer public class EurekaServerApplication { public static void main(String[] args) { SpringApplication.run(EurekaServerApplication.class, args); } }- 1
- 2
- 3
- 4
- 5
- 6
- 7
- 8
- 9
- 10
- 11
- 12
- 13
eureka-provider
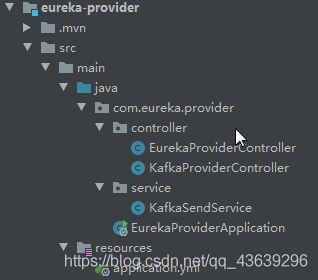
导包org.springframework.cloud spring-cloud-netflix-eureka-server org.springframework.cloud spring-cloud-stream compile org.springframework.cloud spring-cloud-stream-binder-kafka - 1
- 2
- 3
- 4
- 5
- 6
- 7
- 8
- 9
- 10
- 11
- 12
- 13
配置
server: port: 8081 spring: cloud: stream: kafka: binder: brokers: localhost:9092 #Kafka的消息中间件服务器 zk-nodes: localhost:2181 #Zookeeper的节点,如果集群,后面加,号分隔 auto-create-topics: true #如果设置为false,就不会自动创建Topic 有可能你Topic还没创建就直接调用了。 bindings: output: #这里用stream给我们提供的默认output,后面会讲到自定义output destination: stream-demo #消息发往的目的地 content-type: text/plain #消息发送的格式,接收端不用指定格式,但是发送端要 eureka: instance: appname: eureka-provider client: service-url: defaultZone: http://localhost:8091/eureka/- 1
- 2
- 3
- 4
- 5
- 6
- 7
- 8
- 9
- 10
- 11
- 12
- 13
- 14
- 15
- 16
- 17
- 18
- 19
- 20
eureka的服务提供方
import org.springframework.web.bind.annotation.RequestMapping; import org.springframework.web.bind.annotation.RestController; //rest 风格控制器 @RestController public class EurekaProviderController { @RequestMapping("/getInfo") public String getDemoInfo() { return "this is a provider service"; } @RequestMapping("/getString") public String getDemoInfo1(String userId) { return userId + ",this is a provider service"; } }- 1
- 2
- 3
- 4
- 5
- 6
- 7
- 8
- 9
- 10
- 11
- 12
- 13
- 14
- 15
- 16
- 17
kafka消息发送端
import com.eureka.provider.service.KafkaSendService; import org.springframework.beans.factory.annotation.Autowired; import org.springframework.web.bind.annotation.PathVariable; import org.springframework.web.bind.annotation.RequestMapping; import org.springframework.web.bind.annotation.RestController; @RestController public class KafkaProviderController { @Autowired private KafkaSendService kafkaSendService; @RequestMapping("/send/{msg}") public void send(@PathVariable("msg") String msg) { System.out.println("发送消息------->>"+msg); kafkaSendService.sendMsg(msg); } }- 1
- 2
- 3
- 4
- 5
- 6
- 7
- 8
- 9
- 10
- 11
- 12
- 13
- 14
- 15
- 16
- 17
- 18
kafka服务接口
import org.springframework.beans.factory.annotation.Autowired; import org.springframework.cloud.stream.annotation.EnableBinding; import org.springframework.cloud.stream.messaging.Source; import org.springframework.integration.support.MessageBuilder; //这个注解给我们绑定消息通道的,Source是Stream给我们提供的,可以点进去看源码,可以看到output和input,这和配置文件中的output,input对应的。 @EnableBinding(Source.class) public class KafkaSendService { @Autowired private Source source; public void sendMsg(String msg) { source.output().send(MessageBuilder.withPayload(msg).build()); } }- 1
- 2
- 3
- 4
- 5
- 6
- 7
- 8
- 9
- 10
- 11
- 12
- 13
- 14
- 15
- 16
启动类
import org.springframework.boot.SpringApplication; import org.springframework.boot.autoconfigure.SpringBootApplication; import org.springframework.cloud.netflix.eureka.server.EnableEurekaServer; @SpringBootApplication @EnableEurekaServer public class EurekaProviderApplication { public static void main(String[] args) { SpringApplication.run(EurekaProviderApplication.class, args); } }- 1
- 2
- 3
- 4
- 5
- 6
- 7
- 8
- 9
- 10
- 11
- 12
- 13
eureka-customer
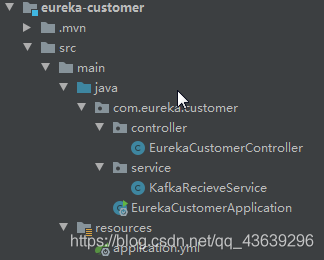
导包org.springframework.cloud spring-cloud-netflix-eureka-server org.springframework.cloud spring-cloud-stream compile org.springframework.cloud spring-cloud-stream-binder-kafka - 1
- 2
- 3
- 4
- 5
- 6
- 7
- 8
- 9
- 10
- 11
- 12
- 13
配置
server: port: 8082 spring: cloud: stream: kafka: binder: brokers: localhost:9092 #Kafka的消息中间件服务器 zk-nodes: localhost:2181 #Zookeeper的节点,如果集群,后面加,号分隔 auto-create-topics: true #如果设置为false,就不会自动创建Topic 有可能你Topic还没创建就直接调用了。 bindings: input: #input是接收,注意这里不能再像前面一样写output了 destination: stream-demo #消息接收的目的地 eureka: instance: appname: eureka-customer client: service-url: defaultZone: http://localhost:8091/eureka/- 1
- 2
- 3
- 4
- 5
- 6
- 7
- 8
- 9
- 10
- 11
- 12
- 13
- 14
- 15
- 16
- 17
- 18
- 19
eureka服务消费方
import org.springframework.beans.factory.annotation.Autowired; import org.springframework.http.HttpMethod; import org.springframework.http.RequestEntity; import org.springframework.http.ResponseEntity; import org.springframework.web.bind.annotation.RequestMapping; import org.springframework.web.bind.annotation.RestController; import org.springframework.web.client.RestTemplate; @RestController public class EurekaCustomerController { @Autowired private RestTemplate restTemplate; @RequestMapping("/test1") public String getEurekaServiceInfo() { /** * exchange(url,type,paras,resutType) * url:请求地址 * type:请求类型 get,post * paras:参数 * resutType:返回值类型 */ String url = "http://localhost:8081/getInfo"; HttpMethod type = HttpMethod.GET; RequestEntityparas = null; ResponseEntity responseEntity = restTemplate.exchange(url, type, paras, String.class); return responseEntity.getBody(); } @RequestMapping("/test2") public String getString1() { //getForObject 调用无参方法,返回结果为String的方法 String url = "http://localhost:8081/getInfo"; String res = restTemplate.getForObject(url, String.class); return res; } @RequestMapping("/test3") public String getString2() { //getForObject 调用有参方法,路径添加参数。返回结果为String的方法 String url = "http://localhost:8081/getString?userId=sn001"; String res = restTemplate.getForObject(url, String.class); return res; } } - 1
- 2
- 3
- 4
- 5
- 6
- 7
- 8
- 9
- 10
- 11
- 12
- 13
- 14
- 15
- 16
- 17
- 18
- 19
- 20
- 21
- 22
- 23
- 24
- 25
- 26
- 27
- 28
- 29
- 30
- 31
- 32
- 33
- 34
- 35
- 36
- 37
- 38
- 39
- 40
- 41
- 42
- 43
- 44
- 45
- 46
- 47
kafka消息接收端
import org.springframework.cloud.stream.annotation.EnableBinding; import org.springframework.cloud.stream.annotation.StreamListener; import org.springframework.cloud.stream.messaging.Sink; import org.springframework.kafka.support.Acknowledgment; import org.springframework.kafka.support.KafkaHeaders; import org.springframework.messaging.Message; //消息接收端,stream给我们提供了Sink,Sink源码里面是绑定input的,要跟我们配置文件的input关联的。 @EnableBinding(Sink.class) public class KafkaRecieveService { @StreamListener(Sink.INPUT) public void process(Message message) { System.out.println("接收到消息----------->>>"+message.getPayload()); Acknowledgment acknowledgment = message.getHeaders().get(KafkaHeaders.ACKNOWLEDGMENT, Acknowledgment.class); if (acknowledgment != null) { System.out.println("Acknowledgment provided"); acknowledgment.acknowledge(); } } }- 1
- 2
- 3
- 4
- 5
- 6
- 7
- 8
- 9
- 10
- 11
- 12
- 13
- 14
- 15
- 16
- 17
- 18
- 19
- 20
- 21
启动类
import org.springframework.boot.SpringApplication; import org.springframework.boot.autoconfigure.SpringBootApplication; import org.springframework.cloud.netflix.eureka.server.EnableEurekaServer; import org.springframework.context.annotation.Bean; import org.springframework.web.client.RestTemplate; @SpringBootApplication @EnableEurekaServer public class EurekaCustomerApplication { public static void main(String[] args) { SpringApplication.run(EurekaCustomerApplication.class, args); } //向spring里注入一个RestTemplate对象 @Bean public RestTemplate getRestTemplate(){ return new RestTemplate(); } }- 1
- 2
- 3
- 4
- 5
- 6
- 7
- 8
- 9
- 10
- 11
- 12
- 13
- 14
- 15
- 16
- 17
- 18
- 19
- 20
-
相关阅读:
亚马逊云科技产品测评』活动征文|通过使用Amazon Neptune来预测电影类型初体验
【题解】同济线代习题一.8.6
JS——利用js实现模态框的拖拽
SpringBoot集成Tomcat服务
【Azure 存储服务】Hadoop集群中使用ADLS(Azure Data Lake Storage)过程中遇见执行PUT操作报错
Roaring Bitmap 更好的位图压缩算法
scss 使用变量名注意事项
电动剃须刀市场现状研究分析与发展前景预测
负载均衡原理及算法
【快应用】如何在快应用中使用自定义指令
- 原文地址:https://blog.csdn.net/m0_66557301/article/details/126516374