-
Django(2)模板、标签
此文章参考菜鸟教程:Django 模板 | 菜鸟教程 (runoob.com)
Django版本:>>> django.VERSION (4, 1, 0, 'final', 0)- 1
- 2
PS:基于前几章的进度进行修改
一、使用Django模板修改页面
-
上一章中,直接使用了
index_test.py添加\修改了资源页面,这次使用模板来添加资源页面\修改页面 -
先来看
index_test.py文件,可以看到使用了模块django.http.HttpResponse()来输出指定的信息:
#-*- coding: utf-8 -*- from django.http import HttpResponse def hello(request): return HttpResponse("Hello World!!!")- 1
- 2
- 3
- 4
- 5
-
而上面的这种方式会将数据和视图混合在一起,不符合Django中的MTC思想,所以我们可以使用模板来输出数据:
-
根据上一章节中的项目结构,现在在helloworld项目目录下创建
templates目录,然后创建test.html文件 -
现在的目录结构如下:

-
下面是test.html模板文件的内容:
<h1>{{ hello }}h1> #这里是变量,使用了双括号- 1
- 下面向Django说明模板文件路径,修改helloworld容器目录下的
settings.py文件:
import os #导入os模块 。。。。。。 TEMPLATES = [ { 'BACKEND': 'django.template.backends.django.DjangoTemplates', 'DIRS': [os.path.join(BASE_DIR,'templates')], #修改DIRS,说明模板文件的路径,BASE_DIR是manage.py文件所在的路径 'APP_DIRS': True, 'OPTIONS': { 'context_processors': [ 'django.template.context_processors.debug', 'django.template.context_processors.request', 'django.contrib.auth.context_processors.auth', 'django.contrib.messages.context_processors.messages', ], }, }, ]- 1
- 2
- 3
- 4
- 5
- 6
- 7
- 8
- 9
- 10
- 11
- 12
- 13
- 14
- 15
- 16
- 17
- 现在修改
index_test.py和urls.py,增加一个新的对象,用于向模板提交数据
render()方法参数:
render(request, template_name, context=None, content_type=None, status=None, using=None)- 1
request:必要参数,浏览器向服务器发送的请求对象,包含用户信息、请求内容、请求方式等template_name:必要参数,设置模板文件名,用于生成网页内容context:对模板上下文即模板变量赋值,以字典格式表示,默认情况下是一个空字典content_type:响应内容的数据格式,一般情况下使用默认值即可status:HTTP状态码,默认是200using:设置模板引擎,用于解析模板文件、生成网页内容等
- index_test.py #-*- coding: utf-8 -*- from django.shortcuts import render def hello(request): contest = {} contest['hello'] = 'Hello World!!!' return render(request,'test.html',contest) #指定模板文件- 1
- 2
- 3
- 4
- 5
- 6
- 7
- 8
- urls.py #-*- coding: utf-8 -*- from django.urls import path from . import index_test urlpatterns = [ path('hello/',index_test.hello), ]- 1
- 2
- 3
- 4
- 5
- 6
- 7
- 8
- 9
-
可以看到,我们这里使用了
render来代替之前使用的HttpResponse,render使用了一个字典contest作为参数,contest字典中元素的键值hello对应了test.html模板文件中{{ hello }}变量 -
再次进行访问:

-
可以看到已经替换页面了,现在已经完成了使用模板来输出数据,实现数据与视图分离
二、Django模板标签
- 经过上面的实践,下面来看一下Django模板中常用的语法规则
- 变量
- 模板语法:
视图view:{"HTML变量名":"views变量名"} HTML:{{ 变量名 }}- 1
- 2
-
可以看到其实也就是字典,跟上面那个一样
-
下面来看案例:
- 现在修改视图文件
index_test.py文件,下面是变量和字典的写法,可以看到思路其实是一样的:
- 变量 # -*- coding: utf-8 -*- from django.shortcuts import render def Hello(request): test_view = "测试" hello_view = "你好" return render(request,'test.html',{"test":test_view,"hello":hello_view})- 1
- 2
- 3
- 4
- 5
- 6
- 7
- 8
- 修改templates目录下的
test.html文件:
DOCTYPE html> <html lang="en"> <head> <meta charset="UTF-8"> <title>测试title> #页面名称 head> <body> <p>{{ test }}p> #导入两个变量 <h1>{{ hello }}h1> body> html>- 1
- 2
- 3
- 4
- 5
- 6
- 7
- 8
- 9
- 10
- 11
- 再次访问,成功修改!

- 现在修改视图文件
- 列表
-
templates中的test.html文件,可以使用
.索引下标取出相对应的元素 -
下面来看案例:
- 修改视图文件
index_test.py,相当于是把字典的值换成列表:
# -*- coding: utf-8 -*- from django.shortcuts import render def Hello(request): test_view = ["测试1号","测试2号","测试3号"] return render(request,'test.html',{"test":test_view})- 1
- 2
- 3
- 4
- 5
- 6
- 修改
test.html文件:
DOCTYPE html> <html lang="en"> <head> <meta charset="UTF-8"> <title>测试title> head> <body> <p>{{ test }}p> <p>{{ test.0 }}p> #配合 . 可以根据列表下标调用元素 <p>{{ test.2 }}p> body> html>- 1
- 2
- 3
- 4
- 5
- 6
- 7
- 8
- 9
- 10
- 11
- 12
- 查看页面:

- 修改视图文件
- 字典
-
templates中的test.html文件,可以使用
.键取出相对应的元素 -
下面来看案例:
- 修改视图文件
index_test.py:
# -*- coding: utf-8 -*- from django.shortcuts import render def Hello(request): test_view = {"name":"测试","age":22} return render(request,'test.html',{"test":test_view})- 1
- 2
- 3
- 4
- 5
- 6
- 修改
test.html文件:
<!DOCTYPE html> <html lang="en"> <head> <meta charset="UTF-8"> <title>测试</title> </head> <body> <p>{{ test }}</p> <h1>{{ test.name }}</h1> <h2>{{ test.age }}</h2> </body> </html>- 1
- 2
- 3
- 4
- 5
- 6
- 7
- 8
- 9
- 10
- 11
- 12
- 查看页面:

- 修改视图文件
- 过滤器
- 模板语法:
{{ 变量名 | 过滤器:可选参数 }}- 1
- 模板过滤器可以在变量被显示前修改它,过滤器使用管道字符:
{{ name | lower }} #文档大写文本会转换成小写- 1
- 过滤管道可以被
套接,也就是说一个过滤器的输出可以作为下一个过滤器的输入,与linux的管道符是一样的
{{ my_list | first | upper }} #取出第一个值并转换成大写- 1
- 有些过滤器有参数,过滤器的参数跟随冒号
:之后并且总是以双引号""包含
{{ bio | truncatewords:"30" }} #显示bio变量的前30个词- 1
-
其他过滤器
addslashes:添加反斜杠到任何反斜杠、单引号或者双引号前面date:按照指定的格式字符串参数格式化date或者datetime对象
{{ pub_date | date:"F J, Y"}}- 1
length:返回变量的长度
1、default
-
default为变量提供一个默认值,如果视图传输的变量的布尔值是False,那么就会使用指定的默认值,以下的值的布尔值都是False:0 0.0 False 0j "" [] () set() {} None- 1
- 2
- 3
- 4
- 5
- 6
- 7
- 8
- 9
- 10
-
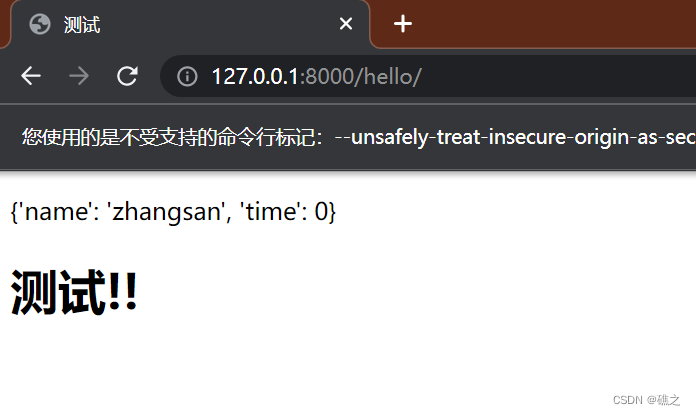
下面来看案例:
- 修改
index_test.py视图文件:
# -*- coding: utf-8 -*- from django.shortcuts import render def Hello(request): test_view = {"name":"zhangsan","time":0} return render(request,'test.html',{"test":test_view})- 1
- 2
- 3
- 4
- 5
- 6
- 修改
test.html文件:
<!DOCTYPE html> <html lang="en"> <head> <meta charset="UTF-8"> <title>测试</title> </head> <body> <p>{{ test }}</p> <h1>{{ test.time | default:"测试!!" }}</h1> #变量的布尔值为False则变量值为 测试!! </body> </html>- 1
- 2
- 3
- 4
- 5
- 6
- 7
- 8
- 9
- 10
- 11
- 访问页面
- 修改
2、length
-
length可以返回对象的长度,一般适用于字符串和列表,字典返回的是键值对的数量,集合返回的是去重后的长度 -
下面来看案例:
- 修改index_test.py视图文件
#-*- coding: utf-8 -*- from django.shortcuts import render def hello(request): test_view = "测试" return render(request,"test.html",{"test":test_view})- 1
- 2
- 3
- 4
- 5
- 6
- 修改test.html文件
DOCTYPE html> <html lang="en"> <head> <meta charset="UTF-8"> <title>测试title> head> <body> <p>{{ test | length }}p> body> html>- 1
- 2
- 3
- 4
- 5
- 6
- 7
- 8
- 9
- 10
- 访问页面

3、filesizeformat
-
filesizeformat会以更人性化的方式显示文件的大小,其实就是加上单位,如KB、MB等
-
字典返回的是键值对的数量,集合返回的是去重后的长度,下面来看案例:
- 修改index_test.py视图文件
#-*- coding: utf-8 -*- from django.shortcuts import render def hello(request): test_view = 10240 return render(request,"test.html",{"test":test_view})- 1
- 2
- 3
- 4
- 5
- 6
- 修改test.py文件
<!DOCTYPE html> <html lang="en"> <head> <meta charset="UTF-8"> <title>测试</title> </head> <body> <p>{{ test | filesizeformat }}</p> </body> </html>- 1
- 2
- 3
- 4
- 5
- 6
- 7
- 8
- 9
- 10
- 访问页面

4、date
-
date会根据指定格式对一个日期变量进行格式化,格式
Y-m-d H:i:s返回年-月-日 时:分:秒的格式时间 -
下面来看案例:
- 修改index_test.py视图文件
#-*- coding: utf-8 -*- from django.shortcuts import render import datetime def hello(request): test_view = datetime.datetime.now() return render(request,"test.html",{"test":test_view})- 1
- 2
- 3
- 4
- 5
- 6
- 7
- 8
- 修改test.py文件
<!DOCTYPE html> <html lang="en"> <head> <meta charset="UTF-8"> <title>测试</title> </head> <body> <p>{{ test | date:"Y-m-d H:i" }}</p> </body> </html>- 1
- 2
- 3
- 4
- 5
- 6
- 7
- 8
- 9
- 10
- 访问页面

5、truncatechars
-
truncatechars可以截断字符串,
如果字符串包含的字符总数多于指定的字符数量,那么多出的部分会被截断,只剩余指定数量的字符 -
下面来看案例:
- 修改index_test.py视图文件
#-*- coding: utf-8 -*- from django.shortcuts import render def hello(request): test_view = "测试!!案例??" return render(request,"test.html",{"test":test_view})- 1
- 2
- 3
- 4
- 5
- 6
- 7
- 修改test.py文件
<!DOCTYPE html> <html lang="en"> <head> <meta charset="UTF-8"> <title>测试</title> </head> <body> <p>{{ test | truncatechars:4 }}</p> </body> </html>- 1
- 2
- 3
- 4
- 5
- 6
- 7
- 8
- 9
- 10
- 访问页面

6、safe
-
Django 会自动对视图文件传到HTML文件中的标签语法进行转义,令其语义失效。而加 safe 过滤器是告诉 Django 该数据是安全的,不必对其进行转义,可以让该数据语义生效。 -
safe会将字符串标记为安全,不需要转移,但是
需要保证视图文件传过来的数据是绝对安全,才能使用safe -
safe和后端视图文件的mark_safe效果相同
-
下面来看案例
- 修改index_test.py视图文件
#-*- coding: utf-8 -*- from django.shortcuts import render def hello(request): test_view = "点击跳转" return render(request,"test.html",{"test":test_view})- 1
- 2
- 3
- 4
- 5
- 6
- 7
- 修改test.py文件,先看不加safe的
<!DOCTYPE html> <html lang="en"> <head> <meta charset="UTF-8"> <title>测试</title> </head> <body> <p>{{ test }}</p> </body> </html>- 1
- 2
- 3
- 4
- 5
- 6
- 7
- 8
- 9
- 10
- 访问

- 现在加上
safe
<!DOCTYPE html> <html lang="en"> <head> <meta charset="UTF-8"> <title>测试</title> </head> <body> <p>{{ test | safe }}</p> </body> </html>- 1
- 2
- 3
- 4
- 5
- 6
- 7
- 8
- 9
- 10
- 访问页面,可以进行跳转


- if/else标签
if/else基本语法格式:
{% if condition %} ... display {% endif %} 或 {% if condition1 %} ... display 1 {% elif condition2 %} ... display 2 {% else %} ... display 3 {% endif %}- 1
- 2
- 3
- 4
- 5
- 6
- 7
- 8
- 9
- 10
- 11
- 12
- 13
-
可以根据条件判断是否输出,并且
if/else支持嵌套 -
{% if %}标签接收
and、or、not等关键字对多个变量进行判断,这点和python基础的流程控制是一样的 -
下面来看案例:
- 修改index_test.py视图文件
#-*- coding: utf-8 -*- from django.shortcuts import render def hello(request): test_view = 95 return render(request,"test.html",{"test":test_view})- 1
- 2
- 3
- 4
- 5
- 6
- 7
- 修改test.py文件
<!DOCTYPE html> <html lang="en"> <head> <meta charset="UTF-8"> <title>测试</title> </head> <body> {%if test > 90 and test <= 100 %} 优秀 {% elif test > 60 and test <= 90 %} 合格 {% else %} 一边玩去~ {% endif %} </body> </html>- 1
- 2
- 3
- 4
- 5
- 6
- 7
- 8
- 9
- 10
- 11
- 12
- 13
- 14
- 15
- 16
- 访问页面

- for标签
-
{% for %}允许我们在一个序列上迭代,与Python中的for循环类似,每一次循环中,模板系统会渲染在{% for %}和{% endfor %}之间的所有内容 -
下面来看案例:
- 修改index_test.py视图文件
#-*- coding: utf-8 -*- from django.shortcuts import render def hello(request): test_view = ["aaa","bbb","ccc","ddd","eee"] return render(request,"test.html",{"test":test_view})- 1
- 2
- 3
- 4
- 5
- 6
- 7
- 修改test.py文件
<!DOCTYPE html> <html lang="en"> <head> <meta charset="UTF-8"> <title>测试</title> </head> <body> {% for i in test %} {{ i }} {% endfor %} </body> </html>- 1
- 2
- 3
- 4
- 5
- 6
- 7
- 8
- 9
- 10
- 11
- 12
- 访问页面

- 给标签增加一个
reversed可以使列表被反向迭代:
<!DOCTYPE html> <html lang="en"> <head> <meta charset="UTF-8"> <title>测试</title> </head> <body> {% for i in test reversed %} #添加reversed {{ i }} {% endfor %} </body> </html>- 1
- 2
- 3
- 4
- 5
- 6
- 7
- 8
- 9
- 10
- 11
- 12
- 访问页面

- for循环也可以遍历字典,使用
.items方法,用变量的解包分别获取键和值,下面来修改index_test.py文件
#-*- coding: utf-8 -*- from django.shortcuts import render def hello(request): test_view = {"name":"测试","age":22}} return render(request,"test.html",{"test":test_view})- 1
- 2
- 3
- 4
- 5
- 6
- 7
- 修改
test.html文件
<!DOCTYPE html> <html lang="en"> <head> <meta charset="UTF-8"> <title>测试</title> </head> <body> {% for i,j in test.items %} {{ i }}:{{ j }} {% endfor %} </body> </html>- 1
- 2
- 3
- 4
- 5
- 6
- 7
- 8
- 9
- 10
- 11
- 12
- 访问页面

- 在
{% for %}标签中,可以通过{{forloop}}变量获取循环序号
'forloop.counter':顺序获取循环序号,从 1 开始计算 'forloop.counter0':顺序获取循环序号,从 0 开始计算 'forloop.revcounter':倒序获取循环序号,结尾序号为 1 'forloop.revcounter0':倒序获取循环序号,结尾序号为 0 'forloop.first(一般配合if标签使用)':第一条数据返回 True,其他数据返回 False 'forloop.last(一般配合if标签使用)':最后一条数据返回 True,其他数据返回 False- 1
- 2
- 3
- 4
- 5
- 6
- 下面修改文件:
- index_test.py #-*- coding: utf-8 -*- from django.shortcuts import render def hello(request): test_view = ["a","b","c","d","e"] return render(request,"test.html",{"test":test_view}) - test.html#依次使用forloop变量 <!DOCTYPE html> <html lang="en"> <head> <meta charset="UTF-8"> <title>测试</title> </head> <body> {% for i in test %} {{ forloop.counter }} {{ forloop.counter0 }} {{ forloop.revcounter }} {{ forloop.revcounter0 }} {{ forloop.first }} {{ forloop.last }} {% endfor %} </body> </html>- 1
- 2
- 3
- 4
- 5
- 6
- 7
- 8
- 9
- 10
- 11
- 12
- 13
- 14
- 15
- 16
- 17
- 18
- 19
- 20
- 21
- 22
- 23
- 24
- 25
- 26
- 27
{{ forloop.counter }}
{{ forloop.counter0 }}
{{ forloop.revcounter }}
{{ forloop.revcounter0 }}
{{ forloop.first }}
{{ forloop.last }}
{% empty %}可选从句,在循环为空时执行,也就是in后面的参数布尔值为False时,下面修改文件
- index_test.py #-*- coding: utf-8 -*- from django.shortcuts import render def hello(request): test_view = [] #设置列表为空 return render(request,"test.html",{"test":test_view}) - test.html <!DOCTYPE html> <html lang="en"> <head> <meta charset="UTF-8"> <title>测试</title> </head> <body> {% for i in test %} {{ forloop.counter0 }} {% empty %} 空 {% endfor %} </body> </html>- 1
- 2
- 3
- 4
- 5
- 6
- 7
- 8
- 9
- 10
- 11
- 12
- 13
- 14
- 15
- 16
- 17
- 18
- 19
- 20
- 21
- 22
- 23
- 24
- 访问页面

- ifequal/ifnotequal标签
{% ifequal %}标签可以比较两个值,当比较结果相等时,会显示在{% ifequal %}和{% endifequal %}之中所有的值,下面来看案例:
#对比两个模板变量 {% ifequal {{ user }} {{ currentuser }} %} <h1>Welcome!</h1> {% endifequal %}- 1
- 2
- 3
- 4
- 和 {% if %} 类似, {% ifequal %} 支持可选的 {% else%} 标签:
{% ifequal section 'sitenews' %} <h1>Site News</h1> {% else %} <h1>No News Here</h1> {% endifequal %}- 1
- 2
- 3
- 4
- 5
- 注释标签
- Django中注释使用
{# #},例如
<!DOCTYPE html> <html lang="en"> <head> <meta charset="UTF-8"> <title>测试</title> </head> <body> {#aaa
#} <h1>test</h1> </body> </html>- 1
- 2
- 3
- 4
- 5
- 6
- 7
- 8
- 9
- 10
- 11
- 12
- 13
- 访问

- include标签
{% include %}标签允许在模板中包含其他模板的内容,例如:
- test.html <!DOCTYPE html> <html lang="en"> <head> <meta charset="UTF-8"> <title>测试</title> </head> <body> <h1>test</h1> {% include "test_2.html" %} #调用test_2.html的内容 </body> </html> - test_2.html <!DOCTYPE html> <html lang="en"> <head> <meta charset="UTF-8"> <title>测试_2</title> </head> <body> <h1>test_2</h1> </body> </html>- 1
- 2
- 3
- 4
- 5
- 6
- 7
- 8
- 9
- 10
- 11
- 12
- 13
- 14
- 15
- 16
- 17
- 18
- 19
- 20
- 21
- 22
- 23
- 24
- 25
- 26
- 27
- 28
- 查看页面
- csrf_token
- csrf_token 用于form表单中,作用是跨站请求伪造保护
如果不用
{% csrf_token %}标签,在用 form 表单时,要再次跳转页面会报 403 权限错误。用了
{% csrf_token %}标签,在 form 表单提交数据时,才会成功。- 解析:
-
首先,向服务器发送请求,获取登录页面,此时中间件 csrf 会自动生成一个隐藏input标签,该标签里的 value 属性的值是一个随机的字符串,用户获取到登录页面的同时也获取到了这个隐藏的input标签。
-
然后,等用户需要用到form表单提交数据的时候,会携带这个 input 标签一起提交给中间件 csrf,原因是 form 表单提交数据时,会包括所有的 input 标签,中间件 csrf 接收到数据时,会判断,这个随机字符串是不是第一次它发给用户的那个,如果是,则数据提交成功,如果不是,则返回403权限错误。
- 自定义标签和过滤器
- 下面是自定义标签和过滤器的过程:
(1)在helloworld的项目目录下创建目录
templatetags,与templates目录同级,需要注意,目录名称必须是templatetags
(2)在
templatetags目录下创建任意的.py文件,这里创建my_tags.py
(3)编写文件,写入:
#-*- coding: utf-8 -*- from django import template register = template.Library() #变量名称register是固定的,不能修改- 1
- 2
- 3
- 4
(4)修改
settings.py文件的TEMPLATES选项配置,添加libraries配置:TEMPLATES = [ { 'BACKEND': 'django.template.backends.django.DjangoTemplates', 'DIRS': [os.path.join(BASE_DIR,'templates')], 'APP_DIRS': True, 'OPTIONS': { 'context_processors': [ 'django.template.context_processors.debug', 'django.template.context_processors.request', 'django.contrib.auth.context_processors.auth', 'django.contrib.messages.context_processors.messages', ], "libraries":{ #添加 'my_tags':'templatetags.my_tags' #添加 } #添加 }, }, ]- 1
- 2
- 3
- 4
- 5
- 6
- 7
- 8
- 9
- 10
- 11
- 12
- 13
- 14
- 15
- 16
- 17
- 18
(5)利用装饰器
@register.filter自定义过滤器,利用装饰器@register.simple_tag自定义标签注意:装饰器的参数最多只能有2个
#-*- coding: utf-8 -*- from django import template register = template.Library() @register.filter #自定义过滤器 def my_filter(v1,v2): return v1 * v2 @register.simple_tag #自定义标签 def my_tag1(v1,v2,v3): return v1 * v2 * v3- 1
- 2
- 3
- 4
- 5
- 6
- 7
- 8
- 9
- 10
- 11
- 12
(7)修改模板文件
test.html,在body的最上方导入该.py文件,并且在文件中使用我们自定义的过滤器和标签<!DOCTYPE html> <html lang="en"> <head> <meta charset="UTF-8"> <title>测试</title> {% load my_tags %} #导入刚才编写的my_tags文件 </head> <body> {{ 11 | my_filter:22}} #使用自定义的过滤器和标签 {% my_tag1 11 22 33 %} </body> </html>- 1
- 2
- 3
- 4
- 5
- 6
- 7
- 8
- 9
- 10
- 11
- 12
- 13
- 14
此时访问页面,发现我们自定义的过滤器和标签已经生效了

(8)创建语义化标签
(语义化的标签,旨在让标签有自己的含义)- 在创建的
my_tags.py文件中导入mark_safe并且进行修改
#-*- coding: utf-8 -*- from django import template from django.utils.safestring import mark_safe register = template.Library() @register.simple_tag def my_html(v1,v2): temp_html = "" %(v1,v2) return mark_safe(temp_html)- 1
- 2
- 3
- 4
- 5
- 6
- 7
- 8
- 9
- 10
- 11
- 然后修改
test.html
<!DOCTYPE html> <html lang="en"> <head> <meta charset="UTF-8"> <title>测试</title> {% load my_tags %} </head> <body> {% my_html "aaa" "bbb" %} </body> </html>- 1
- 2
- 3
- 4
- 5
- 6
- 7
- 8
- 9
- 10
- 11
- 12
- 13
- 访问页面

- 配置静态文件
-
这节需要下载图片、bootstrap框架、css页面等,可以去看原文
-
大致步骤:
- 在项目根目录下创建
static目录

- 在
settings.py文件最后添加配置:
STATIC_URL = '/static/' #别名 STATICFILES_DIRS = [ os.path.join(BASE_DIR, "statics"), #指定目录 ]- 1
- 2
- 3
- 4
-
在
static目录下创建css、js、images、plugins目录,分别存放css文件、js文件、图片、插件 -
把
bootstrap框架放入插件目录plugins -
在HTML文件的head标签中引擎框架
bootstrap -
编写模板,模板中加入
{% load static %}代码
- 模板继承
- 模板可以使用继承的方式实现复用,减少冗余内容
- 网页的头部、尾部内容一般都是一致的,这种情况下就可以通过模板继承来实现复用
- 父模板用于放置可重复利用的内容,子模板继承父模板的内容,并且放置自己的内容
1、父模板
- 标签
{% block %},这是父模板中的预留区域,该区域留给子模版填充差异性的内容,不同预留区域名称不能相同,例如:
{% block 名称 %} 预留给子模板的区域,可以设置设置默认内容 {% endblock 名称 %}- 1
- 2
- 3
2、子模版
- 子模板使用标签
extends去继承父模板,例如:
{% extends %}- 1
- 子模版如果没有设置父模板预留区域的内容,则使用在父模板设置的默认内容,也可以什么都不设置,为空
- 下面来看案例:
#编写父模板test_2.html <!DOCTYPE html> <html lang="en"> <head> <meta charset="UTF-8"> <title>父页面</title> </head> <body> <h1>Hello World!</h1> <p>案例</p> {% block test %} #名称为test <p>测试测试!!!</p> #中间的内容就是子模板可以替换的部分 {% endblock %} </body> </html> #编写子模版test.html <!DOCTYPE html> <html lang="en"> <head> <meta charset="UTF-8"> <title>子页面</title> </head> <body> {%extends "test_2.html" %} {% block test %} #这里的名称要和父模板名称对应 <p>继承test_2.html文件</p> {% endblock %} </body> </html>- 1
- 2
- 3
- 4
- 5
- 6
- 7
- 8
- 9
- 10
- 11
- 12
- 13
- 14
- 15
- 16
- 17
- 18
- 19
- 20
- 21
- 22
- 23
- 24
- 25
- 26
- 27
- 28
- 29
- 30
- 31
- 32
- 33
- 34
- 35
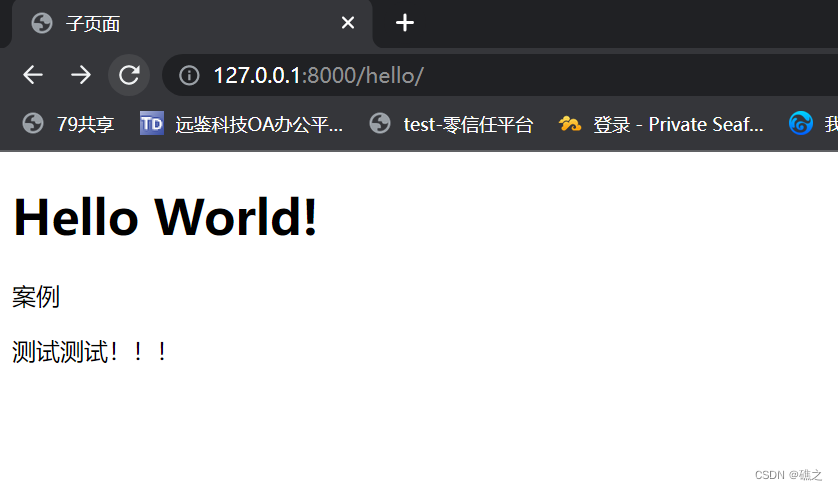
- 访问页面,可以看到被替换了

- 修改子模板,删除
{% block %}的内容:
<!DOCTYPE html> <html lang="en"> <head> <meta charset="UTF-8"> <title>子页面</title> </head> <body> {%extends "test_2.html" %} </body> </html>- 1
- 2
- 3
- 4
- 5
- 6
- 7
- 8
- 9
- 10
- 11
- 12
- 再次访问,发现页面完全变成了
test_2.html的页面
-
相关阅读:
心理学杂文
MFC Windows 程序设计[134]之多彩滑动条
萤火虫优化算法(FA)附matlab代码
Jenkins Manage and Assign Roles角色权限控制
嵌入式Linux驱动开发3---内核配置 Kconfig以及.config
JVM222
充电桩软硬件,赚钱新招数!-慧哥充电桩开源系统
【clickhouse】ubuntu20安装clickhouse并用DBeaver远程管理
Botowski:SEO友好的AI内容生成器
【经典算法学习-排序篇】顺序查找
- 原文地址:https://blog.csdn.net/rzy1248873545/article/details/126460102